The Best & Easiest Gluten-Free English Muffins (You Won’t Believe They’re GF!)
Hello, my baking friends! For anyone who eats gluten-free, there are certain baked goods that can feel like a distant, unattainable memory. At the top of that list for me was always a proper English muffin—soft and chewy, with a crisp cornmeal crust, and most importantly, filled with all of those glorious nooks and crannies….
Hello, my baking friends! For anyone who eats gluten-free, there are certain baked goods that can feel like a distant, unattainable memory. At the top of that list for me was always a proper English muffin—soft and chewy, with a crisp cornmeal crust, and most importantly, filled with all of those glorious nooks and crannies. For years, I thought that texture was impossible without gluten. Today, I am so thrilled to tell you that it is not only possible, it is surprisingly simple with this incredible, Easy Gluten-Free English Muffins recipe.
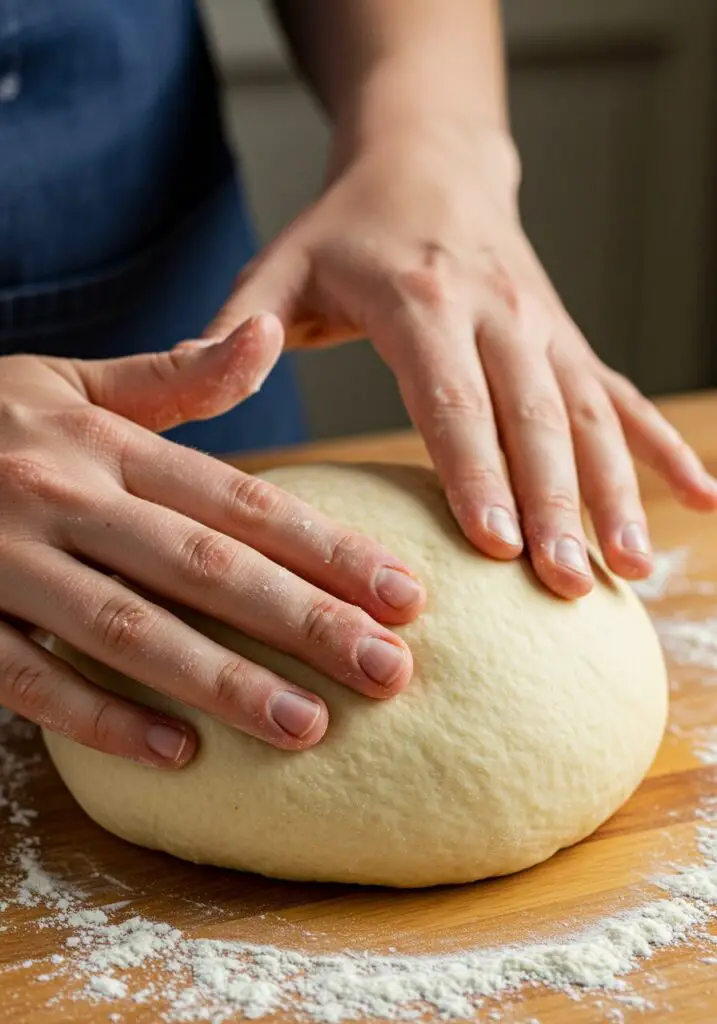
This recipe is a true game-changer. It creates a beautiful, supple dough that is a dream to handle—you can actually knead it and shape it without any problems! The resulting muffins are everything you’ve been hoping for: light, fluffy, and absolutely perfect for splitting open with a fork to reveal that iconic, butter-catching interior. This is the recipe that will restore your faith in gluten-free baking.
Why This Gluten-Free Recipe is a Baking Miracle
This isn’t just a gluten-free substitute; it’s a genuinely fantastic English muffin in its own right. Here’s what makes it so revolutionary.
- The Perfect “Nooks and Crannies” Texture: Thanks to a clever use of psyllium husk and a specific blend of flours, this recipe achieves that light, airy, and wonderfully chewy texture that is the hallmark of a true English muffin.
- A Dream Dough to Work With: If you’ve struggled with sticky, hard-to-handle gluten-free doughs in the past, prepare to be amazed. This dough is smooth, supple, and incredibly user-friendly.
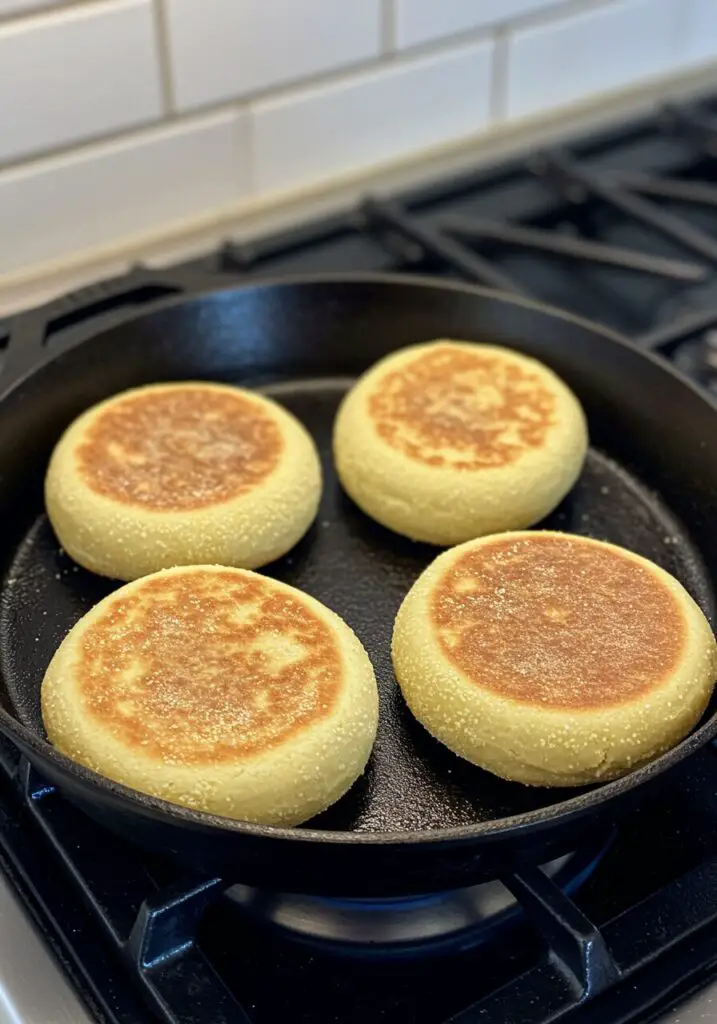
- Cooked Entirely on the Stovetop: No oven required! These muffins are cooked low and slow on a skillet or griddle, which gives them their signature shape and perfectly tender crumb.
- Incredible Flavor: The blend of millet and sorghum flours gives these muffins a delicious, slightly sweet, and nutty flavor that is far more interesting than a standard white flour version.
- Simple, Straightforward Method: While it involves yeast, the process is broken down into easy-to-follow steps that make this a very approachable baking project.
Gather Your Gluten-Free Baking Ingredients
A great gluten-free bake starts with the right blend of ingredients. Here’s what you’ll need.
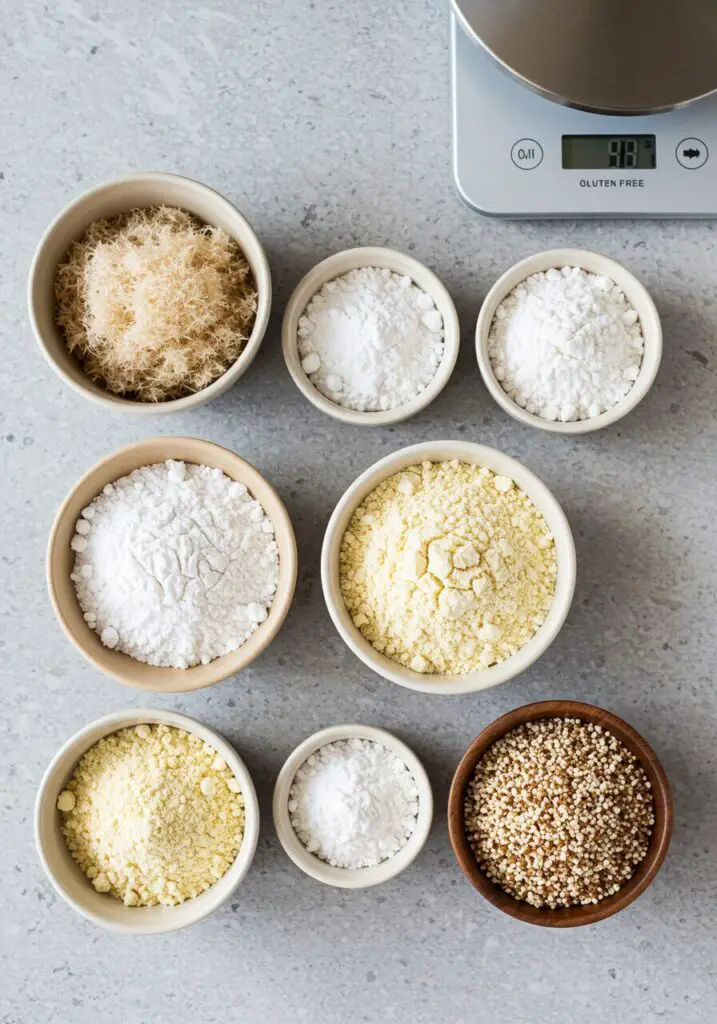
- 20 g (4 tbsp) Whole/Rough Psyllium Husk: This is our magic ingredient! It creates a gel that gives the dough structure and elasticity.
- 360 g (1 ½ cups) Lukewarm Water
- 160 g (1 ⅓ cups + 1 tbsp) Tapioca Starch: Provides chewiness. You can also use cornstarch or arrowroot starch.
- 140 g (1 cup + ½ tbsp) Millet Flour: Gives a lovely, mild, slightly sweet flavor.
- 120 g (¾ cup + 3 tbsp) Sorghum Flour: Adds a wonderful, soft texture. Light buckwheat flour is a good substitute.
- 25 g (2 tbsp) Caster/Superfine Sugar
- 8 g (2 ½ tsp) Instant Yeast
- 8 g (1 ½ tsp) Salt
- 120 g (½ cup) Lukewarm Whole Milk
- 20 g (1 ½ tbsp) Sunflower Oil, or other neutral oil
- 10 g (2 tsp) Apple Cider Vinegar: Helps to tenderize the crumb.
- Cornmeal, for dusting
Crafting Your Gluten-Free English Muffins: Step-by-Step
Let’s walk through this fun and rewarding process together.
- Make the Psyllium Gel: In a small bowl, mix together the psyllium husk and the 360g of lukewarm water. Stir for about 30-45 seconds. You will see it quickly transform into a thick, gel-like consistency. This is the binder for our dough.
- Make the Dough: In a large bowl (or the bowl of a stand mixer with the dough hook), whisk together the tapioca starch, millet flour, sorghum flour, sugar, instant yeast, and salt. Now, add the lukewarm milk, oil, and apple cider vinegar directly to the psyllium gel and mix well. Make a well in the center of your dry ingredients and pour in the psyllium gel mixture.
- Knead the Dough: Knead the dough until it’s smooth and all the ingredients are evenly incorporated. The final dough should be smooth and just slightly sticky to the touch. It’s important to resist the temptation to add more flour, as this can make your muffins dense.
- Shape and Proof: Sprinkle a large baking sheet generously with cornmeal. Turn your dough out onto a lightly floured surface and shape it into a ball. Divide the dough into eight equal portions (each will weigh about 125g). Shape each portion into a smooth ball, place it on the cornmeal-dusted baking sheet, and press down gently to flatten it to about 1 ¼-inch thick. Sprinkle the tops with more cornmeal. Lightly cover with plastic wrap and let them proof in a warm spot for about 1 hour, or until they have puffed up and nearly doubled in size.
- Cook Low and Slow: Preheat a large cast-iron skillet or frying pan over LOW heat. Do not grease the pan. Once the pan is hot, carefully transfer a few of the proofed muffins to the skillet, leaving space between them. Cook them, uncovered, for 11-12 minutes on the first side. They should be a deep, beautiful golden brown.
- Flip and Finish: Using a spatula, carefully flip the muffins over and cook them for another 11-12 minutes on the other side. Transfer the cooked muffins to a wire rack to cool completely.
Wise Tips for GF Baking Success
- Trust the Psyllium Husk: This ingredient is absolutely essential to the recipe. It mimics the structure that gluten provides, creating a dough you can actually handle and a final product with a wonderful chew. Use whole husk if you can, and if you use powder, be sure to use a smaller amount as noted.
- Patience on the Griddle: The “low and slow” cooking method is non-negotiable. Gluten-free bakes need more time for the interior to cook through fully. If you use a higher heat, you will have a burnt outside and a raw, gummy inside.
- Cool Completely (Seriously!): This is the hardest but most important step! Gluten-free bakes need time for their starches to cool and set. If you try to split a muffin while it’s still warm, the inside will be sticky and gummy. Let them cool for at least an hour for the perfect texture.
Easy Gluten-Free English Muffins
Ingredients
Method
- In a small bowl, mix psyllium husk and lukewarm water to form a gel. In a large bowl, whisk together the dry ingredients (tapioca starch, flours, sugar, yeast, salt). Add the milk, oil, and vinegar to the psyllium gel and mix. Add the wet mixture to the dry ingredients and knead until smooth and supple.
- Sprinkle a baking sheet with cornmeal. Turn dough onto a floured surface, shape into a ball, and divide into 8 equal portions (about 125g each). Shape each into a smooth ball, place on the baking sheet, and flatten slightly to 1¼-inch thick. Sprinkle with more cornmeal, cover, and let proof in a warm spot for 1 hour until doubled.
- Preheat a large, dry (unoiled) skillet over low heat. Carefully transfer the proofed muffins to the hot skillet. Cook uncovered for 11-12 minutes on the first side until deep golden brown.
- Carefully flip the muffins and cook for another 11-12 minutes on the other side. Transfer to a wire rack and cool completely (at least 1 hour) before splitting and serving.
Frequently Asked Questions (FAQ) – Gluten-Free English Muffins
- Do I have to use a stand mixer?
Not at all! You can absolutely make this dough by hand. It will just require a bit of arm work with a sturdy spatula and then a few minutes of hand kneading on the counter. - What if my kitchen is cold and my dough won’t rise?
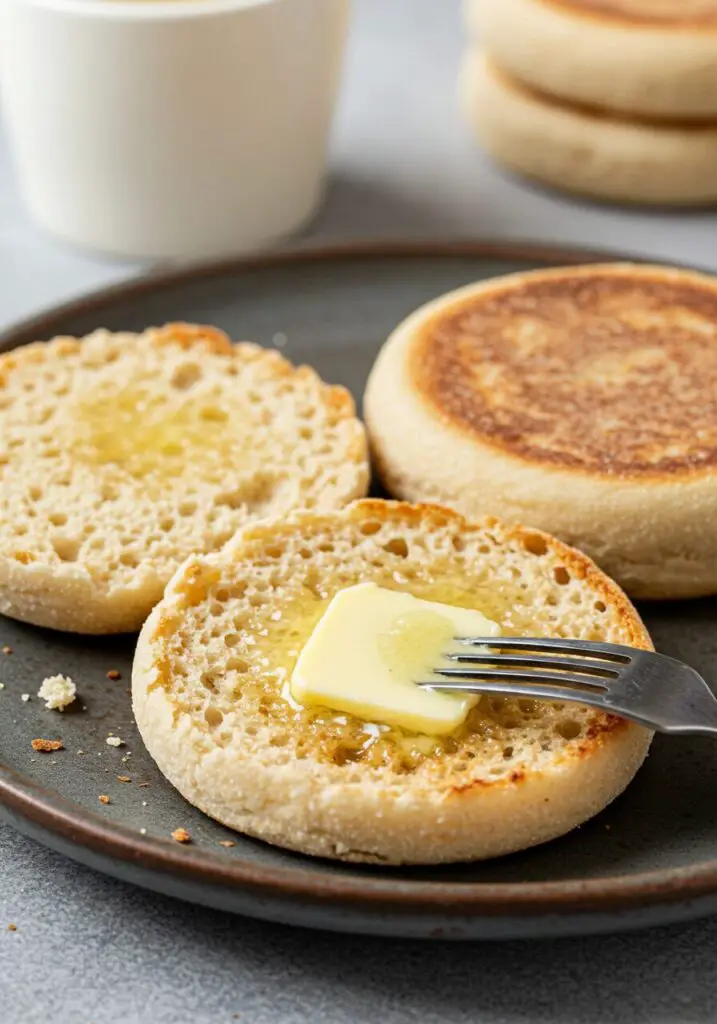
A great trick is to create a DIY proofing box. Place your covered muffins in your (turned-off) oven with a cup of boiling hot water on the rack below. The steam will create the perfect warm, humid environment to encourage rising. - Why do you split English muffins with a fork?
This is the secret to all those nooks and crannies! A fork gently tears the crumb apart, creating tons of little pockets that are perfect for catching melted butter. A knife will just slice through them cleanly. - How do I store these muffins?
They are definitely at their best on the day they are made. However, you can store them in a closed container at room temperature for 2-3 days. I highly recommend toasting them before serving to refresh their texture. They also freeze beautifully!
Conclusion
This Easy Gluten-Free English Muffins recipe is a true gift. It’s a passport back to a beloved breakfast classic, with no compromises on texture or flavor. The process is a joy, the dough is a dream, and the result is a soft, chewy, and absolutely perfect English muffin. I am so excited for you to experience the satisfaction of making these in your own kitchen. Happy baking!