Grandma’s Secret Butter Cookies
The first time I tasted Grandma’s Secret Butter Cookies I can still see the little glass jar on her counter, the one with the lid that never seemed quite to fit, hiding these cookies like a treasure. If you want a fast peek at a version people swear by, there’s an old post I saved…
The first time I tasted Grandma’s Secret Butter Cookies
I can still see the little glass jar on her counter, the one with the lid that never seemed quite to fit, hiding these cookies like a treasure. If you want a fast peek at a version people swear by, there’s an old post I saved called Grandma’s Secret Butter Cookies — the easiest recipe, but what I’m telling you now is how my grandmother actually made them on a rainy Tuesday when the light came through the kitchen window and everything smelled like butter and sugar.
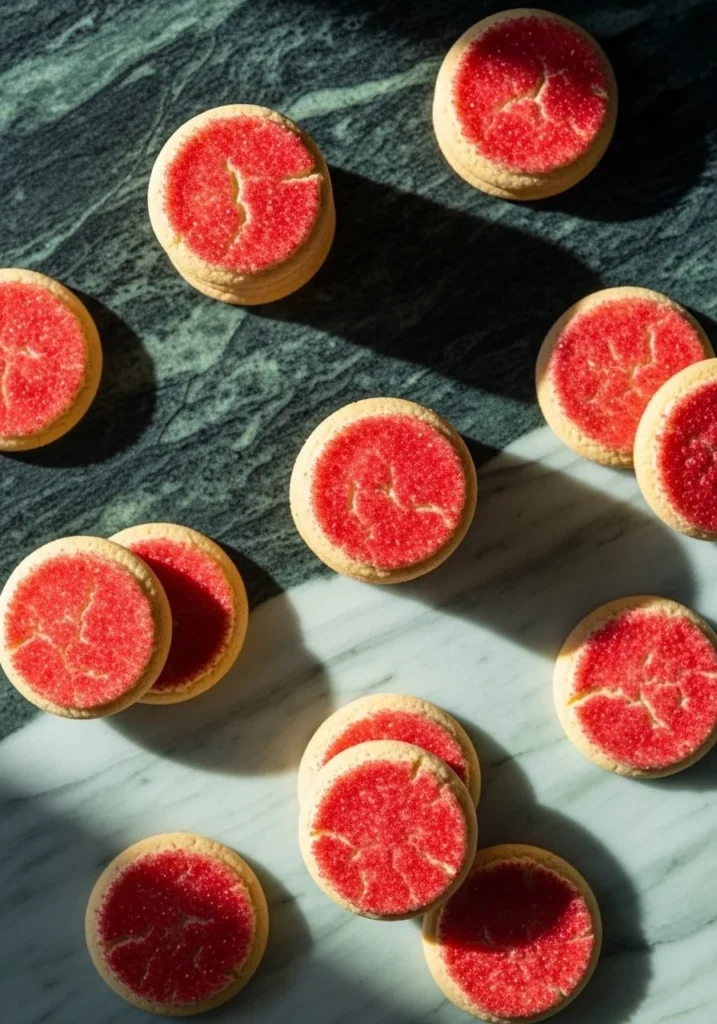
She used simple things: 3/4 pound (3 sticks) salted butter, softened, and 1 3/4 cup granulated sugar, then she added 2 egg yolks and 2 teaspoons vanilla extract. The flour was plain — 3 1/2 cups all-purpose flour — and for the top she kept jars of Red, green, or multi-colored sanding sugar so there was always a sparkle when she pressed them flat. The ingredients are humble, but they make these cookies sing.
The Secret Behind Perfect Grandma’s Secret Butter Cookies
There’s no single magic ingredient beyond butter, but how you treat it matters. I always start by preheating my oven to 350°F (180°C) so the kitchen begins to warm while I work. Then I cream the softened butter and sugar in my mixer until the bowl looks pale and the beaters leave soft ribbons. That’s when I add the egg yolks and vanilla, mixing well so everything tastes rounded and rich.
If you’re wondering about texture, that step is crucial. Creaming until light and fluffy traps air and helps these cookies puff slightly and then settle into the most delightful, tender bite. When I’m telling someone how to get that short, melt-in-your-mouth crumb, I point back to that moment.
How I Make Them (and a Few Tricks)
After the butter and sugar are ready, I add the flour and mix on low speed until it’s thoroughly combined and a soft dough forms. Do not overmix here; overworking flour will give you tough cookies and that is the last thing we want. I keep my bowl moving gently, checking with a spatula to make sure there are no dry patches but stopping as soon as the texture looks like a soft, cohesive dough.
To portion them, I mound teaspoonfuls of dough and roll them into balls, placing each on an ungreased cookie sheet. Here’s a little trick I learned from Grandma: dip the bottom of a flat-bottomed, patterned glass in colored sugar and press onto each dough ball to flatten it. The sound when the glass hits the dough and the flash of colored sugar is somehow so satisfying. The pattern makes each cookie look like it was made with care even when you’re in a hurry.
I bake them for about 10 minutes, watching carefully. The minute you see the edges just lightly golden brown, the oven is done with them. Pull the tray, let the cookies rest on the baking sheet for 1-2 minutes so they set and hold their shape, then gently transfer them to a wire rack to cool completely. If you try to move them straight away they’ll sag, so this brief pause matters.
A few small tips I always share: make sure the butter is properly softened but not oily, or your dough will be greasy; use two sheets and rotate if your oven has hot spots; and if your kitchen is warm, pop the dough in the fridge for 10 minutes before rolling so the cookies spread less. I usually mention this when someone asks how to stop cookies from flattening.
The moment they come out — color, smell, and what to serve with them
When the cookies hit the cooling rack, the kitchen smells like warm butter and vanilla and I always take one while it is still warm. The sanding sugar sparkles, and the edges have that gentle, barely-there golden color that tells you they are done right. The interior should be tender and slightly cakey rather than chewy.
I love serving them with a simple cup of tea in the afternoon, or with a cool glass of milk for the kids. At holiday time, I place them on a platter between slices of citrus fruit and some dark chocolate; the butteriness of the cookie plays beautifully with a sharp orange slice or the bitterness of chocolate. If you’re wondering how to know when they’re done, rely on the edges — lightly golden brown is the sign. If the whole cookie is brown, it’s gone too far.
Little ways I change them and what to avoid
Sometimes I switch things up. You can add a teaspoon of finely grated lemon or orange zest to the butter-sugar mix for a bright twist. Another variation is to roll the balls in finely chopped nuts before pressing them, which adds a lovely textural contrast. If you want something playful for kids, use multi-colored sanding sugar and let them help press the glass; it becomes a small party.
One variation I sometimes try when I’m feeling more elaborate is to sandwich two cookies with a bit of raspberry jam or a smooth chocolate ganache instead of the plain cookie. If you like a slightly richer cookie, swap the salted butter for unsalted and add a pinch of fine sea salt to the dough so the flavor profile changes from gently sweet to more layered. And if you want inspiration for decorated cookies that use a similar base, check out my notes on a project I did with frosted shapes, like these buttercream bunny cookies.
Avoid overbaking and avoid too much handling of the dough once the flour is in. Both will cost you that tender texture that makes these special.
A few practical notes and how to keep them fresh
If you want to make them ahead, you can scoop the dough onto a baking sheet and freeze the unbaked dough balls. When you are ready, press them with the sugared glass and bake from frozen; just add a minute or two to the bake time. For leftovers, once cooled completely, store them in an airtight container at room temperature. They keep happily for about 4 to 5 days. If you need longer, freeze the baked cookies with parchment between layers and thaw at room temperature when you want them. Reheating for a few seconds in a warm oven brings back that freshly-baked feel.
I love this recipe because it is forgiving and familiar. It has become my little ritual when I want comfort in the kitchen: preheat the oven to 350°F (180°C), mix, shape, press, bake about 10 minutes, rest for 1-2 minutes on the sheet, then cool on a rack. It’s simple, it smells incredible, and it connects me to my grandmother every time.
Conclusion
If you want to compare versions or see another take on the method, I sometimes look at recipes online for a refresher; one I found helpful is this Secret Butter Cookies Recipe – Jolie Day, which reminded me of small tricks for texture and presentation. Give these a try and tell me which little variation became your favorite.
Grandma's Secret Butter Cookies
Ingredients
Method
- Preheat your oven to 350°F (180°C).
- In a mixer, cream the softened butter and sugar until pale and light, leaving soft ribbons.
- Add the egg yolks and vanilla, mixing well until fully incorporated.
- Slowly add the flour on low speed until a soft dough forms; do not overmix.
- Scoop teaspoonfuls of dough and roll into balls, placing them on an ungreased cookie sheet.
- Dip the bottom of a flat-bottomed, patterned glass in colored sugar and press onto each dough ball to flatten.
- Bake the cookies for about 10 minutes, watching them closely for lightly golden edges.
- Let the cookies rest on the baking sheet for 1-2 minutes before transferring to a wire rack to cool completely.