Greek Yogurt Chocolate Mousse
Greek Yogurt Chocolate Mousse I know that sounds fancy, but the first time I made Greek Yogurt Chocolate Mousse I was half asleep on a Sunday morning and craving something chocolatey that didn’t feel like dessert sabotage. This recipe became my go-to because it hits that spot between indulgent and honest: it smells like cocoa,…
Greek Yogurt Chocolate Mousse
I know that sounds fancy, but the first time I made Greek Yogurt Chocolate Mousse I was half asleep on a Sunday morning and craving something chocolatey that didn’t feel like dessert sabotage. This recipe became my go-to because it hits that spot between indulgent and honest: it smells like cocoa, feels silky on the tongue, and doesn’t leave you reaching for the antacid afterwards. If you ever want a lighter mousse with real tang, this is it, and if you like to experiment, other versions like a chocolate raspberry mousse cake have inspired me to push the idea further chocolate raspberry mousse cake.
The Secret Behind Perfect Greek Yogurt Chocolate Mousse
The secret for me is keeping things simple and respecting the texture. I use 2 cups Greek yogurt, which gives the mousse body and a slight tang. Then I stir in 1/2 cup unsweetened cocoa powder for that deep chocolate flavor, and sweeten it with about 1/4 cup honey or maple syrup, though I always say to adjust it to taste because sweetness is personal. A teaspoon vanilla extract softens the cocoa edge, and a pinch of salt wakes up the flavors. When you combine such few ingredients, each one matters.
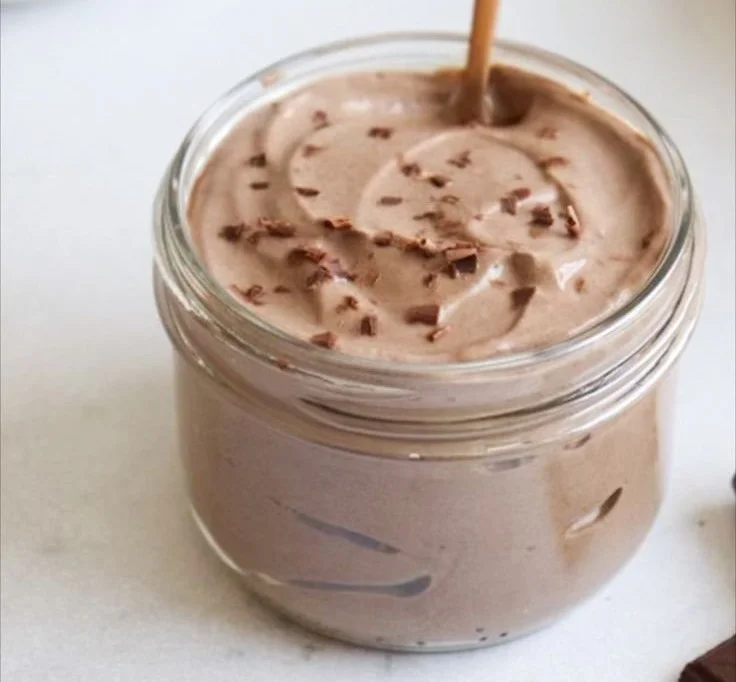
In practice I do this: In a mixing bowl, combine Greek yogurt, cocoa powder, honey or maple syrup, vanilla extract, and a pinch of salt. Use a hand mixer or whisk to blend the ingredients until smooth and creamy. The texture should be glossy and thick but not grainy. If you see streaks of cocoa or clumps of yogurt, keep at it a little longer. Taste and adjust sweetness if necessary. Spoon the mousse into serving dishes and refrigerate for at least 30 minutes before serving. Serve chilled and enjoy.
A Few Things I’ve Learned
One of my early mistakes was treating this like a whipped cream mousse. It is not that. Greek yogurt gives you body, not air, so over-whisking won’t help the mousse rise; instead you want it silky. A hand mixer is handy because it dissolves the cocoa more cleanly than a whisk in my experience, but if you whisk vigorously and patiently you can still get there.
Tip: sift or stir the cocoa into a little of the yogurt first to make a chocolate paste before adding the rest. That trick eliminates dry pockets of cocoa and avoids that slight grainy texture that used to bother me. Another tip: if your yogurt is extremely thick (like strained labneh-thick), loosen it with a tablespoon or two of milk so it folds smoothly, especially if you intend to spoon it into small, elegant glasses.
How do you know it is done right? When you dip a spoon in, the mousse coats it and slowly slides off in a velvety ribbon instead of collapsing into a pool. The surface should have a slight sheen and be free of lumps. The aroma should be rich cocoa with a whisper of vanilla and honey.
Getting the Texture Just Right
When I say blend until smooth and creamy I mean it. Use a hand mixer or whisk to blend the ingredients until smooth and creamy. I usually pulse with the mixer for 30 seconds, scrape the sides, then go another 20 seconds. Taste and adjust sweetness if necessary; sometimes I need an extra teaspoon of honey depending on the tang of the yogurt.
If you want a lighter mouthfeel, fold in a few tablespoons of whipped cream at the end, but be gentle so you don’t deflate any delicate air. For a denser, truffle-like bite, chill it longer; spoon the mousse into serving dishes and refrigerate for at least 30 minutes before serving. After chilling, it firms up and becomes more mousse-like. Serve chilled and enjoy. I like to garnish with a dusting of cocoa or a few crushed toasted hazelnuts to add texture.
A little anecdote: once I served this to a friend who declared it healthier than most desserts and then secretly added caramel sauce. It tasted amazing both ways, and that taught me the dish is forgiving. It is also the dessert I make when I want to look like I put in effort but truly did not.
When I Tweak It
I often play with small variations. For a fruitier angle I stir in a spoonful of raspberry jam or top the mousse with fresh berries; if you prefer a strawberry twist, I sometimes layer it into parfaits for a brunch spread inspired by different combinations like chocolate strawberry mousse cake parfaits which balance sweet and tart beautifully chocolate strawberry mousse cake parfaits. If you want frozen treats, this mousse sets up well and can be spooned into small molds then frozen—think of the idea behind frozen Greek yogurt bites but richer. For a gluten-free version that still feels celebratory, I sometimes serve it with a crumb made from gluten-free chocolate cake gluten free chocolate mousse cake.
Two easy variations are to swap the sweetener: use maple syrup for a woodsy flavor or agave for a neutral sweetness. Another is to add a splash of espresso for depth; a teaspoon dissolved into the cocoa intensifies the chocolate without tasting like coffee.
The Best Part About This Dish
What I love most is how quickly it comes together and how many moods it can fit. You can pull this together in ten minutes for a weeknight dessert, spoon it into small jars and pack it for picnic-like breakfasts, or serve it in crystal bowls when friends drop by unexpectedly. Leftovers keep well: press plastic wrap onto the surface and refrigerate for up to three days. If you want to make it ahead, refrigerate for at least 30 minutes before serving so it firms up. When reheating in your mind, remember it is best cold; microwaving will make it watery.
Personal tip: if you’re serving it at a dinner party and want a prettier presentation, chill the serving dishes first. Cold glass makes the mousse look denser and more luxurious. Another trick is to toast a bit of chopped nuts in a dry pan for a minute or two; the warm, nutty aroma pairs exquisitely with the chocolate and gives a crunchy counterpoint.
What to serve it with? Fresh berries, a shortbread cookie, or a spoonful of salted caramel all work. For brunch, I like it next to a crisp granola and a handful of citrus segments. The mousse is bold enough to be the star but mild enough to play second fiddle.
Wrapping up, this recipe—Greek Yogurt Chocolate Mousse—has a way of being simple and memorable at once. It is a refrigerator staple in my house, a last-minute hospitality trick, and sometimes the quiet end to a long day that feels like a small treat. I hope you make it, tweak it, and make it your own. If you try one of the variations I mentioned, let me know which one became your favorite.
Conclusion
If you want a riff on this mousse with even fewer ingredients, I sometimes compare notes with other simple versions like the Whipped Greek Yogurt Chocolate Mousse (3-ingredients!) which is great when you want ultralight results Whipped Greek Yogurt Chocolate Mousse (3-ingredients!), and I often look at creative takes like the Greek Yogurt Chocolate Mousse page for inspiration before trying new toppings Greek Yogurt Chocolate Mousse – Recipe Hippie.
Greek Yogurt Chocolate Mousse
Ingredients
Method
- In a mixing bowl, combine Greek yogurt, cocoa powder, honey or maple syrup, vanilla extract, and a pinch of salt.
- Use a hand mixer or whisk to blend the ingredients until smooth and creamy.
- Taste and adjust sweetness if necessary.
- Spoon the mousse into serving dishes and refrigerate for at least 30 minutes before serving.