Green Mint Chocolate Chip Cookies
How I Found These Cookies I have a weakness for anything minty and chocolatey, and these Green Mint Chocolate Chip Cookies are the result of a late-night experiment after craving that combo. The very first time I baked them I was riffing off something I saw online and ended up with a batch my roommate…
How I Found These Cookies
I have a weakness for anything minty and chocolatey, and these Green Mint Chocolate Chip Cookies are the result of a late-night experiment after craving that combo. The very first time I baked them I was riffing off something I saw online and ended up with a batch my roommate declared “holiday-level.” If you want to see another green mint cookie take, I once compared notes with a recipe that inspired me, which you can find at green mint chocolate chip cookies inspiration. That moment of discovery matters because the recipe below is equal parts nostalgia and a couple of happy accidents.
I usually say the ingredients out loud while I gather them because it keeps me from forgetting anything: 1 cup Butter, softened, 1 1/2 cups Sugar, 2 large Eggs, plus 1 egg yolk, 1 tsp Peppermint Extract, 10 Drops Green Food Coloring, 3 1/4 cups Flour, 2 tsp Baking Powder, 1 tsp Baking Soda, 1 1/2 tsp Cream of Tartar, 1 tsp Cornstarch, 1/2 tsp Salt, 12 ounces Dark Chocolate Bars, chopped. Saying those measures makes the kitchen feel less like a checklist and more like an invitation.
The Ingredient That Changes Everything
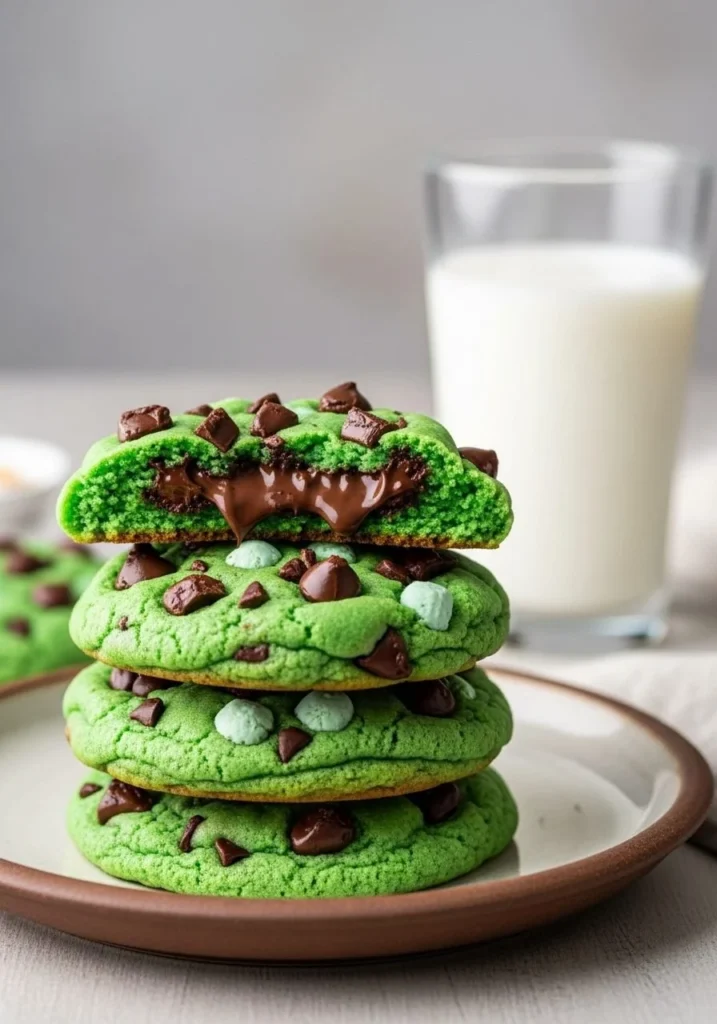
Peppermint extract is subtle but decisive here. I use one teaspoon and it gives the cookies a bright, clean mint lift without tasting like toothpaste. The green food coloring—ten drops in my version—turns these into something holiday-magical, but you could dial it back if you prefer a palest mint or skip it entirely for a natural look. The dark chocolate bars, twelve ounces chopped, provide pockets of intense flavor. I like to chop half into sizeable chunks so each bite has a satisfying chocolate chew, and chop the other half very finely so the dough is speckled with tiny shavings that melt differently in the oven. That texture contrast is one of the reasons I love this recipe.
Building the Dough (and a few tricks)
Get comfortable before you start because there are a few moments that reward patience. In a large bowl or a stand mixer, beat the softened butter and sugar together for 1 minute. Scrape down the sides, then beat on medium for another 1-2 minutes until light and fluffy. I always scrape the bowl and beat a little longer if the mixture still feels dense; that extra fluffiness means lighter cookies. Add the eggs, extra egg yolk, peppermint extract, and the green food coloring. Beat together until everything is smooth and uniformly green. The color should be cheerful but not neon unless you want it to be theatrical.
In a separate bowl, whisk together the flour, baking powder, baking soda, cream of tartar, cornstarch, and salt. Add this dry mixture to the wet ingredients and mix on low speed until the flour is almost fully mixed in. One of my tips is to stop when the flour is nearly incorporated and finish folding by hand if you think you’ve overmixed; overmixing can make cookies too cakey. Add about half of the chopped dark chocolate to the dough. Take the other half and chop it even more coarsely, creating tiny flecks and shavings. Add this to the dough as well. Mix on low until everything is just combined.
Here are a few small tips that always save the batch: chill the dough so the cookies spread less, measure flour by spooning it into the cup and leveling it, and invest in a large cookie scoop or a quarter-cup measure for uniform cookies. Cover the bowl with plastic wrap and refrigerate the dough for 1 to 2 hours. If you’re short on time, 30 minutes helps, but that hour or two in the cold makes the difference between flat discs and those pillowy, slightly domed cookies I love.
Timing, Texture, and Serving
When ready to bake, preheat the oven to 350°F and line baking sheets with parchment paper. I use a 1/4 cup measuring cup or a large cookie scoop to form generous balls of dough and place them on the prepared sheet a few inches apart. The dough is generous—these are not dainty cookies—so give them space.
Bake for 8-10 minutes. The cookies should have edges barely starting to turn golden brown, with the tops still not browned. That visual is the key to knowing when they’re done right: soft, still slightly pale on top, and with edges that have just begun to set. Let the cookies cool on the pan for 5 minutes before transferring them to a wire rack to cool completely. If you take them off the sheet too soon they won’t hold their shape; if you leave them too long they continue to firm up on the hot metal. I usually wait the five minutes with my face close enough to the pan to catch that warm peppermint-chocolate scent—it’s my favorite part.
What to serve with them? Thick milk, of course, or a cup of intense espresso if you want contrast. These cookies also pair surprisingly well with a scoop of vanilla ice cream between two slightly warm cookies for an adult milkshake vibe.
Little Changes That Make It Yours
Variation is where my friends and I get competitive. Replace half the dark chocolate with white chocolate for a sweeter contrast, or fold in a cup of crushed candy canes for crunch. If you want a chewier, more rustic cookie, swap 1/2 cup of the flour for old-fashioned oats—speaking of oats, when I’m in the mood for something heartier I reach for recipes like oatmeal chocolate chip cookies, which taught me how much chew oats bring to a bite. For a sharper mint note, add a drop more peppermint extract, but be careful; peppermint is potent.
If something goes wrong—say the cookies spread too thin—chill the tray for 10 minutes before baking the next sheet. If the dough seems dry, a tablespoon of milk will bring it back. One personal trick: I press a few extra chocolate chunks on top of each dough ball right before baking; those glossy, slightly melted chips on top look as good as they taste.
Storage is natural to talk about here because I always make extra. These cookies keep well at room temperature in an airtight container for up to four days, though they’re at their best in the first two. You can freeze the raw scooped dough for up to three months; just freeze the dough balls on a tray, then transfer to a freezer bag. Bake from frozen, adding a minute or two to the bake time. That make-ahead habit is a lifesaver during holidays or when company drops in.
Conclusion
If you want another take on the mint and chocolate pairing or a slightly different technique to compare notes, I recommend checking an alternative for inspiration at Mint Chocolate Chip Cookies Recipe – The Food Charlatan. These Green Mint Chocolate Chip Cookies have become my go-to when I want something bright, chocolatey, and a little nostalgic. Make the dough ahead, chill it, and enjoy the magic of warm mint and melting dark chocolate.
Green Mint Chocolate Chip Cookies
Ingredients
Method
- In a large bowl or stand mixer, beat softened butter and sugar for 1 minute.
- Scrape down the sides and beat on medium for another 1-2 minutes until light and fluffy.
- Add eggs, extra egg yolk, peppermint extract, and green food coloring. Beat until smooth and uniformly green.
- In a separate bowl, whisk together flour, baking powder, baking soda, cream of tartar, cornstarch, and salt.
- Add the dry mixture to the wet ingredients. Mix on low speed until almost fully combined.
- Fold in half of the chopped dark chocolate and add the other half chopped coarsely. Mix on low until combined.
- Cover the bowl with plastic wrap and refrigerate the dough for 1-2 hours.
- Preheat the oven to 350°F and line baking sheets with parchment paper.
- Use a 1/4 cup measuring cup or large cookie scoop to form balls of dough and place them on the prepared sheet a few inches apart.
- Bake for 8-10 minutes until the edges are barely golden and the tops are still pale.
- Cool on the pan for 5 minutes before transferring to a wire rack.