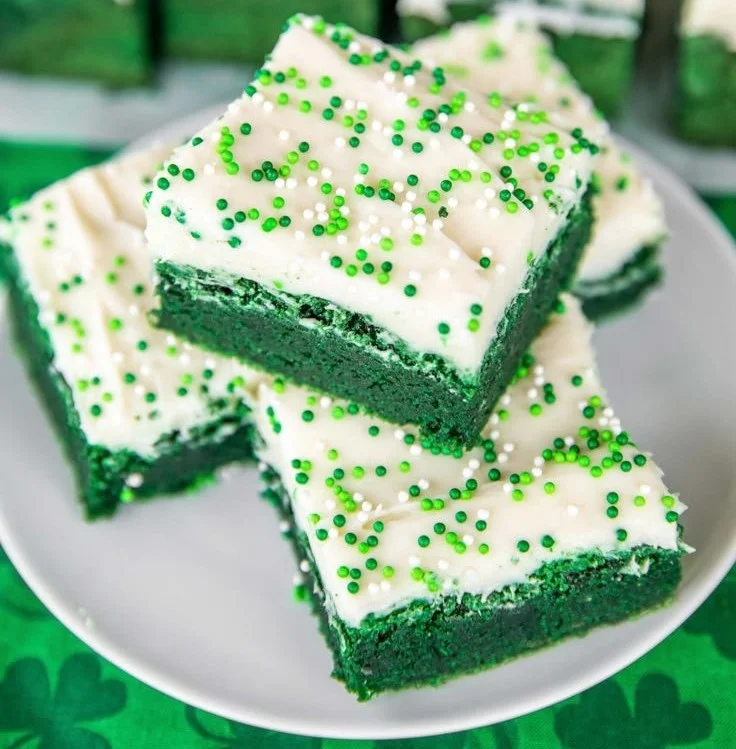
Green Velvet Brownies with Cream Cheese Frosting
I’ll never forget the St. Patrick’s Day my kitchen looked like a small, tasteful swamp — green batter streaked down the mixer, a few chocolate chips rolling under the oven, and my aunt calling to ask if I’d finally lost my mind. I hadn’t; I’d simply discovered the joy of turning a familiar brownie into…
I’ll never forget the St. Patrick’s Day my kitchen looked like a small, tasteful swamp — green batter streaked down the mixer, a few chocolate chips rolling under the oven, and my aunt calling to ask if I’d finally lost my mind. I hadn’t; I’d simply discovered the joy of turning a familiar brownie into something festive and unexpectedly charming: green velvet brownies topped with tangy cream cheese frosting. If you like the idea of fudgy chocolate with a cream-cheese lift, this version is a little wild, a little comforting, and a lot of fun. For a related twist that taught me a lot about balancing cream cheese frosting on dense sweets, I once compared techniques from a recipe for red velvet cookie cups with cream cheese frosting and adapted some lessons here.
The Day I Got Greener Than My Sweater
I start most batters the same way: get the base right. For these brownies you begin with 1 cup butter and 1 cup sugar, melted together to form a glossy, warm foundation. To that I add 2 large eggs and 1 teaspoon vanilla extract — those eggs give structure while the vanilla softens the edge of the cocoa. In my experiments I’ve found that stirring in the dry mix too quickly makes the batter tight, so I whisk the flour gently and let it fall in, folding until smooth. The dry components include 1 cup all-purpose flour, 1/2 teaspoon baking powder, 1/4 teaspoon salt, and 1/4 cup unsweetened cocoa powder; the cocoa provides chocolate depth without turning these into full-on chocolate brownies. Finally, the showstopper: green food coloring, added until the hue feels festive but not artificial (about a teaspoon or two of gel color usually). For pockets of melty richness, I toss in 1 cup chocolate chips last.
Where the Cocoa Hides
Cocoa and green aren’t obvious partners, but when you balance bitterness and creaminess you get something oddly elegant. The cocoa’s role is subtle: chocolate presence without overwhelming the velvet personality. I learned that the trick is to whisk the dry ingredients — flour, baking powder, salt, cocoa — in a separate bowl first so you don’t overwork the batter. That little step keeps the brownies tender instead of cakey. If you want to explore other flavor pairings while keeping the same structure, check out a similar concept applied to cookies in red velvet cookie cups with cream cheese frosting for inspiration on how cream cheese plays with different bases.
The Fifteen-Minute Batter Test (plus the exact method)
I treated this recipe like a mini experiment: time everything and note textures. Here’s the exact method I use so you don’t need to improvise mid-bake:
- Preheat oven to 350°F (175°C) and grease a 9×13 inch baking pan.
- In a large bowl, melt the butter and mix in sugar until well combined.
- Add the eggs and vanilla, mixing until smooth.
- In another bowl, whisk together flour, baking powder, salt, and cocoa powder.
- Gradually add the dry ingredients to the wet mixture.
- Stir in green food coloring and chocolate chips.
- Pour the batter into the prepared baking pan and spread evenly.
- Bake for 25-30 minutes or until a toothpick inserted in the center comes out clean.
- For the frosting, blend cream cheese and powdered sugar until smooth.
- Spread the cream cheese frosting over the cooled brownies.
- Cut and enjoy for your St. Paddy’s Day celebrations!
How do you know when they’re done? Use the toothpick test (step 8): it should come out with a few moist crumbs but not wet batter. The top will spring back slightly when pressed and the edges will pull away from the pan.
Frosting That Won’t Slide Off
The frosting is simple but essential. I use 8 oz cream cheese softened to room temperature, then blend in 2 cups powdered sugar until silky. Room temperature cream cheese gives you a luscious, spreadable frosting that adheres rather than slides — if your brownies are still warm the frosting will melt, so be patient and cool completely before frosting. For a small personal flourish, I grate a few chocolate chips over the top or dust with extra cocoa for contrast. If you want a tutorial on stabilizing cream cheese frosting techniques for different shapes, I found helpful tips in red velvet cookies with easy cream cheese frosting while refining my own method.
Lessons Learned (practical tips)
- Tip 1: Don’t frost while warm — cooling fully prevents a sad, runny top.
- Tip 2: Use gel food coloring for a vibrant hue without adding liquid to the batter.
- Tip 3: If you like gooey centers, aim for 25 minutes in your oven; for more structure, go toward 30.
- Tip 4: Toss chocolate chips in a tablespoon of flour before stirring them into the batter to keep them from sinking.
Two small variations to try
- White chocolate and mint: swap the chocolate chips for 1 cup white chocolate chips and add 1/2 teaspoon peppermint extract to the frosting for a grass-like contrast.
- Gluten-free makeover: use a one-to-one gluten-free flour blend in place of the all-purpose flour and watch texture carefully — you may need to reduce baking time by a couple of minutes.
Leftover Strategy (and a confession)
I’m guilty of slicing brownies too early and watching the frosting smear. Once cooled and frosted, store the pan loosely covered at room temperature for up to two days. For longer keeping, refrigerate in an airtight container for up to a week; the cream cheese frosting keeps best chilled. If you prefer your frosting softer, allow refrigerated brownies to come to room temperature for 20–30 minutes before serving. For freezing, cut into pieces, flash-freeze on a tray, then stack with parchment between layers in a freezer-safe container for up to three months.
What to serve these with
These brownies are friendly with a simple cup of coffee, a pint of stout beer for adults at a St. Paddy’s gathering, or a scoop of vanilla ice cream if you want contrast. A few toasted nuts on the side add texture and crowd-pleasing crunch.
A little story to finish
The first time I served these at a family gathering, my nephew declared them “like a Leprechaun decided to bake,” which I took as the highest compliment. They were gone within the hour. That’s when I realized novelty only takes you so far — the structure and balance have to be right, and when they are, people remember.
Conclusion
If you want to see another home-cook-friendly take on green velvet brownies and compare techniques, I recommend reading this version from Plain Chicken’s green velvet brownies with cream cheese frosting for more variations and serving ideas.
Green Velvet Brownies
Ingredients
Method
- Preheat oven to 350°F (175°C) and grease a 9x13 inch baking pan.
- In a large bowl, melt the butter and mix in sugar until well combined.
- Add the eggs and vanilla, mixing until smooth.
- In another bowl, whisk together flour, baking powder, salt, and cocoa powder.
- Gradually add the dry ingredients to the wet mixture.
- Stir in green food coloring and chocolate chips.
- Pour the batter into the prepared baking pan and spread evenly.
- Bake for 25-30 minutes or until a toothpick inserted in the center comes out clean.
- Blend cream cheese and powdered sugar until smooth.
- Spread the cream cheese frosting over the cooled brownies.
- Cut and enjoy for your St. Paddy’s Day celebrations!