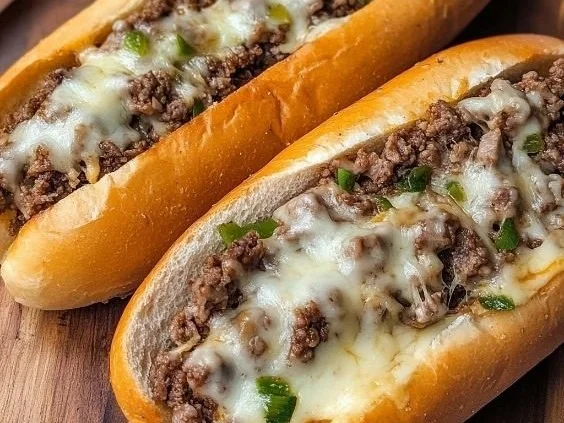
Ground Beef Philly Cheesesteaks
How I Stumbled Into This Comfort Sandwich I have a confession: I am a sucker for melty cheese and anything that smells like it belongs at a backyard cookout. The first time I made what I now call Ground Beef Philly Cheesesteaks, it was late, I was hungry, and I only had a pound of…
How I Stumbled Into This Comfort Sandwich
I have a confession: I am a sucker for melty cheese and anything that smells like it belongs at a backyard cookout. The first time I made what I now call Ground Beef Philly Cheesesteaks, it was late, I was hungry, and I only had a pound of ground beef and a stubborn, wobbly onion in the crisper. I grabbed 1 lb ground beef, 1 onion sliced, 2 hoagie rolls, 4 slices provolone cheese, salt and pepper to taste, and 1 tablespoon olive oil, and figured I’d see what happens. The result was addictive — all those savory juices and toasted bread — and I’ve kept tweaking it ever since. If you like riffing on classics, you might enjoy some of the same ideas I picked up from other riff recipes like this philly cheesesteak casserole with ground beef, which gave me confidence to simplify the whole sandwich into something fast and comforting.
The Secret Behind Perfect Ground Beef Philly Cheesesteaks
It really comes down to a handful of small moves. I start by heating 1 tablespoon olive oil in a skillet over medium heat, and that single step gives the whole dish its warm, nutty foundation. While the oil warms, I cut the onion into thin slices so they surrender quickly and turn translucent; then I add the sliced onions to the skillet and sauté until softened, stirring occasionally so they pick up color but don’t burn. There’s something about the sizzle and the sweet smell of softened onions that feels like the recipe is already halfway done.
Once the onions are soft, I add the 1 lb ground beef, season with salt and pepper to taste, and cook until browned, breaking the meat apart so it gets little crispy bits here and there. Those browned bits are where the flavor lives. When the beef is cooked through and the onions and meat are happily mingled, I split the 2 hoagie rolls and place them in the skillet to toast slightly — just enough to get a little crunch without drying them out. Then I load the beef and onion mixture into the toasted rolls and top with 4 slices provolone cheese. Lastly, I cover the skillet for a minute to melt the cheese, then serve warm. If you’re wondering how to know when it’s done right: the onions should be translucent and slightly caramelized, the beef fully browned with no pink, the rolls golden at the edges, and the provolone should be oozy and slightly pooled into the meat.
A Few Things I’ve Learned (and Tips I Swear By)
Tip number one: slice the onion thinner than you think you need to — it softens faster and blends with the meat instead of becoming a separate stage in the sandwich. Also, when you add the ground beef, let it sit for a few seconds before breaking it up; that sear is what gives you those brown bits that taste amazing. If the pan looks a little dry when browning the meat, add a teaspoon or two of water to deglaze and lift the browned bits from the pan — it’s a trick I borrowed from a few high-protein bowl recipes like this high-protein ground beef power bowls where flavor concentration is everything.
Another small thing: don’t overload the roll. A well-stacked sandwich should be messy in the best way, but if you cram too much in, the cheese won’t melt properly and the bread will fall apart. If you like extra texture, try toasting the inner cut side of the hoagie directly on the skillet for a few seconds; it crisps right up and gives a nice contrast to the soft meat.
Making It Your Own (Variations I Try)
I often change things up depending on what’s in the fridge. Sometimes I swap provolone for sharp cheddar or pepper jack if I want heat; other times I throw in sautéed bell peppers alongside the onions for color and sweetness. If you want a saucier version, stir in a spoonful of ketchup or a drizzle of Worcestershire near the end of cooking. For a lighter twist, you could serve the beef mixture over a bed of greens or in a toasted pita instead of hoagie rolls — one day I even made a taco-inspired version after trying a baked ground beef tacos spin, and it was surprisingly good.
A variation I love for lazy nights is to turn the filling into a casserole with cubed bread and extra cheese; think of it as a bridge between sandwich and dinner. That approach is similar to this cheesy ground beef and potatoes idea where you stretch the ingredients to feed more people without losing the comfort-food factor. If you want to boost veggies, a sprinkle of roasted cauliflower or a spoonful of a crispy chile mix gives an interesting texture contrast reminiscent of these crispy chile ground beef cauliflower protein bowls I tried once.
When Things Don’t Go As Planned
Sometimes the bread gets soggy because the filling is too wet, or the cheese takes forever to melt because the meat is still steaming. If that happens, I pat the meat a little to remove excess liquid before loading it into the roll, and I always toast the rolls beforehand in the skillet after the meat is cooked. If the onions brown too quickly, lower the heat and add a splash of water; they’ll soften without charring. My biggest failure ever was making a double batch for friends and under-toasting the rolls — everyone’s sandwich collapsed into a glorious pile of flavor, but I learned to never underestimate the importance of that quick toasting step.
What to Serve and How I Store Leftovers
This sandwich stands up well to simple sides. I usually go with a crisp green salad, pickles, or some oven fries. Coleslaw on the side adds a nice vinegar cut-through to the richness. If you want something really quick, a bagged salad or some store-bought chips works fine — the sandwich is bold enough that sides only need to play supporting roles.
Leftovers keep surprisingly well. I cool the filling, put it in an airtight container, and refrigerate; it will stay good for 3 to 4 days. To reheat, I prefer popping the filling back into a skillet to warm through and then remelting provolone on top for a minute under a lid — it revives the texture much better than a microwave. If you need to freeze it, put the cooked filling in a freezer-safe container and it will last up to two months; thaw overnight in the fridge before reheating.
Conclusion
If you want another take on this idea, there’s a nice write-up of a similar Ground Beef Philly Cheesesteak – Bottom Left of the Mitten that inspired a few of my swaps, and for a sloppy joe-style twist try the Philly Cheese Steak Sloppy Joes Recipe – Dinner, then Dessert which shows how forgiving and fun this concept can be. Give it a try on a busy weeknight; it’s quick, comforting, and reliably delicious.
Ground Beef Philly Cheesesteaks
Ingredients
Method
- Heat olive oil in a skillet over medium heat.
- Slice the onion thinly and add to the skillet, sautéing until softened and translucent.
- Add the ground beef to the skillet, season with salt and pepper, and cook until browned, breaking it apart.
- While the beef cooks, split the hoagie rolls and place them in the skillet to toast slightly.
- Load the beef and onion mixture into the toasted rolls, and top with provolone cheese.
- Cover the skillet for a minute to melt the cheese, then serve warm.