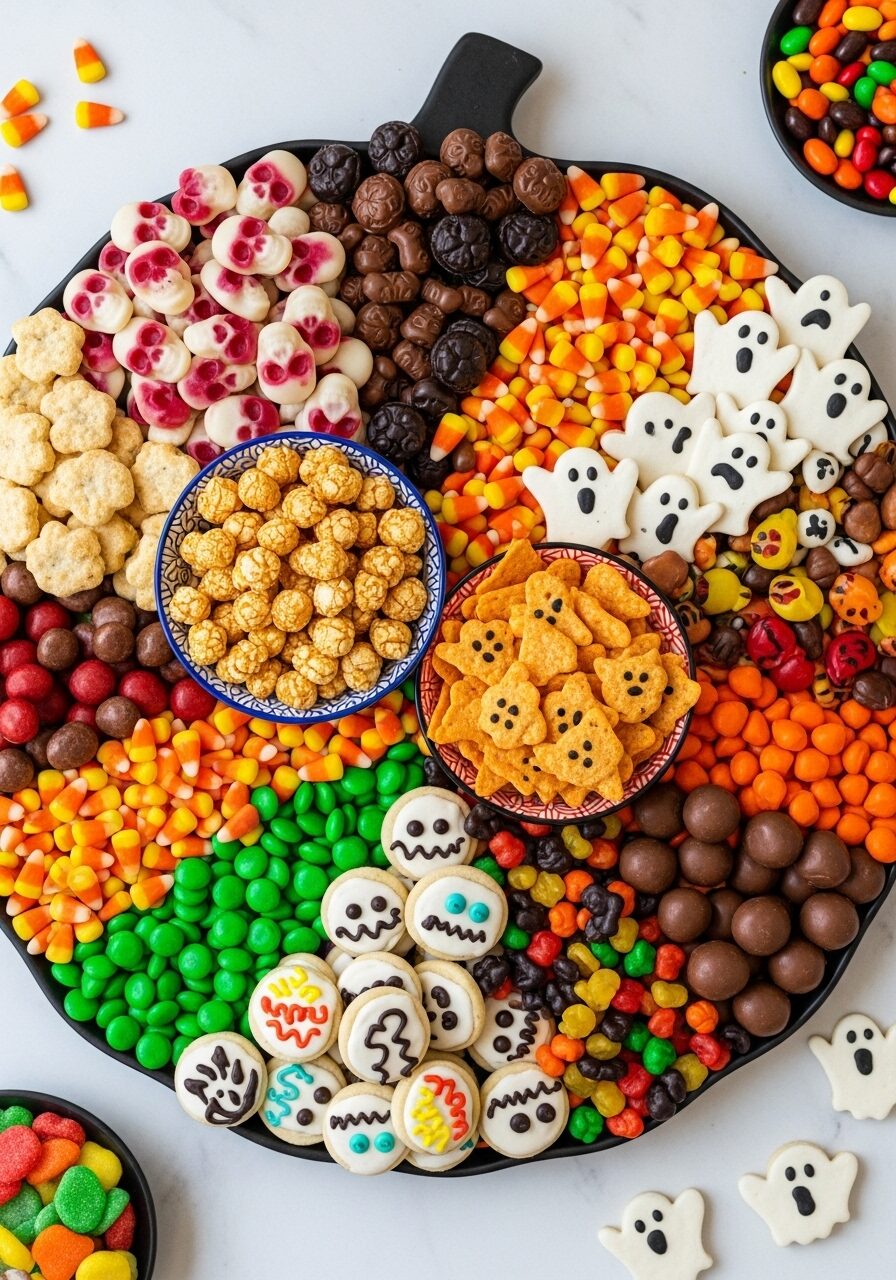
The Ultimate Halloween Candy Board (A Spooky Sweet Feast!)
Imagine the ultimate Halloween fantasy: a massive, sprawling board, shaped like a pumpkin and overflowing with a breathtaking kaleidoscope of spooky, sweet, and savory treats. Picture gummy skulls, ghost-shaped cookies, creepy-crawly candies, and so much more, all artfully arranged into an edible masterpiece. That, my friends, is the epic, show-stopping magic of this Halloween Candy…
Imagine the ultimate Halloween fantasy: a massive, sprawling board, shaped like a pumpkin and overflowing with a breathtaking kaleidoscope of spooky, sweet, and savory treats. Picture gummy skulls, ghost-shaped cookies, creepy-crawly candies, and so much more, all artfully arranged into an edible masterpiece. That, my friends, is the epic, show-stopping magic of this Halloween Candy Board. It is, without a doubt, the most fun and impressive centerpiece you can create for your spooky celebration.
Here’s the thing about a great party platter: it should be an adventure. This isn’t a strict recipe; it’s a creative guide to building the candy board of your dreams. I am completely in love with creating themed boards like this because they are pure, joyful artistry. It’s my go-to for Halloween because it’s a no-cook, low-stress project that delivers an absolutely massive “wow” factor, delighting kids and adults alike.
I promise you, there is no greater feeling than watching your guests’ eyes light up as they discover all the different treats you’ve curated. From the spooky ghost cookies to the sour gummy fangs and classic candy corn, this board is an interactive experience. It’s a celebration of color, texture, and the pure, unadulterated fun of Halloween candy.
Get ready to assemble the most talked-about, Instagram-worthy, and deliciously fun centerpiece of your Halloween party!

Why This Candy Board is a Halloween Masterpiece!
You are going to have an absolute blast putting this creative board together, and your guests will be completely amazed. This is a Halloween must-have. Here’s why:
- A True Show-Stopping Centerpiece: This isn’t just a dessert; it’s an edible decoration! The abundant, overflowing look and the fun, pumpkin shape make it the undeniable star of any party.
- Completely No-Cook and Easy: The best part! There is zero cooking required. This is all about the fun, creative process of arranging your favorite store-bought and homemade treats.
- Something for Absolutely Everyone: With a huge variety of sweet, sour, gummy, chocolatey, and savory options, every single guest is guaranteed to find their favorite treat on the board.
- Endlessly Customizable: Use this as your inspiration! Pick a color scheme, choose your favorite candies, and create a board that is uniquely and perfectly you.
- The Ultimate Low-Stress Party Food: You can gather your candies and treats days or even weeks in advance, making the party-day assembly a quick, fun, and stress-free process.
Recipe Snapshot
| Prep Time | 20 minutes |
| Cook Time | 0 minutes |
| Total Time | 20 minutes |
| Servings | 15-20 servings |
| Calories | ~450 kcal per serving (estimated) |
| Course | Dessert, Snack |
| Cuisine | American |
| Difficulty/Method | Easy / No-Cook, Assembly |
Your Shopping List for This Spooky Spread
The key to an epic board is variety! Have fun shopping for treats that fit your Halloween theme and color palette. Here’s a guide to get you started:

→ For the Sweet Treats (Cookies & Popcorn)
- Pumpkin Cookies & Ghost Cookies → Cute, iced sugar cookies add a wonderful homemade touch.
- Candy Corn Flavored Popcorn → For a sweet and salty crunch.
- Orange Halloween Oreos → The bright orange cream is perfect for the theme.
→ For the Candy (The More, The Merrier!)
- Gummy & Sour Candies → Think Skull Sours, Gummy Fangs, Sour Spiders, and Green Sour Lips for a spooky, chewy element.
- Mini Gummy Pumpkins
- Peanut Butter Cups
- Black Licorice
- Candy Corn → A Halloween classic!
- Green Rock Candy → Great for adding texture and height.
→ For the Savory Snacks
- Pretzel Sticks → For a salty, crunchy contrast.
- Ghost & Bat Chips → These spooky, shaped chips are a fantastic savory addition.
Let’s Build a Board! Your Step-by-Step Assembly Guide
Building a candy board is like painting a delicious picture. There’s no right or wrong way, but here’s a simple process to guide your creativity!
Part 1: The Foundation
- Start with Your Board and Bowls: Grab your largest cutting board, a round tray, or a large platter. First, place any small bowls you’re using for loose or messy items (like the popcorn and the ghost chips) on the board. Placing these “anchor” bowls first helps create structure for your design.
Part 2: Build Around Your Anchors
- Add the Larger Items: Now, arrange your larger items. Create a beautiful fan of the Orange Halloween Oreos around the edge of one of the bowls. Place your larger decorated cookies, like the pumpkins and ghosts, along the bottom edge of the board to create a festive border.
- Create “Rivers” of Candy: Begin filling in the larger spaces. Instead of just making piles, create flowing “rivers” of candy. Make a winding path of gummy pumpkins or a cascade of candy corn from the center of the board outwards.

Part 3: Fill in and Garnish
- Fill Every Single Gap: The secret to an impressive board is making it look lush and overflowing. Use your smaller candies—like the peanut butter cups, sour skulls, and gummy fangs—to fill in every last nook and cranny. Be sure to separate similar colors to create a beautiful, varied mosaic.
- Add the Final Flourishes: Finish by tucking in your long, linear items like the pretzel sticks and the green rock candy sticks along the edges of the board. Now stand back and admire your spooky, sweet masterpiece!
WiseRecipes’ Top Tips for a Spectacular Candy Board
These simple, pro-level secrets will help you create a board that looks like it’s straight from a magazine.
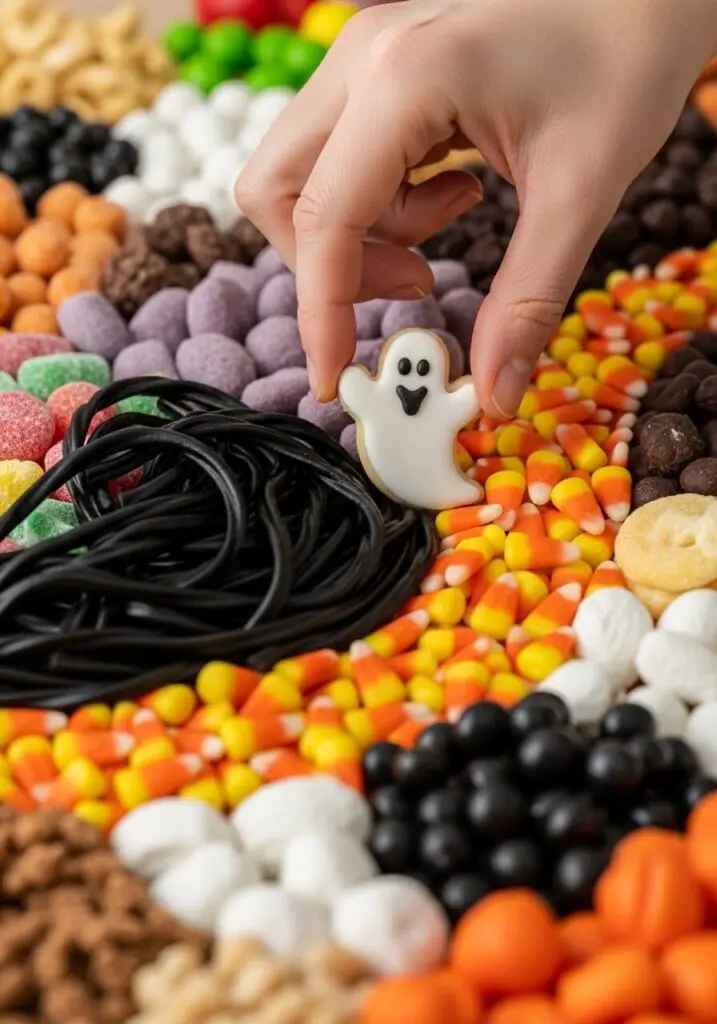
- Pick a Color Palette. The board in the photo beautifully uses the classic Halloween colors of orange, green, purple, and black. Sticking to a color scheme helps your board look cohesive and intentional, even when it’s overflowing.
- Use Bowls for Height and Control. Placing a couple of small bowls on the board is a must. They not only contain small, messy items like popcorn but also add different heights and dimensions, making your board look more dynamic and professional.
- Create Movement. Instead of just making static piles of candy, think about creating flow. Arrange candies in winding “S” curves or radiating lines from a central point. This guides the eye across the board and makes it more visually interesting.
- Variety is the Spice of Life! The key to a truly epic board is a wide variety of shapes, sizes, and textures. Mix gummy with crunchy, sweet with sour, and chocolatey with fruity for the ultimate tasting experience.
- More is More! Don’t be afraid to make it look full! The most stunning boards are the ones that look completely abundant and overflowing. Pile the candies high and fill every single inch of space.
Halloween Candy Board (Charcuterie Style)
Ingredients
Equipment
Method
- Start with your largest board or platter. Place 2-3 small bowls on the board to act as anchors. Fill them with loose items like popcorn or ghost chips.
- Arrange your larger items next. Fan the Oreos around one of the bowls and place your large iced cookies along the edges to create a border.
- Begin filling in the large, open spaces with your main candies. Create visual interest by arranging them in flowing ‘rivers’ or sections, making sure to separate similar colors.
- Use your smallest candies (like peanut butter cups or sour spiders) to fill in all the remaining nooks and crannies until the board looks full and abundant.
- Finish by tucking in any long, linear items like pretzel sticks or rock candy around the edges. Serve immediately.
Notes
FAQs: Your Candy Board Questions, Answered!
How far in advance can I make a Halloween Candy Board?
This is the best part—you can do almost everything in advance! You can shop for your candies weeks ahead of time. The final assembly should be done on the day of the party to keep everything fresh, but it only takes about 20 minutes to arrange everything beautifully.
Where do you find all the fun, themed Halloween candy?
Specialty candy stores (like Dylan’s Candy Store), grocery stores with large bulk candy sections, and even home goods stores (like World Market or HomeGoods) are fantastic places to find unique and festive candies, especially in the months leading up to Halloween. And of course, online retailers have an endless selection!
How do I make a candy board on a budget?
You can absolutely make a stunning board on a budget! Focus on buying a few key “show-stopper” items, then fill in the rest of the board with more affordable bulk candies, homemade treats like popcorn, and classic Halloween staples like candy corn, which are usually very inexpensive.
What kind of board should I use?
Any large, flat, food-safe surface will work! A large wooden cutting board, a round pizza platter, a serving tray with a lip, or even a clean baking sheet can serve as the perfect canvas for your candy creation.
Final Thoughts: The Sweetest Centerpiece
There is nothing more fun, festive, and universally loved than a giant platter of candy. This Halloween Candy Board is the ultimate expression of the playful, indulgent spirit of the holiday. It’s a creative project that invites everyone to gather, graze, and get into the spooky spirit. I hope you have a blast creating your own edible work of art. Happy Halloween!