My Ultimate Halloween Chocolate-Covered Strawberries (So Fun!)
Oh, my friends, who here isn’t utterly charmed by the playful, slightly spooky fun of Halloween? It’s the perfect excuse to get creative in the kitchen, especially with treats that bring a smile (or a delightful shiver!) to every face. Today at WiseRecipes, I’m beyond excited to share a recipe that perfectly embodies that spirit:…
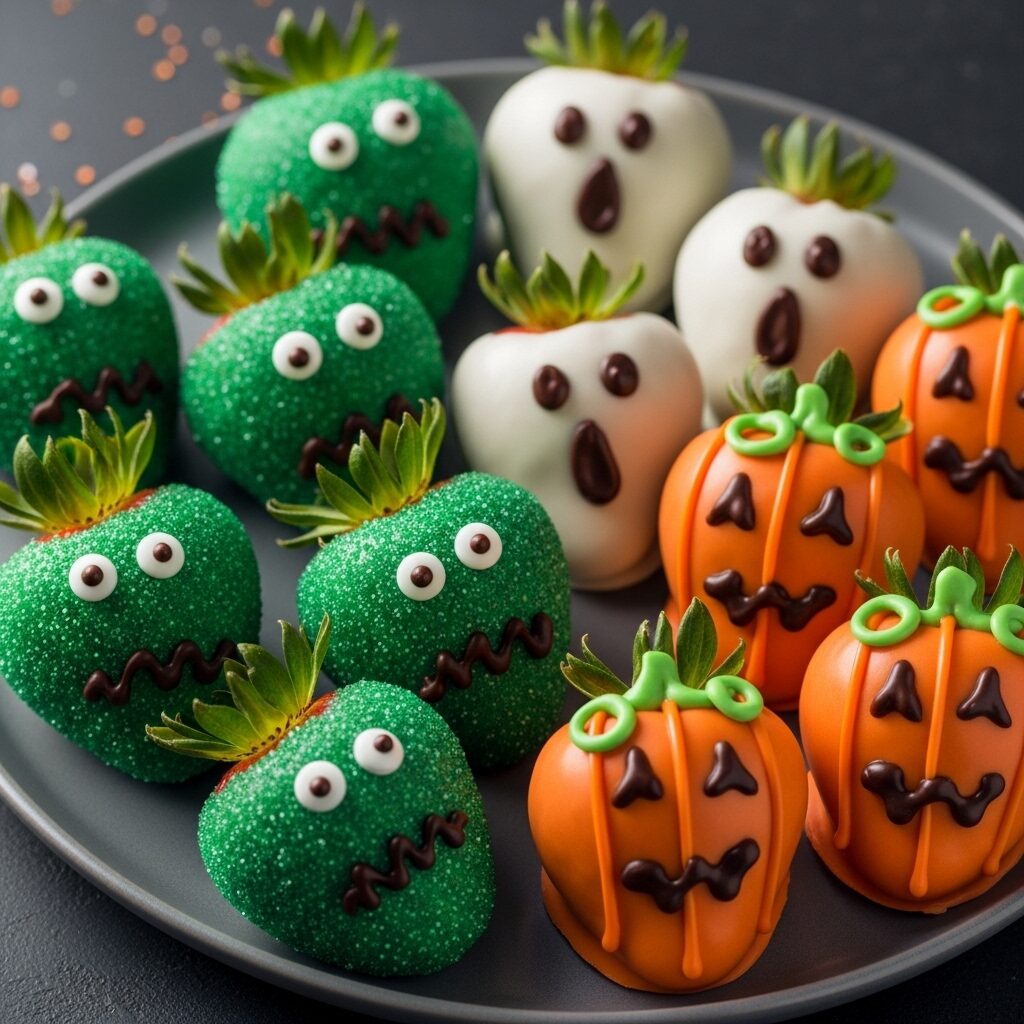
Oh, my friends, who here isn’t utterly charmed by the playful, slightly spooky fun of Halloween? It’s the perfect excuse to get creative in the kitchen, especially with treats that bring a smile (or a delightful shiver!) to every face. Today at WiseRecipes, I’m beyond excited to share a recipe that perfectly embodies that spirit: these incredible Halloween Chocolate-Covered Strawberries! Seriously, prepare for pure bliss – juicy, fresh strawberries transformed into adorable green monsters, ghostly white apparitions, and vibrant orange pumpkins, all adorned with candy eyes, spooky grins, and fun details. They’re fun to make, healthy (ish!), and they are pure joy in every single bite!
I just adore a recipe that feels incredibly special and playful but is secretly super simple to make. This Halloween treat is exactly that! It’s a fantastic way to transform humble fresh strawberries and some candy melts into a powerhouse party food that will have everyone reaching for more. Forget complicated baking; we’re talking about ridiculously flavorful and satisfying treats that come together with just 1 hour of active prep and a quick chill. This isn’t just a dessert; it’s a mood-lifter, a fantastic Halloween party staple, and honestly, a guaranteed hit every single time. This Halloween Chocolate-Covered Strawberries recipe yields three dozen delightful bites, making it perfect for school parties, trick-or-treat gatherings, or any time you crave amazing, effortless fun. Trust me, once you try this incredible combination, you’ll be making them again and again!
Why These [FUN!] Halloween Chocolate-Covered Strawberries Will Be Your New Go-To!
This isn’t just another Halloween treat; it’s a creative, sweet, and incredibly satisfying culinary delight. Here’s why I’m absolutely smitten with it:
- Spooky Fun, Made Easy: These treats look incredibly imaginative and festive, yet they’re surprisingly simple to make! Kids (and adults!) will adore creating their own monster, ghost, and pumpkin faces, making it a fantastic Halloween activity.
- No-Bake & No-Fuss: Forget turning on the oven for complicated baking! This recipe comes together with simple melting and dipping, making it perfect for quick prep and keeping your kitchen cool.
- Healthy(ish!) Indulgence: It’s a win-win! We’re starting with fresh, antioxidant-packed strawberries, then dressing them up in sweet, colorful candy coatings. It’s a treat that feels indulgent but still has some fruity goodness.
- Customizable Monster Fun: This is where the creativity shines! With different colored candy melts, candy eyeballs, and chocolate piping, you can personalize each strawberry, making every treat unique and exciting.
- Perfect for Parties & Gifting: Making three dozen delightful bites, these are ideal for Halloween parties, school events, or even as a fun homemade gift for friends and neighbors.
Your Shopping List for Spooky Strawberry Bliss: Gather What You’ll Need
Creating these incredible Halloween Chocolate-Covered Strawberries uses a blend of fresh fruit, candy melts, and fun decorations. Here’s what you’ll want to grab to get started!
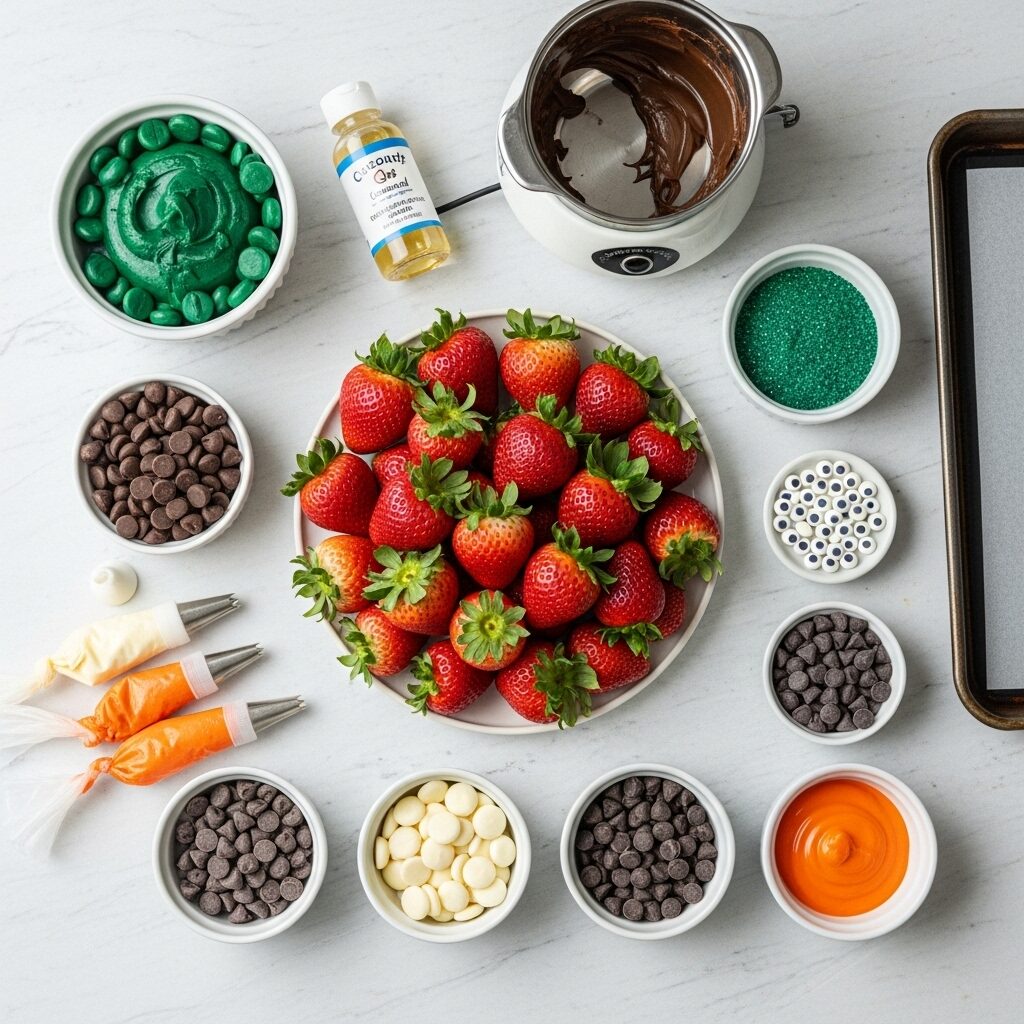
→ For the Grinning Green Monsters
- 6 ounces dark-green candy melting wafers: For our vibrant monster coating.
- 1 to 2 teaspoons coconut oil or vegetable shortening (if needed): Helps thin the candy melts for a smooth coating.
- ½ cup dark-green sanding sugar, plus more as needed: For that fantastic sparkly, “monster skin” texture!
- 12 large strawberries with green tops, rinsed and dried well: Our monster base!
- 24 small candy eyeballs: For those essential goofy (or spooky!) monster peepers.
- 1 ounce chocolate chips (optional): For melting to pipe on monster mouths.
→ For the Ghoulish White Ghosts
- 6 ounces white candy melting wafers: For our ghostly white coating.
- 1 to 2 teaspoons coconut oil or vegetable shortening (if needed): Helps thin the candy melts for smooth dipping.
- 12 large strawberries with green tops, rinsed and dried well: Our ghostly base!
- 1 ounce black candy melting wafers or chocolate chips: For piping on ghostly eyes and mouths.
→ For the Vibrant Orange Pumpkins
- 6 ounces orange candy melting wafers: For our cheerful (or spooky!) pumpkin coating.
- 1 to 2 teaspoons coconut oil or vegetable shortening (if needed): Helps thin the candy melts for smooth dipping.
- 12 large strawberries with green tops, rinsed and dried well: Our pumpkin base!
- 1 ounce chocolate chips (for melting): For piping on jack-o’-lantern faces.
Let’s Create! Crafting Your Perfect Halloween Chocolate-Covered Strawberries, Step-by-Step
This recipe is designed for maximum fun and minimal fuss. Working in batches for each “monster” type ensures the candy melts stay at the right consistency!
Part 1: Crafting Our Grinning Green Monsters!
- Prep & Melt Green Candy: Line a baking sheet with a silicone baking mat or parchment paper. Put the 6 ounces of dark-green candy melting wafers in the top of a double boiler set over simmering water. Cook, stirring occasionally once the wafers soften, until smooth. If the candy starts to reharden or seize up, stir in 1-2 teaspoons of coconut oil or shortening until smooth.
- Dip & Coat in Sugar: Spread the ½ cup of dark-green sanding sugar in a small shallow bowl. Gather a strawberry at the leaves and dip it into the melted green candy, letting any excess drip back into the bowl. Gently press the coated strawberry into the sanding sugar, rolling it to coat completely (don’t press too hard, or you’ll get too much sugar!).
- Set & Decorate: Set the strawberry leaf-side down on the prepared baking sheet. Repeat with the remaining 11 monster strawberries. Refrigerate until set, about 10 minutes, keeping the remaining melted green candy warm in the double boiler if working with other monster types.
- Add Eyes & Mouths: Spread a tiny bit of the remaining melted green candy on the back of 24 small candy eyeballs and press them on near the tip of each strawberry. Meanwhile, if you’d like to make mouths, melt the 1 ounce of chocolate chips (optional) in a small microwave-safe bowl. Transfer to a piping bag fitted with a small plain tip. Pipe mouths onto the monsters. Let sit until eyes and mouths are set, about 10 minutes.

Part 2: Crafting Our Ghoulish White Ghosts!
- Melt White Candy: Line a baking sheet with a silicone baking mat or parchment paper. Put the 6 ounces of white candy melting wafers in the top of a double boiler over simmering water. Cook, stirring occasionally, until smooth. If needed, stir in 1-2 teaspoons of coconut oil or shortening.
- Dip & Form Ghosts: Gather a strawberry at the leaves and dip it into the melted white candy, letting some (but not all!) of the excess drip back into the bowl. Set the strawberry leaf-side up on the prepared baking sheet, allowing the excess melted candy to pool slightly at the front to create the bottom of the ghost. Repeat with the remaining 11 ghost strawberries. Refrigerate until set, about 10 minutes.
- Pipe Faces: Meanwhile, melt the 1 ounce of black candy melting wafers or chocolate chips in a small microwave-safe bowl. Transfer to a piping bag fitted with a small plain tip. Once the white candy coating has set, pipe small ovals for the nose and eyes on each ghost (or use mini chocolate chips for eyes/mouths). Let sit until set, about 10 to 15 minutes.

Part 3: Crafting Our Vibrant Orange Pumpkins!
- Melt Orange Candy: Line a baking sheet with a silicone baking mat or parchment paper. Put the 6 ounces of orange candy melting wafers in the top of a double boiler set over simmering water. Cook, stirring occasionally, until smooth. If needed, stir in 1-2 teaspoons of coconut oil or shortening.
- Dip Strawberries: Gather a strawberry at the leaves and dip into the melted orange candy, letting the excess drip back into the bowl. Set leaf-side up on the prepared baking sheet. Repeat with the remaining 11 pumpkin strawberries. Refrigerate until set, about 10 minutes.
- Pipe Pumpkin Ribs: Meanwhile, transfer the remaining orange melted candy to a piping bag fitted with a plain tip. Once the coating on the strawberries has hardened, pipe vertical lines from top to bottom on each pumpkin to resemble the ribs on a pumpkin. Refrigerate until set, about 5 minutes.
- Pipe Jack-o’-Lantern Faces: Melt the 1 ounce of chocolate chips in a small microwave-safe bowl. Transfer to a piping bag fitted with a small plain tip. Pipe eyes, mouths, and noses on the pumpkins to resemble jack-o’-lanterns. Let set for 10 to 15 minutes.
- Serve! Arrange your three dozen adorable Halloween Chocolate-Covered Strawberries on a platter and serve! They’re ready to delight every ghoul and goblin at your party!
WiseRecipes’ Top Tips for Spooky Strawberry Success!
These fun Halloween treats are incredibly simple, but these WiseRecipes insights will help you achieve Halloween Chocolate-Covered Strawberry perfection every single time!
- Rinse & Dry Strawberries VERY Well: This is THE most important step! Any moisture on the strawberries will cause the candy melts to seize up and not adhere smoothly. After rinsing, dry each strawberry meticulously with paper towels.
- Melt Candy Gently (Double Boiler Method is Best!): Candy melts can seize if they get too hot or if any water gets into them. A double boiler provides gentle, indirect heat, preventing scorching. If using a microwave, melt at 50% power in short bursts, stirring frequently.
- Thin with Coconut Oil (If Needed): If your candy melts are too thick for dipping, stir in a teaspoon or two of coconut oil or vegetable shortening until smooth. This helps achieve a perfect dipping consistency.
- Work in Batches: Since candy melts can cool and thicken, work with one type of monster/color at a time, keeping the unused candy warm in the double boiler or gently reheating in the microwave as needed.
- Chill to Set: Refrigerating the dipped strawberries for 10-15 minutes helps the candy coating set quickly and firmly, preventing smudges during decoration.
- Use Piping Bags for Faces: Small piping bags (even a Ziploc bag with the corner snipped off) fitted with small plain tips make it much easier to pipe neat eyes, mouths, and details on your spooky strawberries.
Creative Twists: Delicious Ways to Customize Your Halloween Strawberries!
These Halloween Chocolate-Covered Strawberries are already fantastic, but they’re also a wonderful canvas for your culinary creativity! Here are some ideas I love to play with:
- Different Monster Colors: Experiment with purple, black, or even bright yellow candy melts for different monster characters!
- Sprinkle Galore: Instead of just green sanding sugar, try orange or black sanding sugar for other monster varieties. Or use a mix of festive Halloween sprinkles on top of plain dipped strawberries.
- Add “Brains”: For a truly gruesome (and fun!) monster, pipe a tiny bit of pink or red icing in a squiggly pattern on top of the green monsters for “brains.”
- Chocolate Drizzle: For ghosts, once the white candy is set, drizzle some melted dark chocolate in zig-zags over the top.
- Nutty Crunch: Roll the monster strawberries in finely chopped toasted almonds or pecans after the sanding sugar (or omit sanding sugar) for a nutty crust.
- Cream Cheese Filling (After Dipping): For an extra indulgent treat, after the strawberries are dipped and set, core them from the bottom and pipe in a little sweetened cream cheese filling before decorating the outside!
Ultimate Halloween Chocolate-Covered Strawberries (So Fun!)
Ingredients
Equipment
Method
- Line a baking sheet with a silicone baking mat or parchment paper. Put dark-green candy melting wafers in top of a double boiler over simmering water. Cook, stirring until smooth. If needed, stir in 1-2 tsp coconut oil/shortening.
- Spread 1/2 cup dark-green sanding sugar in a small shallow bowl. Dip a strawberry (held by leaves) into melted candy, letting excess drip. Gently press coated strawberry in sugar until completely coated. Set leaf-side down on prepared baking sheet. Repeat for 12 monster strawberries. Refrigerate 10 mins.
- Spread tiny bit of remaining melted candy on back of 2 candy eyeballs and press on near tip. Meanwhile, if making mouths, melt 1 oz chocolate chips in small microwave-safe bowl. Transfer to piping bag with small plain tip. Pipe mouths. Let set 10 mins.
- Line a baking sheet with silicone baking mat or parchment paper. Put white candy wafers in top of a double boiler over simmering water. Cook, stirring until smooth. If needed, stir in 1-2 tsp coconut oil/shortening.
- Gather a strawberry (at leaves) and dip into melted candy, letting some excess drip. Set leaf-side up on prepared baking sheet, letting excess pool to create ghost bottom. Repeat for 12 ghost strawberries. Refrigerate 10 mins.
- Meanwhile, melt black candy wafers/chocolate chips in small microwave-safe bowl. Transfer to piping bag with small plain tip. Once white candy set, pipe small ovals for nose/eyes on each ghost. Let set 10-15 mins.
- Line a baking sheet with silicone baking mat or parchment paper. Put orange candy wafers in top of a double boiler. Cook, stirring until smooth. If needed, stir in 1-2 tsp coconut oil/shortening.
- Gather a strawberry (at leaves) and dip into melted candy, letting excess drip. Set leaf-side up on prepared baking sheet. Repeat for 12 pumpkin strawberries. Refrigerate 10 mins.
- Meanwhile, transfer remaining orange melted candy to piping bag with plain tip. Once coating on strawberries set, pipe vertical lines from top to bottom for ribs on pumpkins. Refrigerate 5 mins.
- Melt 1 oz chocolate chips in small microwave-safe bowl. Transfer to piping bag with small plain tip. Pipe eyes, mouths and noses on pumpkins to resemble jack-o’-lanterns. Let set 10-15 mins.
- Arrange your three dozen decorated Halloween Chocolate-Covered Strawberries on a platter and serve!
Notes
Keep It Spooky! Storing Your Halloween Treats
You’ve created something truly special, so let’s make sure it stays fresh and delicious!
- Refrigerator Storage: Once completely set, store your Halloween Chocolate-Covered Strawberries in an airtight container in the refrigerator for up to 2-3 days. They are best enjoyed fresh, as strawberries can soften over time.
- Serving Temperature: Serve them chilled, straight from the refrigerator.
- Avoid Stacking (Until Set!): To prevent smudging decorations, make sure the candy coatings and icing decorations are completely set before stacking the strawberries in a container. You can place parchment paper between layers.
- Freezing? Not Recommended: I do not recommend freezing chocolate-covered strawberries. The strawberries will become mushy upon thawing, and the chocolate coating can develop condensation or bloom. This treat is truly best enjoyed fresh!
- Make-Ahead Prep: You can wash and dry your strawberries up to a day in advance. Melt and temper your chocolate and decorate just before your party for the freshest presentation.
FAQs: Your Top Halloween Chocolate-Covered Strawberries Questions, Answered!
Q: What are candy melting wafers and where can I find them?
A: Candy melting wafers (also called candy melts or confectioner’s coating) are specially formulated to melt smoothly and set firmly without needing to be tempered, making them ideal for dipping and decorating. You can find them in the baking aisle of most craft stores (like Michaels or Jo-Ann) and some grocery stores, especially around holidays.
Q: Can I use regular chocolate chips instead of candy melting wafers?
A: You can, but it’s trickier. Regular chocolate chips contain less cocoa butter and are designed for baking. They may require tempering to achieve a smooth, shiny, non-streaky coating that sets firmly at room temperature. If you don’t temper, they might bloom (get a white film) or be too soft. Candy melts are much easier for dipping.
Q: My candy melts seized up. What went wrong?
A: This usually happens if the candy gets too hot (melt gently, gradually, at low heat) or if even a tiny drop of water (including steam!) gets into the melted candy. Water is the enemy of melting chocolate. If it seizes, try stirring in a tiny bit of refined coconut oil or vegetable shortening (½ tsp at a time) to try and smooth it out, but it might not fully recover.
Q: How do I get the strawberries perfectly dry?
A: After rinsing, lay the strawberries out on a layer of paper towels. Gently pat each one completely dry. You can even let them air dry for a few minutes. Any lingering moisture will cause the candy melts to seize or create streaks.
Q: Can I make these ahead of time?
A: You can make these up to 1-2 days in advance. Store them in an airtight container in the refrigerator. They are freshest and most vibrant on the day they are made, but they still look and taste great the next day!
And there you have it, my friends—your guide to crafting the most delightful, impressive, and truly satisfying Halloween Chocolate-Covered Strawberries! This WiseRecipes creation is more than just a treat; it’s a testament to how simple ingredients, when treated with a little love and smart steps, can come together to create something truly extraordinary. It’s a vibrant, exciting meal that you’ll genuinely look forward to eating, day after day.
I am genuinely so excited for you to try these and experience the delicious magic yourself. Please, please come back and let me know in the comments below what your favorite part of these spooky strawberries was, or any fun twists you tried! Happy cooking from WiseRecipes!