The Ultimate Halloween Plated Dessert (Chocolate Coffin Show-Stopper!)
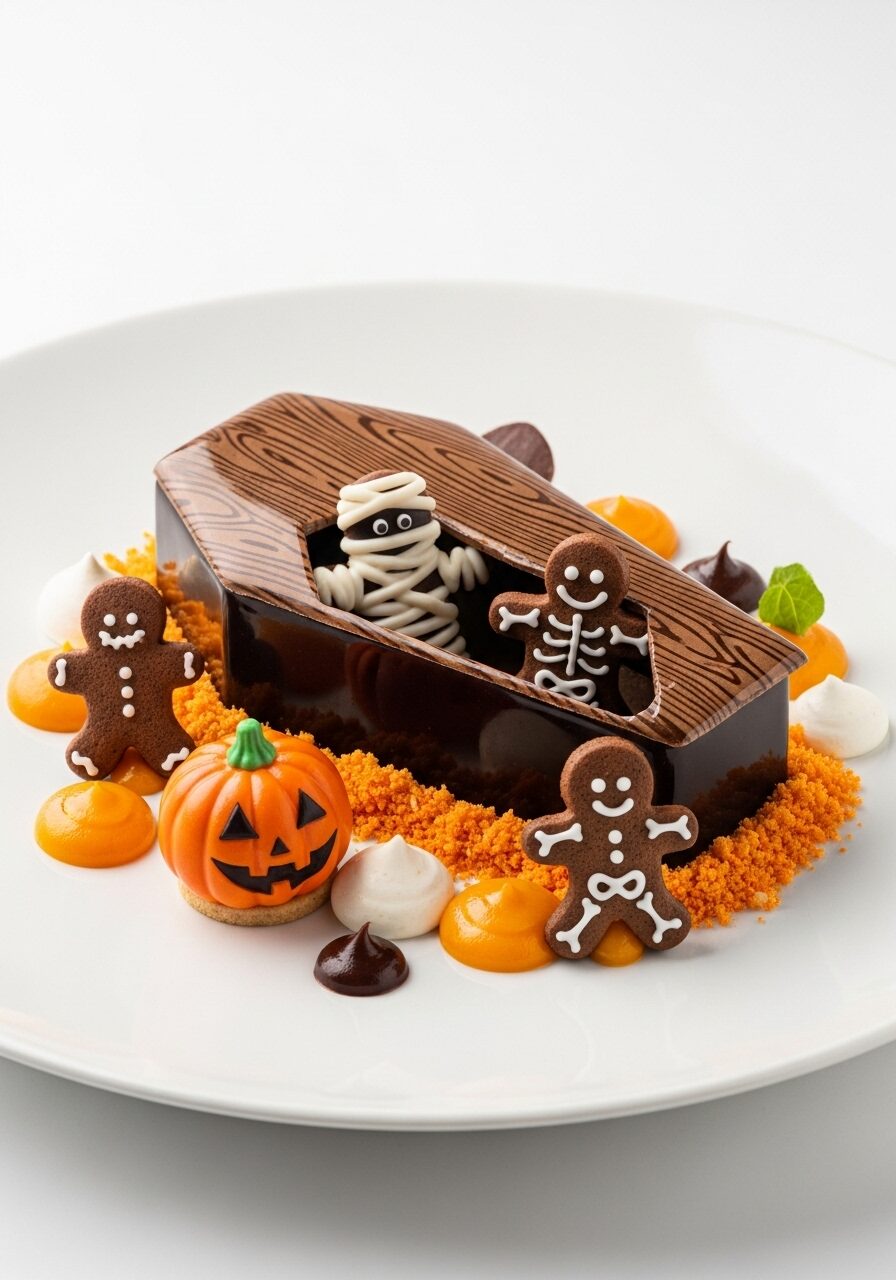
Imagine setting down a dessert at your Halloween gathering that silences the room—a stunning, professional-looking plate featuring an edible dark chocolate coffin, its lid slightly ajar, with mischievous chocolate mummies and pumpkins rising from a bed of vibrant, sweet crumble. This, my ambitious baker friends, is the absolute pinnacle of Halloween desserts. It is, without…
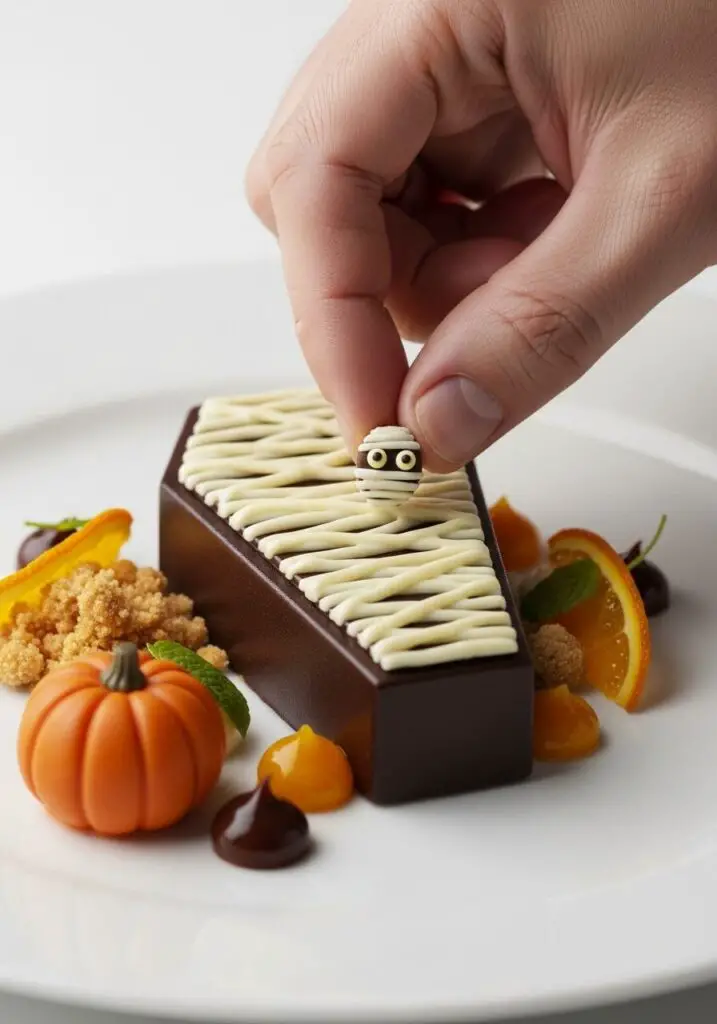
Imagine setting down a dessert at your Halloween gathering that silences the room—a stunning, professional-looking plate featuring an edible dark chocolate coffin, its lid slightly ajar, with mischievous chocolate mummies and pumpkins rising from a bed of vibrant, sweet crumble. This, my ambitious baker friends, is the absolute pinnacle of Halloween desserts. It is, without a doubt, a true culinary masterpiece that is as thrilling to create as it is to behold.
Here’s the thing about a plated dessert of this caliber: it’s a project. It’s a labor of love that involves multiple delicious components and techniques. This isn’t a simple weeknight treat; it’s a rewarding challenge for those who want to create something truly extraordinary. I wanted to share this recipe for those of you who, like me, find joy in the process of building something spectacular from scratch.
I promise you, there is no greater sense of accomplishment than seeing all the elements come together in this final, breathtaking presentation. The dessert is a journey of flavors and textures—a rich brownie base, a silky chocolate cream, a surprising coconut-lime cremeux, and a crunchy coconut crumble. It’s a sophisticated, multi-layered experience that is as delicious as it is visually stunning.
Get ready to elevate your Halloween celebration from a simple party to an unforgettable gourmet event with a dessert that will be remembered for years to come.

Why This Dessert is the Ultimate Halloween Project!
You are going to be so incredibly proud of this creation. It is a true testament to your skill and passion for baking. Here’s why this project is worth the effort:
- An Absolute Show-Stopper: This is not just a dessert; it’s a centerpiece. The creative and spooky presentation is guaranteed to be the main topic of conversation at your party.
- A Symphony of Flavors and Textures: From the dense brownie to the airy chocolate cream, the tangy cremeux, and the crunchy crumble, this dessert is a masterclass in balance and complexity.
- Learn Professional Pastry Techniques: This recipe is a fantastic opportunity to practice and master several pastry skills, including making a cremeux, a stable whipped cream, and a perfect crumble.
- The Ultimate Make-Ahead Dessert: Every single component of this dessert can be made in advance, allowing you to simply focus on the fun, artistic assembly on the day of your event.
- Deliciously Sophisticated: While the theme is fun and spooky, the flavors are grown-up and elegant. The combination of dark chocolate with coconut and lime is truly divine.
Recipe Snapshot
| Prep Time | 2 hours |
| Cook Time | 35 minutes |
| Chill Time | 4+ hours |
| Total Time | ~6 hours 35 minutes |
| Yield | 8-10 individual desserts |
| Calories | ~750 kcal per serving |
| Course | Dessert |
| Cuisine | Modern, Patisserie |
| Difficulty/Method | Advanced / Baking & Assembly |
Your Shopping List for This Spooky Masterpiece
This is an advanced recipe with several components. A kitchen scale is highly recommended for accuracy. Here’s what you’ll need:
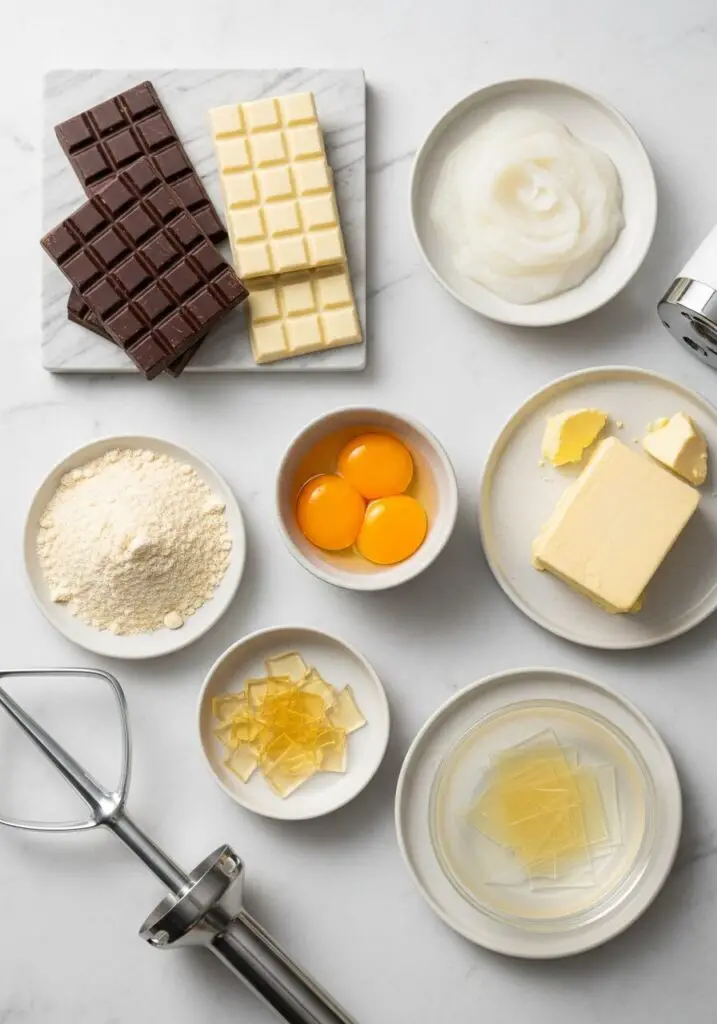
→ For the Brownie Base
- 250g Butter
- 50g Barima Artisanal Dark chocolate 56%
- 350g Sugar
- 4 Eggs
- 180g Plain flour
- 50g Barima Artisanal Cocoa Extra Dark
→ For the Silky Chocolate Cream
- 250g Cream 35% fat (for boiling)
- 250g Mascarpone cheese
- 120g Barima Artisanal Dark chocolate 56%
- 10g Gelatine & 50g Water (for blooming)
- 15g Concentrated vanilla paste
- 60g Sugar
- 400g Cream 35% fat (cold, for whipping)
→ For the Coconut-Lime “Cremeux”
- 240g Coconut puree
- 240g Cream 32% fat
- 240g Egg yolks
- 105g Sugar
- 20g Gelatine & 120g Water (for blooming)
- 30g Concentrated coconut paste & 8g Concentrated lime paste
- 100g Barima Artisanal white chocolate 29%
- 200g Butter
→ For the Coconut Crumble
- 50g cold Butter, 50g Sugar, 25g Almond flour, 25g Desiccated coconut, 30g Plain flour, 30g Corn starch, 1g Salt
- Orange food colorant
→ For the Chocolate Coffin & Decorations
- Additional Dark Chocolate for molds
- Barbara Decor Chocolate Mummies & Pumpkins
Let’s Create! Your Step-by-Step Patisserie Guide
This is a multi-part project. Take it one component at a time, and enjoy the process of building this incredible dessert.
Part 1: The Brownie Base
- Melt and Mix: Melt the butter with the 50g of dark chocolate. In a separate bowl, mix the sugar and eggs. Pour the melted chocolate mixture into the eggs and mix well.
- Add Dry Ingredients and Bake: Fold in the plain flour and cocoa powder. Spread the batter thinly on a tray lined with baking parchment and bake at 180°C (350°F) for 20 minutes. Once cooled, cut out pieces to fit the bottom of your coffin molds.
Part 2: The Silky Chocolate Cream
- Bloom Gelatine: Soak the 10g of gelatine in 50g of cold water.
- Infuse the Cream: In a saucepan, bring the 250g of cream (1) and sugar to a boil. Remove from heat, add the soaked gelatine, and stir to dissolve.
- Combine and Cool: Pour the hot cream over the 120g of dark chocolate, mascarpone, and vanilla paste. Stir until completely smooth. Combine this mixture with the 400g of cold cream (2) and refrigerate until fully set.
- Whip: Once the cream base is completely cold and set, transfer it to a stand mixer and whip on medium speed until it holds peaks.
Part 3: The Coconut-Lime Cremeux
- Bloom Gelatine: Soak the 20g of gelatine in 120g of cold water.
- Make the Anglaise: Heat the coconut puree and cream. In a separate bowl, whisk the egg yolks and sugar. Temper the hot liquid into the yolks, then return everything to the saucepan and cook, stirring constantly, to 82°C (180°F).
- Emulsify: Strain the mixture. Add the soaked gelatine, white chocolate, coconut paste, and lime paste, and stir until smooth. Cool the mixture down to 45°C (113°F).
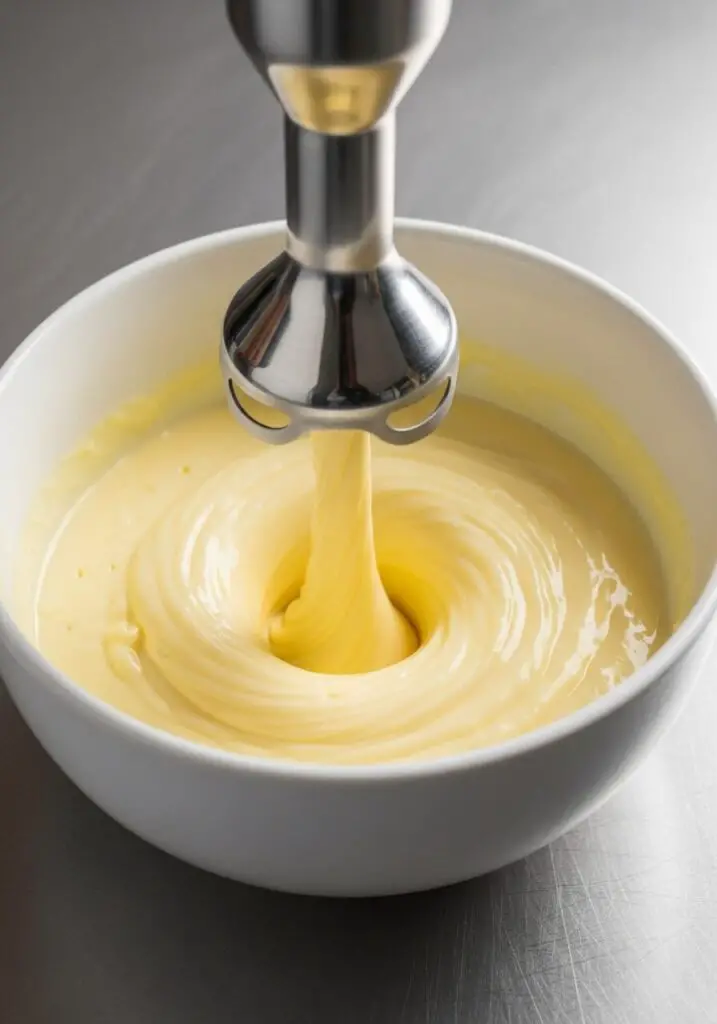
- Add Butter and Blend: Add the butter and use an immersion blender to create a smooth, perfect emulsion. Refrigerate to set.
Part 4: The Coconut Crumble
- Mix and Freeze: In a mixer with a paddle attachment, combine all crumble ingredients, including the orange colorant. Spread the crumble on a tray lined with baking parchment and freeze until solid.
- Bake: Bake the frozen crumble at 180°C (350°F) for about 12 minutes until crisp. Let it cool completely.
Part 5: Assembly
- Create the Coffin: This requires a special mold. Temper dark chocolate and create the coffin shells and lids.
- Layer the Dessert: Place a piece of the cut brownie at the bottom of the chocolate coffin. Pipe in a layer of the Coconut-Lime Cremeux. Top with the whipped Chocolate Cream.
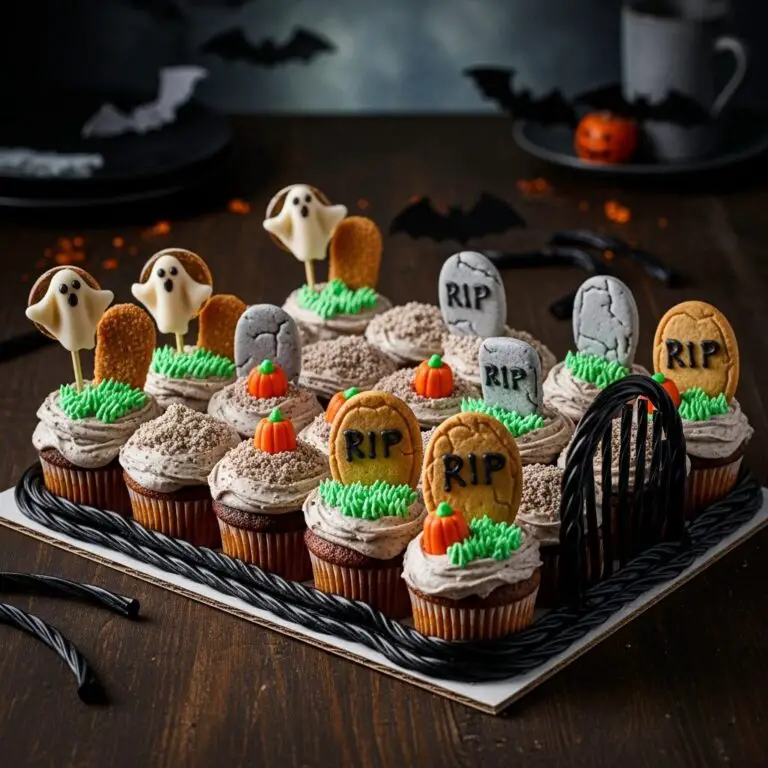
- Plate and Decorate: On a clean white plate, create a bed of the orange coconut crumble. Place the filled chocolate coffin on top. Artfully arrange the chocolate Mummies and Pumpkins around the coffin, making them look like they are rising from the “dirt.” Place the coffin lid on at an angle, and add more decorations as desired. Serve chilled.
WiseRecipes’ Top Tips for Pastry Success
This is an advanced dessert. These professional tips will help guide you to a spectacular result.
- Use a Digital Scale. For pastry work of this level, volume measurements (cups) are not accurate enough. Grams are the standard for a reason. Precision is the key to success.
- Master Your Gelatine. Always “bloom” your gelatine in cold water first. This hydrates the granules evenly. Add the bloomed gelatine to a hot liquid to dissolve it completely, but avoid boiling it after it’s been added, which can weaken its setting power.
- Temperature is Everything. Pay close attention to the temperatures in the cremeux steps. Heating the custard to 82°C cooks the egg yolks enough to thicken, and cooling to 45°C before adding the butter is crucial for a stable emulsion. A digital thermometer is your best friend.
- Strain Your Creams and Custards. Straining the chocolate cream and the cremeux through a fine-mesh sieve is a non-negotiable step for a perfectly silky, professional texture.
- Prep Everything in Advance. Read through the entire recipe. Make the components over one or two days. Make the crumble, the cremeux, and the chocolate cream base one day. Bake the brownie, whip the cream, and assemble the next. This makes the project much less daunting.
Halloween Plated Dessert: Chocolate Coffin
Ingredients
Equipment
Method
- Melt butter with chocolate. Add sugar and eggs and mix well. Finally add flour and cocoa powder. Spread on a tray lined with baking parchment and bake at 180°C for 20 minutes. Cool and cut to desired shape.
- Soak gelatine in cold water. Boil cream(1) with sugar, add soaked gelatine. Pour over chocolate, mascarpone and vanilla paste and stir until smooth. Combine with the cold cream(2) and leave in the refrigerator to set completely.
- Once set, whip the cold cream mixture in a mixer on medium speed until it holds peaks.
- Soak gelatine in cold water. Heat the coconut puree with cream. Whisk egg yolks with sugar, then temper with the hot cream mixture. Return to the pot and heat to 82°C, stirring constantly.
- Strain the mixture. Add soaked gelatine, white chocolate, coconut paste, and lime paste. Stir until smooth. Cool to 45°C. Add butter and blend with an immersion blender until emulsified. Refrigerate to set.
- Mix all crumble ingredients in a mixer with the paddle attachment. Spread on a tray lined with baking parchment and freeze. Bake the frozen crumble at 180°C for 12 minutes. Cool.
- Create dark chocolate coffin shells and lids using a mold. Place a cut piece of brownie in the bottom of each coffin. Pipe in a layer of the Coconut-Lime Cremeux, then top with the whipped Chocolate Cream.
- On a serving plate, create a bed of the orange coconut crumble. Place the filled coffin on top. Arrange chocolate decorations artfully. Serve chilled.
Notes
Storing Your Spooky Creation
Due to the multiple components, this dessert is all about make-ahead and final assembly.
- Components: The baked brownie, the un-whipped chocolate cream base, the set cremeux, and the baked crumble can all be stored in separate airtight containers in the refrigerator for up to 3 days.
- Assembly: The dessert should be fully assembled on the day of serving for the best textures. Once plated, it should be served within a few hours.
FAQs: Your Halloween Dessert Questions, Answered!
What is a “cremeux”?
A cremeux (pronounced “krem-UH”) is a French term for a type of dense, rich, and incredibly smooth custard, similar to a pudding or the filling of a cream pie. It’s typically set with egg yolks and gelatine, and the process of emulsifying it with butter at the end gives it its signature velvety texture.
Do I really need a coffin-shaped mold?
To achieve the exact look in the photo, a special chocolate mold is used. However, you can deconstruct this dessert! Serve the components layered in a beautiful glass, or simply place a square of the brownie on a plate, pipe the creams on top, and scatter the crumble and decorations around it for a different but equally delicious presentation.
My cremeux looks split or greasy. What happened?
This usually means the emulsion broke. It’s most often caused by adding the butter when the custard base is either too hot or too cold. Cooling the base to 45°C before blending in the butter is the critical step for a stable, smooth cremeux.
Where can I find chocolate decorations like mummies and pumpkins?
High-quality, pre-made chocolate decorations like the ones from Barbara Decor can be found at specialty baking supply stores or online. Alternatively, you could use small Halloween-themed silicone molds to make your own simple chocolate shapes.
Final Thoughts: A Hauntingly Good Masterpiece
There is no greater thrill for a passionate baker than successfully executing a complex, multi-component dessert. This Halloween Chocolate Coffin is more than a treat; it’s a project, a challenge, and a spectacular achievement. I hope this guide empowers you to create this unforgettable dessert and that it becomes the legendary centerpiece of your Halloween celebration. Happy Haunting!