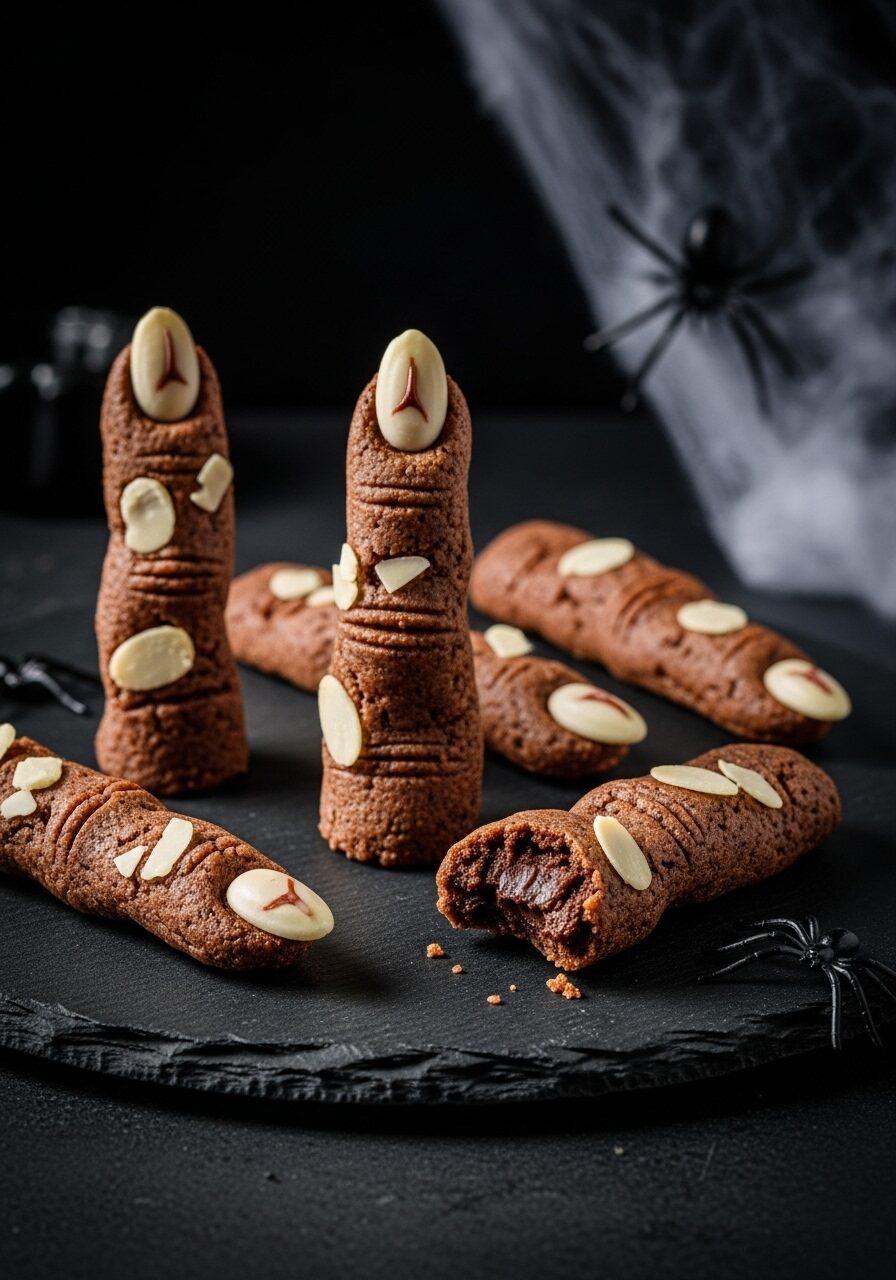
The Ultimate Zombie Fingers (Easy & Healthy Halloween Party Favors!)
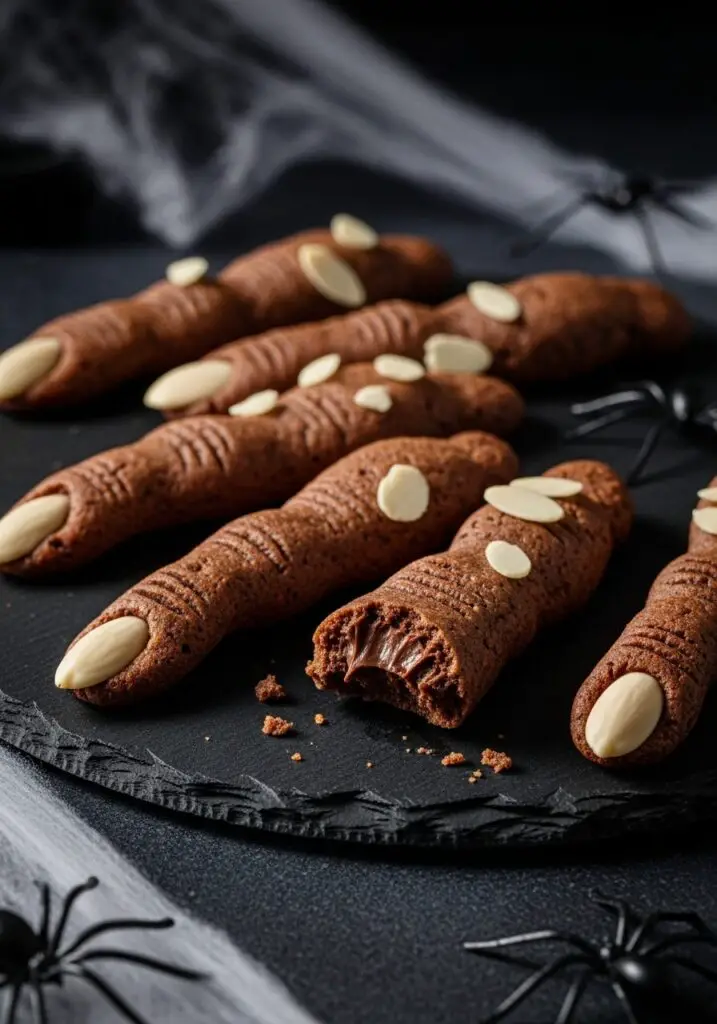
Imagine handing out the most delightfully spooky and secretly healthy treat at your next Halloween party. Picture this: gnarled, spooky “zombie fingers” made from a rich, fudgy, no-bake mixture of dates, chocolate, and peanut butter, each finished with a creepy almond fingernail. That, my friends, is the genius of these Zombie Fingers, and they are,…
Imagine handing out the most delightfully spooky and secretly healthy treat at your next Halloween party. Picture this: gnarled, spooky “zombie fingers” made from a rich, fudgy, no-bake mixture of dates, chocolate, and peanut butter, each finished with a creepy almond fingernail. That, my friends, is the genius of these Zombie Fingers, and they are, without a doubt, the best edible Halloween party favors you will ever make.
Here’s the thing about halloween party favors: we often default to bags of store-bought candy. I was on a mission to create something that was just as fun and exciting for kids and adults, but was also homemade, wholesome, and incredibly easy. This no-bake, food processor recipe is the glorious answer. It’s a simple, 4-ingredient treat that is naturally vegan and gluten-free, so everyone can enjoy it.
I promise you, there is no greater party victory than a treat that is both spooky and satisfying. The natural sweetness from the dates, the richness from the dark chocolate and peanut butter, and the hearty texture from the oats create a delicious, energy-bite-like treat that just happens to look terrifyingly cool. They are the perfect, unique, and memorable take-home gift.
Get ready to master this simple, no-bake recipe and create the most talked-about, most delicious halloween party favors your guests have ever received.
Why These Are the Best Halloween Party Favors!
You are going to be completely amazed at how easy it is to make a treat this fun and delicious. This will become an instant Halloween staple. Here’s why you’ll love them:
- The Perfect Edible Halloween Party Favors: These are a unique, memorable, and homemade alternative to candy that guests of all ages will love.
- Incredibly Easy & No-Bake: This entire recipe comes together in a food processor in just a few minutes, with no oven required. It’s the ultimate low-stress party prep.
- Healthy & Wholesome Ingredients: Made with dates, oats, peanut butter, and dark chocolate, these are a naturally sweetened, fiber-packed treat you can feel good about.
- Allergy-Friendly for Everyone: This recipe is naturally vegan and can be made gluten-free, so it’s a safe and delicious option for all your party guests.
- So Fun to Make and Shape: Getting your hands “dirty” and shaping the spooky, gnarled fingers is a fun activity for the whole family. The spookier, the better!
Recipe Snapshot
| Prep Time | 10 minutes (+ 30 mins chill time) |
| Cook Time | 0 minutes |
| Total Time | 40 minutes |
| Servings | 16 fingers |
| Calories | 115 kcal per finger |
| Course | Dessert, Snack |
| Cuisine | American / Vegan |
| Difficulty/Method | Easy / No-Bake |
Your Shopping List for a Spooky Treat
This recipe uses just a handful of simple, wholesome ingredients to create these terrifyingly tasty treats.

→ For the Zombie Fingers
- 250g (8.8oz) stoned dates → Pitted dates are the secret to the sweet, fudgy, and naturally caramel-like base. Medjool dates are extra soft and delicious!
- 100g (3.5oz) dark chocolate → Use a good quality vegan dark chocolate, either in chips or a roughly chopped bar.
- 3 tbsp smooth peanut butter → Adds richness, protein, and helps bind the mixture together.
- 4 tbsp porridge oats → Also known as rolled oats. Use certified gluten-free oats to keep the recipe gluten-free.
- 3 tbsp flaked almonds → These make the most perfect, creepy-looking fingernails!
Let’s Get Spooky! Your Step-by-Step Guide
Ready for the easiest, most fun Halloween treat ever? Grab your food processor!
Part 1: The No-Bake “Dough”
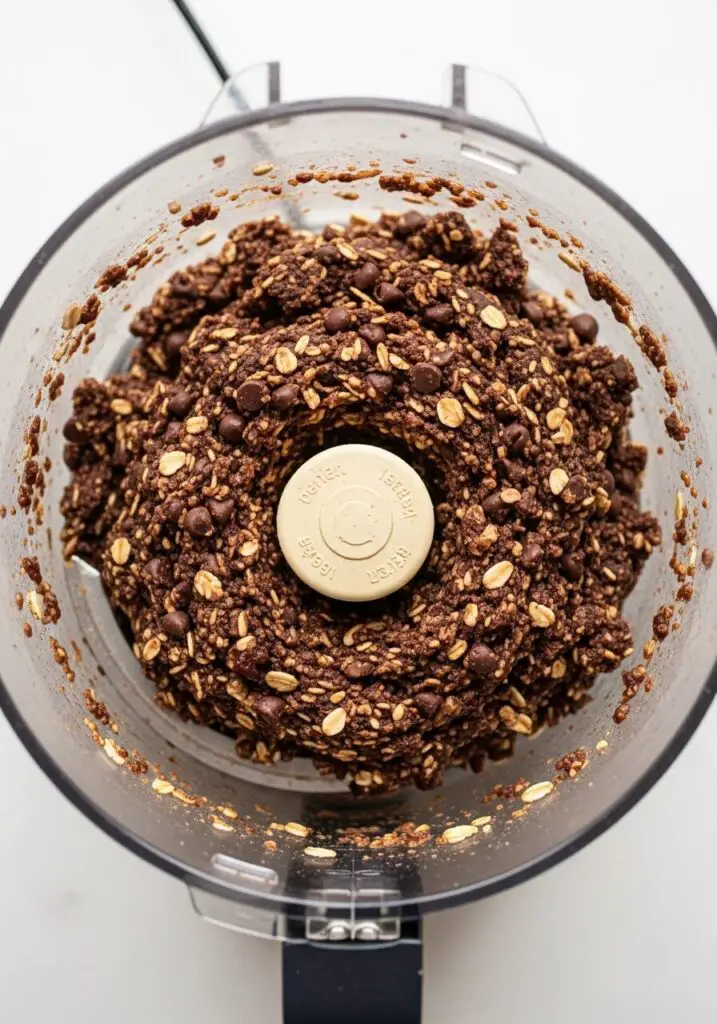
- Process the Ingredients: In the bowl of a food processor, combine the pitted dates, dark chocolate, smooth peanut butter, and porridge oats.
- Whiz Until Crumbly: Pulse the mixture until it breaks down and comes together into a thick, crumbly, and slightly sticky consistency. It should easily hold its shape when you pinch it together.
Part 2: Shape Your Zombie Fingers
- Shape the Fingers: Take about a tablespoon of the mixture and use your hands to roll and shape it into a gnarled, spooky finger shape. Don’t make them too perfect—the lumps and bumps make them look more realistic!
- Add the Details: Use a small knife to gently press three shallow slits into the finger to create “knuckle” wrinkles.
- Attach the Fingernail: Firmly press one flaked almond onto the tip of each finger to create the creepy fingernail.
- Chill to Set: Place the finished fingers on a plate or a small tray lined with parchment paper. Chill them in the refrigerator for at least 30 minutes to allow them to firm up.
- Pack and Serve: Once chilled, they are ready to serve on a spooky platter or to be packed up into little bags as the perfect halloween party favors!

WiseRecipes’ Top Tips for Perfect Zombie Fingers
These simple secrets will ensure your spooky treats are a huge hit.
- Use Soft, Sticky Dates. The success of this recipe depends on the dates! If your dates feel a bit dry or hard, soak them in hot water for about 10 minutes, then drain them very well before adding them to the food processor. This will make them soft and sticky enough to bind everything together.
- Don’t Over-Process. You’re looking for a texture that’s like a thick, crumbly dough, not a completely smooth paste. Pulse the mixture just until it starts to clump together.
- Slightly Oily Hands Help. If you find the mixture is a bit too sticky to roll comfortably, you can lightly grease your hands with a tiny bit of coconut oil to prevent sticking.
- Get Creative with the Shape! The best part of this recipe is the creative freedom. Make some fingers long and thin, some short and stout. Bend them at the “knuckles” to make them look extra creepy. Have fun with it!
- The Perfect Halloween Party Favors Packaging: To turn these into great take-home gifts, place two or three fingers in a small, clear cellophane bag and tie it with a festive orange or black ribbon.
Halloween Party Favors – Zombie Fingers
Ingredients
Equipment
Method
- Add the first 4 ingredients (dates, dark chocolate, peanut butter, oats) into your food processor.
- Pulse until the mixture has a thick, crumbly, and slightly sticky consistency that holds together when pinched.
- Take about a tablespoon of the mixture and shape it into a gnarled finger. Use a small knife to press 3 shallow slits along the finger to create knuckles.
- Press a flaked almond firmly onto the tip of the finger to create the fingernail. Repeat with remaining mixture.
- Place the finished fingers on a parchment-lined plate or tray and chill for at least 30 minutes before serving or packing as party favors.
Notes
Keep It Fresh! Storing Your Spooky Treats
These treats are perfect for making ahead of your Halloween party!
- Refrigerator: Store the finished Zombie Fingers in an airtight container in the refrigerator. They will stay fresh and delicious for up to a week.
- Freezer: These also freeze wonderfully! Place them in a single layer in a freezer-safe container or bag. They can be frozen for up to 3 months. They are actually delicious straight from the freezer for a chewy, frozen treat!
FAQs: Your Zombie Finger Questions, Answered!
Can I make these nut-free?
Yes, absolutely! To make these nut-free for an allergy-friendly option, substitute the peanut butter with sunflower seed butter (SunButter). For the fingernail, you can use a pumpkin seed (pepita) or a sunflower seed instead of the flaked almond.
Can I use a different kind of chocolate?
Dark chocolate is recommended for its rich flavor and for giving the fingers a spooky, dark color. However, you could use semi-sweet chocolate chips if you prefer. I would avoid milk chocolate, as it might make the mixture too sweet.
What if I don’t have a food processor?
If you don’t have a food processor, this recipe will be a bit more work, but it’s possible! You would need to very, very finely chop the dates and the chocolate with a knife until they are almost a paste. Then, in a bowl, use your hands to knead and work all the ingredients together until a sticky dough forms.
Are these actually healthy?
Yes! When it comes to Halloween treats, these are a fantastic, healthier option. They are naturally sweetened with dates and contain healthy fats from the peanut butter and fiber from the oats. They are a much more wholesome choice than traditional candy.
Final Thoughts: Your Spookiest, Healthiest Treat
There is such a special joy in creating a Halloween treat that is fun, spooky, delicious, and secretly good for you. These No-Bake Zombie Fingers are the perfect embodiment of that. They are a fantastic project to make with kids and one of the most creative halloween party favors you can share. I hope they bring a touch of ghoulish delight to your celebration. Happy Halloween!