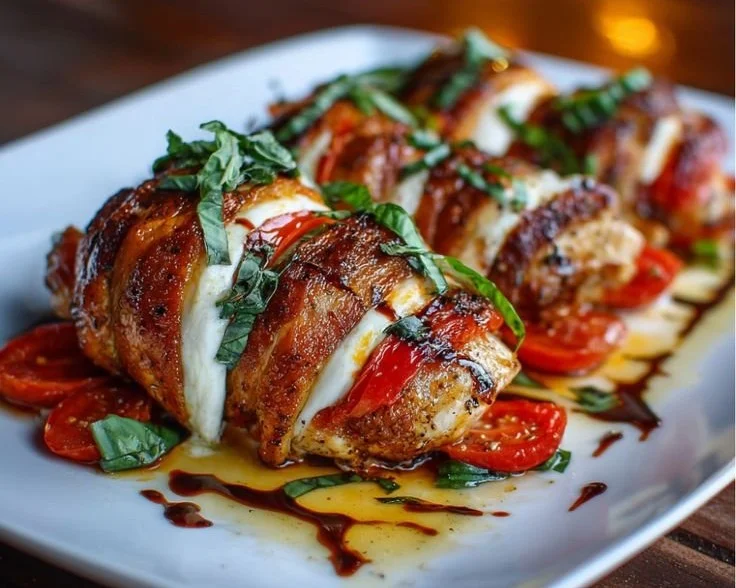
Hasselback Chicken
How I Fell in Love with Hasselback Chicken The first time I made Hasselback Chicken, I was cobbling together dinner from whatever was in the fridge on a humid Tuesday evening. I had four boneless chicken breasts, a ball of mozzarella, a couple of tomatoes, and a handful of basil leaves. I wanted something that…
How I Fell in Love with Hasselback Chicken
The first time I made Hasselback Chicken, I was cobbling together dinner from whatever was in the fridge on a humid Tuesday evening. I had four boneless chicken breasts, a ball of mozzarella, a couple of tomatoes, and a handful of basil leaves. I wanted something that looked a little special without a lot of fuss, something that would sizzle and smell like summer as it roasted. The result felt like a tiny miracle: warm, melting cheese poking out of neat little slits, the tomatoes soft and tangy, basil perfuming everything. If you like easy chicken dinners, I have a list of my other go-to recipes that pair perfectly with simple weeknights, like these slow-cooker chicken recipes I turn to when I need dinner to cook itself.
To be clear about what you’ll need in the kitchen for this version: four boneless chicken breasts, eight ounces of mozzarella cheese, two medium tomatoes, a half cup of fresh basil leaves, two tablespoons of olive oil, salt and pepper to taste, and balsamic glaze for drizzling if you want that sweet finish. Nothing fussy, but each thing matters.
The Secret Behind Perfect Hasselback Chicken
There’s a small trick that makes the presentation and texture sing: the slits. People get nervous, but once you understand it, it’s easy and even a little meditative. 1. Preheat the oven to 375°F (190°C). 2. Using a sharp knife, make slits in each chicken breast, being careful not to cut all the way through. I like to place a wooden spoon handle alongside the breast to act as a guard so my knife doesn’t go all the way through. 3. Season the chicken with salt and pepper. That’s simple, yes, but don’t be shy—salt is flavor. 4. Insert slices of mozzarella, tomatoes, and basil into the slits of the chicken. I cut the mozzarella and tomatoes thin so they tuck in neatly; tearing basil leaves gently with your fingers releases more aroma. 5. Drizzle with olive oil and more seasoning if desired. A little extra salt and a crack of fresh pepper on top just before roasting makes a difference. 6. Place the chicken in a baking dish and bake for 25-30 minutes, or until the chicken is cooked through and the cheese is melted. I check the center with a thermometer; 165°F is where you want to be, or cut into the thickest piece—if the juices run clear you’re good. 7. Drizzle with balsamic glaze before serving, if desired. That glossy, tangy finish is my favorite part.
A Few Things I’ve Learned
I’ll share a handful of practical tips I’ve picked up: first, always use a sharp knife. The neatness of the slits affects both the look and how evenly the cheese melts into the meat. Second, slice the mozzarella thin and let it sit at room temperature for 10 minutes before assembling; it melts more easily and blends into the tomato juices better. Third, don’t overcrowd the baking dish—give each breast room so air can circulate and the exterior browns slightly. If the tops start to brown too fast while the centers are still underdone, tent a piece of foil over the dish and finish cooking; the cheese will stay gooey without burning.
People often ask how to tell when it’s done. The best way is an instant-read thermometer in the thickest part hitting 165°F, but I also look for visual cues: cheese bubbling and slightly golden at the edges, tomatoes softened and slightly collapsed, and the juices running clear when you cut into the breast. Texture-wise, the outside should be tender, not rubbery, and the inside juicy—if you overbake it becomes dry, so keep an eye around that 25-30 minute mark.
When I’m short on time or energy, this chicken adapts. One evening I swapped mozzarella for crumbled goat cheese and stirred wilted spinach into the slits, which became a different but delightful meal; it reminded me of a version I once saved and loved online. For more ideas if you want a spinach-and-goat-cheese take, I sometimes read up on variations like the simple casseroles I make when I need to stretch flavors further.
Putting It on the Table
I usually pair this with something simple: a green salad dressed in lemon and olive oil, roasted baby potatoes, or a quick pasta. If you want something more comforting and carb-forward, a speedy one-pot pasta works beautifully alongside this chicken, and I’ve got a favorite 30-minute one that I lean on when guests are coming over and I need both speed and comfort in one pan pairing suggestion. Serve the chicken hot so the cheese is still stringy and the basil smell hits first—that moment when you lift the serving fork and the cheese stretches a little is why I make this recipe over and over.
As for leftovers, which I always hope there will be, here’s what I do: cool the pieces to room temperature, then store them in an airtight container in the refrigerator for up to three days. Reheating gently in a 350°F oven keeps the texture better than the microwave—15 minutes or so until warmed through. If you must microwave, cover the dish with a damp paper towel to keep it from drying out.
The Best Part About This Dish
It’s the little theatrics—the neat rows of stuffed slits, the smell of basil and olive oil turning sweet in the oven, the contrast between warm cheese and tangy tomato. I love that it reads fancy without asking for much. There are small ways to make it your own: sprinkle a little parmesan on top before baking for a crisper edge, or add a pinch of red pepper flakes inside the slits for heat. Try a lemon zest in the oil for brightness. One of my favorite variations is to swap mozzarella for a salty provolone and slip in sun-dried tomatoes for concentrated flavor.
I remember the first time I served this to a skeptical friend who claimed she “didn’t like chicken.” She came back for seconds and then seconds more, and ever since I have half a dozen friends who request “that cheesy chicken with basil” whenever they drop by. It’s the kind of recipe that feels like a small celebration, even on ordinary nights.
Conclusion
If you want another take or inspiration for different fillings, I often look at other chefs’ riffs and adapt their ideas into my weeknight rhythm; Tasty’s version gave me ideas for presentation and seasoning, and the spinach-and-goat-cheese approach inspired a creamy, tangy alternative that’s great for leafy greens fans Tasty’s Hasselback Chicken recipe and Hasselback Chicken with Spinach + Goat Cheese. Give it a try and tweak the fillings until it feels like yours.
Hasselback Chicken
Ingredients
Method
- Preheat the oven to 375°F (190°C).
- Using a sharp knife, make slits in each chicken breast without cutting all the way through.
- Season the chicken with salt and pepper generously.
- Insert slices of mozzarella, tomatoes, and basil into the slits of the chicken.
- Drizzle with olive oil and add additional seasoning if desired.
- Place the chicken in a baking dish and bake for 25-30 minutes, or until the chicken is cooked through and the cheese is melted.
- Check the internal temperature; it should reach 165°F.
- Drizzle with balsamic glaze before serving.