Healthy Dinner Ideas That Don’t Taste Like Diet Food
As someone who loves delicious food but also prioritizes health, I often find myself searching for dinner ideas that strike the perfect balance. If you’re tired of bland meals that make you feel like you’re on a diet, you're in for a treat! In this guide, I’ll share some of my favorite healthy dinner recipes…
As someone who loves delicious food but also prioritizes health, I often find myself searching for dinner ideas that strike the perfect balance. If you’re tired of bland meals that make you feel like you’re on a diet, you're in for a treat! In this guide, I’ll share some of my favorite healthy dinner recipes that not only nourish your body but also excite your palate. With options ranging from zesty shrimp bowls to hearty quinoa dishes, you’re bound to find something that will make your taste buds dance. So, let’s dive into these vibrant meals that prove healthy eating can be both satisfying and tasty!
1. The Ultimate Sheet Pan Cashew Chicken (Easy & Healthy Dinner!)

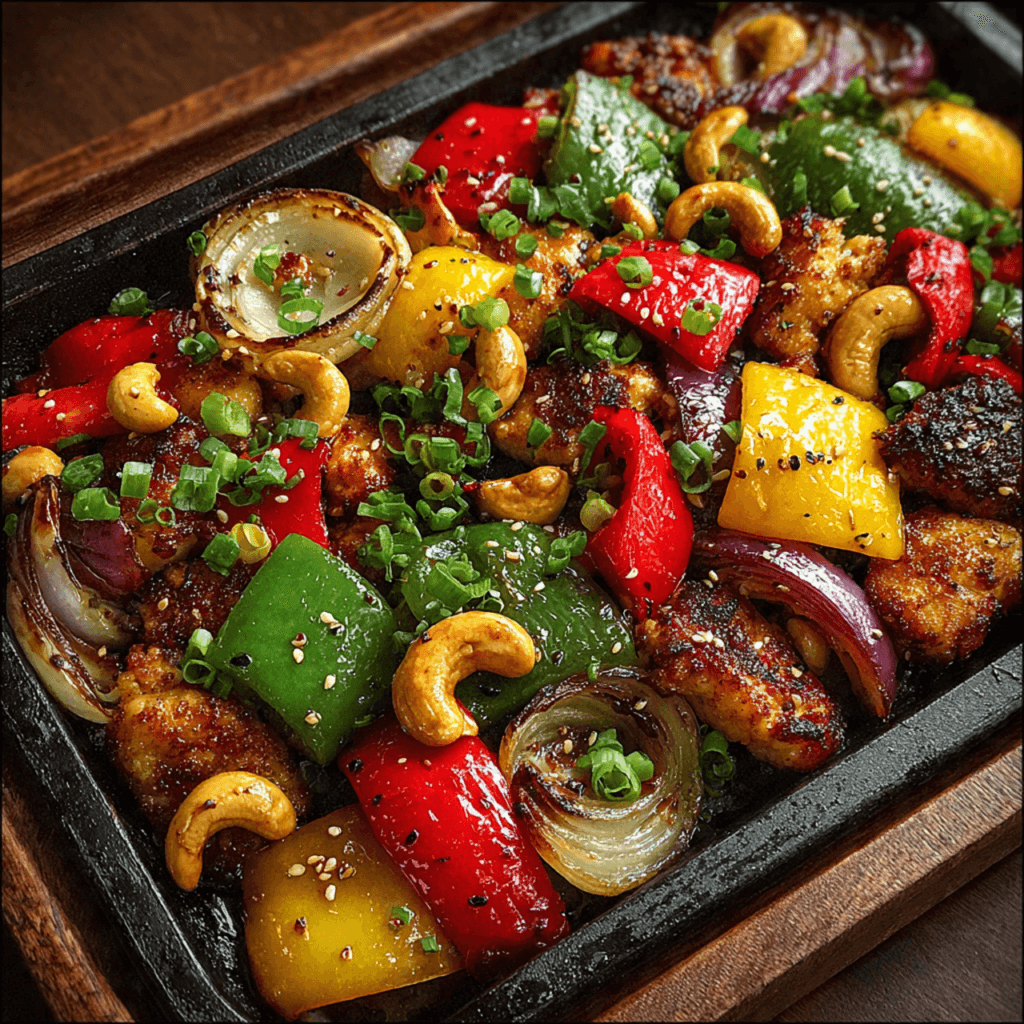
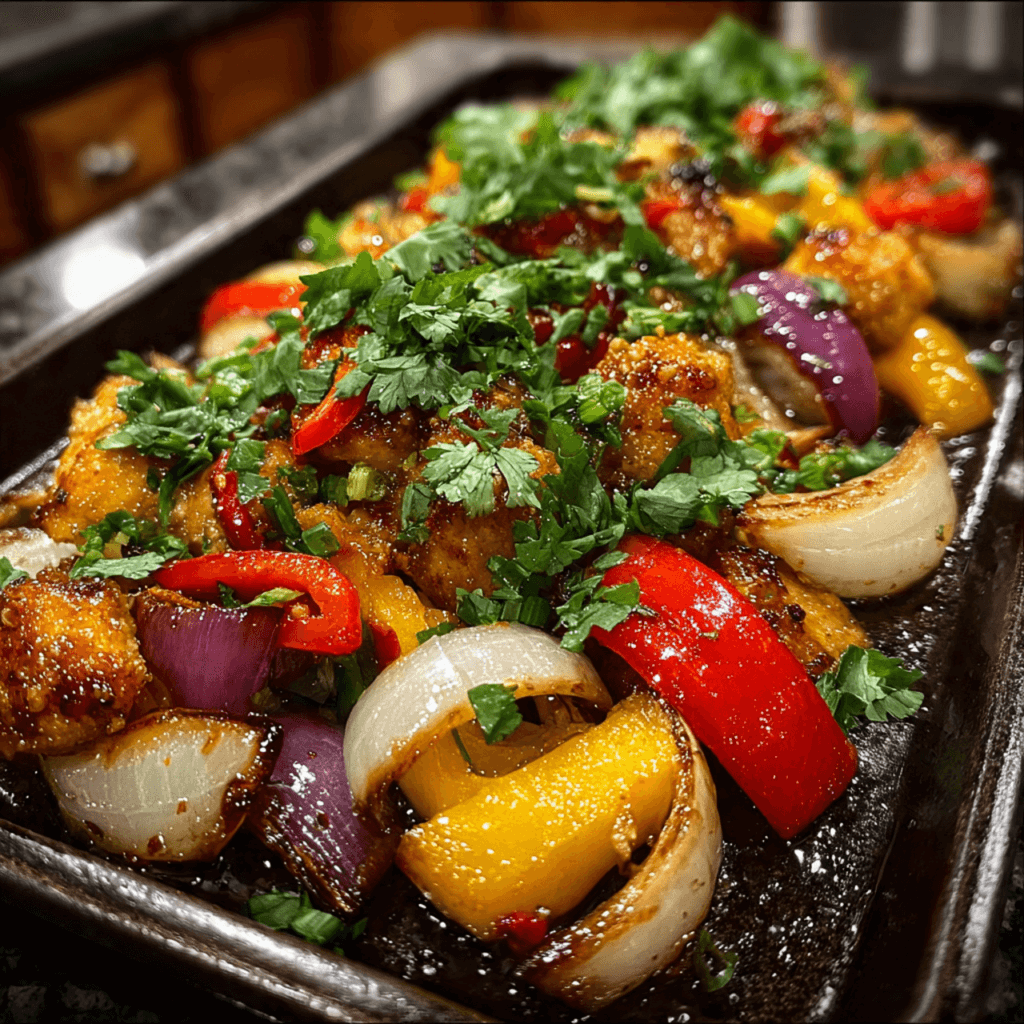
Imagine a weeknight dinner that delivers all the sweet, savory, and nutty flavors of your favorite takeout cashew chicken, but is ridiculously easy to make, requires only one pan, and is packed with protein and fresh vegetables. That, my friends, is the glorious, game-changing magic of this Sheet Pan Cashew Chicken. This is, without a doubt, the most delicious and effortless one-pan meal you will add to your weekly rotation.
I promise you, there is no greater weeknight victory than pulling this sizzling, colorful pan from the oven. The chicken becomes incredibly tender and juicy, the peppers and onions get sweet and slightly charred, and the cashews toast to nutty perfection, all coated in a glossy, irresistible sauce. It’s a complete, satisfying meal that will have the whole family raving.
Get ready to ditch the takeout menu and master the art of the one-pan dinner, creating a stunning, healthy, and completely delicious meal that’s destined to become a new family favorite.
Why This Sheet Pan Dinner is an Absolute Game-Changer
You are going to be completely obsessed with how much flavor you can get from one single pan. This recipe is a true weeknight hero. Here’s why:
- A True One-Pan Wonder: From the veggies to the chicken to the cashews, everything roasts together on a single sheet pan, which means incredible flavor and minimal cleanup.
- Better Than Takeout & So Much Healthier: You get all that sweet and savory Asian-inspired flavor you crave, but with fresh ingredients and complete control over the salt and sugar.
- Packed with Protein and Veggies: This is a well-balanced meal loaded with lean chicken breast, colorful bell peppers, and healthy fats from the cashews to keep you full and satisfied.
- Perfect for Meal Prep: This recipe reheats beautifully, making it a fantastic and delicious option for a week of healthy, pre-portioned lunches.
- Ready in Under an Hour: With just 20 minutes of active prep, the oven does the rest, delivering a sizzling, hot, and delicious dinner with minimal effort.
Recipe Snapshot
| Prep Time | 20 minutes |
| Cook Time | 35 minutes |
| Total Time | 55 minutes |
| Servings | 4 servings |
| Calories | 420 kcal per serving |
| Course | Dinner, Main Course |
| Cuisine | American, Asian |
| Difficulty/Method | Easy / Roasting |
Your Shopping List for This Easy Weeknight Win
This flavor-packed meal comes together with a handful of fresh ingredients and pantry staples.
→ For the Chicken and Veggies
- 1 pound boneless, skinless chicken breasts → Cut into uniform 1-inch pieces.
- 1 red bell pepper & 1 green bell pepper → Chopped into 1-inch pieces for a sweet crunch and vibrant color.
- 1 red onion → Diced into 1-inch pieces. It becomes wonderfully sweet when roasted.
- 1 cup unsalted cashews → The star of the show! They’ll get perfectly toasty in the oven.
→ For the Sweet & Savory Marinade
- ¼ cup soy sauce → Use low-sodium to better control the saltiness.
- 3 tablespoons honey → For that perfect touch of sweetness that helps everything caramelize.
- 2 tablespoons rice vinegar → Adds a bright, tangy acidity to balance the sauce.
- 1 tablespoon sesame oil → Toasted sesame oil is best for an incredible, nutty aroma.
- 3 cloves garlic & 1 teaspoon fresh ginger → Minced. These aromatics are the heart of the flavor.
- Salt and pepper → Use sparingly, as the soy sauce is already salty.
- Fresh cilantro → For a final, fresh, herbaceous garnish.
Let’s Get Roasting! Your One-Pan Guide
Ready for the easiest, most flavorful dinner of the week? Let’s get everything on the pan.
Part 1: The Flavorful Marinade
- Preheat and Prep: First, preheat your oven to 400°F (200°C) and place an oven rack in the center position.
- Whisk the Marinade: In a large mixing bowl, whisk together the soy sauce, honey, rice vinegar, sesame oil, minced garlic, and minced ginger. Keep whisking until the honey is fully dissolved and the marinade is smooth and glossy.
- Marinate the Chicken: Add the bite-sized chicken pieces to the bowl with the marinade. Toss thoroughly to ensure every piece is completely coated. Let it sit at room temperature for at least 15 minutes to soak up all that amazing flavor.
Part 2: Assemble and Roast
- Arrange on the Pan: Add the chopped bell peppers and red onion to the bowl with the marinating chicken. Toss everything together. Spread the entire mixture out onto a large, rimmed baking sheet in a single, even layer. It is crucial not to overcrowd the pan! Drizzle any remaining marinade from the bowl over the top.
- First Bake: Place the sheet pan in the preheated oven and bake for 20 minutes.
- Stir and Add Cashews: After 20 minutes, carefully remove the pan from the oven. Use a spatula to give everything a gentle stir. Scatter the unsalted cashews evenly over the chicken and vegetables.
- Finish Roasting: Return the pan to the oven and roast for another 10-15 minutes. The chicken is done when it’s cooked through (165°F on a meat thermometer) and the vegetables have tender, caramelized edges.
Part 3: Garnish and Serve
- Garnish and Serve Hot: Remove the pan from the oven. Garnish generously with fresh, chopped cilantro. Serve immediately, straight from the pan, over a bed of rice, quinoa, or cauliflower rice to soak up the delicious pan juices.
Sheet Pan Cashew Chicken with Peppers and Onions
Ingredients
Equipment
Method
-
Preheat your oven to 400°F (200°C). In a large bowl, whisk together soy sauce, honey, rice vinegar, sesame oil, minced garlic, and ginger until smooth.
-
Add the chicken pieces to the marinade and toss to coat. Let sit for at least 15 minutes.
-
Add the bell peppers and red onion to the bowl and toss everything together. Spread the mixture in a single layer on a large sheet pan. Drizzle with any remaining marinade.
-
Bake for 20 minutes. Remove the pan from the oven and give everything a gentle stir.
-
Scatter the cashews over the chicken and vegetables, then return the pan to the oven for another 10-15 minutes.
-
The chicken should be cooked through (165°F) and the vegetables should be tender with caramelized edges.
-
Remove from oven, garnish with fresh cilantro, and serve hot over rice or your favorite grain.
Notes
Toast the Cashews: Adding the cashews during the last 10-15 minutes of cooking toasts them perfectly without burning.
Meal Prep: Store cooled portions in airtight containers with rice for up to 4 days for quick and delicious lunches.
WiseRecipes’ Top Tips for Perfect Sheet Pan Dinners
These simple secrets are the key to achieving that perfect roast instead of a steamed mess.
- Don’t Crowd the Pan! This is the most important rule of any sheet pan meal. Give your ingredients space! If they are crowded together and stacked, they will steam in their own liquid instead of roasting and caramelizing. Use a large half-sheet pan (18×13 inches) or two smaller pans if needed.
- Cut Everything to a Uniform Size. For even cooking, try to cut your chicken, peppers, and onions into similar 1-inch pieces. This ensures that everything is perfectly cooked at the same time.
- Let the Chicken Marinate. That 15-minute marinade time is not just for flavor; the acidity from the rice vinegar also helps to tenderize the chicken breast, ensuring it stays juicy.
Keep It Fresh! Meal Prep & Storing Instructions
This recipe is a meal prep champion. Here’s how to store it for amazing lunches all week.
- Refrigerator: Once the dish has cooled, store leftovers in an airtight container in the refrigerator for up to 4 days. The flavors will continue to meld and it’s just as delicious the next day.
- Meal Prep Assembly: For perfect grab-and-go lunches, portion the cooled Cashew Chicken into individual meal prep containers with a side of your favorite grain like rice or quinoa. Keep the fresh cilantro garnish in a separate small bag to add after reheating to maintain its fresh flavor.
FAQs: Your Sheet Pan Cashew Chicken Questions, Answered!
Can I use chicken thighs instead of breasts?
Absolutely! Boneless, skinless chicken thighs would be fantastic in this recipe. They are naturally juicier and can be even more forgiving. The cooking time should be about the same; just make sure they reach an internal temperature of 165°F.
Can I add other vegetables to this?
Yes, this is a very versatile recipe! Broccoli florets, sliced mushrooms, or snap peas would all be delicious additions. Just be sure to cut them to a similar size as the other ingredients for even cooking.
How can I make this dish spicy?
Easy! You can add a teaspoon or two of sriracha or a pinch of red pepper flakes to the marinade to give the entire dish a wonderful, warm heat.
Can I use a different kind of nut?
Of course. While cashews are classic, this would also be delicious with unsalted peanuts or even chopped almonds for a different kind of crunch.
Final Thoughts: Your New Weeknight Savior
There is nothing more satisfying than pulling a complete, vibrant, and delicious meal out of the oven on a single pan. This Sheet Pan Cashew Chicken is the perfect solution for busy weeknights when you crave something flavorful and healthy without the fuss. It’s a testament to the magic of simple, fresh ingredients and a hot oven. I hope it becomes a beloved favorite in your home. Happy cooking!
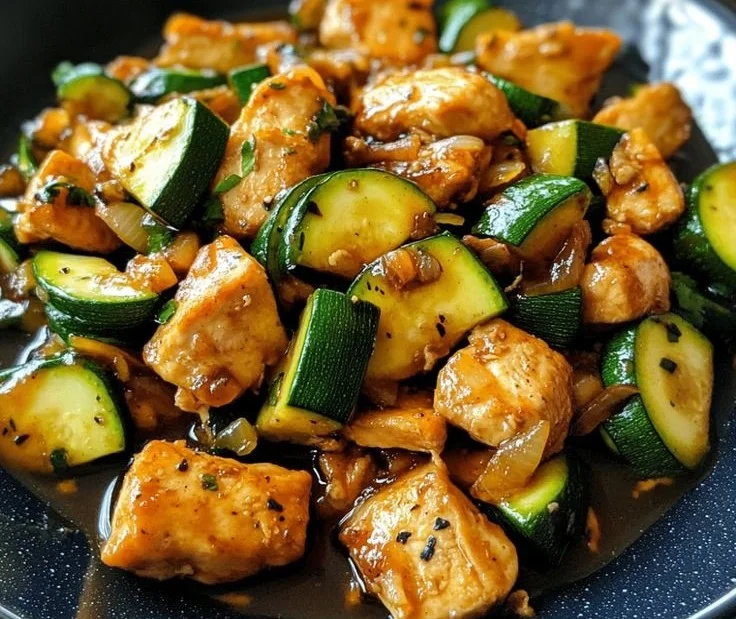
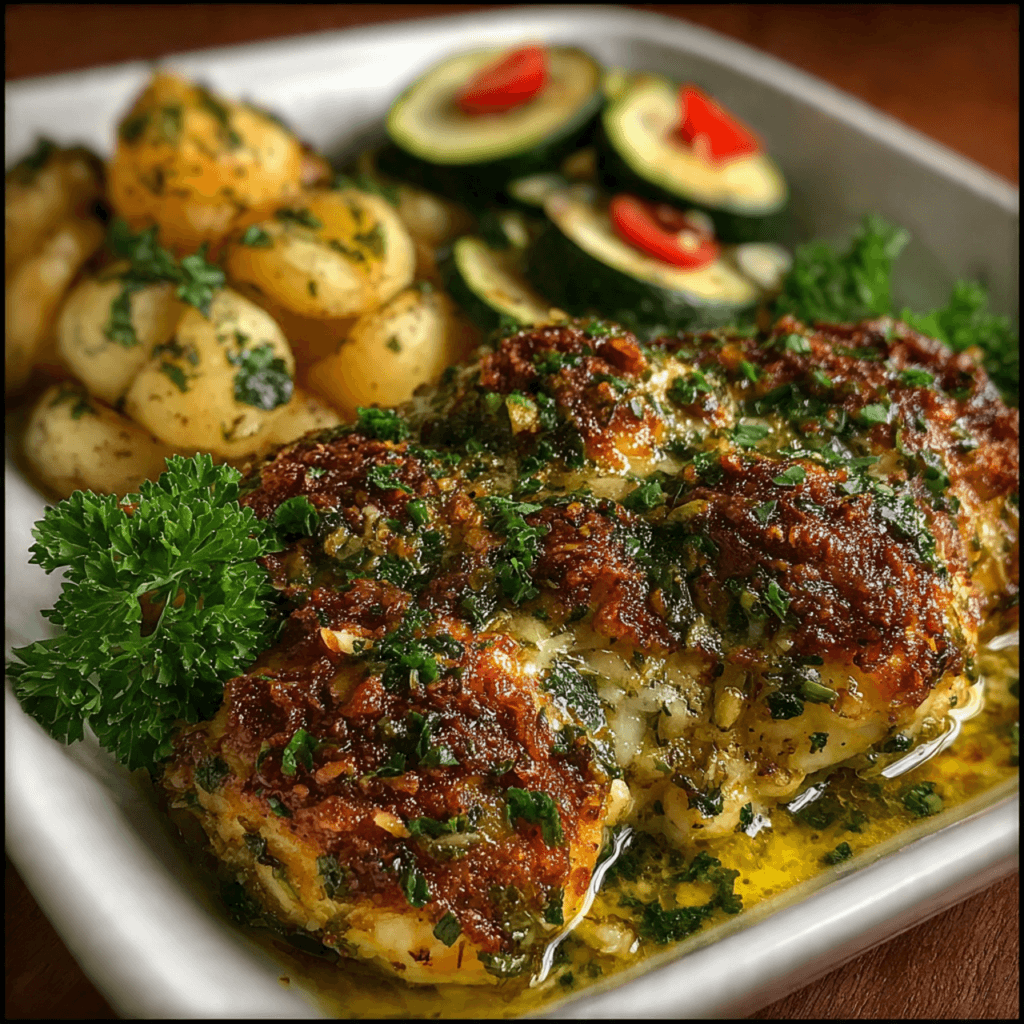
2. The Ultimate Chicken Zucchini Bake (Easy & Healthy Dinner!)

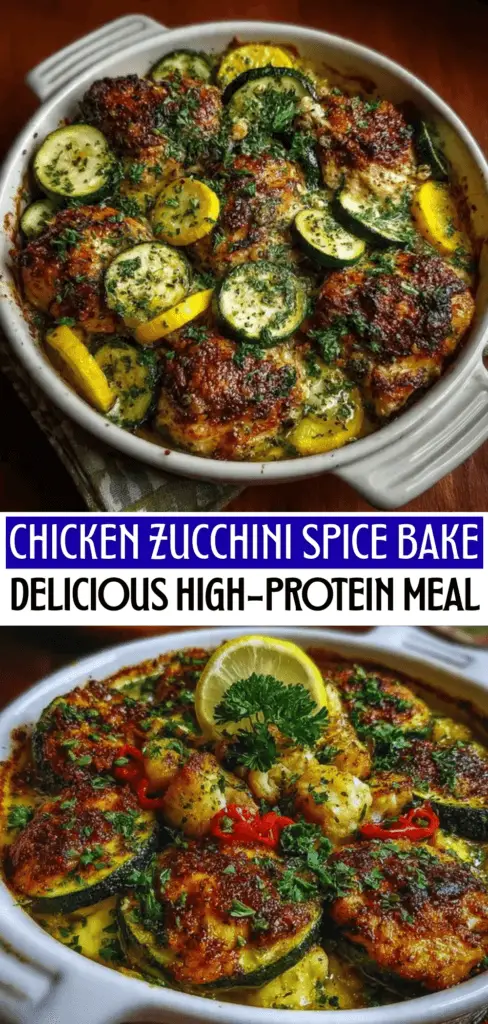
Imagine a simple, vibrant, one-pan dinner that’s bursting with savory flavor, packed with protein, and requires minimal cleanup. That, my friends, is the weeknight-winning magic of this High-Protein Chicken Zucchini Bake. This is, without a doubt, the most delicious and effortless way to get a healthy, satisfying meal on the table, even on your busiest days.
I promise you, there is no greater weeknight victory than pulling this sizzling, aromatic dish from the oven. The chicken becomes incredibly tender and juicy, while the zucchini and onions caramelize at the edges into sweet, savory perfection. It’s a complete, well-rounded meal that tastes like you spent hours on it, but it’s our little secret that it came together in a flash.
Get ready to discover your new go-to healthy dinner, a recipe so simple and flavorful, it will become a staple in your meal rotation.
Why This Chicken Zucchini Bake is a Weeknight Hero
You are going to be completely amazed by how much flavor you can get from such a simple, wholesome dish. It’s a true game-changer. Here’s why:
- Packed with Lean Protein: This dish is loaded with tender chicken breast, making it an incredibly satisfying meal that will keep you full and fueled for hours.
- A True One-Dish Wonder: Everything gets tossed together and baked in a single dish, which means incredible flavor development and, more importantly, minimal cleanup!
- Ready in Under an Hour: With just 15 minutes of active prep, the oven does the rest of the work, giving you a delicious, home-cooked meal in about 45 minutes total.
Recipe Snapshot
| Prep Time | 15 minutes |
| Cook Time | 30 minutes |
| Total Time | 45 minutes |
| Servings | 4 servings |
| Calories | 320 kcal per serving |
| Course | Dinner, Main Course |
| Cuisine | American, Mediterranean |
| Difficulty/Method | Easy / Baking |
Your Shopping List for This Healthy Bake
This vibrant and flavorful dish comes together with a handful of fresh, simple ingredients.

→ For the Chicken and Zucchini Bake
- 1 lb boneless, skinless chicken breasts → Cut into uniform, bite-sized pieces for even cooking.
- 2 medium zucchinis → Diced. The star vegetable of our dish!
- 1 medium onion → Diced, to build a sweet and savory flavor base.
- 2 tablespoons olive oil → To help everything roast and caramelize beautifully.
- 2 cloves garlic → Minced, for that essential aromatic kick.
Let’s Get Baking! Your Step-by-Step Guide
Ready for the easiest, most flavorful one-pan dinner? Let’s toss it all together.
Part 1: Season Everything Up
- Preheat and Prep: First, preheat your oven to 375°F (190°C). Lightly grease a large baking dish (a 9×13-inch dish is perfect) with olive oil or cooking spray.
- Combine the Main Ingredients: In a large mixing bowl, combine the bite-sized chicken pieces, diced zucchini, and diced onion.
- Add the Flavor: Drizzle the olive oil over the mixture. Sprinkle in the minced garlic, smoked paprika, cumin, oregano, salt, and pepper. Toss everything together thoroughly until every single piece of chicken and vegetable is well-coated in the oil and spices.
Part 2: Bake to Golden Perfection
- Spread and Bake: Transfer the seasoned mixture to your prepared baking dish and spread it out into a single, even layer. It’s important not to overcrowd the dish!
- Bake Until Tender: Place the dish in the preheated oven and bake for 25-30 minutes. The chicken should be cooked through (reaching an internal temperature of 165°F) and the zucchini should be tender.
- The Caramelization Step (Optional but Recommended!): For those beautiful, golden-brown, caramelized edges, switch your oven to the broil setting for the last 2-3 minutes of cooking. Watch it like a hawk to prevent it from burning!
- Rest, Garnish, and Serve: Carefully remove the dish from the oven. Immediately sprinkle with the fresh chopped cilantro or parsley and an extra pinch of smoked paprika for color. Let it rest for 3-4 minutes, then serve hot over a bed of cooked rice to soak up all the delicious juices.
One-Dish Chicken and Zucchini Bake with Savory Spices
Ingredients
Equipment
Method
-
Preheat your oven to 375°F (190°C) and lightly grease a large baking dish.
-
In a large mixing bowl, combine the bite-sized chicken pieces with diced zucchini and onion. Drizzle with olive oil, then add minced garlic, smoked paprika, cumin, oregano, salt, and pepper. Toss thoroughly until everything is well-coated.
-
Transfer the seasoned mixture to your prepared baking dish, spreading it in a single, even layer.
-
Bake for 25-30 minutes, until the chicken is cooked through (165°F) and the zucchini is tender.
-
For a more golden, caramelized finish, switch the oven to the broil setting and broil for 2-3 minutes, watching carefully to prevent burning.
-
Remove from oven and immediately sprinkle with fresh chopped herbs and an extra pinch of smoked paprika. Let rest for 3-4 minutes before serving over rice.
Notes
Don’t Crowd the Pan: Spreading the ingredients in a single layer is key to roasting and caramelizing, rather than steaming.
Meal Prep: Store cooled portions in airtight containers with rice for up to 4 days for easy, healthy lunches.
WiseRecipes’ Top Tips for the Perfect Bake
These simple secrets will ensure your chicken and zucchini are juicy, flavorful, and perfectly cooked.
- Don’t Crowd the Pan. This is the golden rule of roasting! Spreading your ingredients in a single, even layer allows them to roast and caramelize. If the pan is too crowded, the ingredients will steam, resulting in a soggy texture. Use a larger dish or two smaller ones if needed.
- For Extra-Dry Zucchini, Salt It First. As the recipe notes, this optional step is a game-changer if you’re worried about watery results. Tossing the diced zucchini with salt and letting it sit in a colander for 15 minutes draws out a significant amount of excess moisture. Just be sure to pat it dry!
- Cut Everything to a Uniform Size. For even cooking, try to cut your chicken and zucchini pieces to a similar bite-sized dimension. This ensures that everything is perfectly cooked at the same time.
- Don’t Skip the Broiler Finish. That final 2-3 minutes under the broiler is what takes this dish from simply “cooked” to “beautifully roasted.” It creates those delicious, slightly charred, and caramelized edges that add so much flavor.
- Let It Rest. That short 3-4 minute rest after it comes out of the oven is important. It allows the juices in the chicken to redistribute, ensuring every bite is as moist and tender as possible.
Keep It Fresh! Meal Prep & Storing Instructions
This dish is an absolute champion for meal prep. Here’s how to do it right.
- Refrigerator: Once the bake has cooled, you can store it in an airtight container in the refrigerator for up to 4 days. It reheats beautifully.
- Meal Prep Assembly: For the best results, you can portion the cooled chicken and zucchini bake into individual meal prep containers with a side of cooked rice. Keep the fresh herb garnish in a small baggie to sprinkle on after reheating to maintain its fresh flavor.
- Reheating: Simply microwave individual portions for 1-2 minutes until heated through.
FAQs: Your Chicken Zucchini Bake Questions, Answered!
Can I use chicken thighs instead of breasts?
Absolutely! Boneless, skinless chicken thighs would be fantastic in this recipe. They are naturally juicier and can be even more forgiving. The cooking time should be about the same; just make sure they reach an internal temperature of 165°F.
How do I stop my zucchini from getting too soggy?
The two most important tips are to not overcrowd the pan and to use the optional salting method described in the recipe. Drawing out the water before baking makes a huge difference in the final texture of the zucchini.
Can I add cheese to this?
Yes, and it would be delicious! For a cheesy version, you could sprinkle some grated Parmesan or a shredded Italian cheese blend over the top during the last 5-10 minutes of baking.
What other vegetables would work well in this bake?
This is a very versatile recipe! Bell peppers (any color), cherry tomatoes, broccoli florets, or chopped asparagus would all be fantastic additions or substitutions. Just be mindful of cooking times for different vegetables.
Final Thoughts: Your New Favorite Healthy Dinner
There is nothing more satisfying than finding a recipe that is healthy, delicious, and incredibly easy to make. This High Protein Chicken Zucchini Bake checks all the boxes. It’s a perfect, well-rounded meal that’s packed with flavor and nourishing ingredients. I hope it becomes a go-to favorite for your busy weeknights. Happy cooking!
3. The Ultimate Chipotle Tahini Bowls (Healthy Dinner Bowls!)
If you have been stuck in a food rut, eating the same old salads or sandwiches, prepare to have your tastebuds woken up. These Chipotle Tahini Bowls are the definition of flavor-packed, satisfying, and vibrant eating. We are talking about crispy roasted sweet potatoes, massaged kale, nutty quinoa, and perfectly jammy soft-boiled eggs. But the real star? It is the Chipotle Tahini Sauce. It is smoky, spicy, creamy, and has a secret splash of citrus that makes it absolutely addictive.
I promise you, mastering the “build-your-own-bowl” technique is the best thing you can do for your meal prep routine. The roasted sweet potatoes (made extra crispy with a special cornstarch trick!) and the sauce can be made ahead, meaning you can assemble a gourmet-level lunch or dinner in minutes. It’s nourishing, colorful, and proof that clean eating can be incredibly exciting.
Get ready to meet your new favorite sauce. You are going to want to put it on everything.

Why These Are the Best Healthy Dinner Bowls You’ll Make
You are going to be completely obsessed with the bold flavors in this bowl. It’s a standout recipe for so many reasons:
- The “Magic” Sauce: The Chipotle Tahini sauce is a game-changer. The combination of sesame paste, spicy chipotles, and sweet orange juice creates a unique, creamy dressing that is totally vegan and bursting with flavor.
- The Crispy Potato Hack: This recipe uses a brilliant trick of tossing sweet potatoes in cornstarch before roasting. The result? Crispy, caramelized edges that mimic deep-fried texture without the guilt.
- Perfectly Jammy Eggs: A soft-boiled egg with a jammy yolk adds a rich, saucy element to the bowl that feels incredibly luxurious and adds a great protein boost.
- Meal Prep Friendly: Every component—the sauce, the grains, the potatoes, and the eggs—can be prepped in advance, making this the ultimate grab-and-go healthy lunch.
- Versatile and Forgiving: While the recipe suggests specific veggies, this bowl is a perfect canvas for whatever produce you have on hand. Roasted broccoli, cauliflower, or peppers would all fit right in.
Recipe Snapshot
| Prep Time | 5 minutes |
| Cook Time | 15 minutes |
| Total Time | 20 minutes |
| Servings | 6 servings |
| Calories | 449 kcal per serving |
| Course | Dinner, Lunch |
| Cuisine | Mexican-Inspired / Fusion |
| Difficulty/Method | Easy / Roasting & Blending |
Your Shopping List for Flavorful Bowls
This recipe combines fresh produce with some powerful pantry staples to create a vibrant meal.

→ For the Chipotle Tahini Sauce
- ½ cup olive oil → The base of our emulsion.
- ¼ cup tahini → Sesame seed paste adds creaminess and nuttiness without dairy.
- 1–2 chipotles in adobo sauce → These canned peppers provide the signature smoke and heat. Start with one if you are sensitive to spice!
- Juice of 1 orange → About ¼ cup. This adds a necessary sweetness and acidity to balance the spice.
- 1 small clove garlic → For a savory kick.
- ½ teaspoon salt → Plus more to taste.
- ¼ cup water → To thin the sauce to the perfect drizzling consistency.
→ For the Bowl Components
- 2-3 large sweet potatoes → Peeled and cubed.
- 1 tablespoon cornstarch → The secret ingredient for crispy roasted potatoes!
- Eggs → Plan for 1-2 per bowl.
- Kale → Or your favorite green, massaged or lightly sautéed.
- Quinoa → Cooked fluffy and warm.
- Avocado → For cool, creamy contrast.
Let’s Build a Bowl! Your Step-by-Step Guide
Ready to create a bowl that hits every flavor note? Let’s get cooking!
Part 1: The Crispy Sweet Potatoes
- Preheat and Toss: Preheat your oven to 450°F. Peel and cube your sweet potatoes. Here is the secret: Toss the cubes with 1 tablespoon of cornstarch first until coated. This absorbs surface moisture. THEN toss with olive oil and salt.
- Roast: Spread them on a parchment-lined baking sheet. Roast for 20 minutes, give them a gentle stir, and roast for another 10-15 minutes. You will end up with brown, crispy, irresistible potatoes.
Part 2: The Magic Sauce
- Blend: In a food processor or blender, combine the olive oil, water, tahini, chipotle peppers (start with one if you’re unsure!), garlic, orange juice, and salt.
- Pulse: Pulse until completely smooth and creamy. Taste it! Needs more kick? Add another pepper. Too thick? Add a splash more water. Set aside.

Part 3: The Perfect Jammy Eggs
- Boil: Bring a pot of water to a gentle boil (enough to cover the eggs by an inch).
- Cook: Gently lower your eggs into the water. Set a timer for exactly 6 ½ minutes. This creates a set white and a jammy, runny yolk.
- Ice Bath: Immediately remove the eggs and plunge them into a bowl of ice water to stop the cooking. Once cool, peel and slice in half.
Part 4: Assemble
- Build: Create a base with your quinoa and massaged kale. Add a generous scoop of the crispy sweet potatoes, slices of avocado, and your stunning jammy eggs.
- Drizzle: Smother everything generously with the Chipotle Tahini Sauce. Enjoy the explosion of flavors!

Chipotle Tahini Bowls
Ingredients
Equipment
Method
-
Combine olive oil, water, tahini, chipotles, garlic, orange juice, and salt in a food processor.
-
Pulse until completely smooth. Taste and adjust seasoning if needed.
-
Preheat oven to 450°F. Toss sweet potato cubes with cornstarch to coat. Then toss with olive oil and salt. Roast on a parchment-lined sheet for 20 minutes, stir, then roast 10-15 minutes more until brown and crispy.
-
Bring a pot of water to a gentle boil. Add eggs and cook for 6 1/2 minutes. Transfer to an ice bath to cool, then peel and slice.
-
Build bowls with a base of quinoa and kale. Top with roasted sweet potatoes, avocado slices, and a soft-boiled egg.
-
Smother everything generously with the Chipotle Tahini Sauce.
Notes
Perfect Eggs: For that jammy yolk, 6 and a half minutes is the sweet spot. An ice bath immediately after cooking is essential to stop the cooking process.
Sauce Flavor: The orange juice is the secret ingredient here—it adds sweetness and acidity that balances the smoky heat of the chipotles perfectly.
WiseRecipes’ Top Tips for Bowl Perfection
These simple secrets will ensure your healthy dinner bowls are restaurant-quality.
- Don’t Skip the Cornstarch. It sounds unusual, but tossing the sweet potatoes in cornstarch before oil is the only way to get them truly crispy in the oven without deep frying. It makes a huge texture difference.
- Massage Your Kale. Raw kale can be tough. Put it in a bowl with a tiny drizzle of oil and a pinch of salt, then rub it with your hands for 30 seconds. It will turn bright green and become tender and sweet.
- Control the Spice. Chipotles in adobo are spicy! Start with one pepper, blend, and taste. You can always add more, but you can’t take it out. The orange juice helps tame the heat, but go slow.
- Meal Prep the Eggs. You can boil a whole batch of 6 ½ minute eggs at once. Keep them in the fridge (unpeeled) for up to 3 days. They make a perfect protein snack or bowl topper on the fly.
- Sauce Consistency. Tahini brands vary in thickness. If your sauce is too thick to drizzle, just whisk in water, one tablespoon at a time, until it reaches a pourable consistency.
Creative Twists: Customize Your Bowl
This bowl is very flexible. Here are some ideas to switch it up:
- Make it Vegan: Simply swap the soft-boiled eggs for roasted chickpeas or crispy tofu cubes. The sauce is already naturally vegan!
- Change the Base: Swap quinoa for brown rice, farro, or even cauliflower rice for a lighter option.
- Add Crunch: Top the bowl with toasted pumpkin seeds (pepitas) or sunflower seeds for an extra textural element.
Keep It Fresh! Storing Your Meal Prep
These bowls are excellent for preparing ahead of time.
- Refrigerator: Store the roasted potatoes, cooked quinoa, and sauce in separate airtight containers. They will keep for up to 4-5 days. Store the eggs unpeeled if possible, or peeled in a sealed container for 3 days.
- Reheating: Reheat the quinoa and potatoes in the microwave or a skillet. Add the cold kale, avocado, and egg afterwards. The sauce can be used cold or at room temperature.
- Freezing: You can freeze the sauce! Pour it into an ice cube tray for individual portions. I do not recommend freezing the cooked eggs or fresh avocado.
FAQs: Your Chipotle Bowl Questions, Answered!
What is tahini?
Tahini is a paste made from ground sesame seeds. It’s a staple in Middle Eastern cooking (think hummus!) and adds a rich, nutty creaminess to sauces without using dairy.
Can I use lime juice instead of orange juice?
You can, but it will change the flavor profile. Orange juice provides a specific sweetness that balances the smoky heat of the chipotles perfectly. If using lime, you might need to add a teaspoon of honey or maple syrup to balance the acidity.
Where do I find chipotles in adobo?
They are found in small cans in the “International” or “Latin” aisle of almost any major grocery store. They are jalapeños that have been smoked and dried, then canned in a tangy tomato sauce.
Is this recipe gluten-free?
Yes! As long as you use gluten-free tamari or ensure your spices are GF certified, every ingredient in this bowl—quinoa, potatoes, veggies, eggs, and the sauce—is naturally gluten-free.
Final Thoughts: A Bowl Full of Flavor
Healthy eating doesn’t have to be boring, and it certainly doesn’t have to be bland. These Chipotle Tahini Bowls are proof that you can have a nourishing meal that explodes with smoky, sweet, and savory flavors. It’s a meal that feels good to eat and fun to make. I hope this sauce becomes a new staple in your fridge! Happy cooking!
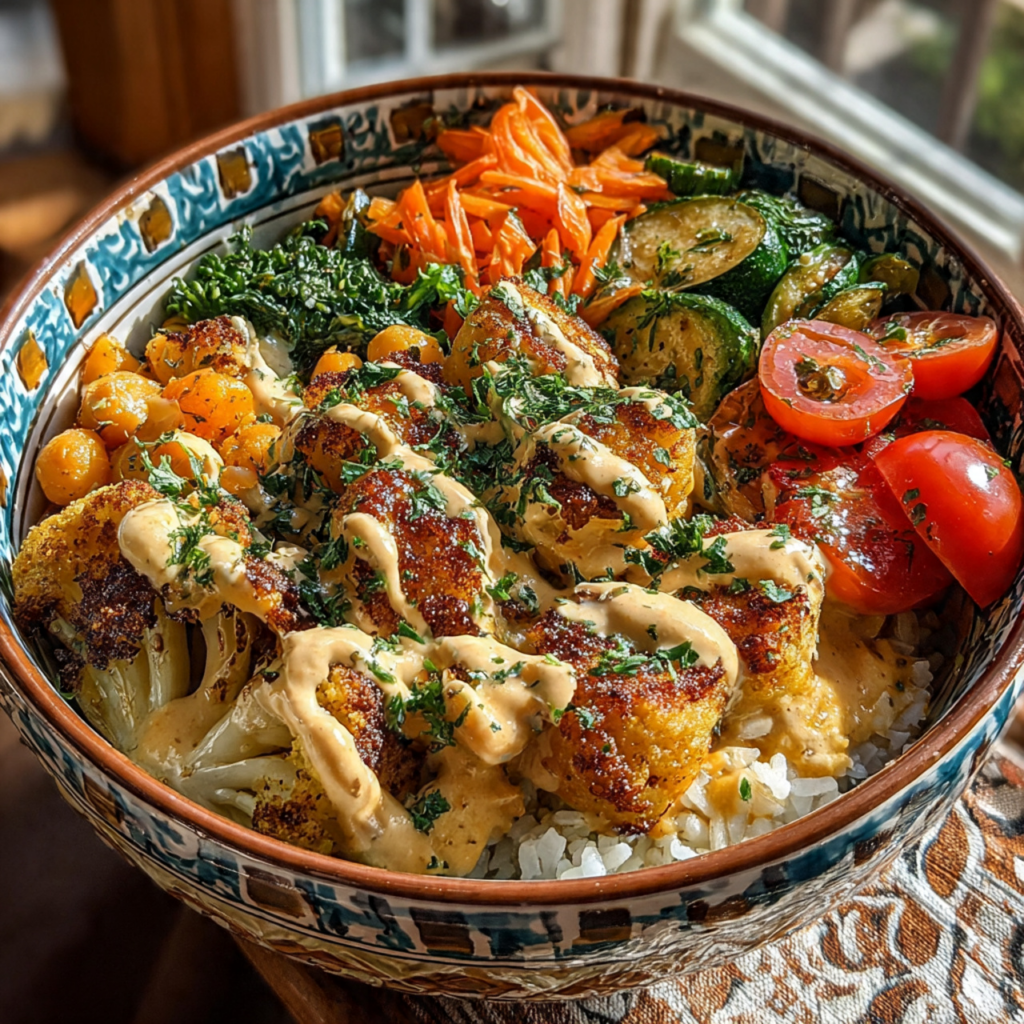
4. The Ultimate Roasted Vegetable Bowls with Green Tahini (Healthy Dinner Bowls!)
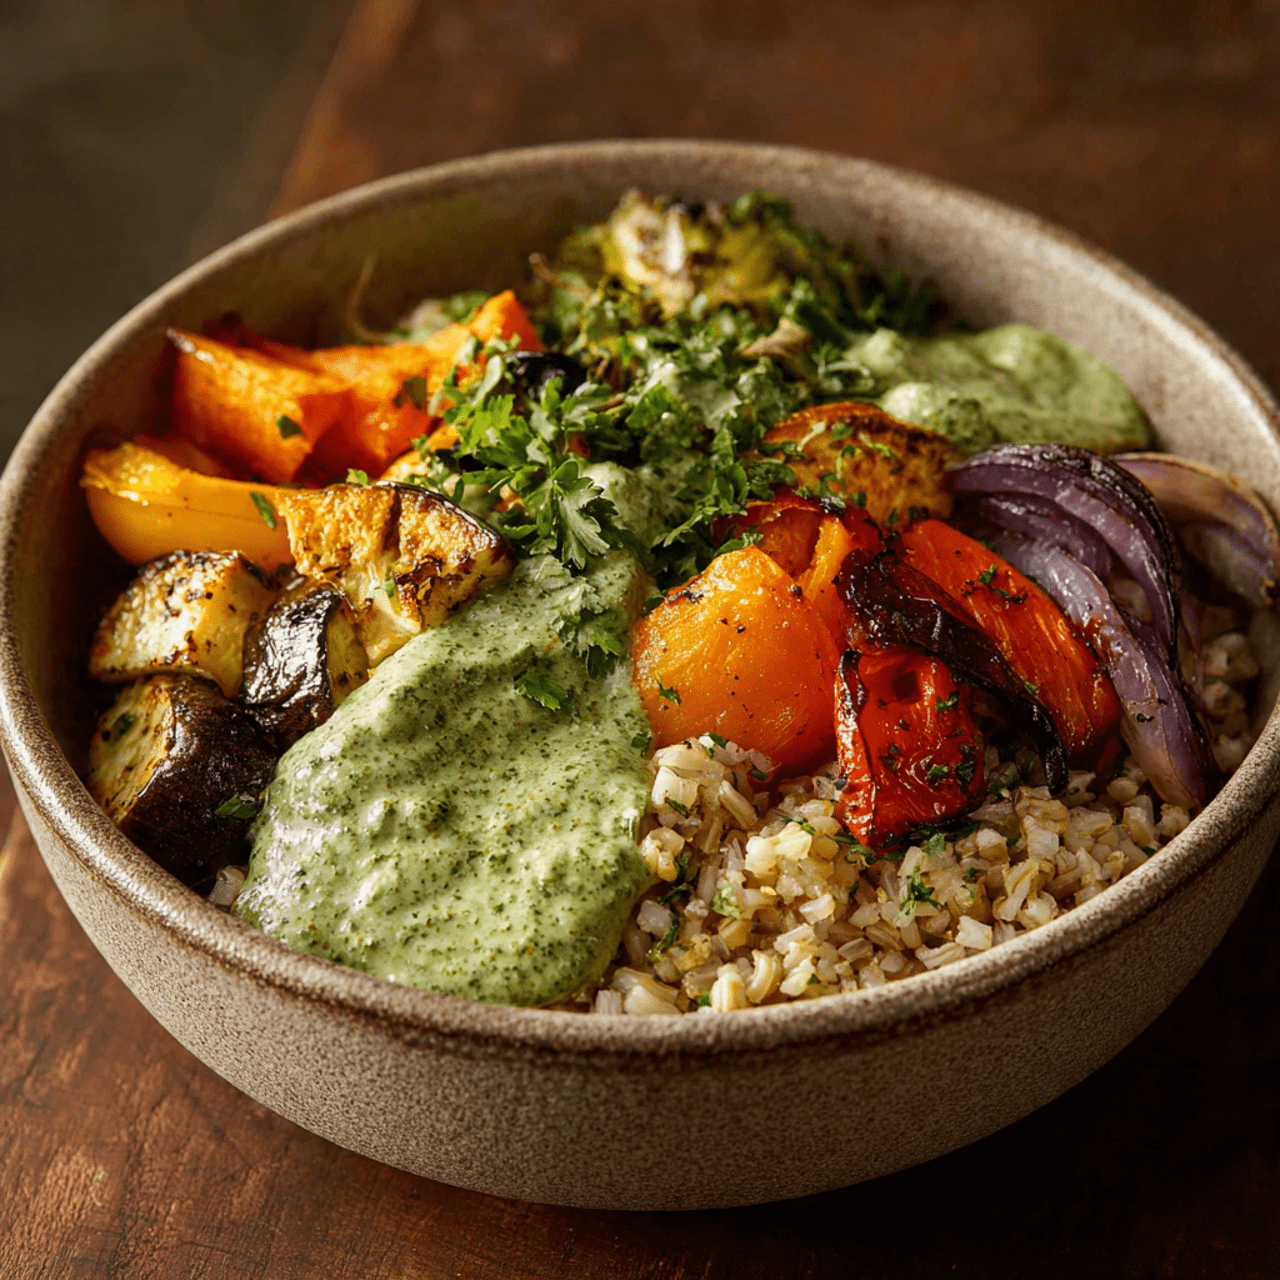
There is a moment around 5:00 PM on a Tuesday when the “what’s for dinner” panic sets in. You want something nourishing, something that makes you feel vibrant and energized, but you also want something that tastes incredible. That is exactly where these Roasted Vegetable Bowls come in. If you are looking for the gold standard of healthy dinner bowls, this is it. We are talking about caramelized, golden-edged root vegetables, crispy broccoli and cauliflower, and a Green Tahini sauce so good I could practically drink it.
I promise you, opening your fridge to find these colorful roasted veggies and a jar of that green magic waiting for you is the best feeling. Whether you serve them over grains, with eggs for breakfast, or just as they are, these bowls are satisfying, wholesome, and deeply delicious. It’s clean eating that feels abundant, not restrictive.
Get ready to master the art of the sheet pan and the blender. This is the recipe that will make you actually look forward to eating your vegetables.

Why These Will Be Your New Favorite Healthy Dinner Bowls
You are going to be completely obsessed with how versatile and flavorful this meal is. It is a staple in my kitchen for so many reasons:
- The “Magic” Green Sauce: This isn’t just tahini; it’s a blended emulsion of herbs, garlic, and lemon that tastes amazing on literally everything. It instantly elevates simple roasted veggies to restaurant quality.
- Strategic Roasting: By grouping vegetables with similar cooking times (potatoes with carrots, broccoli with cauliflower), we ensure everything is cooked perfectly—no mushy broccoli or crunchy potatoes here!
- Meal Prep Perfection: These bowls are designed to be made ahead. The roasted vegetables hold their texture well in the fridge, and the flavors of the sauce meld and deepen over time.
- Nutrient Dense and Colorful: This is “eating the rainbow” in the truest sense. You get beta-carotene, fiber, healthy fats, and vitamins in every single bite.
- Naturally Gluten-Free and Vegetarian: It’s a crowd-pleaser that fits almost any dietary requirement, and can easily be made vegan by omitting the optional egg.
Recipe Snapshot
| Prep Time | 15 minutes |
| Cook Time | 30 minutes |
| Total Time | 45 minutes |
| Servings | 6 bowls |
| Calories | 322 kcal per serving |
| Course | Dinner, Lunch |
| Cuisine | Vegetarian / Mediterranean-Inspired |
| Difficulty/Method | Easy / Roasting |
Your Shopping List for Vegetable Perfection
This recipe uses whole, fresh produce and a few pantry staples to create a vibrant meal.

→ For the Roasted Vegetables
- 8 large carrots → Peeled and chopped. They become wonderfully sweet when roasted.
- 3 golden potatoes → Chopped. Yukon golds are perfect here for their creamy interior.
- 1 head of broccoli & 1 head of cauliflower → Cut into florets. These provide the crunch and texture.
- Olive oil and salt → The essentials for roasting.
→ For the Green Tahini Sauce
- ¼ cup tahini → Sesame seed paste. Look for a brand that is smooth and runny, not stiff.
- ½ cup olive oil → Use a mild-tasting olive oil here so it doesn’t overpower the herbs.
- 1 big bunch cilantro and/or parsley → Use the leaves and the tender stems for maximum flavor and color.
- 1 clove garlic → Fresh is best for that spicy kick.
- ½ lemon → Juiced (about 2 tablespoons). Adds the necessary brightness.
- ½ cup water → To thin the sauce to the perfect drizzling consistency.
→ Optional Extras (To Bulk It Up!)
- 6 hard-boiled eggs → A great vegetarian protein boost.
- 3 avocados → For creamy, healthy fats.
- Cooked grains → Quinoa, brown rice, or farro make this a heartier meal.
Let’s Cook! Your Step-by-Step Guide
Ready to fill your kitchen with the smell of roasting veggies? Let’s get these trays in the oven.
Part 1: The Roasted Vegetables
- Preheat and Prep: Preheat your oven to 425°F. This high heat is crucial for caramelization. Line a few baking sheets with parchment paper for easy cleanup.
- Chop and Arrange: Chop your vegetables. Arrange them on the baking sheets. Pro Tip: Group the dense root vegetables (carrots and potatoes) on one sheet, and the cruciferous veggies (broccoli and cauliflower) on another. This allows you to control the cooking time for each group.
- Season and Roast: Toss the vegetables generously with olive oil and salt right on the pans. Roast for 25-30 minutes. I personally like to go a little longer—up to 40 minutes—for the potatoes and carrots to get them deeply browned and crispy edges. Check the broccoli and cauliflower earlier so they don’t burn.
Part 2: The Green Tahini Sauce
- Combine: While the veggies are roasting, combine the mild olive oil, water, tahini, cilantro (and/or parsley), garlic clove, lemon juice, and salt in a blender or food processor.
- Blitz: Blend on high until the sauce is completely smooth and a vibrant, bright green color. Taste and add more salt or lemon if needed. It should be punchy!
Part 3: Assemble the Bowls
- Build: Divide the roasted veggies among bowls. If you are using grains, lay those down first.
- Top and Drizzle: Add your optional proteins like hard-boiled eggs or slices of avocado. Drizzle everything generously with the Green Tahini sauce.
- Store: If meal prepping, let the veggies cool completely before storing them in containers. Keep the sauce in a separate jar and drizzle it on just before eating.
Roasted Vegetable Bowls with Green Tahini
Ingredients
Equipment
Method
-
Preheat the oven to 425 degrees F. Line baking sheets with parchment paper.
-
Arrange vegetables on the baking sheets, keeping root vegetables (carrots, potatoes) separate from cruciferous vegetables (broccoli, cauliflower) for easier timing. Toss with olive oil and salt.
-
Roast for 25-30 minutes. For deeper browning, roast carrots and potatoes for up to 40 minutes, removing broccoli/cauliflower earlier if needed.
-
While vegetables are roasting, combine olive oil, water, tahini, herbs, garlic, lemon juice, and salt in a blender or food processor.
-
Blitz until completely smooth and bright green. Taste and adjust salt or lemon if needed.
-
Divide roasted vegetables among bowls. Top with optional hard boiled eggs and avocado. Drizzle generously with Green Tahini sauce.
Notes
Sauce Consistency: The sauce should be pourable. If it’s too thick, add water one tablespoon at a time. If too thin, add a little more tahini.
Meal Prep: Store the sauce and roasted veggies in separate containers. Assemble fresh for each meal.
WiseRecipes’ Top Tips for the Best Vegetable Bowls
These simple secrets will ensure your bowls are flavorful, never soggy, and perfectly cooked.
- Don’t Crowd the Pan. This is the golden rule of roasting! If the vegetables are touching or piled on top of each other, they will steam instead of roast. Use two or even three baking sheets if you need to. You want air to circulate around each piece for crispy edges.
- Separate by Density. As the recipe suggests, keep potatoes and carrots separate from broccoli and cauliflower. Root veggies take longer to cook. By separating them, you can pull the broccoli out when it’s perfectly crisp-tender while letting the potatoes get golden and soft.
- Dry Your Herbs. For the green sauce, make sure your cilantro and parsley are washed and dried well. Excess water on the herbs can make the sauce taste watered down and less vibrant.
- Customize the Sauce Thickness. The ½ cup of water creates a pourable dressing. If you want a thicker dip-style sauce, start with ¼ cup of water and add more slowly until you reach your desired consistency.
- Season After Roasting. While we salt the veggies before roasting, give them a taste when they come out of the oven. A final sprinkle of flaky sea salt or a crack of black pepper can really wake up the flavors.
Creative Twists: Make It Your Own
These bowls are incredibly versatile. Here is how to switch them up:
- Add a Grain Base: To make these healthy dinner bowls even more filling, serve the veggies over a bed of brown rice, quinoa, farro, or couscous.
- Change the Protein: While eggs are great, this is amazing with roasted chickpeas (throw them on the sheet pan!), grilled chicken strips, or seared halloumi cheese.
- Spice it Up: Toss the vegetables with cumin, smoked paprika, or chili powder before roasting for a smoky, spicy kick.
Keep It Fresh! Storing Your Meal Prep
This recipe is designed for the week ahead.
- Refrigerator: Store the roasted vegetables in airtight containers for up to 5 days. Store the Green Tahini sauce in a glass jar for up to 1 week. It may separate slightly; just give it a good shake or stir before using.
- Reheating: You can eat these bowls cold, room temperature, or warm. To reheat, pop the veggies (and grains if using) in the microwave or warm them in a skillet. Add the avocado and sauce after reheating.
- Freezing: I do not recommend freezing this specific mix. Roasted potatoes and zucchini tend to get mushy when thawed, and the emulsion in the tahini sauce can break.
FAQs: Your Healthy Bowl Questions, Answered!
Is this recipe vegan?
The roasted vegetables and the Green Tahini sauce are 100% vegan! The recipe lists hard-boiled eggs as an optional extra; simply omit them or swap for chickpeas or tofu to keep the entire meal vegan.
Can I use frozen vegetables?
You can, but the texture will be different. Frozen broccoli and cauliflower tend to be softer and release more water when roasted. For the best “crispy” result, fresh vegetables are superior. If using frozen, do not thaw them first; roast them straight from frozen at a high temperature.
My tahini sauce is bitter. Why?
Tahini can sometimes have a bitter edge. This is usually balanced by the lemon juice and salt. If it still tastes bitter to you, try adding a teaspoon of maple syrup or honey to the blender. It won’t make the sauce sweet, but it will neutralize the bitterness.
What kind of olive oil should I use for the sauce?
Use a “light” or mild-tasting olive oil. A very robust, peppery extra-virgin olive oil can sometimes be too overpowering when blended with the garlic and tahini. You want the herbs to shine!
Final Thoughts: A Bowl of Vibrant Health
There is something deeply satisfying about a meal that is as colorful as it is nutritious. These Roasted Vegetable Bowls with Green Tahini are a celebration of whole foods, simple cooking, and big flavors. They prove that eating well doesn’t have to be complicated or boring. I hope this recipe becomes a staple in your meal prep routine, bringing a little bit of green, gold, and deliciousness to your week. Happy roasting!
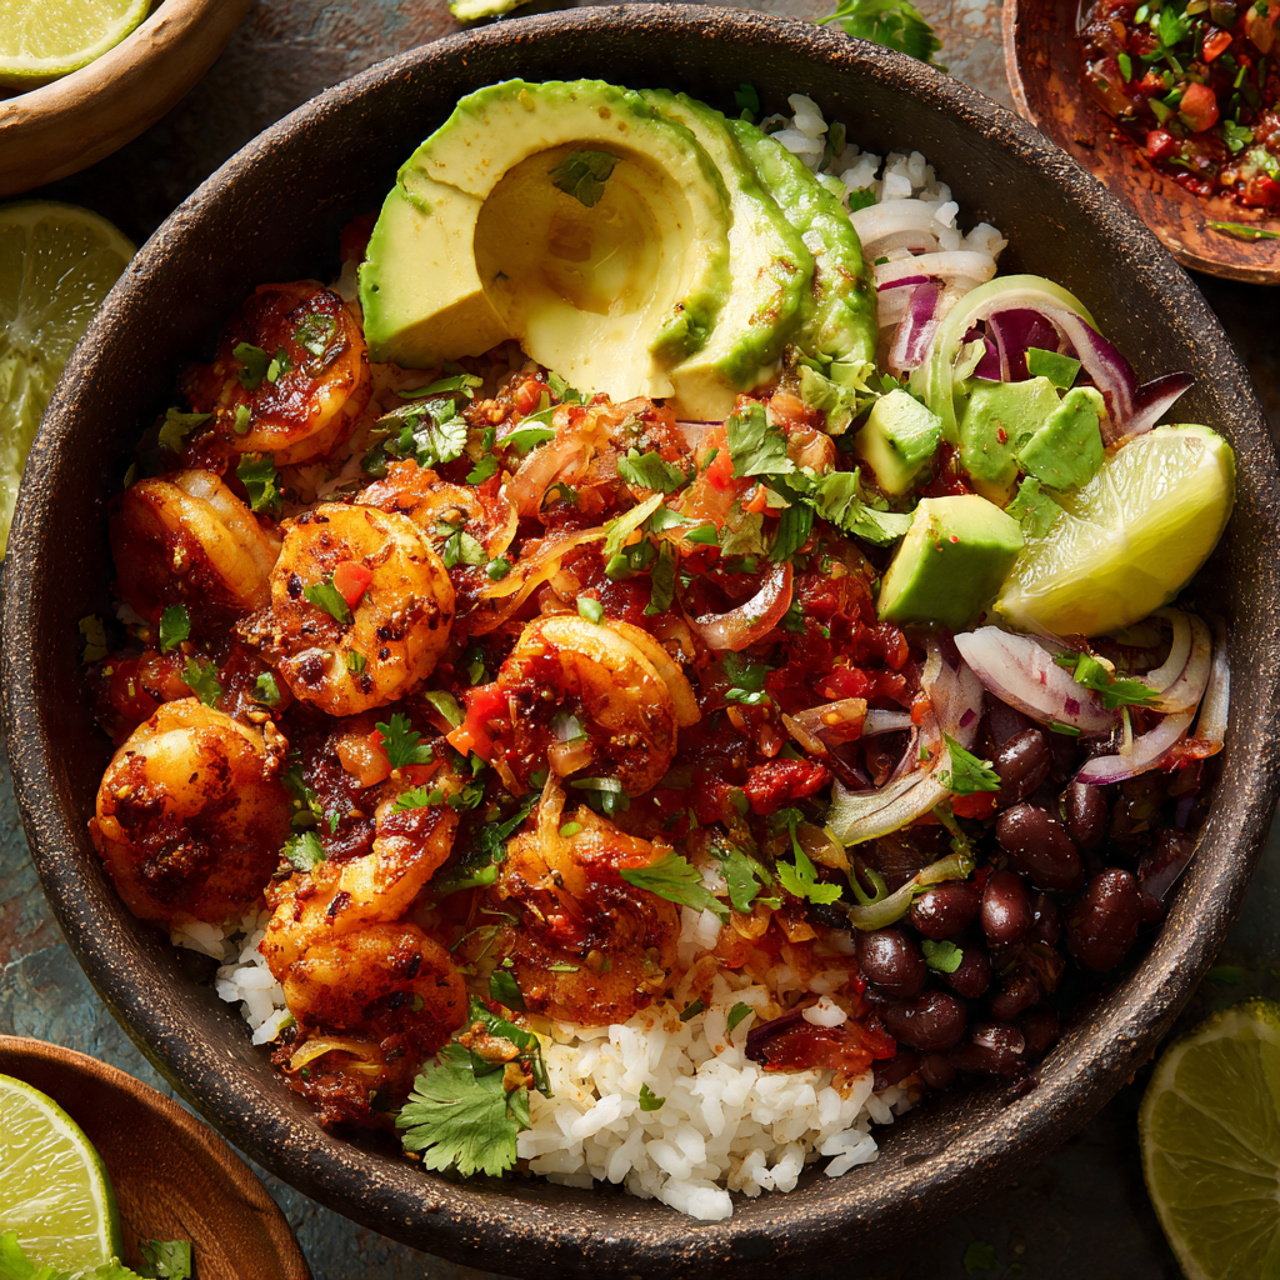
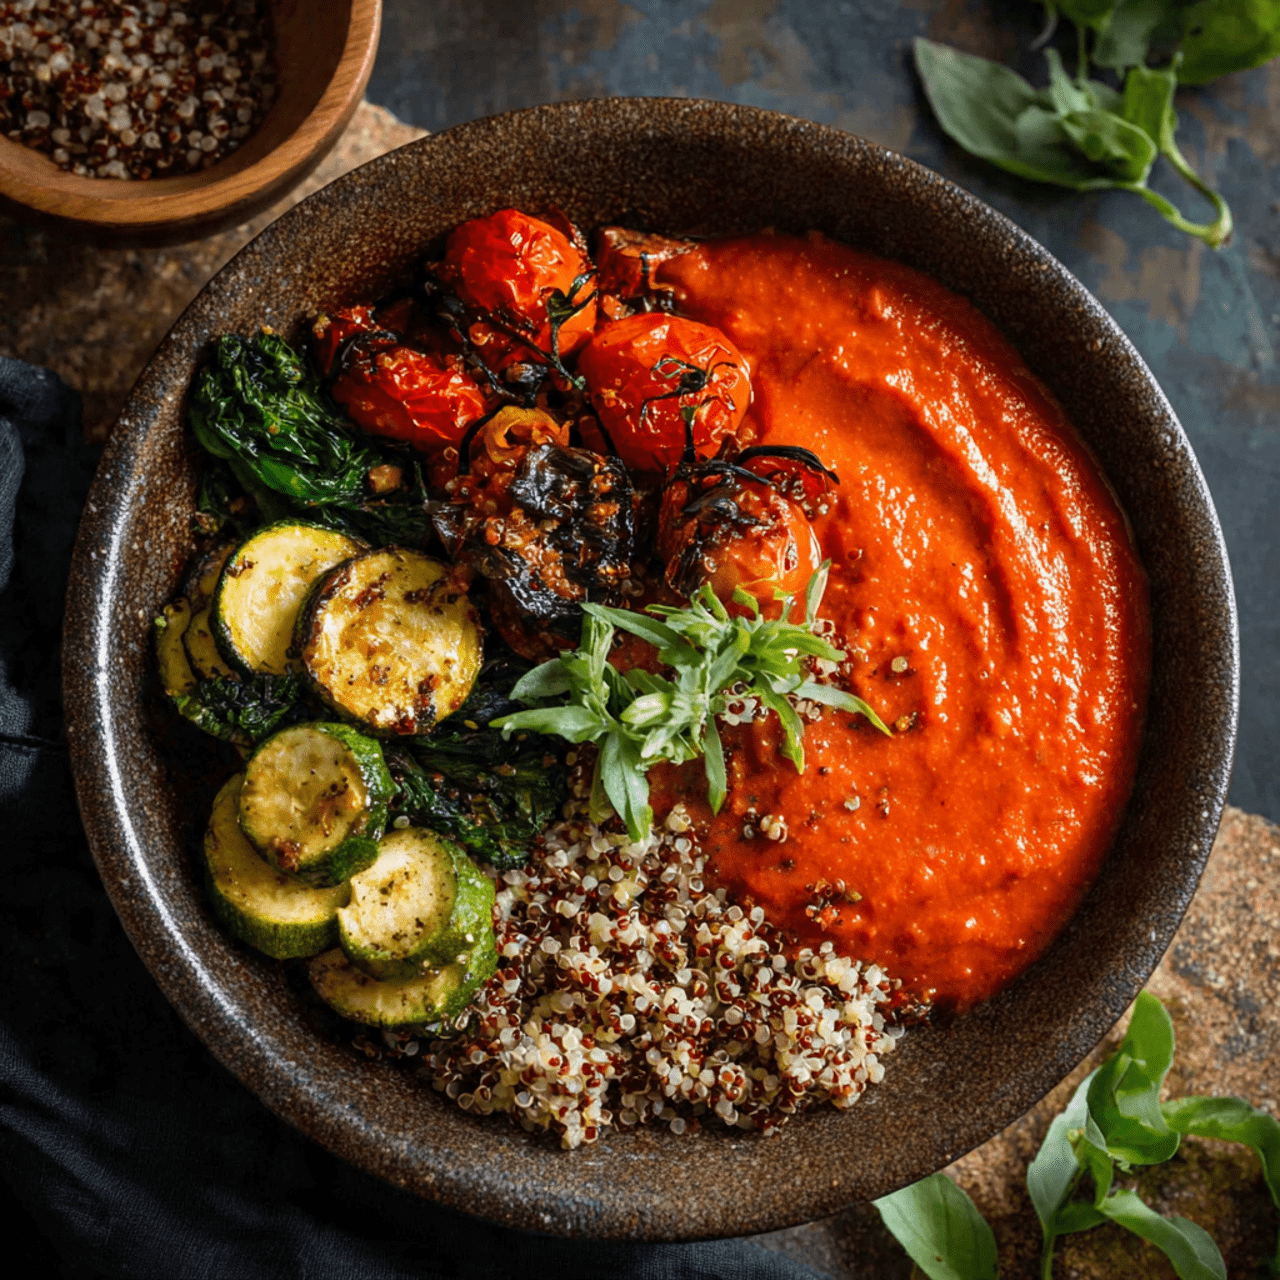
5. The Ultimate Spicy Shrimp Veracruz Bowls (Healthy Dinner!)
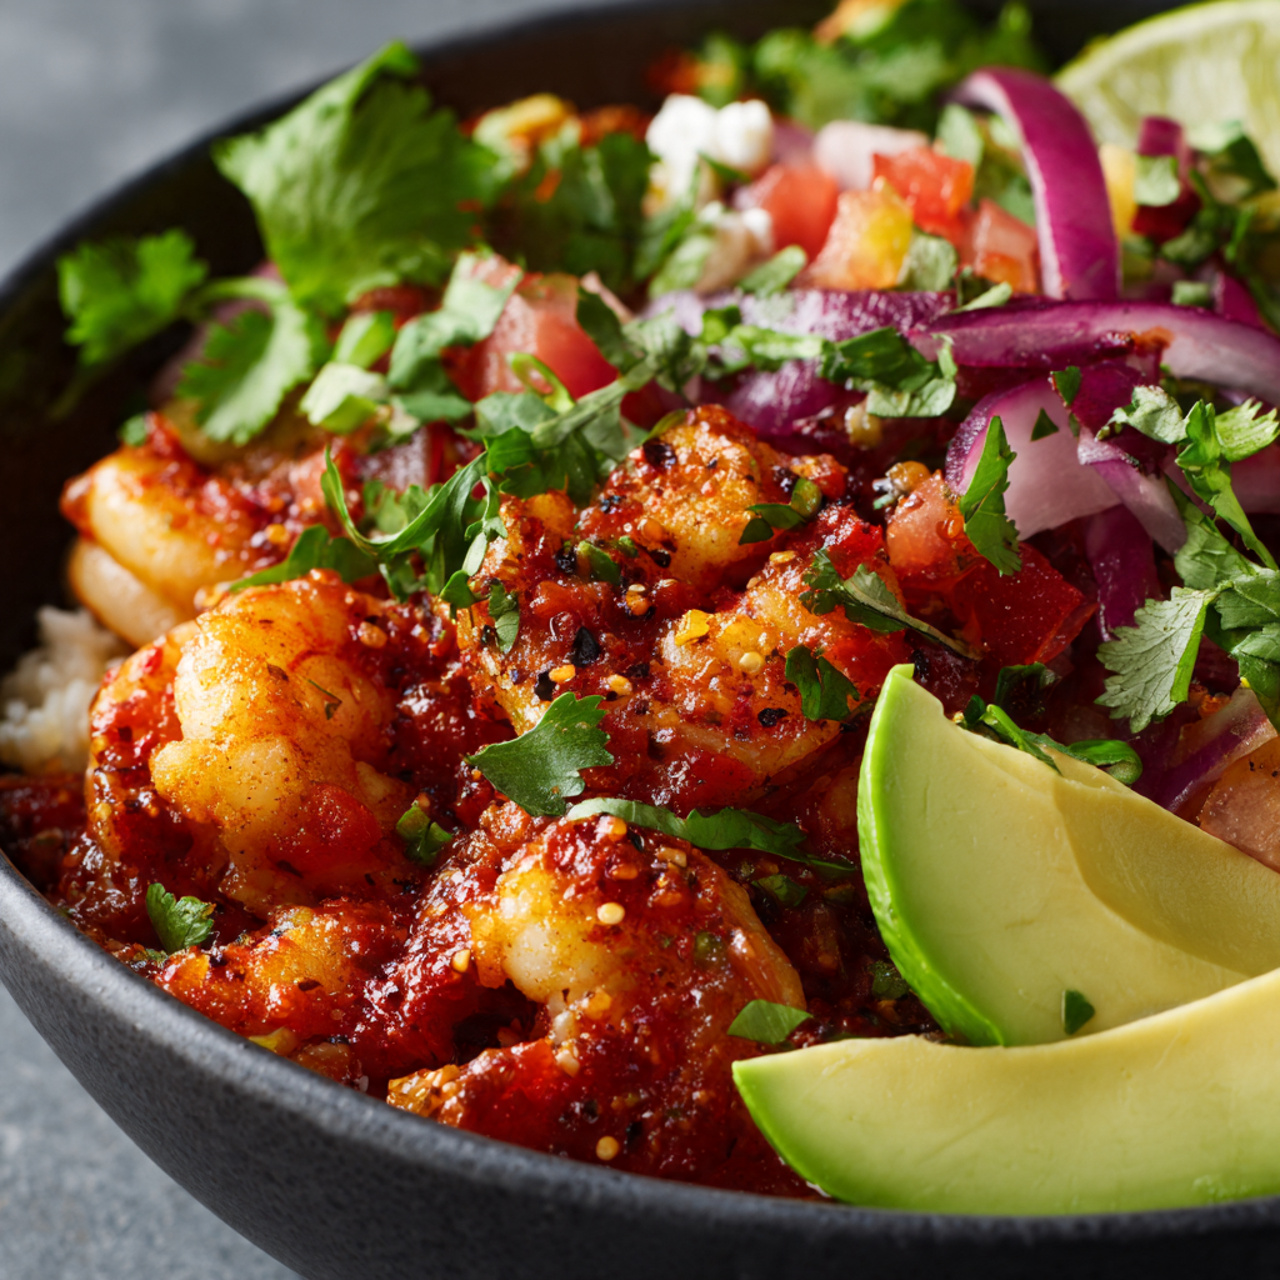
Imagine a dinner that tastes like a tropical vacation but comes together in your kitchen in just 45 minutes. We are talking about juicy, plump shrimp simmered in a vibrant, spicy, and briny tomato sauce, served over fluffy rice. This is Spicy Shrimp Veracruz, and it is about to become your absolute favorite way to eat seafood. If you are looking for healthy dinner bowls that pack a massive punch of flavor without feeling heavy, this is the recipe for you.
I promise you, this one-pan sauce is magic. By swapping the traditional wine for a splash of bright lime juice and water, we keep the acidity high and the flavors fresh. The shrimp poach gently right on top of the sauce, soaking up all those incredible spices. It’s a meal that feels sophisticated and complex, but is actually incredibly simple to throw together on a busy weeknight.
Get ready to shake up your dinner routine with a bowl that is saucy, spicy, sweet, and savory all at once.

Why These Veracruz Bowls Are a Weeknight Win!
You are going to be obsessed with the complex flavor profile of this dish. It’s a standout recipe for so many reasons:
- A Flavor Explosion: The combination of salty capers, spicy jalapeños, sweet raisins, and tart lime creates a “sweet-heat-briny” profile that is absolutely addictive.
- One-Skillet Wonder: Aside from the rice, the entire meal comes together in one large skillet. Less cleanup means a happier cook!
- Healthy and Light: Shrimp is a fantastic lean protein, and the sauce is vegetable-heavy and oil-light. It’s a satisfying meal that leaves you feeling energized.
- Perfectly Poached Shrimp: Cooking the shrimp directly on top of the simmering sauce ensures they stay tender and juicy, never rubbery or dry.
- Pantry-Friendly Gourmet: It uses ingredients you likely have in your pantry (raisins, capers, rice, spices) to create a dish that tastes like a restaurant special.
Recipe Snapshot
| Prep Time | 15 minutes |
| Cook Time | 30 minutes |
| Total Time | 45 minutes |
| Servings | 4 servings |
| Calories | 254 kcal per serving |
| Course | Dinner, Main Course |
| Cuisine | Mexican (Veracruz Style) |
| Difficulty/Method | Easy / Stovetop |
Your Shopping List for Spicy Shrimp Bowls
This recipe uses a unique blend of ingredients to create that signature Veracruz flavor.

→ For the Spicy Sauce Base
- 2 tablespoons olive oil → For sautéing the peppers.
- 8–10 sweet mini peppers → Chopped. These add a lovely sweetness and crunch. Bell peppers work too!
- 1 pint cherry tomatoes → Halved. They break down quickly to form a fresh, bright sauce.
- 2 cloves garlic → Minced, for savory depth.
- 2 tablespoons pickled jalapeños → Minced. This adds the heat and a nice vinegar tang.
- 2 tablespoons capers → For that essential briny, salty pop.
- ¼ cup golden raisins → The secret ingredient! Do not skip these; they balance the spice perfectly.
- 1 teaspoon dried oregano & ½ teaspoon salt → Classic seasonings.
- Liquid: 1 tablespoon fresh lime juice + 1 tablespoon water (to replace wine), plus up to 1 cup water for the sauce consistency.
→ For the Bowls
- 1 pound uncooked shrimp → Peeled and deveined. Medium to large size works best.
- 1 cup rice → White or brown, uncooked (to be steamed separately).
- Extra lime or lemon → For serving.
Let’s Cook! Your Step-by-Step Guide
Ready to make the most flavorful shrimp of your life? Let’s get that skillet heating up.
Part 1: The Rice and Veggies
- Start the Rice: Get your rice cooking according to the package directions first, so it’s ready when the shrimp are done.
- Sauté the Peppers: Heat the olive oil in a very large skillet over medium-high heat. Add the chopped mini peppers and sauté for 5-10 minutes, until they are softened and starting to brown slightly.
- Add Aromatics: Turn the heat down to medium (we don’t want to burn the garlic!). Add the halved cherry tomatoes, minced garlic, pickled jalapeños, capers, golden raisins, dried oregano, and salt. Sauté for another 5-10 minutes. You want the tomatoes to burst and release their juices, creating a fragrant, chunky base.

Part 2: The Sauce and Shrimp
- Build the Sauce: Pour in the tablespoon of lime juice and tablespoon of water (our wine substitute) and let it sizzle. Then, start adding the main water, about ½ cup to begin with. Simmer for about 5 minutes. The goal is a moderately saucy consistency—not a soup, but enough liquid to poach the shrimp. Add more water if it looks dry.
- Poach the Shrimp: Nestle the raw shrimp in a single layer right on top of the bubbling sauce. Sprinkle them with a little extra salt and pepper. Let them cook undisturbed on one side for 4-5 minutes until they turn pink.
- Flip and Finish: Flip the shrimp over and cook for another 1-2 minutes on the other side, just until they are opaque and cooked through.
- Serve: Spoon the hot rice into bowls. Top with the saucy, briny shrimp mixture. Squeeze a fresh lime wedge over the top for an extra zing!
Spicy Shrimp Veracruz Bowls
Ingredients
Equipment
Method
-
Cook the rice according to package directions.
-
Heat the olive oil in a large skillet over medium-high heat. Sauté the chopped peppers for 5-10 minutes until soft.
-
Turn heat to medium. Add tomatoes, garlic, jalapeños, capers, raisins, oregano, and salt. Sauté for 5-10 minutes until fragrant and tomatoes release juices.
-
Add the lime juice and water mixture. Then add the main water, starting with 1/2 cup. Simmer for about 5 minutes until sauce thickens slightly. Add more water if needed.
-
Place shrimp on top of the sauce in a single layer. Sprinkle with salt and pepper. Cook on one side for 4-5 minutes.
-
Flip shrimp and cook for 1-2 minutes on the other side until opaque and cooked through.
-
Serve the shrimp and sauce over hot rice. Squeeze fresh lime juice over the top.
Notes
Adjust Liquid: Start with 1/2 cup water for the sauce and add more gradually. You want a sauce, not a soup, but it shouldn’t be dry.
Raisins are Key: The golden raisins provide a crucial sweetness that balances the spicy jalapeños and salty capers.
WiseRecipes’ Top Tips for Perfect Veracruz Sauce
These simple secrets will ensure your sauce is balanced and delicious every time.
- Use a Wide Skillet. As mentioned in the notes, a wide skillet is crucial here. You want enough surface area so that all the shrimp can sit in a single layer on top of the sauce. If they are piled up, they will steam unevenly.
- Adjust the Liquid Carefully. You can always add more water, but you can’t take it out! Start with ½ cup. If the sauce looks too thick or dry while simmering, add more water in ¼ cup increments. You want it loose enough to coat the rice but rich enough to cling to the shrimp.
- Don’t Fear the Raisins. Even if you aren’t a raisin lover, give them a chance in this recipe. They plump up and absorb the savory juices, becoming little bursts of sweetness that counteract the spicy jalapeños perfectly.
- Taste Before Salting. Capers and pickled jalapeños are naturally salty. Taste your sauce before you add the final seasoning to the shrimp to ensure you don’t over-salt the dish.
- Don’t Overcook the Shrimp. Shrimp cook very fast! Once they turn pink and curl into a “C” shape, they are done. If they curl into a tight “O,” they might be overcooked and rubbery.
Creative Twists: Customize Your Bowl
This sauce is so good, you can use it on almost anything!
- Swap the Protein: This Veracruz sauce is traditionally served over white fish like Red Snapper or Tilapia. You can gently poach fish fillets in the sauce instead of shrimp (adjust cooking time accordingly).
- Grain Options: While rice is classic, this is delicious over quinoa, couscous, or even cauliflower rice for a low-carb version.
- Extra Heat: If you love spicy food, add a splash of the juice from the pickled jalapeño jar into the sauce, or sprinkle with red pepper flakes.
Keep It Fresh! Storing Your Shrimp Bowls
This dish makes for a fantastic lunch the next day.
- Refrigerator: Store leftover shrimp and sauce in an airtight container in the refrigerator for up to 3 days. Store the rice separately if possible to prevent it from getting mushy.
- Reheating: Be gentle when reheating shrimp, as they can get rubbery. The best way is to heat the sauce and rice first in the microwave or on the stove, and then add the shrimp in at the very last minute just to warm them through.
- Freezing: I don’t recommend freezing the cooked shrimp, as the texture suffers. However, you can make the sauce base (peppers, tomatoes, raisins, capers) ahead of time and freeze that. Thaw it, heat it up in a skillet, and add fresh shrimp for a quick dinner!
FAQs: Your Shrimp Veracruz Questions, Answered!
Q: Is this dish very spicy? A: It has a moderate kick from the pickled jalapeños, but the sweetness of the raisins and the acidity of the lime balance it out well. If you are sensitive to spice, start with 1 tablespoon of jalapeños and add more to taste. Q: Can I use frozen shrimp? A: Yes! Thaw them completely under cold running water and pat them very dry before adding them to the skillet. If you add them frozen, they will release too much water and dilute your beautiful sauce. Q: What are capers? A: Capers are the unripened flower buds of the caper bush. They are pickled and have a distinct lemony, olive-like, salty flavor that is essential to the “briny” profile of this dish. Q: Why substitute the wine? A: Traditional Veracruz recipes often use wine for acidity and depth. However, a combination of fresh lime juice and water provides that necessary acidic lift and liquid volume while keeping the recipe fresh, zesty, and alcohol-free.
Final Thoughts: A Flavor Vacation
There is nothing better than a meal that transports you to a sunny coast with just one bite. These Spicy Shrimp Veracruz Bowls are a testament to how bold, contrasting flavors—sweet, salty, sour, and spicy—can come together to create perfect harmony. It’s a healthy dinner that feels like a treat. I hope this becomes a new favorite in your kitchen! Happy cooking!
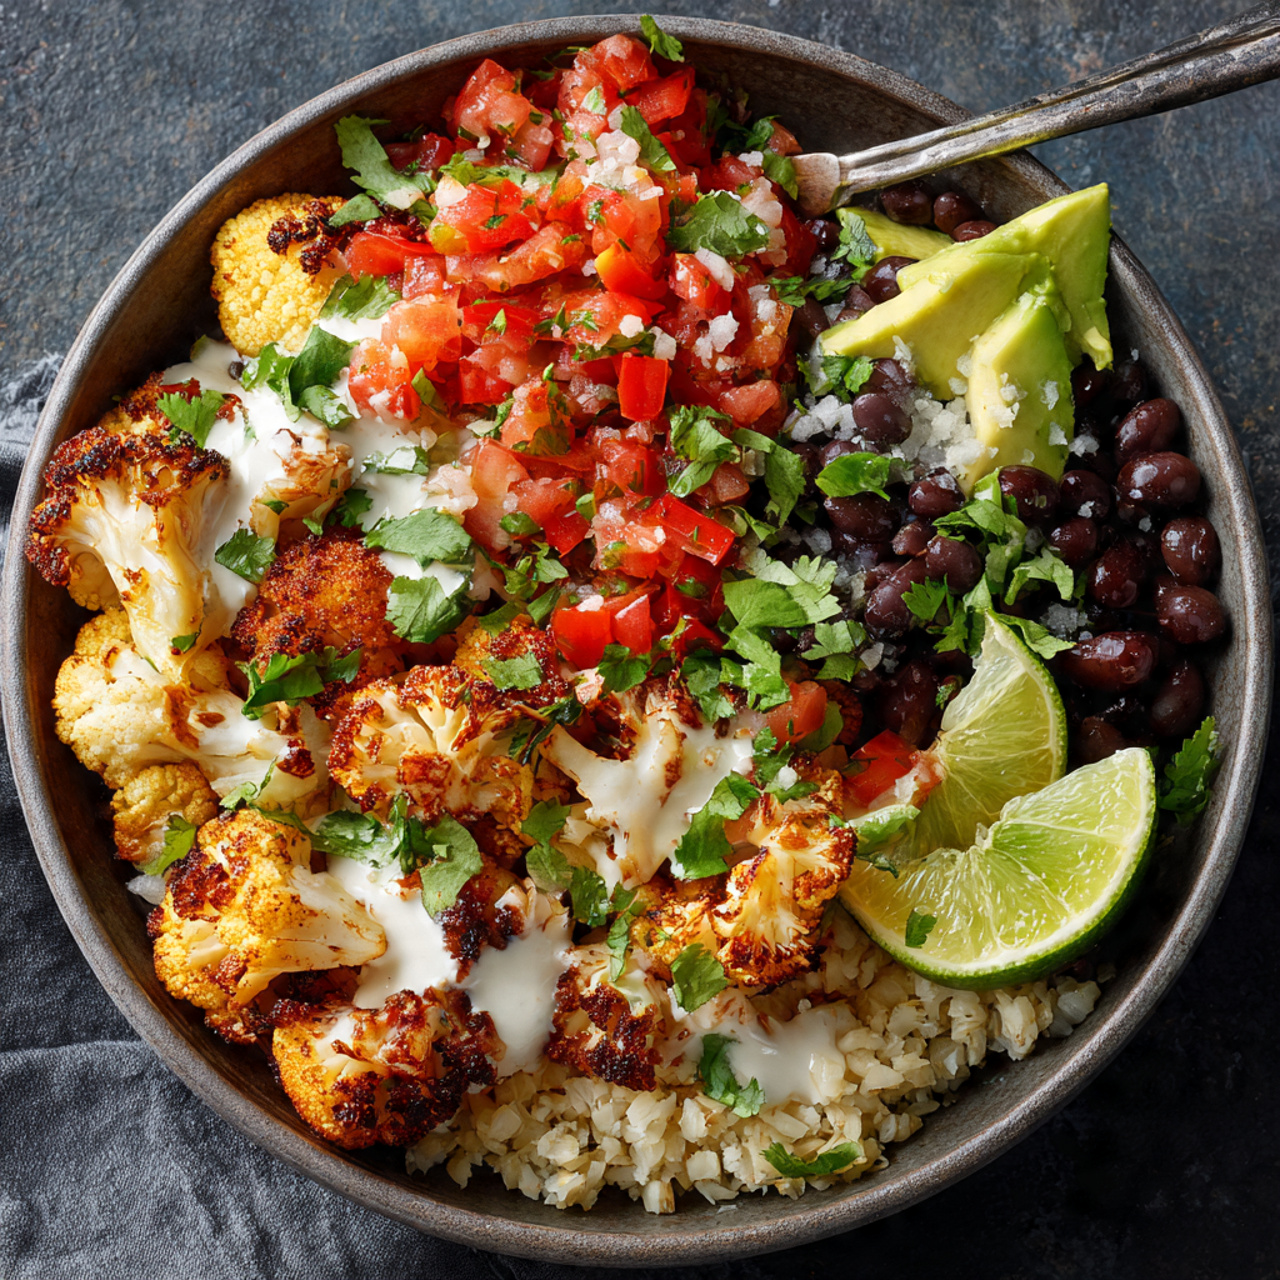
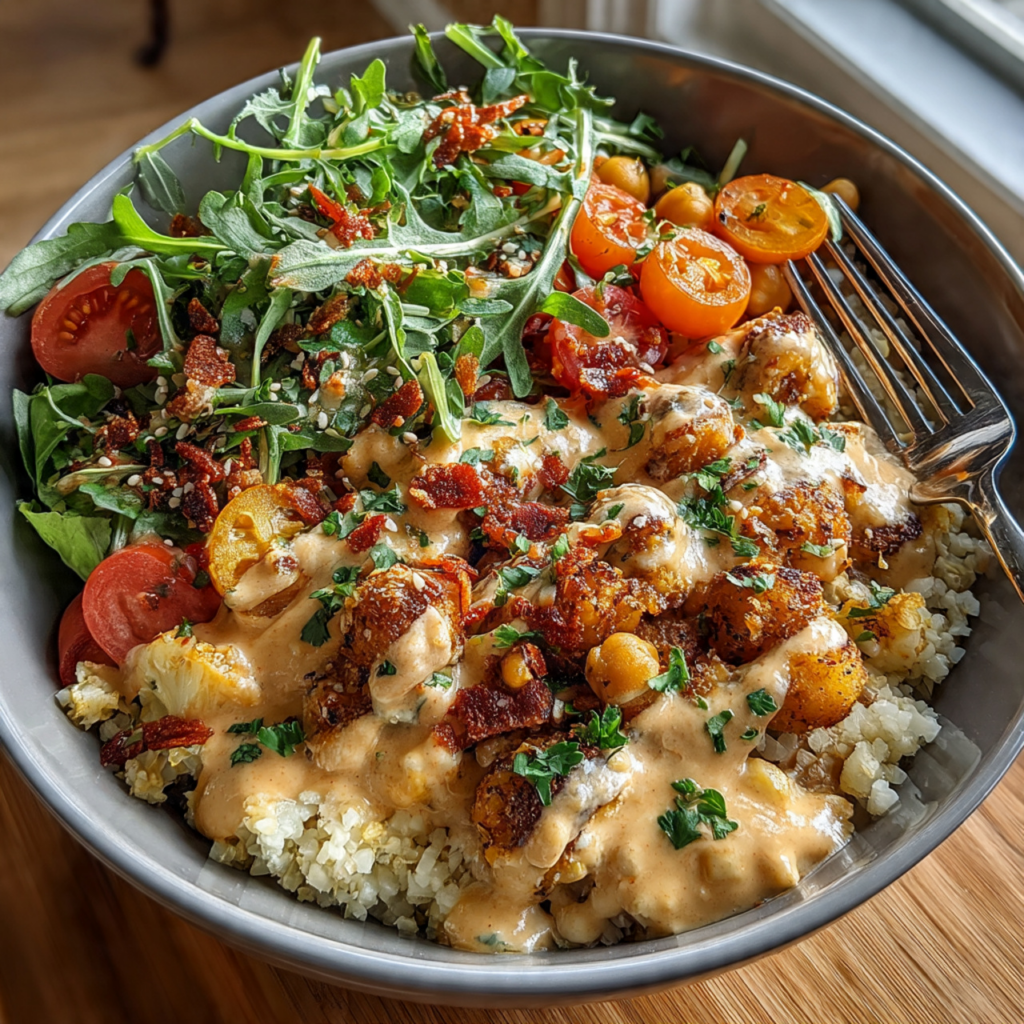
6. Vibrant Roasted Cauliflower Burrito Bowls (A Healthy Dinner Win!)
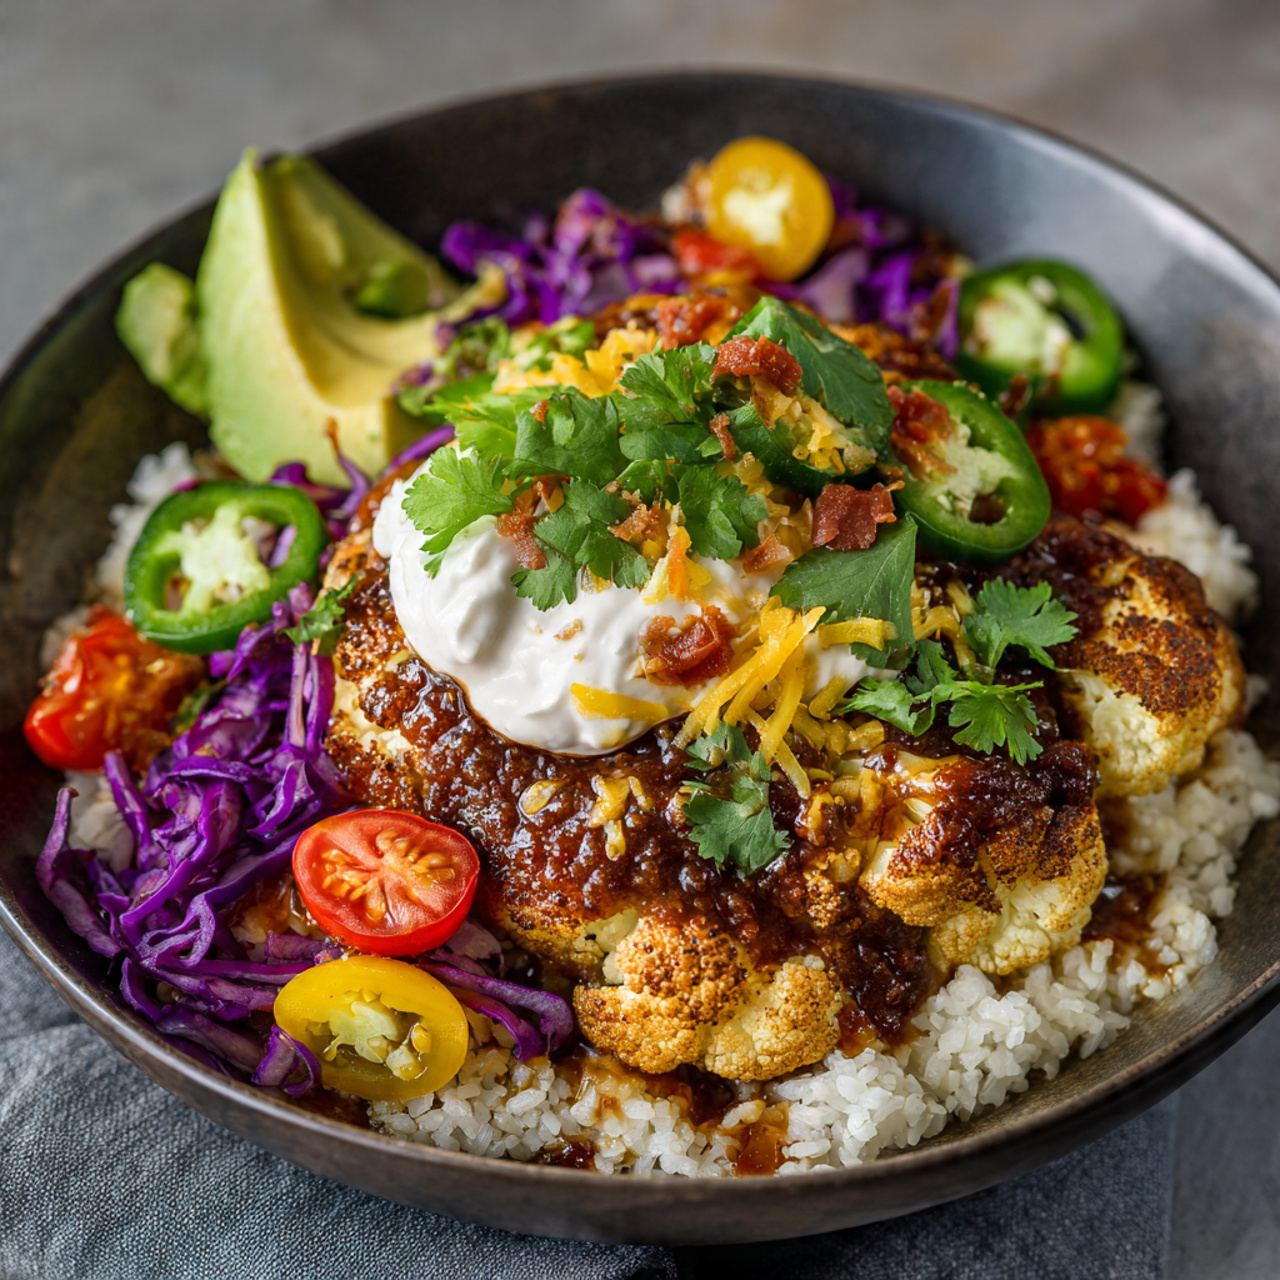
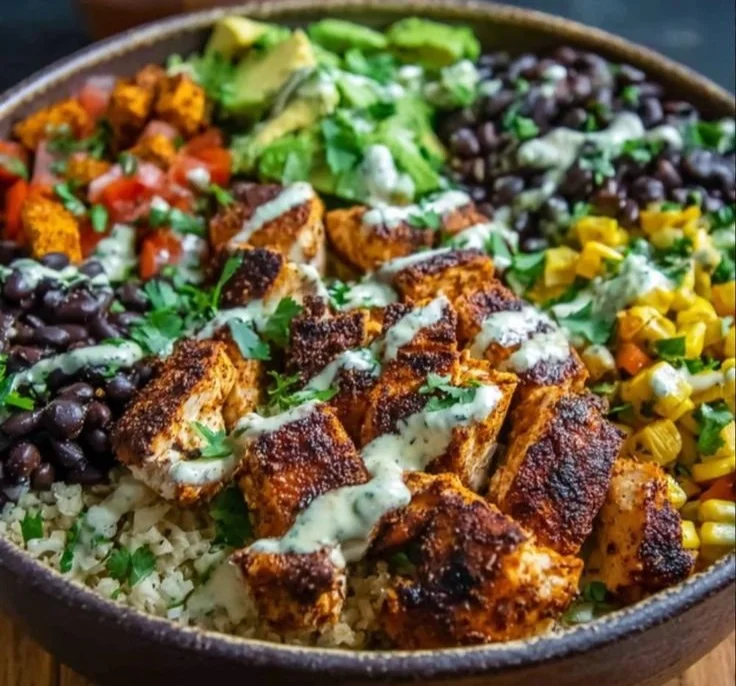
There is a misconception that eating clean means sacrificing flavor or satisfaction. I am here to tell you that is absolutely not the case. If you are looking for the ultimate example of healthy dinner bowls that actually leave you feeling full and happy, these Roasted Cauliflower Burrito Bowls are it. We are talking about spicy, charred cauliflower florets, creamy “refried” black beans made from scratch in minutes, and a bright, zesty pico de gallo that cuts through all the richness.
I promise you, there is no greater feeling than assembling these bowls. Layering the warm rice, the smoky beans, the hot cauliflower, and then piling on the cool, fresh corn and avocado creates a temperature and flavor contrast that is just magic. It’s a meal that makes you feel good from the inside out, and it’s easy enough for a Tuesday night but special enough for a weekend lunch with friends.
Get ready to discover your new favorite way to eat your veggies. This is the vegan dinner that even the carnivores in your life will ask for seconds of.

Why These Are the Best Healthy Dinner Bowls You’ll Make
You are going to be completely obsessed with how fresh and satisfying this meal is. It is a standout recipe for so many reasons:
- Flavor-Packed Cauliflower: Roasting the cauliflower with taco seasoning transforms a humble vegetable into a savory, spicy star of the show with amazing texture.
- Homemade “Refried” Beans: Forget the can of mushy refried beans. We create a quick, creamy bean mash using whole black beans and spices that tastes infinitely fresher and better.
- Nutrient-Dense and Vegan: This bowl is a powerhouse of fiber, plant-based protein, and healthy fats from the avocado. It fits perfectly into a clean-eating lifestyle.
- Incredibly Customizable: This is a “choose your own adventure” meal. Don’t like cilantro? Skip it. Want more heat? Load up the hot sauce. It’s perfect for feeding picky eaters.
- Meal Prep Friendly: All the components—the rice, the roasted cauliflower, and the beans—store beautifully, making this a fantastic option for healthy lunches all week long.
Recipe Snapshot
| Prep Time | 20 minutes |
| Cook Time | 30 minutes |
| Total Time | 50 minutes |
| Servings | 4-6 bowls |
| Calories | 465 kcal per serving |
| Course | Dinner, Lunch |
| Cuisine | Mexican |
| Difficulty/Method | Easy / Roasting & Stovetop |
Your Shopping List for Burrito Bowl Bliss
This recipe relies on fresh produce and a few pantry spices to create a vibrant, colorful meal.
→ The Roasted Base
- 1 head of cauliflower → Chopped into bite-sized florets. This mimics the “meat” of the dish.
- 1 tablespoon olive oil → For roasting and getting those crispy edges.
- 1 tablespoon taco seasoning → Divided. Half for the cauliflower, half for the beans.
→ The Creamy Beans & Grains
- 1 cup white or brown rice → Uncooked. Brown rice adds a nice nuttiness, but white rice is classic.
- 1 (14-ounce) can black beans → Rinsed and drained.
- ½ cup water → To help simmer and mash the beans.
→ The Fresh Pico & Toppings
- 2 tomatoes → Chopped. Roma or vine-ripened work well.
- Half of a small onion → Chopped fine for the pico. White or red onion works.
- Juice of 2 limes → Plus extra wedges for serving. Fresh lime juice is non-negotiable!
- ½ cup fresh cilantro → Chopped. It brings that signature herbal freshness.
- 2 ears of corn → Kernels cut off the cob. Fresh is best, but frozen/thawed works too.
- 1 avocado → For that essential creamy, healthy fat component.
- Hot sauce → Your favorite brand to tie it all together with a kick.
Let’s Cook! Building Your Bowls Step-by-Step
Ready to assemble the freshest dinner of the week? Let’s get cooking!
Part 1: Roast the Cauliflower
- Preheat and Prep: Preheat your oven to 425°F. This high heat is crucial for getting a good char on the cauliflower rather than just steaming it.
- Season and Roast: On a baking sheet, toss the cauliflower florets with the olive oil and half (about 1 ½ teaspoons) of the taco seasoning. Sprinkle generously with salt and pepper. Spread them out in a single layer and roast for 20-25 minutes. Be sure to toss them halfway through so they brown evenly. You want them tender with crispy, golden edges.
Part 2: The Rice and Beans
- Cook the Rice: While the oven heats up, get your rice going according to the package directions. (I like to add a squeeze of lime and some cilantro to the rice once it’s cooked!)
- Make the Creamy Beans: In a small saucepan, combine the rinsed black beans, ½ cup of water, and the remaining taco seasoning. Bring it to a low simmer.
- Mash and Simmer: Using the back of a spoon or a potato masher, mash the beans directly in the pot. You don’t need to mash every single one; aim for a mix of creamy paste and whole beans. Let it simmer over medium-low heat until it thickens into a rich, creamy consistency.
Part 3: Fresh Pico and Assembly
- Mix the Pico de Gallo: In a small bowl, toss together the chopped tomatoes, onion, cilantro, and the lime juice. Season well with salt. This fresh salsa adds the necessary acid to cut through the starchy beans and rice.
- The Moment of Glory: Now, build your bowls! Start with a scoop of fluffy rice. Add a generous dollop of the creamy refried beans. Pile on the roasted cauliflower, fresh corn kernels, and a big scoop of your homemade pico de gallo.
- Top and Serve: Finish the bowl with slices of fresh avocado and a lime wedge on the side. Drizzle everything with your favorite hot sauce for a final kick. Dig in!
Roasted Cauliflower Burrito Bowls
Ingredients
Equipment
Method
-
Cook the rice according to package directions.
-
Heat the oven to 425 degrees F. Toss the cauliflower florets with the olive oil and half of the taco seasoning. Sprinkle with salt and pepper.
-
Roast the cauliflower for 20-25 minutes, tossing halfway through to prevent burning, until tender and browned.
-
Combine the black beans, water, and remaining taco seasoning in a small saucepan. Bring to a low simmer.
-
Mash the black beans with the back of a spoon until the mixture starts to get creamy. Continue to simmer over medium-low heat until thickened.
-
Toss the tomatoes, onion, lime juice, and cilantro together to make a pico de gallo. Season with salt.
-
Build a big bowl with rice, creamy refried beans, fresh corn, pico de gallo, avocado, and a lime wedge.
-
Top the bowl with your roasted cauliflower and add hot sauce if desired.
Notes
Mash the Beans: Don’t skip mashing the beans! It releases starch and creates a creamy, ‘refried’ texture without any added fat.
Customize: This bowl is extremely versatile. Feel free to add other roasted veggies or swap the grain for quinoa.
WiseRecipes’ Top Tips for Better Bowls
These simple secrets will ensure your healthy dinner bowls are flavor-packed and never boring.
- Don’t Crowd the Cauliflower. When roasting, make sure there is space between the florets on the baking sheet. If they are piled on top of each other, they will steam and get mushy instead of developing that delicious, roasted, caramelized flavor. Use two pans if you need to!
- Season Every Layer. Don’t rely on the toppings to do all the work. Season your rice with a little salt and lime juice. Taste your beans before serving. Layering the seasoning ensures every bite is delicious, not just the top layer.
- Fresh Corn is Best. While frozen corn is fine, raw corn cut straight off the cob adds a sweet, milky crunch that is unbeatable in this bowl. You don’t even need to cook it; the crunch is a great contrast to the soft beans.
- Customize the Heat. The taco seasoning adds flavor, but not necessarily heat. If you like it spicy, add a pinch of cayenne to the cauliflower before roasting, or slice up some fresh jalapeños for the pico.
- Creaminess without Dairy. The mashed beans and avocado provide plenty of creaminess, but if you want an extra drizzle, try mixing a little lime juice and hot sauce into some vegan yogurt or sour cream for a quick crema.
Keep It Fresh! Storing Your Meal Prep
These bowls are fantastic for lunches throughout the week.
- Separate Storage: If you are prepping ahead, store the cooked components (rice, beans, cauliflower) in separate containers from the fresh components (pico, corn, avocado). This allows you to reheat the hot parts without cooking the salad parts.
- Refrigerator: The cooked components will stay fresh in airtight containers for up to 4 days. The pico is best eaten within 2 days as the tomatoes will release water.
- Reheating: Reheat the rice, beans, and cauliflower in the microwave or on the stovetop until warm, then top with the cold ingredients.
- Avocado Tip: Always slice the avocado fresh right before serving to prevent it from turning brown.
FAQs: Your Burrito Bowl Questions, Answered!
Can I use canned refried beans instead?
You can, but I highly recommend making your own with the whole beans as described! Canned refried beans can sometimes be heavy or greasy. This quick-mash method feels lighter, fresher, and you can control exactly how much salt and spice goes in.
What if I don’t have taco seasoning?
You can easily make a quick blend! Mix equal parts chili powder and cumin, with a dash of garlic powder, onion powder, and paprika. It works perfectly.
Is this recipe gluten-free?
Yes, it is naturally gluten-free! Just double-check your taco seasoning packet, as some brands use flour as a thickener. Or, use homemade seasoning to be safe.
Can I add other roasted veggies?
Absolutely. Sweet potatoes, bell peppers, or zucchini would all be fantastic roasted alongside the cauliflower. Just cut them into similar-sized pieces so they cook evenly.
Final Thoughts: A Feast of Color and Health
There is something so energizing about eating a meal that is this colorful. These Roasted Cauliflower Burrito Bowls are proof that healthy dinner bowls don’t have to be complicated to be absolutely delicious. They are vibrant, nourishing, and packed with bold Mexican-inspired flavors. I hope this recipe becomes a staple in your healthy eating rotation. Happy cooking!
7. The Ultimate Mediterranean Quinoa Bowls (Healthy Dinner Bowls!)
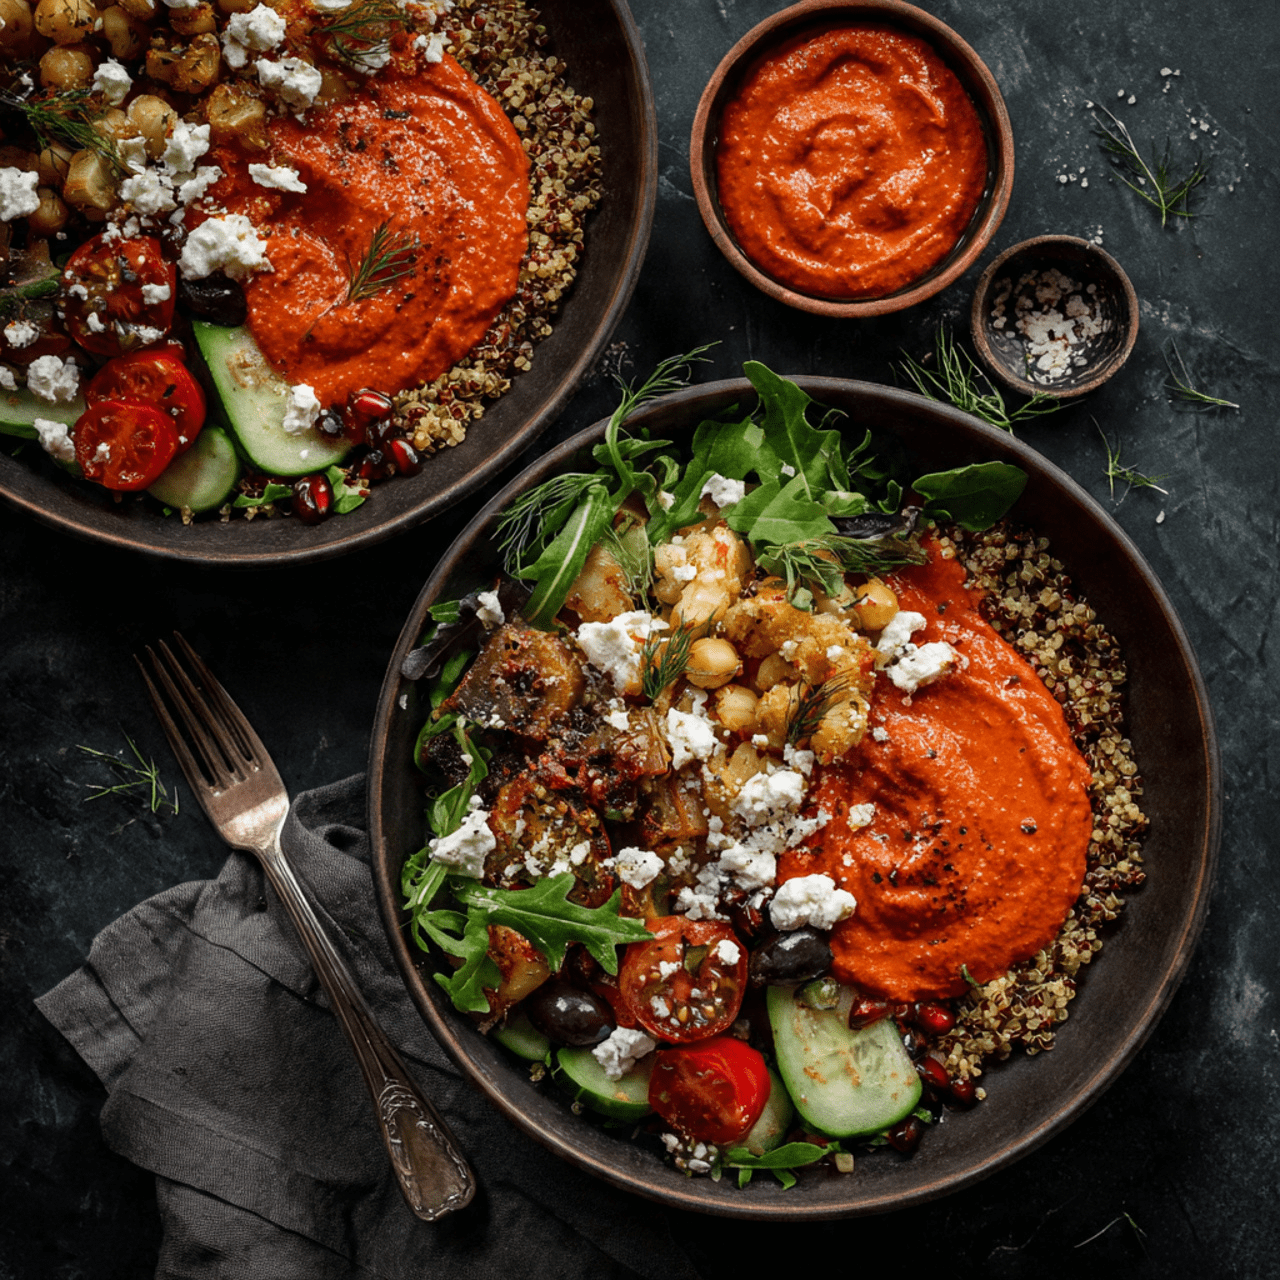
Imagine a dinner that feels like a vibrant escape to the Greek isles, yet comes together in your kitchen in just 20 minutes. That is the fresh, colorful magic of these Mediterranean Quinoa Bowls. We are talking about fluffy quinoa piled high with crisp cucumbers, salty feta, briny olives, and the real star of the show: a homemade Roasted Red Pepper Sauce that is so creamy and savory, you’ll want to put it on everything.
I promise you, there is no greater feeling than opening your fridge to find these beautiful components prepped and ready to go. Whether you are looking for a quick weeknight family dinner or the perfect meal-prep lunch that you’ll actually look forward to eating, these bowls are a game-changer. It’s clean eating that feels like a feast.
Get ready to master the art of the grain bowl. This is the recipe that will make you fall in love with healthy eating all over again.

Why These Are the Best Healthy Dinner Bowls You’ll Ever Make!
You are going to be completely obsessed with how fresh, fast, and flavorful these bowls are. They are a weeknight winner for so many reasons:
- Ready in Just 20 Minutes: With minimal cooking (just the quinoa!), this meal comes together in a flash. It’s faster than ordering takeout and infinitely better for you.
- That Roasted Red Pepper Sauce: This sauce is the secret weapon. Made with jarred peppers, almonds, and garlic, it’s a nutrient-dense flavor bomb that brings the whole bowl to life.
- Endlessly Customizable: Don’t like olives? Skip them. Love spinach? Load it up. These bowls are a “build-your-own” dream, making them perfect for picky eaters.
- Meal Prep Perfection: The components store beautifully in the fridge. Keep the sauce, grains, and veggies separate, and you have instant, high-quality lunches for days.
- Packed with Plant-Based Power: Between the protein-rich quinoa and the healthy fats from the almonds and olive oil, this meal will keep you fueled and energized without weighing you down.
Recipe Snapshot
| Prep Time | 15 minutes |
| Cook Time | 5 minutes |
| Total Time | 20 minutes |
| Servings | 8 servings |
| Calories | 381 kcal per serving |
| Course | Dinner, Lunch |
| Cuisine | Mediterranean |
| Difficulty/Method | Easy / Stovetop & Blender |
Your Shopping List for Mediterranean Bliss
This recipe uses fresh produce and high-quality pantry staples to create a vibrant, healthy meal.

→ For the Roasted Red Pepper Sauce
- 1 (16-ounce) jar roasted red peppers → Drained. Using jarred peppers is our huge time-saving hack!
- ½ cup almonds → These add body, creaminess, and protein to the sauce without dairy.
- ½ cup olive oil → Use a good quality oil for the best flavor.
- 1 clove garlic → For a savory kick.
- Juice of one lemon → Adds brightness and acidity to cut through the richness.
- ½ teaspoon salt → Plus more to taste.
→ For the Bowl Base & Toppings
- Cooked quinoa or couscous → The hearty grain base. Quinoa offers a great protein boost.
- Fresh Greens → Spinach, chopped kale, or crisp cucumber slices all work beautifully.
- Feta cheese → For that signature salty, tangy Mediterranean bite. (Swap for white beans for a vegan version!)
- Kalamata olives → Adds a deep, briny richness.
- Pepperoncini → For a little vinegary heat.
- Red onion → Thinly sliced for crunch and zest.
- Hummus → Store-bought or homemade, for extra creaminess.
- Fresh herbs → Basil or parsley adds a final pop of fresh flavor.
Let’s Build a Bowl! Your Step-by-Step Guide
Ready to create the most colorful, healthy dinner on your rotation? Let’s get started!
Part 1: The Magic Sauce
- Combine Ingredients: In the bowl of a food processor or high-speed blender, add the drained roasted red peppers, garlic clove, salt, lemon juice, olive oil, and almonds.
- Pulse to Perfection: Pulse the mixture until it is mostly smooth but still has a little bit of texture. You want a thick, spoonable sauce, not a watery puree. Taste and add more salt if needed.

Part 2: Prep and Assemble
- Cook the Quinoa: While you make the sauce, cook your quinoa (or couscous) according to the package directions. Pro Tip: Use a rice cooker for hands-off cooking while you prep the veggies!
- Build Your Bowl: Now for the fun part! Start with a base of fluffy quinoa. Layer on your choice of greens (spinach, kale, or cucumber). Add a generous scoop of hummus, a sprinkle of feta cheese, some olives, pepperoncini, and red onion.
- Sauce and Serve: Drizzle a generous amount of that incredible Roasted Red Pepper Sauce over the top. Finish with fresh herbs, a squeeze of lemon, and maybe a crack of black pepper. Dig in!
Mediterranean Quinoa Bowls with Roasted Red Pepper Sauce
Ingredients
Equipment
Method
-
Add the roasted red peppers, garlic, salt, lemon juice, olive oil, and almonds to a food processor or blender.
-
Pulse until mostly smooth but still thick and textured.
-
Cook the quinoa according to package directions.
-
Build your bowl by layering the quinoa with your choice of greens, feta, olives, pepperoncini, onion, and hummus.
-
Top generously with the roasted red pepper sauce and enjoy!
Notes
Meal Prep: Store the sauce, grains, and fresh veggies in separate containers to keep everything fresh. Assemble just before eating.
Vegan Option: Replace the feta cheese with white beans or chickpeas for a fully plant-based meal.
WiseRecipes’ Top Tips for Perfect Dinner Bowls
These simple secrets will ensure your healthy bowls are flavorful and satisfying every time.
- Texture is Key. Don’t over-blend the sauce! The almonds should provide a little bit of graininess and body. If you blend it too smooth, it loses that wonderful rustic texture that clings so well to the quinoa.
- Season Your Quinoa. Quinoa can be bland on its own. Cook it in vegetable broth instead of water, or stir in a squeeze of lemon juice and a pinch of salt right after it cooks to infuse flavor from the bottom up.
- Toast the Almonds. If you have an extra 5 minutes, toast the almonds in a dry skillet before adding them to the sauce. This amplifies their nutty flavor and adds a deeper dimension to the sauce.
- Massage Your Kale. If you are using raw kale as your green, give it a quick massage with a little olive oil and salt before adding it to the bowl. This softens the leaves and makes them much more pleasant to eat.
- Prep Ingredients Separately. If you are meal prepping, keep the sauce, the warm grains, and the cool veggies in separate containers. Assemble them just before eating to keep everything fresh and prevent the greens from wilting.
Keep It Fresh! Storing Your Healthy Bowls
These bowls are the ultimate meal prep solution!
- Refrigerator: Store the sauce in a jar and the other ingredients in separate airtight containers. They will stay fresh for up to 4-5 days.
- Assembly: For the best texture, assemble your bowl right before eating. If taking it to work, put the sauce in a small separate container.
- Freezing: You can freeze the Roasted Red Pepper Sauce! Freeze it in an airtight container or ice cube trays for up to 3 months. Thaw in the fridge before using. Do not freeze the assembled fresh vegetables.
FAQs: Your Mediterranean Bowl Questions, Answered!
Can I use a different grain?
Absolutely! This bowl is delicious with brown rice, farro, barley, or even cauliflower rice for a low-carb option. Couscous is also a traditional and quick cooking option.
Is this recipe vegan?
The sauce and the base are vegan! To make the entire bowl vegan, simply swap the feta cheese for white beans (cannellini beans work great) or chickpeas. This adds extra protein and keeps it plant-based.
Can I add meat to this?
Of course. While it’s designed as a healthy vegetarian meal, grilled chicken, shrimp, or even leftover sliced steak would be fantastic additions if you want extra protein.
I have a nut allergy. What can I use instead of almonds?
If you are allergic to nuts, you can substitute the almonds with sunflower seeds or pumpkin seeds (pepitas). You could also use chickpeas in the sauce to provide that thick, creamy body without nuts.
Final Thoughts: A Bowl Full of Goodness
There is nothing better than a meal that makes you feel as good as it tastes. These Mediterranean Quinoa Bowls are vibrant, nourishing, and bursting with the sunny flavors of the Mediterranean. They prove that healthy dinner bowls don’t have to be complicated to be delicious. I hope they become a staple in your healthy eating routine. Happy cooking!
8. The Best Easy Baked Tilapia (A 20-Minute Healthy Dinner!)

Hello, my friends, and welcome to a recipe that is the very definition of a quick, easy, and incredibly delicious weeknight meal. If you are looking for a healthy and flavorful way to get fish on the dinner table with minimal effort, then this Easy Baked Tilapia is about to become your new best friend.
This isn’t just a plain, boring piece of fish. We take tender, flaky tilapia fillets and bathe them in a luscious, savory sauce of melted butter, bright lemon juice, and garlic. A sprinkle of briny capers, oregano, and paprika adds the perfect finishing touch. The magic happens in the oven, where the tilapia bakes to perfectly moist and tender perfection in just about 10 minutes. It’s a light, satisfying, and unbelievably simple meal that the whole family will love.

Why This is The Ultimate Baked Tilapia Recipe
This recipe is a true weeknight champion. Here’s why you’ll make it again and again:
- Ready in 20 Minutes Flat: From your fridge to the dinner table, this entire meal comes together in about 20 minutes, making it a true lifesaver for busy nights.
- Incredibly Moist & Flaky: Baking is the perfect, foolproof method for cooking a delicate fish like tilapia. It ensures the fillets stay wonderfully moist and tender.
- Packed with Bright, Savory Flavor: The simple lemon garlic butter sauce is the perfect complement to the mild flavor of the tilapia, and the capers add a wonderful, briny pop.
- A Healthy & Light Meal: This recipe is naturally low-carb, packed with lean protein, and a fantastic choice for a healthy eating plan.
Gather Your Simple, Flavorful Ingredients: What You’ll Need
This impressive main course comes together with just a handful of powerful pantry staples.
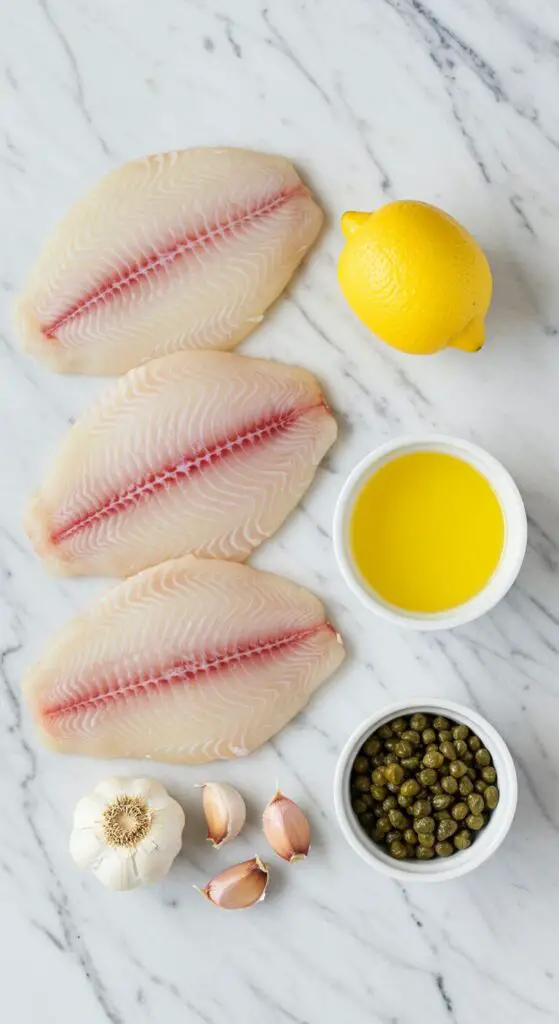
- 4 tilapia fillets (6 ounces each)
- 3 tablespoons butter, melted
- 3 tablespoons lemon juice
- 1 1/2 teaspoons garlic powder
- 1/8 teaspoon salt
- 2 tablespoons capers, drained
- 1/2 teaspoon dried oregano
- 1/8 teaspoon paprika
Crafting Your Baked Tilapia: Step-by-Step Guide
Let’s get this quick and elegant meal in the oven. It’s almost too easy!
- Prep the Oven and Fish: First, preheat your oven to 425°F (220°C). Arrange the four tilapia fillets in a single layer in an ungreased 13×9-inch baking dish.
- Make the Lemon Butter Sauce: In a small bowl, combine the melted butter, fresh lemon juice, garlic powder, and salt.

- Sauce and Season: Pour the lemon butter sauce evenly over the four tilapia fillets in the baking dish. Sprinkle the tops of the fillets with the drained capers, the dried oregano, and the paprika.

- Bake to Flaky Perfection: Place the baking dish in the preheated oven and bake, uncovered, for 10 to 15 minutes. The exact time will depend on the thickness of your fillets. The tilapia is done when it is opaque and just begins to flake easily when you test it with a fork.
- Serve and Enjoy: Serve the baked tilapia immediately, spooning any extra sauce from the pan over the top.
Wise Tips for Perfect Baked Tilapia
- Don’t Overcook the Fish! This is the most important rule for cooking any delicate white fish. Tilapia cooks very quickly. Start checking for doneness at the 10-minute mark. The moment it flakes easily with a fork, it’s done. Overcooked tilapia will be dry.
- Use Fresh Lemon Juice: For the brightest, freshest flavor, always use freshly squeezed lemon juice. The bottled kind just can’t compare.
- Pat Your Fish Dry: Before placing the fillets in the baking dish, give them a quick pat with a paper towel. This helps them bake more evenly.
- A Simple and Elegant Main: This dish is beautiful and flavorful enough to serve to company, but simple enough that you can make it any night of the week.
Easy Baked Tilapia
Ingredients
Equipment
Method
-
Preheat oven to 425°F. Place tilapia fillets in an ungreased 13×9-in. baking dish.
-
In a small bowl, combine the melted butter, lemon juice, garlic powder and salt. Pour this mixture evenly over the fillets.
-
Sprinkle the fillets with capers, oregano and paprika.
-
Bake, uncovered, for 10-15 minutes, or until the fish just begins to flake easily with a fork. Serve immediately.
Notes
Frequently Asked Questions (FAQ) – Easy Baked Tilapia
What should I serve with baked tilapia?
This is a wonderfully versatile dish! It pairs perfectly with roasted vegetables like asparagus or broccoli, a side of fluffy rice or quinoa, or a simple green salad.
Can I use a different kind of fish?
Yes! This lemon butter sauce and baking method would be delicious with other flaky white fish like cod, haddock, or flounder. You may need to adjust the baking time based on the thickness of the fillets.
Can I use fresh garlic instead of garlic powder?
You can, but be mindful that minced fresh garlic can burn easily in the high heat of the oven. If using fresh, I recommend stirring it into the melted butter off the heat to let it infuse, rather than sprinkling it on top. Garlic powder provides a more consistent, burn-proof flavor for this method.
How do I store and reheat leftovers?
Store leftover tilapia in an airtight container in the refrigerator for up to 3 days. Reheat it gently in a low-temperature oven or for a few seconds in the microwave until just warmed through to avoid drying it out.
Conclusion
This Easy Baked Tilapia is a true weeknight hero. It’s an incredibly fast, healthy, and elegant meal that is packed with the most incredible flavor. I know this simple recipe will become a new favorite in your cooking repertoire!
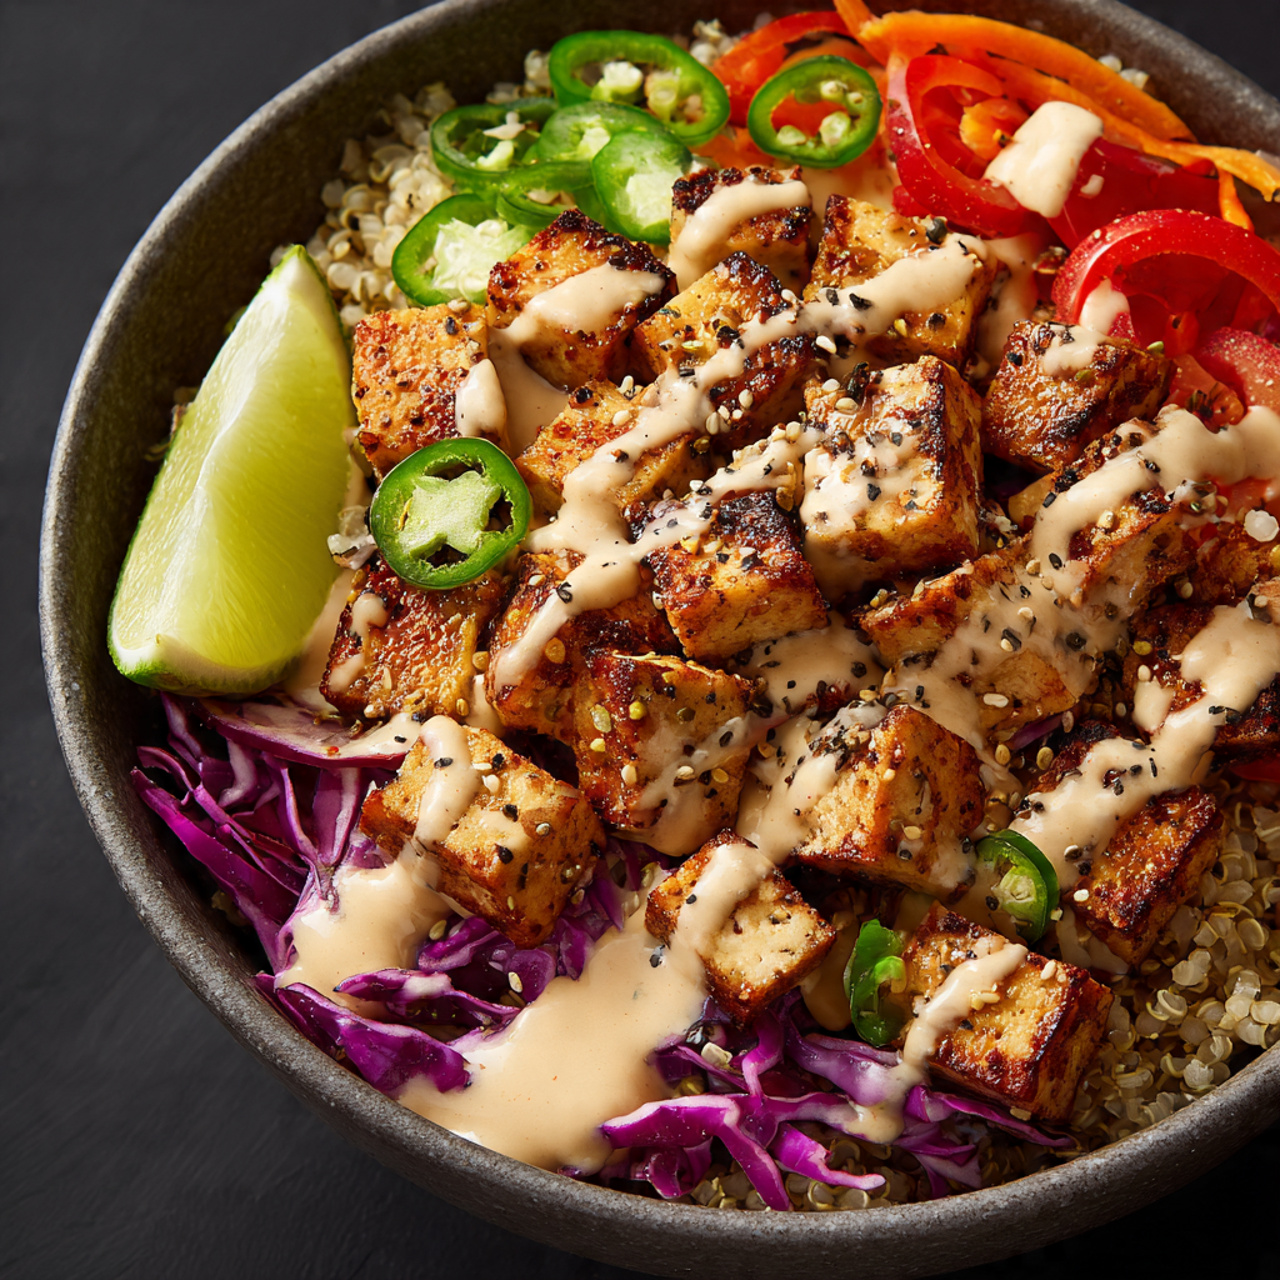
9. The Ultimate Peanut Chickpea Power Bowls (Healthy Weeknight Dinner!)

Imagine a vibrant, colorful bowl, absolutely brimming with wholesome ingredients: crispy, pan-fried chickpeas, crunchy shredded cabbage and carrots, cool cucumber, and hearty brown rice, all drizzled with the most incredible, creamy, and savory peanut sauce. That, my friends, is the fresh, energizing, and utterly delicious magic of these Peanut Chickpea Protein Bowls. This is, without a doubt, the most satisfying and flavor-packed vegetarian weeknight dinner you will make.
I promise you, there is no greater weeknight victory than a meal that is this healthy, this beautiful, and this easy to assemble. It’s a completely customizable bowl of goodness that’s perfect for a quick dinner and even better for meal prepping a week of fantastic lunches. It’s a true celebration of fresh, vibrant, plant-powered food.
Get ready to discover your new favorite weeknight obsession, a recipe so delicious and satisfying, you won’t even miss the meat.
Why These Peanut Chickpea Bowls are a Weeknight Staple
You are going to be completely amazed by how much flavor is packed into this simple, healthy bowl. It’s a go-to for so many reasons. Here’s why:
- Incredible Layers of Flavor & Texture: From the crispy, savory chickpeas to the crunchy raw veggies and the creamy, rich peanut sauce, every single bite is a delicious adventure.
- A Plant-Based Protein Powerhouse: Loaded with protein and fiber from the chickpeas and peanuts, this bowl is incredibly satisfying and will keep you full and energized for hours.
- Ready in Just 20 Minutes: This is the ultimate fast and fresh weeknight dinner. The whole meal comes together in the time it takes to cook your rice (if you haven’t prepped it!).
Recipe Snapshot
| Prep Time | 15 minutes |
| Cook Time | 5 minutes |
| Total Time | 20 minutes |
| Servings | 4 servings |
| Calories | 753 kcal per serving |
| Course | Main Course, Dinner |
| Cuisine | Asian-Inspired, American |
| Difficulty/Method | Easy / Skillet |
Your Shopping List for This Vibrant Bowl
This recipe uses a wonderful mix of fresh ingredients and pantry staples to create a flavor-packed meal.
→ For the Savory Peanut Sauce
- 1 garlic clove & ½ tsp ginger → Grated, for a pungent, aromatic base.
- ¼ cup all-natural creamy peanut butter → The rich, creamy heart of our sauce.
- 3 Tbsp fresh lime juice → For a bright, tangy kick that cuts through the richness.
- 2 Tbsp reduced-sodium soy sauce → For a deep, savory, umami flavor.
- 1 Tbsp honey → For a touch of sweetness to balance the flavors.
- 2 tsp toasted sesame oil → Adds a wonderful, nutty, aromatic finish.
→ For the Crispy Chickpeas & Bowls
- 2 cans chickpeas → Drained, rinsed, and patted very dry.
Let’s Get Cooking! Your Step-by-Step Guide
Ready for a fast, fresh, and incredibly satisfying dinner? Let’s get started.
Part 1: The Irresistible Peanut Sauce
- Whisk It All Together: In a medium bowl, whisk together the grated garlic, grated ginger, peanut butter, lime juice, soy sauce, honey, and toasted sesame oil until smooth.
- Adjust Consistency: Add a teaspoon of warm water at a time, whisking after each addition, until the sauce reaches your desired drizzling consistency. Set aside.
Part 2: The Crispy Garlic-Ginger Chickpeas
- Dry the Chickpeas: This step is key! Spread the rinsed chickpeas on a clean kitchen towel, top with another towel, and gently press and roll to get them as dry as possible. For extra crispiness, take a moment to pick off any loose chickpea skins.
- Pan-Fry the Chickpeas: Heat the neutral oil in a large, deep skillet over medium heat. Add the dry chickpeas, season with ½ tsp of salt, and spread them in a single layer. Cook, tossing occasionally, for 4 to 5 minutes, until they are browned and slightly crisp.
- Add the Aromatics: Add the chopped garlic and grated ginger to the skillet. Continue to cook, tossing constantly, for 1 to 2 minutes more, until the chickpeas are crispy all over and the garlic is fragrant and lightly browned. Transfer the crispy chickpeas to a plate.
Part 3: Assemble Your Power Bowls
- Make the Cabbage Slaw: In a medium bowl, toss the shredded red cabbage with the chopped cilantro and the remaining ¼ tsp of salt.
- Build Your Bowl: Divide the cooked brown rice among four bowls. Top with the cabbage slaw, sliced cucumbers, shredded carrots, and a generous portion of the crispy chickpeas.
- Garnish and Serve: Sprinkle each bowl with chopped roasted peanuts and a little more fresh cilantro. Drizzle generously with the prepared peanut sauce and serve with a fresh lime wedge on the side for squeezing.

Crispy Peanut Chickpea and Veggie Power Bowls
Ingredients
Equipment
Method
-
Make the Peanut Sauce: In a medium bowl, whisk garlic, ginger, peanut butter, lime juice, soy sauce, honey, and sesame oil. Add warm water, 1 tsp. at a time, until desired drizzling consistency is reached.
-
Dry the chickpeas thoroughly on a kitchen towel. In a large skillet over medium heat, heat oil. Add chickpeas, season with 1/2 tsp. kosher salt, and spread in a single layer. Cook, tossing occasionally, until browned and slightly crisp, 4 to 5 minutes.
-
Add chopped garlic and grated ginger to the skillet. Continue to cook, tossing constantly, until chickpeas are crispy and garlic is lightly browned, 1 to 2 minutes more. Transfer to a plate.
-
In a medium bowl, toss the shredded cabbage, chopped cilantro, and remaining 1/4 tsp. salt.
-
Assemble the bowls: Divide the brown rice among four bowls. Top with the cabbage mixture, cucumbers, carrots, and crispy chickpeas.
-
Sprinkle with chopped peanuts and more cilantro. Drizzle generously with peanut sauce and serve with lime wedges alongside.
Notes
Meal Prep: Store all components separately in the fridge for up to 4 days. Assemble just before serving for the best texture. The peanut sauce can be made 3 days ahead.
Air Fryer Option: To air fry the chickpeas, toss them with oil and seasonings and air fry at 400°F for 12-15 minutes until crispy.
WiseRecipes’ Top Tips for the Best Protein Bowls
These simple, pro-level secrets will make your power bowls truly exceptional.
- Dry Your Chickpeas Thoroughly. This is the non-negotiable secret to getting them truly crispy, not soggy. The drier they are when they hit the hot oil, the better they will brown and crisp up. Removing the skins also makes a big difference!
- Don’t Crowd the Pan. When frying the chickpeas, make sure they are in a single, even layer. This allows them to fry and get crispy. If they are piled on top of each other, they will just steam. Cook in two batches if needed.
Keep It Fresh! Storing & Meal Prep Instructions
This bowl is a meal prepper’s dream. Here’s how to do it right.
- Meal Prep: For the best results, store all the components in separate airtight containers in the refrigerator for up to 4 days: the cooked rice, the crispy chickpeas, the cabbage slaw, the sliced cucumbers/carrots, and the peanut sauce.
- Assembly: When you’re ready for lunch or dinner, simply assemble your bowl! You can enjoy it cold, or gently reheat the rice and chickpeas in the microwave before adding the fresh, cold toppings.
FAQs: Your Peanut Chickpea Bowl Questions, Answered!
Can I make these in an air fryer?
Yes, the chickpeas are fantastic in the air fryer! Toss the dried chickpeas with oil, salt, garlic, and ginger. Air fry at 400°F (200°C) for 12-15 minutes, shaking the basket a few times, until golden and crispy.
Can I add other proteins to this bowl?
Absolutely! This bowl is a great base. Crispy tofu, shredded rotisserie chicken, or grilled shrimp would all be delicious additions or substitutions for the chickpeas.
Is there a substitute for peanut butter in the sauce?
Yes. If you have a peanut allergy, you can make a very similar sauce using creamy almond butter or SunButter (sunflower seed butter). The flavor will be slightly different but still delicious!
What other grains can I use?
This bowl is fantastic with a base of quinoa for an extra protein boost, or even with soba noodles or farro for a different texture and flavor.
Final Thoughts: Your New Favorite Healthy Meal
There is nothing more empowering than creating a meal that is bursting with flavor, packed with nutrition, and makes you feel absolutely amazing. These Peanut Chickpea Protein Bowls are a true celebration of vibrant, plant-based eating. They are proof that a healthy weeknight dinner can be exciting, satisfying, and anything but boring. I hope this recipe becomes a new staple in your healthy eating rotation. Happy Cooking!
10. The Ultimate Steak Fajita Power Bowls (Healthy Weeknight Dinner!)

Imagine the irresistible, sizzling sound and savory aroma of a classic steak fajita platter from your favorite restaurant. Now, imagine capturing all that incredible flavor in a vibrant, wholesome, and incredibly easy-to-make bowl at home. That, my friends, is the pure, satisfying magic of these Steak Fajita Power Bowls. This is, without a doubt, the most delicious and well-rounded weeknight dinner you will make all month.
I promise you, there is no greater weeknight victory than this meal. The steak is perfectly seared and seasoned with chili and cumin, the peppers and onions are sweet and tender-crisp, and it’s all piled high with creamy avocado, black beans, and zesty cilantro. It’s a complete, satisfying, and energizing meal all in one glorious bowl.
Get ready to skip the takeout and create a stunning, restaurant-quality meal that’s perfect for a quick dinner or a week of fantastic meal prep.

Why These Fajita Bowls are a Weeknight Winner
You are going to be completely hooked on how much flavor is packed into this simple, healthy bowl. It’s a true staple recipe. Here’s why:
- All the Fajita Flavor, None of the Fuss: You get that classic, sizzling, smoky flavor profile of steak, peppers, and onions without the need for a special cast-iron platter or tortillas.
- A Perfectly Balanced, Healthy Meal: This “power bowl” is packed with lean protein, healthy fats, fiber-rich carbs, and a ton of veggies for a truly nourishing and satisfying dinner.
- Ready in Under 45 Minutes: This is a fantastic, fast recipe for busy weeknights. The whole meal comes together in the time it takes to cook your rice.
Recipe Snapshot
| Prep Time | 30 minutes |
| Cook Time | 15 minutes |
| Total Time | 45 minutes |
| Servings | 4 servings |
| Calories | 615 kcal per bowl (estimated) |
| Course | Main Course, Dinner |
| Cuisine | Tex-Mex, American |
| Difficulty/Method | Easy / Skillet |
Your Shopping List for This Vibrant Bowl
This recipe uses a handful of fresh, powerful ingredients to create its incredible flavor.

→ For the Steak and Veggies
- 2 Tbsp vegetable oil → Divided for cooking the veggies and the steak.
- ½ yellow onion & 2 bell peppers → The classic fajita vegetable combination. Use a mix of colors for a beautiful bowl!
- Kosher salt & freshly ground black pepper → For seasoning every layer.
- 1 lb skirt steak → The perfect cut for fajitas! It’s flavorful and cooks quickly. Flank steak is a great substitute.
- 1 lime → You’ll need the juice of half a lime to add a zesty kick to the steak.
- ½ tsp chili powder & ½ tsp cumin → The essential warm and smoky fajita spices.
→ For Assembling the Bowls
- 4 cups cooked brown rice → A hearty and healthy base for your power bowl.
- 1 avocado → Thinly sliced for a creamy, healthy fat.
Let’s Get Cooking! Your Step-by-Step Guide
Ready for a quick and incredibly satisfying dinner? Let’s get that skillet sizzling.
Part 1: The Sizzling Peppers and Onions
- Sauté the Veggies: In a large skillet (cast iron is perfect!) over medium heat, heat 1 tablespoon of the vegetable oil. Add the sliced onions and bell peppers. Season them with a good pinch of salt and pepper.
- Cook Until Tender: Cook, stirring frequently, for 7 to 10 minutes, until the onions are soft and translucent and the peppers are tender-crisp. Transfer the cooked vegetables to a plate and set aside.
Part 2: The Perfect Seared Steak
- Heat the Skillet: In the same skillet, turn the heat up to medium-high. Add the remaining 1 tablespoon of oil and heat until it’s very hot and just beginning to shimmer.
- Sear the Steak: Arrange the steak slices in the hot pan in a single layer. Pour the lime juice over the top. Sprinkle with the chili powder, cumin, and another pinch of salt and pepper.
- Cook to Perfection: Let the steak cook, completely undisturbed, for 2 to 3 minutes to get a beautiful brown crust. Then, flip the pieces and continue to cook, stirring occasionally, for about 2 more minutes for a perfect medium. Cook for a minute less for medium-rare, or a minute more for well-done. Transfer the cooked steak to another plate to rest.
Part 3: Build Your Power Bowls
- Create the Base: Divide the warm cooked brown rice among four bowls.
- Pile on the Goodness: Top the rice in each bowl with a portion of the seared steak, the cooked onions and peppers, sliced avocado, black beans, and corn.
- Garnish and Serve: Finish each bowl with a sprinkle of fresh cilantro and a cool drizzle of sour cream. Serve immediately and enjoy!
Steak Fajita Power Bowls with Brown Rice
Ingredients
Equipment
Method
-
In a large skillet over medium heat, heat 1 Tbsp. oil. Add onions and peppers; season with salt and pepper. Cook, stirring frequently, until tender, 7 to 10 minutes. Transfer to a plate.
-
In the same skillet over medium-high heat, heat the remaining 1 Tbsp. oil until very hot. Arrange steak in the pan in a single layer.
-
Pour lime juice over the steak. Add chili powder, cumin, salt, and pepper. Cook steak, undisturbed, until well browned on one side, 2 to 3 minutes.
-
Continue to cook, stirring occasionally, until cooked to your preference, about 2 minutes more for medium. Transfer to another plate.
-
Divide the cooked brown rice among four bowls. Top with the steak, cooked onions and peppers, sliced avocado, black beans, and corn.
-
Garnish with fresh cilantro and a drizzle of sour cream before serving.
Notes
Get a Good Sear: Make sure your pan is very hot before adding the steak and don’t overcrowd it. This is the key to getting a delicious, brown crust.
Slice Against the Grain: For the most tender steak, be sure to slice your skirt steak against the direction of the muscle fibers.
WiseRecipes’ Top Tips for the Best Fajita Bowls
These simple, pro-level secrets will make your steak bowls truly exceptional.
- A Hot Pan is Non-Negotiable. For both the veggies and the steak, the secret to that classic “fajita” flavor is a good, hard sear, not a gentle steam. Make sure your skillet is properly preheated before you add your ingredients.
- Don’t Crowd the Pan. This is especially important for the steak. If you pile all the meat in at once, the temperature of the pan will drop, and the steak will steam instead of sear. Cook in two batches if you have to!
- Slice Steak Against the Grain. For the most tender bite, look at the direction the muscle fibers are running in your skirt steak and slice perpendicular to them. This shortens the fibers and makes the meat much more tender to chew.
- Meal Prep Perfection. This recipe is a dream for meal prep. Cook the rice, veggies, and steak as directed. Portion the rice, beans, corn, and cooked veggies/steak into airtight containers. Keep the avocado, cilantro, and sour cream separate to add just before serving.
- Make a Creamy Lime Drizzle. To take it to the next level, mix your sour cream (or Greek yogurt) with a squeeze of fresh lime juice and a pinch of salt. This creates a quick, delicious crema that ties the whole bowl together.
Keep It Fresh! Storing & Reheating Instructions
This bowl is fantastic for leftovers and planned meal prep.
- Refrigerator: Store the components in separate airtight containers for the best results, or store fully assembled bowls (minus the avocado and sour cream) for up to 4 days. The rice, veggies, steak, beans, and corn all keep and reheat beautifully.
- Reheating: To reheat, simply microwave a bowl for about 90 seconds to 2 minutes, until warmed through. Then, top with your fresh avocado, cilantro, and a drizzle of sour cream.
FAQs: Your Steak Fajita Bowl Questions, Answered!
What’s the best steak to use for fajitas?
Skirt steak is the classic and best choice. It has an incredible, beefy flavor and a texture that’s perfect when sliced thin. Flank steak is the next best substitute. You can also use sirloin, but be extra careful not to overcook it.
Can I make this with chicken or shrimp instead?
Absolutely! This recipe is a fantastic template. For chicken, use boneless, skinless chicken breasts or thighs, sliced thin, and cook them through. For shrimp, add them at the very end and cook for just a couple of minutes until they are pink and opaque.
Can I make this low-carb?
Yes, easily! Simply swap the brown rice base for a bed of crisp chopped lettuce to create a delicious Fajita Steak Salad, or use cilantro-lime cauliflower rice for a low-carb grain alternative.
What other toppings would be good on this?
The possibilities are endless! Shredded cheddar or cotija cheese, your favorite salsa, pickled jalapeños, or a big scoop of fresh pico de gallo would all be fantastic additions.
Final Thoughts: Your New Weeknight Hero
There is nothing more satisfying than sitting down to a meal that is bursting with flavor, packed with nutrition, and was secretly easy to make. These Steak Fajita Power Bowls are a true weeknight hero. They are a perfect, balanced, and delicious way to get that restaurant-quality flavor right in your own kitchen. I hope this becomes a staple in your dinner rotation. Happy Cooking!