Healthy Kit Kat Recipe (Gluten Free, Vegan) – Bake It Paleo
I never set out to replicate a candy bar perfectly — I wanted the crunch, the whisper of chocolate, and something that would survive my afternoon slump without sullying my conscience. While I was testing textures and sweeteners I bookmarked a different kind of no-bake treat, the healthy no-bake Oreo cheesecake bites for inspiration on…
I never set out to replicate a candy bar perfectly — I wanted the crunch, the whisper of chocolate, and something that would survive my afternoon slump without sullying my conscience. While I was testing textures and sweeteners I bookmarked a different kind of no-bake treat, the healthy no-bake Oreo cheesecake bites for inspiration on binding and chilling techniques, and it informed how I set these bars without overbaking.
What I keep on the counter most afternoons:
- 1 1/2 cups sunflower seed butter (smooth) — nut-free, creamy, and predictable
- 1/3 cup coconut oil, melted
- 1/3 cup pure maple syrup (or liquid sweetener of choice)
- 1 teaspoon vanilla extract
- 1/2 cup coconut flour (absorbs moisture without gluten)
- 1/4 cup tapioca starch (for lightness)
- 1/2 teaspoon fine sea salt
- 6 oz dairy-free dark chocolate (or vegan chocolate chips)
- 1 tablespoon cocoa powder (for a touch more chocolate depth)
Optional: 1–2 tablespoons finely chopped roasted hazelnuts or crisped quinoa for added crunch
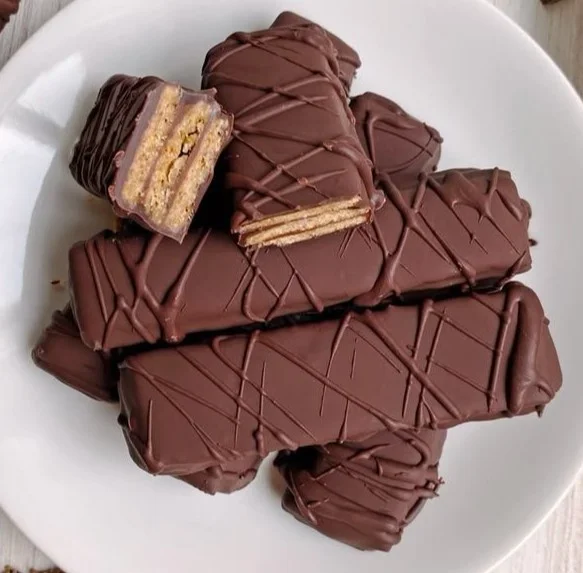
The method I landed on is part rolling-pin meditation, part science experiment. I mix the wet ingredients until silky, fold the dry ones in until there’s no floury streaks, and then chill the dough until it firms enough to roll. Rolling thin is the key—thinner, crispier layers. I press the sheet between two pieces of parchment and use the bottom of a pan to get uniform thickness. After cutting into long thin rectangles (bars!), I bake them very briefly—just until they feel set to the touch—because I want a crisp surface without browning, which keeps the color even for coating.
Coating is where patience pays. I temper the chocolate loosely by melting two-thirds with the coconut oil and stirring in the remaining third off the heat so it cools a smidge without seizing. Dipping the bars with two forks is clumsy but effective; I let excess chocolate drip back into the bowl and set each bar on parchment. A sprinkle of flaky sea salt while the chocolate is still tacky adds a tiny hit that plays against the sweetness.
Little technique notes I discovered while doing multiple batches: if the dough is too sticky to roll, a short chill or an extra tablespoon of coconut flour helps; too dry, and the bars crack—add a teaspoon of maple syrup or a few drops of melted coconut oil. For a no-bake shortcut, press the dough into a shallow pan, freeze until firm, slice, and dip—no oven required, but the texture is slightly softer.
I like to vary the bars. Cocoa powder in the dough makes everything feel more like a classic candy wafer; adding a touch of instant espresso powder deepens the chocolate flavor. If you want extra layers, make thinner bars and sandwich a thin smear of seed butter between two pieces before coating. For seasonal flair, grate orange zest into the chocolate; it brightens the whole thing.
Serving suggestions are flexible. These feel right next to a simple fruit plate or as a sweet finish to a rustic brunch. When I make a richer spread with fried apple bites, I sometimes pair one of these bars alongside baked apple fritters to balance the menu; the contrast between warm apple and chilled chocolate is unexpectedly soothing. And because I sometimes entertain with savory-forward platters, I’ve even had success offering them after a light fish course — the bright notes of citrus on the side made me think of the grapefruit salad in this baked salmon with grapefruit salad I tried last summer.
Storage and make-ahead: they keep well in a single layer in an airtight container in the refrigerator for up to two weeks. If you stack them, separate layers with parchment so the chocolate doesn’t stick. For longer storage, freeze in a sealed box for up to two months and let thaw in the fridge for 15–20 minutes before serving so the chocolate softens but the wafer stays crisp.
A brief how-to in a single flow:
I combine sunflower seed butter, maple syrup, melted coconut oil, and vanilla until smooth; sift in coconut flour, tapioca starch, cocoa if using, and salt until it binds to a slightly tacky dough. Chill fifteen to thirty minutes, roll thin between parchment, trim into bars, and bake just until set (or freeze solid for a no-bake route). Melt chocolate with coconut oil, dip each cooled bar, and finish with a pinch of salt or toasted seeds. Cool until the coating snaps.
I’ll also mention two pitfalls so you don’t repeat my mistakes: overbake and they taste toasted rather than candy-like; under-chill and the dough will tear during rolling. A thin, steady hand when cutting gives the most uniform bars.
Conclusion
If you want a close reference and ideas for ingredient swaps I found helpful, the original concept that inspired my tweaks is detailed in Healthy Kit Kat Recipe (Gluten Free, Vegan) – Bake It Paleo, and for another plant-based take on wafer bars see Vegan Paleo Kit Kat Bars – Feasting on Fruit. For more on using sunflower seed butter in desserts like this one, I also consulted Recipes with Sunbutter (Paleo, Vegan, Keto). One limitation I noticed: if your pantry is warm, the bars soften quickly and require refrigeration to keep their crispness.
Chocolate Crunch Bars
Ingredients
Method
- Combine sunflower seed butter, maple syrup, melted coconut oil, and vanilla until smooth.
- Sift in coconut flour, tapioca starch, cocoa powder (if using), and salt; mix until it forms a slightly tacky dough.
- Chill the dough for 15-30 minutes until firm enough to roll.
- Roll out the dough thinly between two pieces of parchment paper and cut into long thin rectangles.
- Bake the bars briefly until set to the touch, while ensuring they don’t brown.
- Melt the chocolate with coconut oil, tempering it by mixing two-thirds of the chocolate until melted and then stirring in the remaining third off the heat.
- Dip each cooled bar into the tempered chocolate, allowing excess to drip off and place on parchment paper.
- Sprinkle with flaky sea salt while the chocolate is still tacky.