A Clever Heart-Shaped Cake for Valentine’s Day (No Special Pan Needed!)
There is something undeniably romantic about a beautiful, heart-shaped cake for Valentine’s Day. It’s a classic, sweet gesture that says “I love you” in the most delicious way possible. But let’s be honest, most of us don’t have a heart-shaped cake pan collecting dust in our cupboards for one day a year. And that, my…
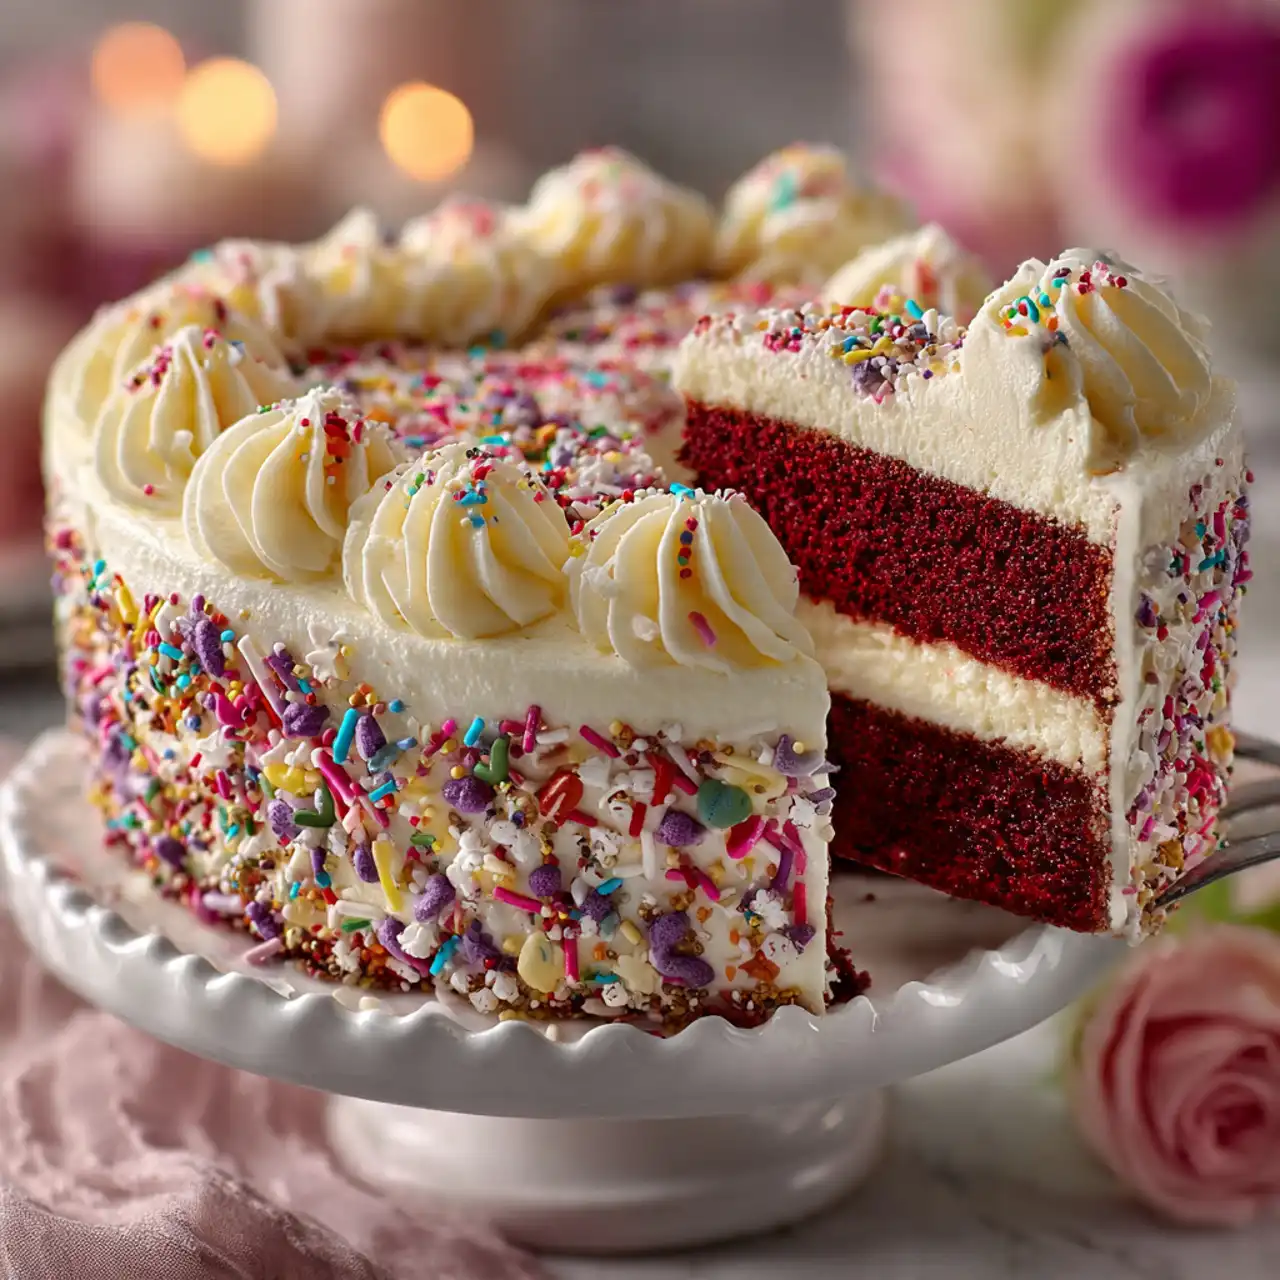
There is something undeniably romantic about a beautiful, heart-shaped cake for Valentine’s Day. It’s a classic, sweet gesture that says “I love you” in the most delicious way possible. But let’s be honest, most of us don’t have a heart-shaped cake pan collecting dust in our cupboards for one day a year. And that, my friends, is where the pure, simple genius of this recipe comes in. This isn’t just a recipe for a stunning red velvet cake with luscious cream cheese frosting; it’s a guide to a brilliant kitchen hack that will change your Valentine’s baking forever.
The secret is wonderfully simple: one round cake and one square cake. That’s it. With a single, strategic slice, you can transform these two basic shapes into a perfect, impressive heart. I was so delighted the first time I tried this technique; it felt like a magic trick! This recipe pairs that clever assembly with a classic, moist, and tender red velvet cake that has a hint of cocoa and a beautiful, tangy crumb from the buttermilk. Crowned with a rich, silky, and not-too-sweet cream cheese frosting, it is the absolute perfect Valentine’s dessert.

Why This is the Only Heart Cake Recipe You’ll Ever Need
You are going to fall head-over-heels for this clever, beautiful, and delicious cake. It’s a true Valentine’s Day show-stopper. Here’s why:
- No Special Heart-Shaped Pan Required! This is the ultimate hack! The recipe brilliantly uses one standard 8-inch round pan and one 8-inch square pan to create a perfect heart shape.
- A Classic, Moist Red Velvet Cake: The cake itself is a dream—wonderfully tender, moist, with a hint of cocoa and that classic, tangy buttermilk flavor that makes red velvet so beloved.
- Luscious, Silky Cream Cheese Frosting: The frosting is the perfect partner to the red velvet cake. It’s rich, creamy, tangy, and perfectly sweet.
- A True Valentine’s Day Centerpiece: A beautifully frosted, vibrant red, heart-shaped cake is a guaranteed “wow” moment and the perfect, romantic centerpiece for your celebration.
- Surprisingly Simple to Assemble: While the final result looks impressive and complex, the steps for creating the heart shape and frosting the cake are straightforward and fun.
Recipe Snapshot
| Prep Time | 25 minutes |
| Cook Time | 30 minutes |
| Cooling Time | ~1 hour |
| Total Time | ~2 hours |
| Servings | 16 servings |
| Calories | 453 kcal per serving |
| Course | Dessert |
| Cuisine | American |
| Difficulty/Method | Easy / Baking |
Your Shopping List for This Romantic Cake
This impressive cake comes together with a handful of classic, high-quality baking staples.
→ For the Red Velvet Cake
- Cooking spray & parchment paper → For preparing your pans perfectly.
- 1 cup (2 sticks) butter → Softened to room temperature.
- 1 cup granulated sugar
- 2 large eggs → At room temperature.
→ For the Cream Cheese Frosting
- 1 (8-oz.) block cream cheese & 4 Tbsp butter → Both must be softened to room temperature for a smooth, lump-free frosting.
- 4 ¼ cups powdered sugar → Sifted, for the smoothest possible texture.
Let’s Get Baking! Your Step-by-Step Guide
Ready to create the most clever and beautiful cake for your Valentine? Let’s get started.
Part 1: The Tender Red Velvet Cakes
- Preheat and Prep: Preheat your oven to 350°F (175°C). Grease one 8-inch round cake pan and one 8-inch square cake pan, and line the bottoms with parchment paper.
- Cream the Fats and Sugar: In a large bowl, using a hand mixer or a stand mixer, beat the softened butter and granulated sugar until light and fluffy. Add the eggs one at a time, beating well after each, then beat in the vanilla.
- Combine the Batter: In a separate bowl, whisk together the flour, cocoa powder, baking soda, and salt. In another small bowl, whisk together the buttermilk, vinegar, and red food coloring. Alternately add the dry ingredients and the wet (buttermilk) ingredients to the creamed mixture, beginning and ending with the dry ingredients, mixing on low until just combined.
- Bake and Cool: Divide the vibrant red batter evenly between your two prepared pans. Bake for 25 to 30 minutes, or until a toothpick inserted into the center of each cake comes out clean. Let the cakes cool in their pans for 15 minutes before inverting them onto a wire rack to cool completely.
Part 2: The Luscious Frosting and Heart Assembly
- Make the Frosting: While the cakes cool, make the frosting. In a large bowl, beat the softened cream cheese and butter until smooth. Gradually add the powdered sugar and beat until light and fluffy. Finally, mix in the vanilla and salt.
- The Magic Cut: Once the round cake is completely cool, use a large, sharp knife to cut it exactly in half, creating two perfect semi-circles.
- Assemble the Heart: Place your square cake on a large serving platter or cake board, positioning it like a diamond. Place the cut, flat side of one semi-circle against one of the top adjacent sides of the “diamond.” Place the second semi-circle against the other top side. Voila—you have a perfect heart!
Part 3: Decorate and Serve
- Frost Your Masterpiece: Use an offset spatula to generously frost the entire surface and sides of your assembled heart-shaped cake with the creamy, luscious cream cheese frosting.
- Decorate and Serve: If you’re using them, decorate the cake with your favorite colorful Valentine’s sprinkles. Slice and serve to your favorite person!
Heart-Shaped Red Velvet Cake with Cream Cheese Frosting
Ingredients
Equipment
Method
- Preheat oven to 350°F. Grease and line one 8″ round cake pan and one 8″ square cake pan with parchment.
- In a large bowl, beat butter and sugar until light and fluffy. Add eggs one at a time, then add vanilla.
- In another bowl, whisk flour, cocoa, baking soda, and salt. In a small bowl, whisk buttermilk, vinegar, and red food coloring. Alternately add the dry and wet mixtures to the butter mixture, beginning and ending with dry, mixing until just combined.
- Divide batter between the two prepared pans and bake until a toothpick comes out clean, 25 to 30 minutes. Cool in pans for 15 minutes, then invert onto a cooling rack to cool completely.
- Make the frosting: In a large bowl, beat the softened cream cheese and butter until smooth. Gradually add the powdered sugar and beat until light and fluffy. Mix in the vanilla and salt.
- To assemble, cut the cooled round cake in half. Place the square cake on a platter like a diamond. Arrange the two semi-circles against the top adjacent sides of the square to form a heart.
- Frost the entire cake with the cream cheese frosting. Garnish with sprinkles, if using.
Notes
WiseRecipes’ Top Tips for a Perfect Heart Cake
These simple secrets will ensure your Valentine’s cake is a flawless, flavorful triumph.
- Use Room Temperature Ingredients. For a smooth, emulsified cake batter and a lump-free frosting, it is crucial that your butter, eggs, and cream cheese are all at room temperature before you begin.
- Don’t Overmix Your Cake Batter. Once you start adding the flour and buttermilk, mix only until the ingredients are just combined. Overmixing develops the gluten and can lead to a tough, dense cake instead of a light and tender one.
- Cool the Cakes Completely. This is the golden rule of cake decorating! If you try to frost a cake that is even slightly warm, the cream cheese frosting will melt into a sad, greasy puddle. Patience is key.
- Do a “Crumb Coat.” For a perfectly clean, professional finish, apply a very thin layer of frosting all over the cake first. This is called a “crumb coat” and it traps any loose crumbs. Chill the cake for about 20-30 minutes to set this layer before applying your final, generous coat of frosting.
- Use Gel Food Coloring for the Best Red. For a deep, vibrant, true red color without adding a lot of extra liquid to your batter, a concentrated gel or paste food coloring is far superior to the liquid kind you find in the little dropper bottles.
Keep It Fresh! Storing Your Cake
Because of the cream cheese frosting, this beautiful cake needs to be stored with care.
- Refrigerator: The finished cake must be stored in the refrigerator. You can keep it in a cake carrier or loosely tented with foil. It will stay fresh and delicious for up to 4 days.
- Serving: For the best flavor and texture, let the cake sit at room temperature for about 20-30 minutes before slicing and serving.
FAQs: Your Heart-Shaped Cake Questions, Answered!
Can I make this with a different kind of cake?
Absolutely! This brilliant assembly technique will work with any cake recipe that can be baked in an 8-inch round and an 8-inch square pan. A classic chocolate cake or even a vanilla cake would be fantastic.
Can I make the cakes ahead of time?
Yes, this is a great time-saver! You can bake the cake layers a day in advance. Let them cool completely, then wrap them tightly in plastic wrap and store them at room temperature overnight before assembling and frosting.
My cream cheese frosting is runny. How can I fix it?
This usually happens if your butter or cream cheese was too soft, or if your kitchen is very warm. The fix is simple: just place the bowl of frosting in the refrigerator for about 20-30 minutes to firm up before you try to use it.
Can I freeze this cake?
Yes! For best results, freeze the unfrosted, cooled cake layers wrapped tightly in plastic wrap and then foil. You can also freeze the finished, frosted cake, but be aware that condensation can sometimes affect the texture of the frosting upon thawing. Thaw the cake in the refrigerator.
Final Thoughts: A Cake from the Heart
There is nothing more special than a homemade cake, baked with love and a little bit of clever kitchen magic for someone you care about. This Heart-Shaped Cake is the perfect project to show your affection in the most delicious way possible. It’s a beautiful, classic, and surprisingly simple way to create a memorable Valentine’s Day. I hope you have a wonderful time creating this edible love letter. Happy Baking!