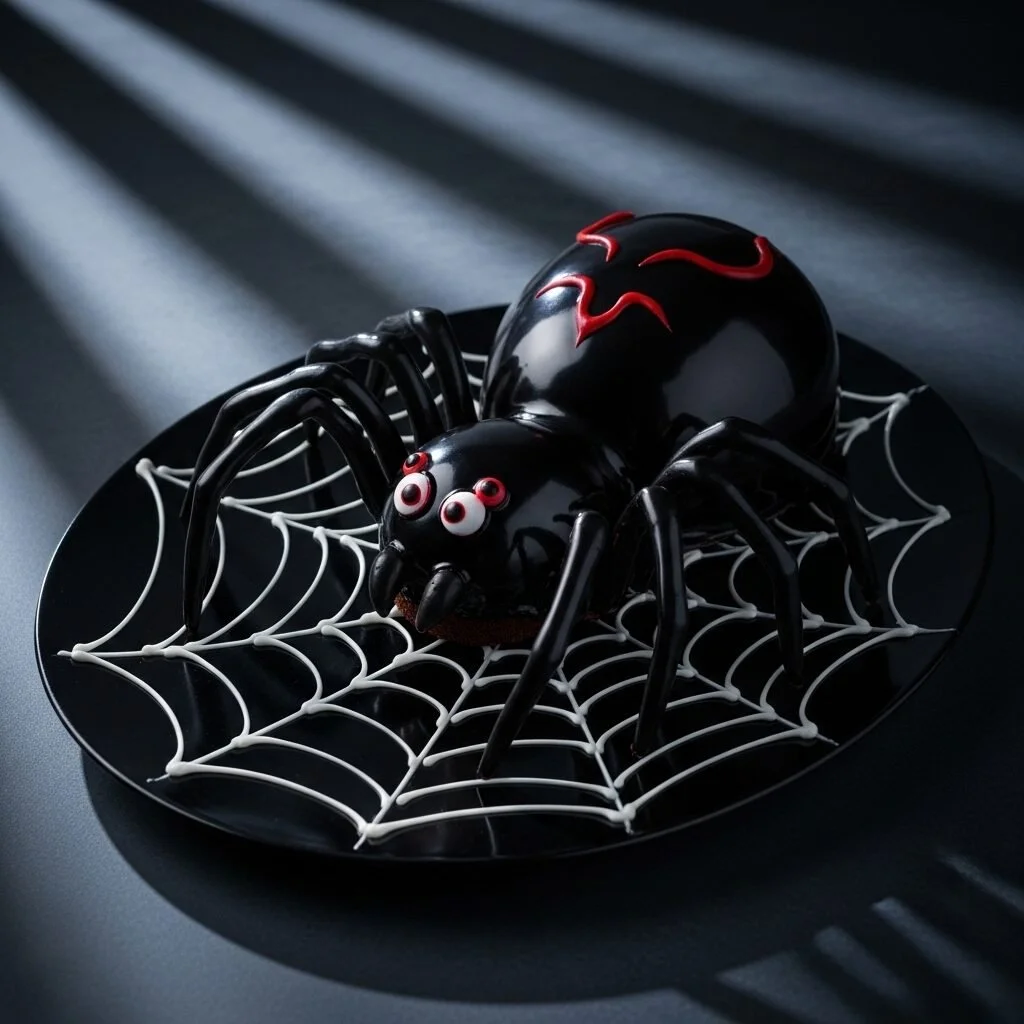
Hidden Horror Black Widow Cake
The Secret Behind Perfect Hidden Horror Black Widow Cake I have a confession: I make this Hidden Horror Black Widow Cake every October and more than once for friends who insist they need the "full spooky experience." The first time I tried it, I thought it was complicated, but I learned a few kitchen short-cuts…
The Secret Behind Perfect Hidden Horror Black Widow Cake
I have a confession: I make this Hidden Horror Black Widow Cake every October and more than once for friends who insist they need the "full spooky experience." The first time I tried it, I thought it was complicated, but I learned a few kitchen short-cuts that make the whole thing feel doable and even a little meditative. If you want a quick reference while you read, I originally found one version online and compared notes with it here: a handy write-up of the Hidden Horror Black Widow Cake.
When I describe the ingredients you need, it comes out like a shopping list, but I promise I think of each item as part of the personality of the spider. You will need a 1 (15.25-ounce) box chocolate cake mix (plus whatever the package asks for), Nonstick cooking spray as needed, 16 ounces bittersweet chocolate finely chopped, 16 chocolate cream-covered biscuit sticks such as Pocky, 1 tablespoon coconut oil, 1/3 cup chocolate or vanilla frosting, 6 candy eyes, 1 tube store-bought red decorating icing, Red sanding sugar as needed, 3 cups mini marshmallows, 2 tablespoons chocolate sprinkles, and 1 (11.75-ounce) jar strawberry ice cream topping. Read that sentence once and you can hear the textures in your head: crumbly cake, glossy chocolate, crunchy biscuit sticks, and the syrupy red reveal at the end.
The Ingredients That Pull It Off
The cake itself starts simple: prepare the chocolate cake according to package directions in two 8-inch cake pans and let cool completely. While the cakes bake and cool, get your chocolate ready. Spray an 8-inch bowl with cooking spray, line it neatly with plastic wrap and spray the wrap, then put it in the freezer until it is very cold. This step matters more than you might think; a cold mold helps the chocolate shell set up thin and strong. I also line a baking sheet with parchment and give it a quick spray before I start melting chocolate.
Microwave the 16 ounces of bittersweet chocolate in a medium microwave-safe bowl in 30-second intervals until melted which takes about 3 minutes total, and then let it rest for 5 minutes. While the chocolate is cooling, take 16 chocolate cream-covered biscuit sticks and cut off 1 inch from the chocolate ends of 8 of them so you have eight short and eight regular sticks. Working in pairs of the same length, dip the chocolate ends into the melted chocolate and lay them on the prepared baking sheet in a V shape to become the spider legs. Refrigerate those until set. Stir 1 tablespoon of coconut oil into the remaining chocolate; it thins the coating so it makes nice layers.
Making the Spider: Step by Step in My Kitchen
Once your bowl has lived its frozen life, remove it and brush the inside with 1/4 cup of the chocolate, then refreeze 10 minutes. I repeat this brushing and refreezing four more times, making sure the chocolate goes all the way to the rim and does not pool at the bottom. Then freeze the whole chocolate-lined bowl until solid, about 30 minutes. This is when patience pays: multiple thin coats give a stronger shell than one thick smear.
Now for the head and body: put one cake layer in a food processor and pulse it until it becomes fine crumbs. Add 1/3 cup chocolate or vanilla frosting and pulse until it just comes together, then shape the mixture into a slightly flattened ball to become the head. Freeze that ball for 30 minutes so it firms up and is easier to coat. Remove the head from the freezer and brush it with the chocolate mixture, refreeze 15 minutes, then repeat two more times. On the final coating, stick 6 candy eyes in a horseshoe shape so the face has a creepy, childlike charm.
When the dome is ready, fill the chocolate-lined bowl with 3 cups mini marshmallows, then top the marshmallow-filled bowl with the remaining cake layer and flip the whole thing onto a large serving platter. Carefully remove the plastic wrap from the chocolate dome and arrange the cake ball head to touch the body so it looks like one big spider. Drizzle the body with any remaining chocolate mixture and sprinkle 2 tablespoons chocolate sprinkles over the top. Use your tube of red decorating icing to pipe a red hourglass on the upper third of the body close to the head, then sprinkle red sanding sugar over the icing so it glitters like a warning sign.
Position four biscuit stick legs on each side of the body, with the two shorter ones in the middle, and gently push each leg into the dome about 1 inch. The legs hold surprisingly well; if you have trouble tucking them in, warm the ends slightly so they slide into the chocolate shell more easily. When it’s time for the reveal, heat the jar of strawberry ice cream topping in a small saucepan over medium heat until it boils, then slowly pour it over the spider’s body to spill out the marshmallow eggs.
Small Tricks from My Oven
I have a few tips I always share. First, when you melt chocolate, stop microwaving when a few unmelted bits remain—residual heat finishes it and you avoid scorching. Second, chill time is not optional; the head and shell must be freezing cold before coating otherwise the chocolate will not set smoothly. Third, when brushing the bowl, use a pastry brush and watch for pooling; if you see a drip form, even it out immediately. Fourth, if you want cleaner red piping, chill the body briefly before piping so the icing sits on the chocolate instead of running. Fifth, make the biscuit-stick legs the night before and refrigerate them flat so they are ready when the shell is done.
You can tell this is done right when the chocolate shell looks glossy and solid, the head holds together when you nudge it, and the marshmallows stay fluffy until the strawberry sauce is poured. The initial pour is the best sound—hot syrup sizzling on cold chocolate—and the room will go quiet for a second before people squeal.
How I Serve It and Store Leftovers
I serve this with plain vanilla ice cream and strong coffee because the sweetness and the bitter coffee balance the chocolate and fruit. For a different menu, try it next to a simple cheesecake or another dessert like a blackberry bliss cheesecake to keep the sweets table interesting. If you want to make the spider ahead, assemble the chocolate shell and legs up to two days before and keep it refrigerated, loosely covered. The assembled spider will keep, covered and chilled, for about 48 hours; keep the strawberry topping separate and heat it right before serving for the best dramatic effect.
Some easy variations: use white chocolate for the shell and swap raspberry topping for the strawberry for a brighter reveal, or make individual mini spiders using silicone muffin cups and smaller cake balls for a party where you want single-serve drama. For a less sugary version, use dark chocolate and reduce the sanding sugar on the hourglass.
I always tell people this cake is as much theater as it is dessert. The first time I made it for a group of kids, they screamed in the best possible way when the "eggs" came out, and an aunt who works in theater said the effect was Oscar-worthy. It takes a little time, but mostly you are waiting between steps, so play music, pour a glass of something, and enjoy the rhythm.
Conclusion
If you want the original source and a cooking layout to follow as a quick checklist, I compared my notes with the recipe on Food Network and it helped smooth a few details: Hidden Horror Black Widow Cake Recipe | Food Network Kitchen.
Hidden Horror Black Widow Cake
Ingredients
Method
- Prepare the chocolate cake according to package directions in two 8-inch cake pans and let cool completely.
- Spray an 8-inch bowl with nonstick cooking spray, line it with plastic wrap, and spray the wrap.
- Put the bowl in the freezer until it is very cold.
- Microwave the chopped bittersweet chocolate in a medium bowl in 30-second intervals until melted (about 3 minutes). Let it rest for 5 minutes.
- Dip the ends of 8 chocolate biscuit sticks into the melted chocolate and lay them on a parchment-lined baking sheet to form spider legs. Refrigerate until set.
- Stir in the coconut oil into the remaining melted chocolate.
- Brush the inside of the cold bowl with 1/4 cup of the chocolate, then freeze for 10 minutes. Repeat brushing and freezing for a total of five times.
- Freeze the chocolate-lined bowl until solid, about 30 minutes.
- In a food processor, pulse one cake layer until it forms fine crumbs. Add the chocolate or vanilla frosting and pulse until combined. Shape into a flattened ball for the spider head and freeze for 30 minutes.
- Brush the head with the chocolate mixture, refreeze for 15 minutes, and repeat two more times. Stick candy eyes into the head on the final coating.
- Fill the chocolate-lined bowl with marshmallows, top with the second cake layer, and flip it onto a serving platter.
- Remove the plastic wrap and place the cake ball head on the body to resemble a spider.
- Drizzle with remaining chocolate and sprinkle with chocolate sprinkles.
- Pipe a red hourglass on the spider’s body with red icing and sprinkle with red sanding sugar.
- Position the biscuit stick legs into the body, being sure to push them in carefully.
- Heat the strawberry ice cream topping until it boils and pour over the spider for the reveal effect.