The Best Hocus Pocus Binx Cookies (An Adorable Halloween Treat!)
Hello, my fellow Halloween fanatics! “Twist the bones and bend the back…” It’s time to conjure up a treat that is pure, spooky, nostalgic magic! In honor of everyone’s favorite immortal black cat, today we are making these absolutely adorable Hocus Pocus Binx Cookies. This is one of my favorite Halloween baking projects because they…
Hello, my fellow Halloween fanatics! “Twist the bones and bend the back…” It’s time to conjure up a treat that is pure, spooky, nostalgic magic! In honor of everyone’s favorite immortal black cat, today we are making these absolutely adorable Hocus Pocus Binx Cookies. This is one of my favorite Halloween baking projects because they are so fun to create and the result is just the cutest, most charmingly spooky cookie you’ll ever see.
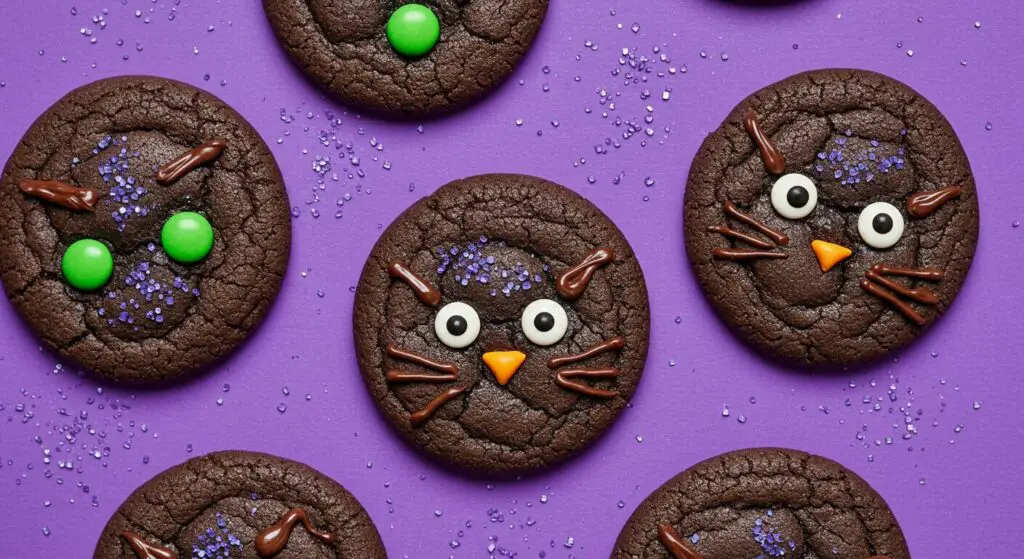
This isn’t just a cute cookie; it’s a genuinely delicious one, too! We start with a rich, dark, and chewy chocolate cookie dough, made extra dark with black cocoa powder. Then, we have a blast shaping them into little cat faces, complete with perky ears, and decorating them with candy to create those iconic, glowing green eyes. They are the perfect, fun, and festive treat for your Hocus Pocus movie night or any Halloween party.
Why You’ll Be Absolutely Obsessed With These Cookies
This is the ultimate cookie for any Hocus Pocus fan. Here’s why it’s so magical:
- Incredibly Cute & Spooky: The little cat faces with their bright green M&M eyes are just so charming and perfect for Halloween. They are a guaranteed showstopper.
- Rich, Dark Chocolate Flavor: We use black cocoa powder to give these cookies a deep, dark color reminiscent of a black cat, and it also provides a wonderful, rich, Oreo-like chocolate flavor.
- A Super Fun Decorating Project: Shaping the ears and placing the candy eyes and nose is a fantastic and creative process. It’s the perfect Halloween baking activity to do with kids.
- Perfect for Parties: A platter of these adorable Binx cookies is a guaranteed hit and a wonderful, nostalgic conversation starter at any Halloween gathering.
Gather Your Magical Ingredients: What You’ll Need
This impressive cookie comes together with just a handful of classic baking staples and some fun candies.
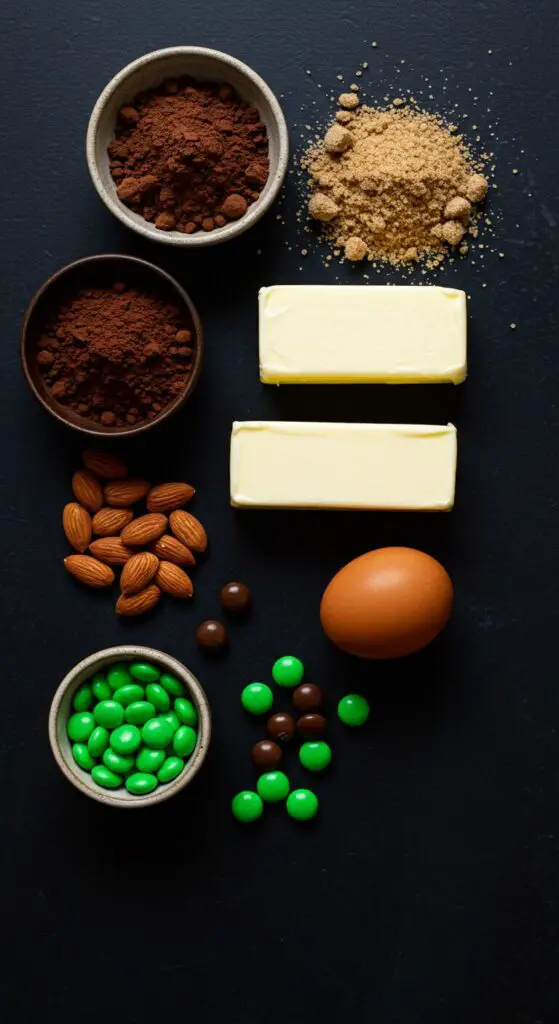
- 1 1/2 cups all-purpose flour
- 1/4 cup black cocoa powder
- 1/2 tsp. baking soda
- 1/4 tsp. kosher salt
- 3/4 cup granulated sugar
- 1/2 cup (1 stick) unsalted butter, softened
- 1/2 cup packed light brown sugar
- 1 large egg
- 1 tsp. pure vanilla extract
- Sanding sugar, for rolling
- 48 sliced raw almonds
- 1/4 cup semisweet chocolate chips
- 48 mini green M&M’s
- 24 mini brown M&M’s
Crafting Your Hocus Pocus Binx Cookies: Step-by-Step Guide
Let’s bring these magical black cats to life. The chilling step is key!
- Make the Chocolate Dough: In a medium bowl, whisk together the flour, black cocoa powder, baking soda, and salt. In a separate large bowl, using an electric mixer, beat the granulated sugar, butter, and brown sugar until creamy. Beat in the egg and vanilla. Gradually add the dry ingredients to the wet and beat on low until just combined. Cover the bowl and refrigerate the dough for at least 30 minutes to chill.
- Shape the Cat Heads: Preheat your oven to 350°F (175°C) and line two baking sheets with parchment paper. Using a medium cookie scoop, portion out 24 balls of dough. Roll each portion into a 1-inch ball, then roll it in sanding sugar to coat. Arrange the balls on your prepared baking sheets, spacing them about 2 inches apart, and flatten each one into a 2-inch circle.

- Add the Ears and Eyes: From your reserved dough, scoop out tiny 1/4-teaspoon sized balls. Roll them in sanding sugar and arrange two of these small balls on the top edge of each flattened circle to act as ears. Gently pinch the tops of the “ears” to form a slight triangle shape. Now, gently press two sliced almonds into each flattened circle to create the shape of the eyes, with the pointy ends facing the center.
- Bake and Cool: Bake the cookies for 8 to 10 minutes, until the edges are set. Let them cool on the baking sheets for 5 minutes before transferring them to a wire rack to cool completely.
- Decorate Binx’s Face: In a small heatproof bowl, melt the chocolate chips in the microwave in 10-second increments until smooth. Transfer the melted chocolate to a small piping bag or a zip-top bag with a tiny corner snipped off.
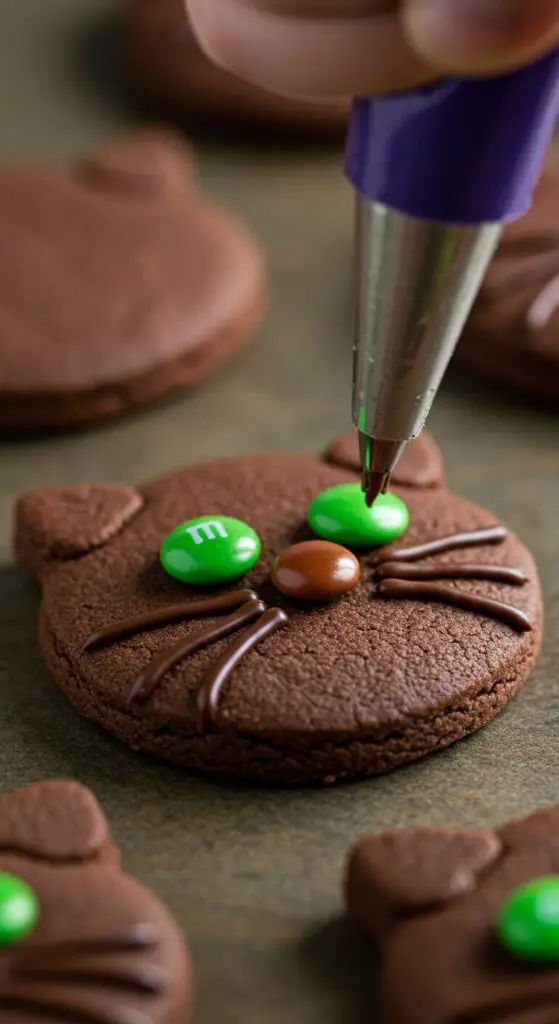
- Add the Final Touches: Pipe a small dot of melted chocolate in the center of each almond eye and press a green M&M onto the dot. Pipe another dot of chocolate below the eyes for the nose and add a brown M&M. Finally, pipe two little whiskers on each side of the nose. Let the chocolate set completely before serving.
Wise Tips for the Best Binx Cookies
- Don’t Skip the Chill Time: Chilling the dough for at least 30 minutes is crucial. It helps prevent the cookies from spreading too much during baking, ensuring your cute cat shapes stay defined.
- Black Cocoa Powder is Key: For that authentic, deep black cat color and a rich, Oreo-like flavor, black cocoa powder is highly recommended. You can find it online or at specialty baking stores. Regular cocoa powder will also work, but the cookies will be a standard brown color.
- Work with Cold Dough: The dough can become soft as you work with it. If the little ears are hard to shape, pop the dough back in the fridge for a few minutes to firm up.
- The Piping Bag Trick: A small piping bag with a tiny round tip (like a Wilton #2) will give you the most control for piping the delicate whiskers.
Hocus Pocus Binx Cookies
Ingredients
Equipment
Method
- Whisk together flour, cocoa powder, baking soda, and salt. In a separate large bowl, beat granulated sugar, butter, and brown sugar until creamy. Beat in egg and vanilla. Add dry ingredients and beat until just combined. Refrigerate dough for at least 30 minutes.
- Preheat oven to 350°F. Line 2 baking sheets with parchment. Scoop 24 (1 1/2-tbsp) portions of dough, roll into balls, then roll in sanding sugar. Arrange on sheets and flatten each to a 2″ circle.
- Scoop tiny 1/4-tsp balls of reserved dough, roll in sugar, and press 2 onto the top of each circle for ears, pinching them into a slight triangle shape.
- Gently press 2 sliced almonds onto each circle for the eye shapes. Bake for 8 to 10 minutes. Let cool completely on a wire rack.
- Melt the chocolate chips. Transfer to a small piping bag. Pipe a dot of chocolate on each almond and press a green M&M on top for the pupil. Pipe another dot for the nose and add a brown M&M. Pipe two whiskers on each side. Let the chocolate set.
Notes
Frequently Asked Questions (FAQ) – Hocus Pocus Binx Cookies
Can I make the dough ahead of time?
Yes! The cookie dough is perfect for making ahead. You can store it, tightly wrapped, in the refrigerator for up to 2 days before you shape and bake the cookies.
What if I can’t find black cocoa powder?
You can use Dutch-processed cocoa powder. Your cookies will be a rich brown color instead of black, but they will still be delicious and adorable!
How do I store the finished cookies?
Store the completely cooled and decorated cookies in an airtight container at room temperature for up to 3 days.
Conclusion
These Hocus Pocus Binx Cookies are such a fun, festive, and delicious way to celebrate the Halloween season. They are a wonderfully creative baking project that is sure to put a spell on all your friends and family. Happy Halloween!