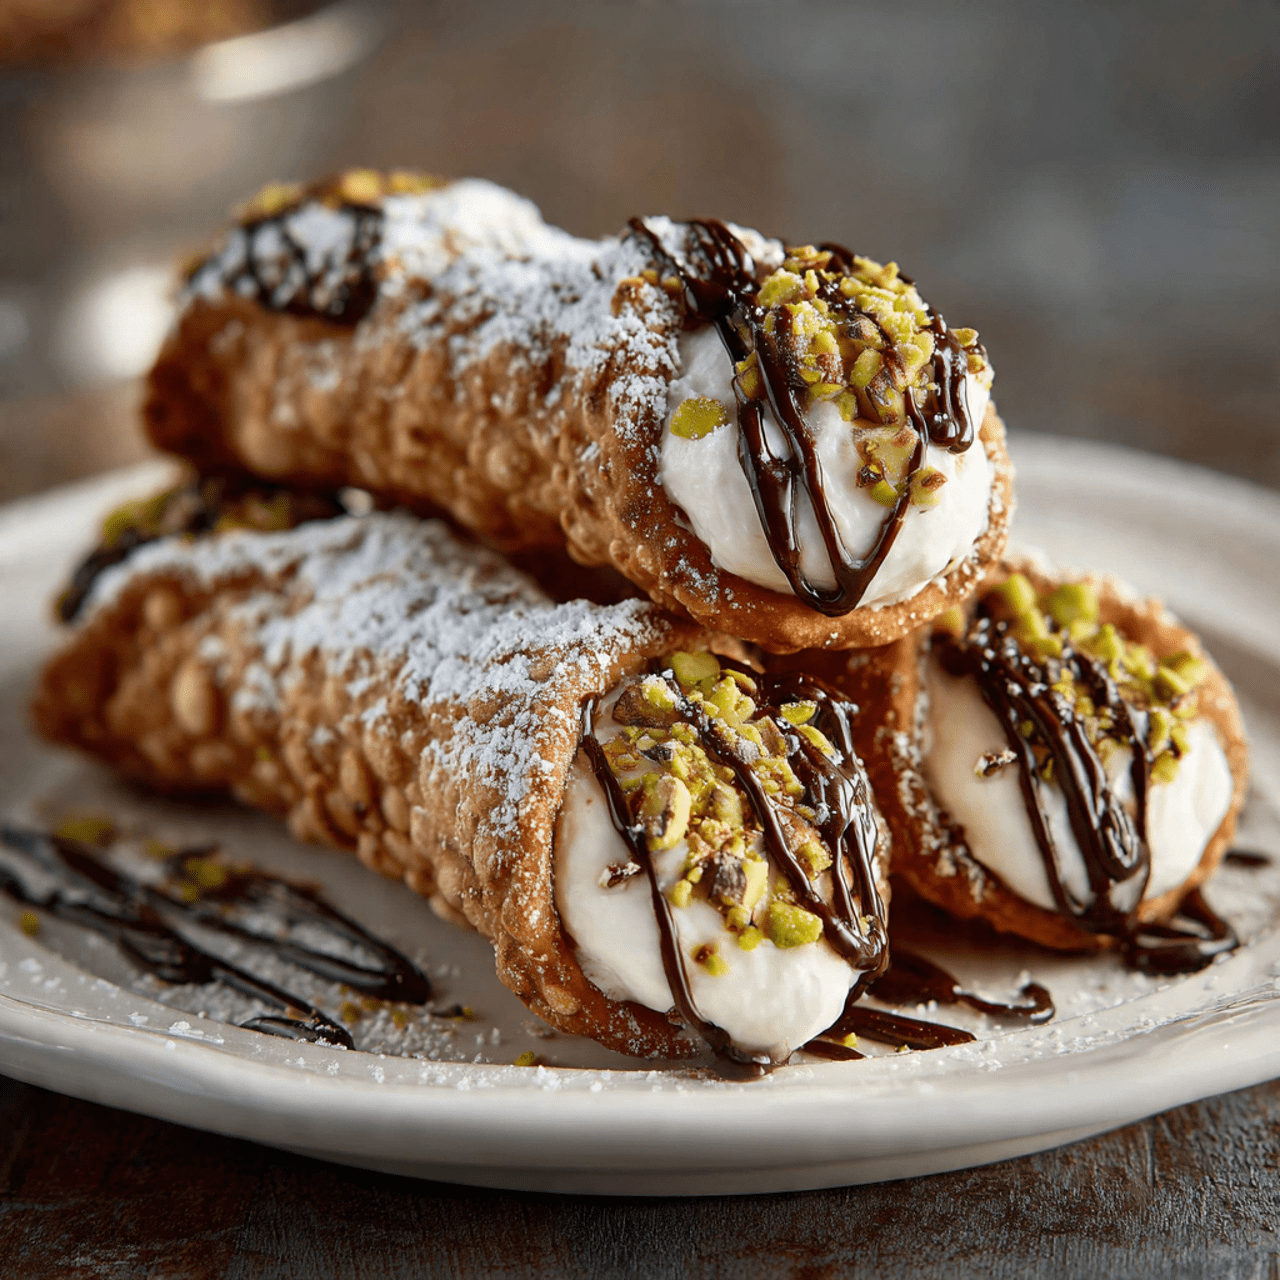
The Ultimate Homemade Cannoli (Classic Christmas Dessert!)
Imagine the ultimate Italian pastry: a shatteringly crisp, bubbly, golden-brown shell, filled to the brim with a sweet, creamy, and luscious ricotta filling, studded with mini chocolate chips and a hint of citrus. That, my friends, is the iconic, deeply satisfying magic of a perfect, Homemade Cannoli. This is, without a doubt, the most rewarding…
Imagine the ultimate Italian pastry: a shatteringly crisp, bubbly, golden-brown shell, filled to the brim with a sweet, creamy, and luscious ricotta filling, studded with mini chocolate chips and a hint of citrus. That, my friends, is the iconic, deeply satisfying magic of a perfect, Homemade Cannoli. This is, without a doubt, the most rewarding and impressive classic dessert you will make for your Christmas celebration.
I promise you, there is no greater baking triumph than taking that first bite of a freshly filled, homemade cannoli. The crunch of the shell giving way to the cool, sweet cream is a textural and flavor masterpiece. They are a true show-stopper for any holiday dessert table and a beautiful tribute to Italian-American tradition. The final dusting of powdered sugar is like a magical Christmas snowfall.
Get ready to embark on a delicious baking journey, to create not just a dessert, but an experience that will transport your family and friends straight to a pastry shop in Sicily.

Why Making Homemade Cannoli is a Holiday Must
You are going to be so incredibly proud of these stunning and delicious pastries. Mastering this classic is a true baker’s delight. Here’s why it’s so special:
- The Ultimate Crispy, Bubbly Shell: This recipe guides you through creating that iconic, shatteringly crisp cannoli shell that is the hallmark of an authentic, high-quality pastry.
- Luxuriously Creamy Ricotta Filling: The filling is a perfect balance of sweet, creamy whole milk ricotta, warm spices, mini chocolate chips, and a hint of bright lemon zest.
- A True Taste of Italian Tradition: Making cannoli from scratch is a rewarding experience that connects you to the rich history of Sicilian pastry and Italian-American celebrations.
Recipe Snapshot
| Prep Time | 45 minutes |
| Chill Time | 30 minutes |
| Cook Time | 15 minutes |
| Total Time | 1 hour 30 minutes |
| Servings | 24 cannoli |
| Calories | 200 kcal per cannoli (estimated) |
| Course | Dessert |
| Cuisine | Italian |
| Difficulty/Method | Advanced / Frying |
Your Shopping List for This Italian Masterpiece
This classic pastry is built from several high-quality, essential components.

→ For the Crispy Cannoli Shells
- 2 cups all-purpose flour
- 1 Tbsp granulated sugar & 1/4 tsp kosher salt
- 1 Tbsp plus 2 tsp unsalted butter → Cold and cut into small pieces.
- 1 egg yolk & 1 lightly beaten egg for egg wash
- ½ cup white grape juice & 2 tsp white wine vinegar → The acidic component that helps create a tender, flaky dough.
- 1 quart canola oil → Or another neutral oil for frying.
→ For the Creamy Ricotta Filling
- 2 cups whole milk ricotta cheese → The star of the filling. See notes on draining!
- ¾ cup powdered sugar → Sifted for a perfectly smooth texture.
- 1 tsp ground cinnamon & ¼ tsp allspice → For a touch of warm, traditional spice.
- ¼ cup cold heavy cream → To lighten the filling and make it extra luscious.
- ¼ cup small semisweet chocolate chips
- 1 lemon → You’ll just need the zest for a bright, citrusy note.
Let’s Make Cannoli! Your Step-by-Step Guide
Ready to create this iconic Italian dessert? It’s a project of parts. Let’s tackle it step-by-step.
Part 1: The Cannoli Shell Dough & Filling
- Make the Dough: In a medium bowl, sift together the flour, sugar, and salt. Using your fingers, work the cold butter pieces into the flour until the mixture is coarse and sandy. Add the egg yolk, white grape juice, and vinegar, and mix until a smooth dough forms. Wrap the dough tightly in plastic wrap and let it rest in the fridge for at least 30 minutes.
- Make the Filling: While the dough rests, make the filling. In a medium bowl, whisk the ricotta until smooth. Sift in the powdered sugar, cinnamon, and allspice and mix to combine.
- Whip the Cream: In a separate, chilled bowl, beat the heavy cream with an electric mixer until it holds fairly stiff peaks.
- Finish the Filling: Gently fold the whipped cream into the ricotta mixture with a spatula. Then, stir in the mini chocolate chips and the fresh lemon zest. Cover the filling and refrigerate it for at least 30 minutes to an hour to firm up.
Part 2: Frying the Crispy Shells
- Heat the Oil: In a medium, heavy-bottomed pot, heat the canola oil to 360°F.
- Roll and Cut: On a lightly floured surface, roll the chilled dough out until it is very thin (about 1/8-inch thick). Use a 3-to-4-inch round cutter to cut out about 24 circles.
- Wrap the Molds: Wrap one dough circle around a metal cannoli mold. Dab a little egg wash on the overlapping edge to seal it shut. Gently flare the edges of the dough away from the mold.
- Fry to Golden Perfection: Using tongs, carefully lower the mold into the hot oil. Fry for 2 to 3 minutes, turning, until the shell is a deep golden brown and covered in beautiful bubbles.
- Remove and Repeat: Carefully remove the mold from the oil. Using a kitchen towel to protect your hand, gently slide the hot shell off the mold and onto a wire rack to cool. Repeat with all the dough circles. Let the shells cool completely.
Part 3: Fill and Serve Your Masterpiece
- Fill Just Before Serving: This is the golden rule of cannoli! To keep the shells perfectly crisp, only fill them right before you plan to serve. Transfer the chilled ricotta filling to a pastry bag.
- Pipe from Both Ends: Pipe the filling into one end of a cannoli shell until it’s halfway full, then pipe from the other end to fill it completely. This ensures the entire shell is filled.
- Garnish and Enjoy: Dust the filled cannoli generously with powdered sugar. Arrange them on a platter and serve immediately to a chorus of amazed and delighted guests!
Classic Homemade Cannoli with Ricotta Filling
Ingredients
Equipment
Method
- Make the shell dough: In a bowl, combine flour, sugar, and salt. Work the butter into the flour with your fingers until coarse. Add egg yolk, white grape juice, and vinegar; mix until a smooth dough forms. Wrap in plastic and rest in the fridge for 30 minutes.
- Make the filling: Whisk ricotta until smooth. Sift in powdered sugar, cinnamon, and allspice; mix to blend. In a separate bowl, beat heavy cream until fairly stiff peaks form. Fold the whipped cream into the ricotta mixture, then stir in the chocolate chips and lemon zest. Refrigerate for at least 30 minutes.
- Heat canola oil in a medium pot to 360°F. On a floured surface, roll the dough very thin (1/8-inch). Cut into 3-to-4-inch rounds.
- Wrap each dough circle around a cannoli mold, sealing the overlapping edge with a dab of egg wash.
- Using tongs, fry the shells in the hot oil until crispy and golden brown, 2 to 3 minutes. Carefully slide the hot shell off the mold onto a wire rack to cool. Repeat with all dough. Let shells cool completely.
- Just before serving, transfer the chilled filling to a pastry bag. Pipe the filling into the cannoli shells from both ends.
- Dust generously with powdered sugar and serve immediately for the best crispy texture.
Notes
WiseRecipes’ Top Tips for Perfect Cannoli
These traditional pastries have a few key steps. These tips will help you master them.
- Drain Your Ricotta! This is the most important secret to a thick, luscious filling that isn’t watery. If your whole milk ricotta seems wet, place it in a fine-mesh strainer lined with cheesecloth and let it drain in the fridge for at least a few hours, or even overnight.
- Roll the Dough THIN. For that signature, delicate, shatteringly crisp shell, you must roll the dough as thinly as you can, about 1/8 of an inch. A pasta roller is a fantastic tool for this if you have one!
- Maintain Your Oil Temperature. A deep-fry or candy thermometer is your best friend here. If the oil is too cool, the shells will be greasy. If it’s too hot, they’ll burn before they cook through. 360°F is the sweet spot.
- Don’t Fill Them in Advance! I’ve said it before, but it bears repeating. The magic of a great cannoli is the textural contrast. Even an hour is enough for the shell to start softening from the moist filling. Fill them just moments before you serve them.
- Be Careful with Hot Shells. The metal cannoli forms will be extremely hot when they come out of the oil. Use tongs to hold the mold and a thick kitchen towel to protect your other hand as you slide the fresh shell off.
FAQs: Your Homemade Cannoli Questions, Answered!
Do I absolutely need metal cannoli molds?
Yes, to get the traditional tube shape, the metal forms are essential. They are inexpensive and can be found at most kitchen supply stores or online. There really isn’t a good household substitute for them.
Can I make the components ahead of time?
Absolutely! This is the best way to do it. You can make and fry the cannoli shells up to two days in advance. Store them in an airtight container at room temperature once they are completely cool. The ricotta filling can also be made a day in advance and kept in an airtight container in the fridge.
My cannoli shells aren’t bubbly. What did I do wrong?
The signature bubbles come from a combination of things: a well-rested, acidic dough, rolling the dough very thin, and frying at the correct temperature. Make sure you’re not skipping the dough’s rest time in the fridge!
What are some other traditional filling variations or toppings?
While mini chocolate chips are classic, you can also stir in finely chopped pistachios or candied orange peel into the filling. For toppings, you can dip the ends of the filled cannoli in chopped pistachios, mini chocolate chips, or even dip one end in melted chocolate.
Final Thoughts: A True Taste of Italy
There is no greater baker’s accomplishment than mastering a timeless, beloved classic like the homemade cannoli. It is a true project, a journey of textures and flavors that results in one of the world’s most perfect pastries. This is more than just a dessert; it’s a celebration of tradition and the joy of creating something truly special from scratch. I hope this recipe brings a little piece of Italy and a lot of delicious pride to your Christmas table. Buon Natale!