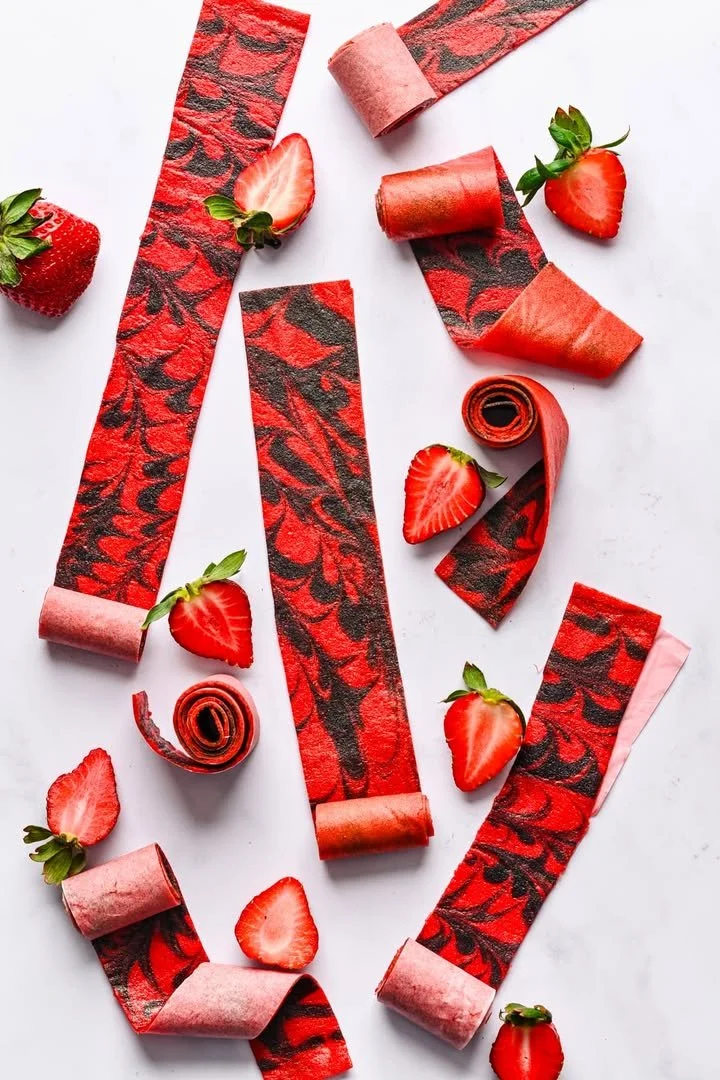
Homemade Fruit Roll Ups
There’s something undeniably joyful about the vibrant taste of ripe fruit, and when you transform that fruit into Homemade Fruit Roll Ups, it’s like encapsulating summer in a chewy treat! Imagine biting into a sweet, tangy burst of strawberries, the gentle sweetness of honey complementing each delicious layer. These homemade gems are not only a…
There’s something undeniably joyful about the vibrant taste of ripe fruit, and when you transform that fruit into Homemade Fruit Roll Ups, it’s like encapsulating summer in a chewy treat! Imagine biting into a sweet, tangy burst of strawberries, the gentle sweetness of honey complementing each delicious layer. These homemade gems are not only a nostalgic nod to our childhood snacks but also a true testament to the beauty of simplicity in cooking. Let’s dive into why these delightful rolls deserve a place in your kitchen!
This Recipe is a Winner
- Wholesome Ingredients: Homemade Fruit Roll Ups are entirely crafted from fresh fruit, giving you complete control over what goes into your snacks. No preservatives, no artificial flavors—just nature’s candy!
- Customizable to Your Liking: While strawberries are a classic choice, you can easily substitute or mix in other fruits like raspberries, mangoes, or even apples. The world is your fruit basket!
- Simple Process: You don’t need to be a culinary expert to create these tiny rolls of joy. The process is straightforward and requires only a blender and an oven, making it accessible to all.
- Perfect for Snacks and Lunchboxes: These chewy treats are ideal for kids (and adults!) heading to school or work. They pack well, are mess-free, and satisfy that sweet tooth without any guilt.
- Nostalgia Factor: Making your own fruit roll ups brings back memories of childhood snacks. It’s a fun cooking project that can be shared with family, creating new fond memories!
Your Shopping List
To whip up these delightful Homemade Fruit Roll Ups, gather the following ingredients:
- Strawberries: Fresh, ripe strawberries are the star of the show! You can substitute with other berries or fruits to create unique flairs.
- Honey or Maple Syrup: This adds just the right sweetness. Depending on your preference for natural sweeteners, feel free to choose.
- Lemon Juice: A splash of lemon juice enhances the natural flavors of the fruit and helps prevent browning, giving the rolls a fresh taste.
- Water: This will help achieve a smoother blending consistency.
- Pinch of Salt: Just a tiny hint enhances all the flavors and balances the sweetness.
Let’s Get Cooking
Now that you’ve got your ingredients ready, it’s time to create your Homemade Fruit Roll Ups! Here’s how you can do it step-by-step:
- Preheat your oven to 170°F (or 75°C). This low temperature is key to gently drying the fruit mixture without cooking it.
- In a blender, combine the strawberries, honey or maple syrup, lemon juice, and a pinch of salt. Blend until the mixture is smooth, enjoying the sweet aroma wafting up as you blend.
- Pour the fruit mixture onto a lined baking sheet, spreading it into an even layer. Take your time to ensure it’s the right thickness for consistent drying.
- Bake in the oven for about 6-8 hours, or until the fruit leather is no longer sticky. It’s incredible watching the transformation as the vibrant color deepens and the texture changes.
- Once cooled, slice into strips and roll them up, ready to be enjoyed!
My Favorite Tricks
To elevate your Homemade Fruit Roll Ups to the next level, here are some expert tips to keep in mind:
- Choose Ripe Fruit: The sweetness of your final product heavily depends on the ripeness of your fruit. Always select the freshest and ripest produce for the best flavor.
- Experiment with Seasonings: Don’t shy away from adding spices like cinnamon or vanilla extract to the mix. A pinch can add a warm depth and complexity to your rolls.
- Don’t Rush the Baking: Patience is key! Allowing them to dry slowly ensures a perfect chewy texture without burning or getting rubbery.
- Store with Care: Ensure the fruit leather is completely cool before storing; otherwise, moisture can accumulate and spoil the texture.
- Mix and Match Flavors: Feel free to blend different fruits together. A strawberry-mango combination could transport you to a tropical paradise with every bite!
Creative Twists
The beauty of Homemade Fruit Roll Ups lies in their versatility. Here are some fun variations to try:
- Berry Medley: Combine strawberries, blueberries, and raspberries for a delightful mix that’s bursting with antioxidants and flavor.
- Tropical Twist: Substitute in mangoes and pineapple for a refreshing summer vibe—perfect for beach-themed snacks!
- Spiced Up Rolls: Add a pinch of ginger or cardamom to add an exotic flair to the traditional recipe.
- Choco Delight: Blend in cocoa powder with your base fruit for a fruity yet chocolatey treat that will satisfy any chocolate lover.
- Apple Cinnamon Rolls: Use pureed apples and a sprinkle of cinnamon for a taste reminiscent of apple pie.
Best Ways to Serve
Presenting your Homemade Fruit Roll Ups can be just as fun as making them! Consider these serving suggestions to enhance your snack experience:
- Snack Packs: Roll them up tight and pack them into snack bags for on-the-go munching.
- Lunchbox Treats: Slip them into school lunches for a delightful surprise that your kids will surely love.
- Fruit Charcuterie Board: Arrange sliced roll ups alongside cheeses, nuts, and fresh fruit slices for a beautiful, colorful board that’s perfect for gatherings.
- Dessert Topping: Chop into smaller pieces and use as a topping for yogurt or acai bowls, providing a chewy contrast to the creamy base.
- Gift Them: Package them in cellophane bags with a decorative ribbon for a charming homemade gift!
Keep It Fresh
Once you’ve made these delicious Homemade Fruit Roll Ups, proper storage ensures they remain delightful and fresh:
- Refrigeration: Store in an airtight container or wrapped tightly in wax paper in the fridge. They can last for up to 2 weeks.
- Freezing: For longer storage, roll up your fruit leather and freeze them. Thaw as needed and enjoy the later-year bounty of summer.
- Avoiding Stickiness: If your rolls seem sticky, you can lightly dust them with cornstarch before storing, helping prevent them from sticking together.
Got Questions?
It’s natural to have a few questions! Here are some common ones answered:
- Can I use frozen fruit?: Absolutely! Just thaw and drain excess moisture before blending. This works great for off-season fruit.
- What if I don’t have a blender?: A food processor can work, or if you’re up for the challenge, mash the fruit by hand for a rustic texture!
- How do I know when they’re done?: They should feel dry but still slightly flexible. Avoid taking them out too soon to prevent stickiness.
- Can I add sugar instead of honey?: While it’s possible, honey and maple syrup add moisture and richer flavor, so use them if you can!
There’s something incredibly satisfying about crafting your own Homemade Fruit Roll Ups. With vibrant flavors, customizable ingredients, and a simplicity that invites you into the kitchen, these delights are not just snacks—they’re a creative journey! Whether you enjoy them as a quick energy booster or a sweet treat after dinner, I invite you to roll up your sleeves and dive into this delightful recipe. Happy cooking!

Homemade Fruit Roll Ups
Ingredients
Method
- Preheat your oven to 170°F (or 75°C).
- In a blender, combine the strawberries, honey or maple syrup, lemon juice, and a pinch of salt. Blend until smooth.
- Pour the fruit mixture onto a lined baking sheet, spreading it into an even layer.
- Bake in the oven for about 6-8 hours, or until the fruit leather is no longer sticky.
- Once cooled, slice into strips and roll them up.