Homemade Fruit Roll Ups
How I First Made These in My Tiny Kitchen I remember the first time I tried to make fruit roll ups at home: I had a pile of strawberries that needed saving and a toddler who refused to eat anything that looked like it had been rescued. The smell of strawberries warming in the oven…
How I First Made These in My Tiny Kitchen
I remember the first time I tried to make fruit roll ups at home: I had a pile of strawberries that needed saving and a toddler who refused to eat anything that looked like it had been rescued. The smell of strawberries warming in the oven filled our tiny kitchen and somehow convinced both of us it was worth the wait. If you like comparing methods, I even bookmarked another homemade fruit roll ups guide when I started experimenting, and that helped me strip the process down to the essentials.
There is something so satisfying about taking a bowl of bright red fruit and turning it into a chewy, portable snack. I make these on quiet Sunday afternoons and sometimes on busy weekday evenings when packing lunches feels like a small victory.
The Ingredient List That Fits in One Bowl
This is one of those recipes where the shopping list is embarrassingly short, and that’s part of the charm. For a single tray I use 2 cups Fresh strawberries, 1/4 cup Honey or Maple Syrup, 1 tablespoon Lemon juice, 2 tablespoons Water, Pinch of Salt. That’s it. If you’re tempted to get fancy, go ahead—sometimes I add a splash of vanilla—but the basic combo above gives you a sweet, bright leather that tastes like summer.
If you ever want to branch into savory roll-ups later, you might like the idea behind the 5-ingredient zucchini feta roll-ups I tried last year; the technique of rolling is the same, even if the flavors change completely.
Making the Fruit Leather the Way I Do It
I start with the oven because patience is mostly about temperature control. 1. Preheat your oven to 170°F (or 75°C). While the oven comes to temp, I wash and hull the strawberries and let them sit to drain for a few minutes. 2. In a blender, combine the strawberries, honey or maple syrup, lemon juice, and a pinch of salt. Blend until smooth. Sometimes I add the 2 tablespoons of water a bit at a time; it helps the blender work if your strawberries are especially dense. Taste the puree and if the strawberries aren’t sweet enough, I’ll add another teaspoon or two of honey or maple syrup, but be careful—too much makes the leather sticky.
Once the puree is silky, I line a baking sheet with parchment paper (this makes life easier later) and pour the fruit mixture onto the lined baking sheet, spreading it into an even layer so it dries uniformly. 3. Pour the fruit mixture onto a lined baking sheet, spreading it into an even layer. I use the back of a spoon or an offset spatula to get the edges thin and neat; a thinner edge will dry first and you’ll thank me when peeling it off.
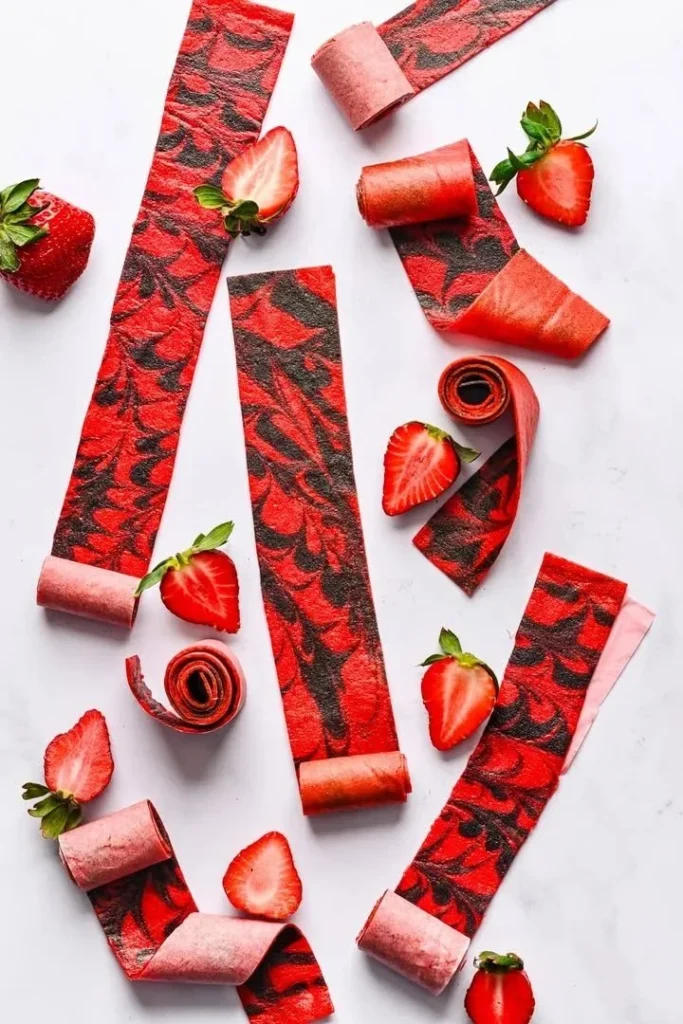
Then the slow part: 4. Bake in the oven for about 6-8 hours, or until the fruit leather is no longer sticky. I usually check it at six hours. If the center still feels tacky but not wet, it needs more time. If it’s dry and flexible and peels away from the parchment without tearing, you’re there. Let it cool completely on the counter; the cooling helps it firm up just enough. 5. Once cooled, slice into strips and roll them up. I like to cut strips with kitchen scissors, then roll each on itself and tuck into a container.
A playful note: once I got brave, I tried making little star shapes by cutting the cooled leather with tiny cookie cutters—my kid was delighted. If you want a visual on creative shapes, I drew inspiration from a festive tutorial for Christmas tree tortilla roll-ups and adapted the idea for fruit leather.
Getting the Texture Just Right
Knowing when the fruit leather is done is more about touch than a timer. When it’s done right, it should be pliable rather than sticky, with a slightly tacky surface that doesn’t cling to your fingers. It peels off the parchment smoothly and bends without cracking. If you tear it trying to roll it, it needed a bit more time. If it sticks like glue, you underbaked it or added too much sweetener.
A few tricks I’ve learned: always line the baking sheet with parchment and leave a little border so you can lift the whole sheet to the counter. Spread the puree as thinly as you can while keeping it even; a thin layer will dry faster and have that classic chewy texture. I also rotate my baking sheet once during the drying period because my oven has a hot spot and that small move keeps the drying even. If you want to make these ahead, roll the cooled strips in parchment and store them in an airtight container. They’ll last at room temperature for about a week, or you can freeze them for up to three months, separating layers with parchment so they don’t stick together.
Ways I Like to Change Things Up
I love how forgiving this recipe is. For variations, you can swap the strawberries for raspberries or a mix of berries for a deeper flavor. If you want a tart note, a splash more lemon brightens it; for kids who like things sweeter, use maple syrup instead of honey or vice versa depending on what you have. For a tropical twist, blend in some mashed mango and reduce the water a touch. Two other ideas I use often: sprinkle a little powdered sugar onto the parchment before pouring the puree for lighter color, and for a seeded look keep some raspberry seeds for texture.
As for what to serve it with, these are perfect with simple snacks: I pack them in lunchboxes with cheese and crackers, or I tear strips to dot the edge of a yogurt cup. They are also great as a portable treat for hikes or as a fun garnish on a fruit plate. If you’re putting together a savory snack board, a hearty option like the creamy chicken enchilada roll-ups works surprisingly well alongside the sweetness.
Here are a few personal tips I always tell friends: let it cool fully before cutting to avoid sticky edges; check at the earliest time if your layer is thin; and if you want uniform rolls, measure the width of strips with a ruler once cooled.
Conclusion
If you want to compare a more involved technique, take a look at Fifteen Spatulas’ homemade strawberry fruit roll ups recipe for inspiration. For a healthier take and ideas on different fruits, I also like the approachable notes from Erin Lives Whole’s healthy fruit roll ups tutorial.
Making Homemade Fruit Roll Ups became one of my favorite little rituals. The long bake time makes it feel like an event, the bright aroma of strawberries is a reward, and the chewy, homemade result is proof that the simplest ingredients can be the most satisfying.
Strawberry Fruit Roll Ups
Ingredients
Method
- Preheat your oven to 170°F (75°C).
- Wash and hull the strawberries, then let them sit to drain for a few minutes.
- In a blender, combine the strawberries, honey or maple syrup, lemon juice, and a pinch of salt. Blend until smooth, adding water as needed for consistency.
- Taste the puree and adjust sweetness if necessary with additional honey or maple syrup.
- Line a baking sheet with parchment paper.
- Pour the fruit mixture onto the lined baking sheet and spread it into an even layer.
- Bake in the oven for about 6-8 hours, checking periodically. It's done when it feels dry and flexible.
- Let it cool completely on the counter once removed from the oven.
- Once cooled, slice the fruit leather into strips and roll them up. Use scissors for easy cutting.
- Store in an airtight container at room temperature or freeze for longer storage.