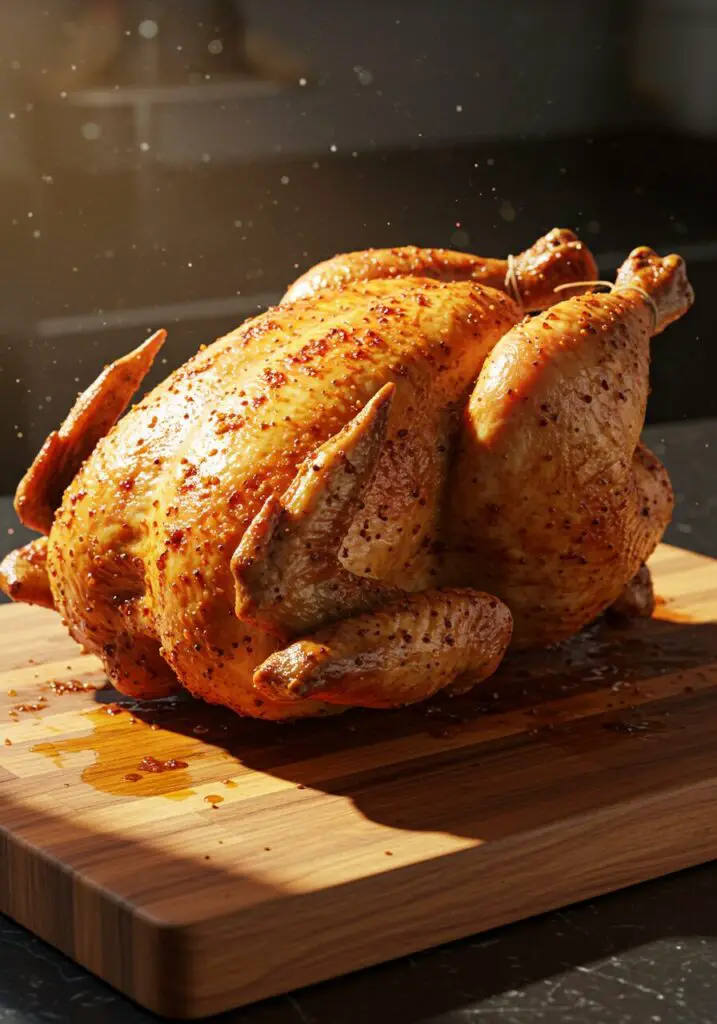
Rotisserie-Style Bliss: My Foolproof Guide to Juicy Homemade Chicken!
Oh, friends, who here can resist the sight (and smell!) of a perfectly cooked rotisserie chicken? That golden, crispy skin, the incredibly juicy, tender meat – it’s pure magic. But what if I told you that you could recreate that irresistible flavor right in your own kitchen, with minimal fuss? Today at WiseRecipes, I’m beyond…
Oh, friends, who here can resist the sight (and smell!) of a perfectly cooked rotisserie chicken? That golden, crispy skin, the incredibly juicy, tender meat – it’s pure magic. But what if I told you that you could recreate that irresistible flavor right in your own kitchen, with minimal fuss? Today at WiseRecipes, I’m beyond excited to share my super simple, wildly flavorful Homemade Rotisserie Chicken recipe that will have you skipping the supermarket deli for good!
I’ve always loved the convenience of a rotisserie chicken, but there’s something truly special about making one from scratch. You get to control every ingredient, ensuring it’s packed with wholesome goodness and exactly the flavors you crave. Whether you’re blessed with a countertop rotisserie oven (hello, game-changer!) or you’re simply looking to perfect your oven-roasted chicken technique, this recipe has you covered. We’re talking just four pantry-staple spices (plus salt & pepper!) that transform a whole chicken into a golden, aromatic masterpiece. In just over an hour, you’ll have a beautifully cooked bird that’s perfect for a weeknight dinner, meal prepping, or shredding for a dozen other delicious recipes. Trust me, once you make this Homemade Rotisserie Chicken, you’ll wonder why you ever bought one!
Why This Homemade Rotisserie Chicken Will Be Your New Go-To Dinner
This isn’t just another chicken recipe; it’s a testament to simple ingredients delivering incredible flavor. Here’s why I’m absolutely smitten with it:
- Unbeatable Flavor & Aroma: Our simple four-spice rub (paprika, thyme, garlic, onion) creates an incredibly savory, aromatic, and truly delicious crust that tastes just like your favorite store-bought rotisserie chicken, but even better!
- Perfectly Juicy & Tender Every Time: Whether you use a dedicated rotisserie or your trusty oven, my method ensures the chicken cooks evenly, resulting in wonderfully tender, juicy meat that’s never dry.
- Crispy, Golden Skin: That perfect, crave-worthy crispy skin? We’re going to achieve it! My tips (and a little basting for the oven method) guarantee that beautiful golden-brown exterior.
- Surprisingly Simple Process: Don’t let a whole chicken intimidate you! This recipe is incredibly straightforward, making it accessible for even beginner cooks. It’s truly a “set it and forget it” (mostly!) kind of meal.
- Versatile Meal Prep Powerhouse: A perfectly cooked whole chicken is the ultimate gift to your future self! Enjoy it as a main course, then shred the leftovers for salads, sandwiches, tacos, soups, and more throughout the week.
Your Simple Shopping List for Rotisserie Chicken Magic: Gather What You’ll Need
Creating this amazing homemade rotisserie chicken uses just a handful of pantry staples. Here’s what you’ll want to grab!
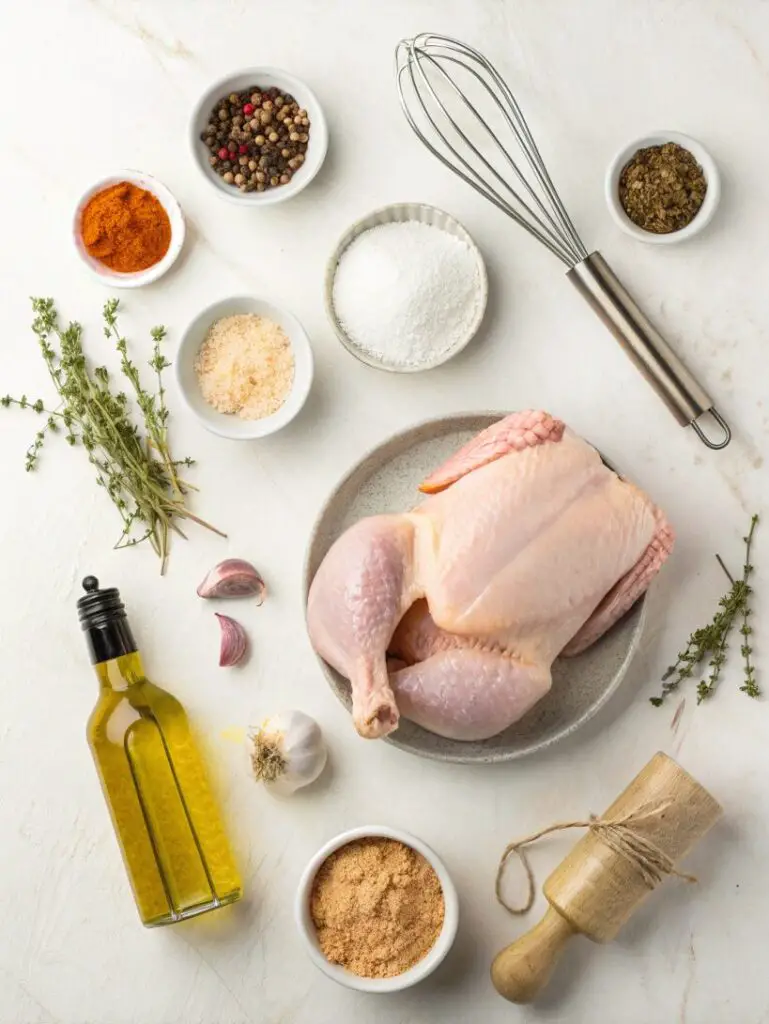
→ For the Secret-Weapon Spice Rub
- 2 teaspoons paprika: Adds a lovely color and sweet, smoky depth.
- 1 ½ teaspoons dried thyme: Fragrant and herbaceous – a classic pairing with chicken.
- 1 teaspoon garlic powder: For that savory, aromatic goodness.
- 1 teaspoon onion powder: Another essential for a rich, well-rounded flavor.
- Salt and freshly ground black pepper, to taste: I personally like about 1 teaspoon salt and ½ teaspoon pepper for a 4-5lb bird, but adjust to your preference!
→ For the Star of the Show: The Chicken
- 1 (4 to 5 pound) whole chicken: (See my notes below for substituting chicken pieces!).
→ For the Oven Method (Optional)
- 2 tablespoons olive oil: Only needed if you’re roasting in the oven, to help achieve that crispy skin.
Let’s Cook! Crafting Your Perfect Homemade Rotisserie Chicken, Step-by-Step
Whether you’re using a rotisserie oven or your standard kitchen oven, the prep is almost the same! Choose your adventure below.
Part 1: Preparing Our Flavorful Chicken
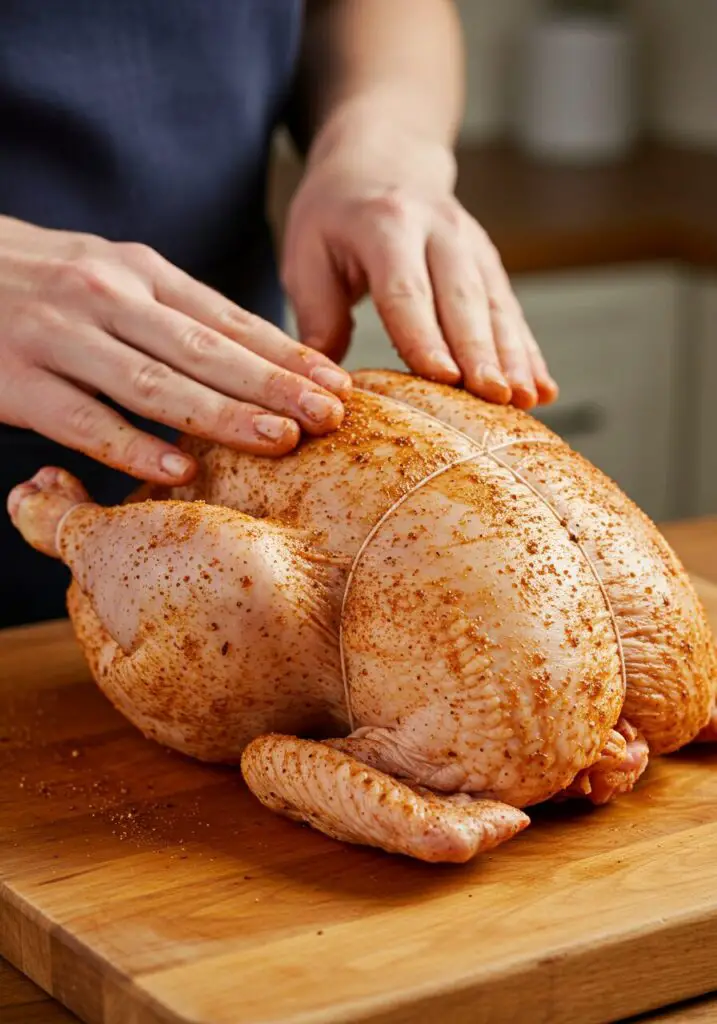
- Make the Spice Rub: In a small bowl, whisk together the 2 teaspoons of paprika, 1 ½ teaspoons of dried thyme, 1 teaspoon of garlic powder, 1 teaspoon of onion powder, and salt and pepper to taste. (I typically use about 1 teaspoon salt and ½ teaspoon pepper for a 4-5lb chicken). This is our magic blend!
- Prep the Chicken: Remove the giblets (the neck, gizzards, liver, heart, often found in a bag inside the cavity) from the whole chicken and discard them (or save them for gravy!). Now, for even cooking and a juicier bird, I highly recommend trussing the chicken with kitchen twine (see my “Notes” section below for more on this!). Pat the chicken dry with paper towels – a dry skin is a crispy skin!
Part 2: Choose Your Cooking Method!
→ Option A: In a Rotisserie Oven
- Rub & Skewer: Once your chicken is prepped and trussed, rub that amazing spice mixture all over the outside of the chicken, ensuring it’s thoroughly coated. No olive oil is necessary here, as the rotisserie cooking method crisps the skin beautifully on its own. Skewer the trussed chicken onto your rotisserie spit according to your manufacturer’s instructions.
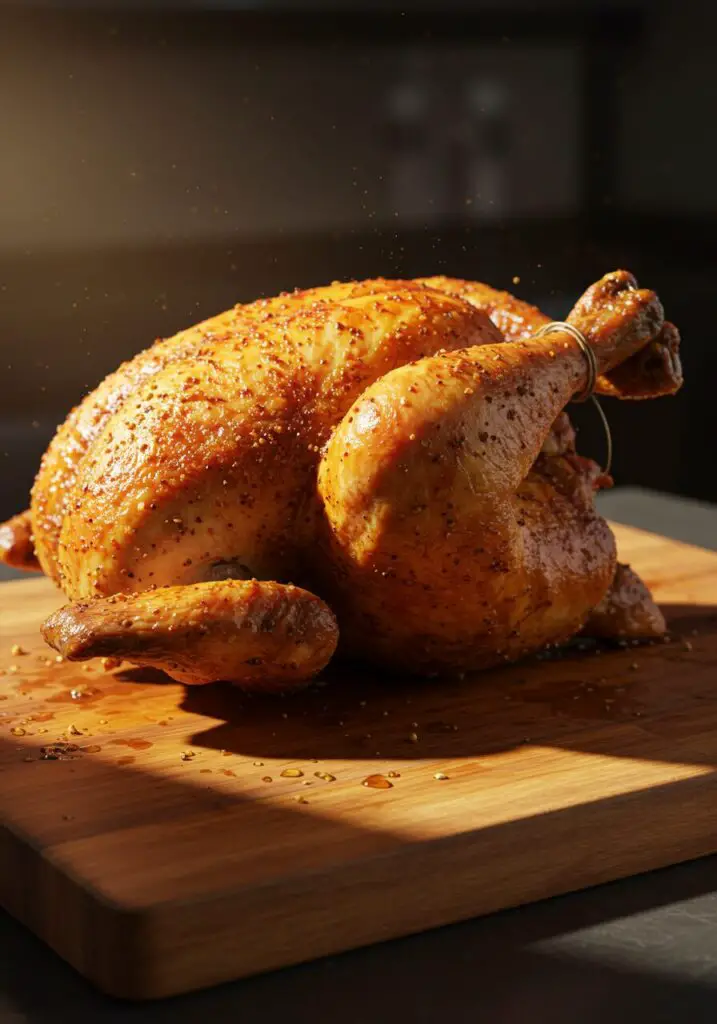
- Cook & Rest: Insert the rotisserie skewers into your rotisserie oven. Cook according to your rotisserie manufacturer’s instructions (for my Cuisinart rotisserie, it’s typically one hour on the “Rotisserie” setting for a 4-5lb bird). The skin will turn beautifully golden and crispy. Once cooked, carefully remove the chicken from the rotisserie and let it rest on a cutting board for 10 minutes before carving. Resting is crucial for juicy meat!
→ Option B: In a Standard Oven
- Prep for Oven: Move an oven rack to the lowest position in your oven and preheat the oven to 425°F (220°C). Place your trussed chicken in a roasting pan, baking dish, or a sturdy cast iron skillet.
- Oil & Rub: Brush the entire outside of the chicken generously with 2 tablespoons of olive oil. Now, rub that delicious spice mixture all over the outside of the chicken, making sure it’s evenly coated.
- Bake & Baste: Bake the chicken, uncovered, until its internal temperature reaches 165°F (74°C) when a meat thermometer is inserted into the thickest part of the thigh (without touching bone). This usually takes about 70 to 80 minutes for a 4-5lb bird. Crucially, you’ll need to baste the chicken periodically (every 15-20 minutes, see my “Notes” section for why!) with the accumulated juices in the pan or a little extra olive oil. This keeps the skin moist and helps it crisp up beautifully.
- Rest & Carve: Once cooked, remove the chicken from the oven and let it rest on a cutting board for 10 minutes before carving. This allows the juices to redistribute, guaranteeing a tender, succulent bird.

Part 3: Keeping it Warm (Optional) & Serving
- Keep Warm (Optional): If you’re not serving immediately, you can place your cooked rotisserie chicken in a slow cooker on the lowest possible “warm” setting for up to 8 hours. The skin won’t stay as crispy, but the meat will remain tender and warm.
- Carve & Serve: Carve your rested chicken into pieces or shred the meat. Serve immediately with your favorite sides!
WiseRecipes’ Golden Tips for Rotisserie Chicken Perfection at Home
Making a whole chicken feel special is easy with these WiseRecipes insights. These tips will ensure your Homemade Rotisserie Chicken is absolutely perfect every time!
- Trussing is Your Secret Weapon: While optional, trussing your chicken (tying its legs together and wings close to the body with kitchen twine) is a game-changer! It ensures an evenly-cooked, juicier bird by allowing everything to cook at roughly the same rate, preventing the breast from drying out. [For a quick visual guide, check out how to truss a chicken (Internal Link)]
- Pat it Dry, Dry, Dry! Before applying the rub (and before oil, if using the oven method), ensure your chicken is as dry as possible. Use paper towels to pat down every surface. A dry skin is the secret to a truly crispy, golden skin!
- Don’t Skip the Basting (for Oven Method): If you’re oven-roasting at a high temperature for that crispy skin, basting every 15-20 minutes is critical. It keeps the skin moist and prevents it from scorching, ensuring it turns beautifully golden and crisp. You can use the pan juices or just a little olive oil.
- Resting is Non-Negotiable: After cooking, let your chicken rest for a full 10 minutes before carving. This crucial step allows the juices, which have gathered in the center of the bird during cooking, to redistribute throughout the meat. The result? A wonderfully juicy and tender chicken every single time.
- Trust Your Thermometer: The best way to know if your chicken is perfectly cooked and safe to eat is to use a meat thermometer. Insert it into the thickest part of the thigh (without touching the bone) – you’re looking for an internal temperature of 165°F (74°C).
Creative Twists: Delicious Ways to Customize Your Homemade Rotisserie Chicken
This Homemade Rotisserie Chicken is already a star, but it’s also a fantastic canvas for your culinary creativity! Here are some ideas I love to play with:
- Herb Garden Freshness: Add a tablespoon of fresh chopped rosemary or sage to your spice rub for an extra layer of aromatic flavor.
- Spicy Kick: For a bit of heat, mix a pinch of cayenne pepper or a dash of chili powder into your spice rub.
- Citrus Infusion: Stuff the chicken cavity with a halved lemon or orange before cooking. The citrus steam will infuse the chicken with subtle, bright flavor.
- Garlic Butter Boost: For the oven method, instead of just olive oil, melt a tablespoon of butter with a clove of minced garlic and brush this mixture over the chicken before rubbing on the spices.
- Different Rubs: Experiment with other spice blends! A smoky BBQ rub, a Mediterranean blend with oregano and marjoram, or even a spicy Cajun seasoning would be fantastic.
Keep It Delicious! Storing Your Homemade Rotisserie Chicken
This healthy and delicious chicken is perfect for leftovers, making meal prep a breeze!
- Refrigerator Storage: Once completely cooled (cool quickly after cooking!), store any leftover rotisserie chicken (whole, in pieces, or shredded) covered in an airtight container in the refrigerator. Use within 3 to 4 days.
- Making 2 Chickens? Smart! The great news is that the baking time is generally the same if you want to roast 2 chickens instead of 1. It’s an awesome way to make extra for a friend in need, or to guarantee you have plenty of cooked chicken for your favorite recipes throughout the week.
- Slow Cooker for Warmth (Not Crispness): If you cook your chicken via rotisserie or oven and want to keep it warm for an extended period (up to 8 hours), you can place it in a slow cooker on the lowest possible “warm” setting. Just know the skin won’t stay crispy this way, but the meat will be beautifully tender and warm.
- Freezing Cooked Chicken: Cooked, shredded rotisserie chicken freezes wonderfully! Once completely cooled, pack the chicken meat (without skin or bones) into freezer-safe bags or containers. You can freeze it for up to 3-4 months. Thaw overnight in the refrigerator before using in recipes.

Rotisserie-Style Bliss: My Foolproof Guide to Juicy Homemade Chicken!
Ingredients
Equipment
Method
- In a small bowl, whisk together the paprika, thyme, garlic powder, onion powder, and salt and pepper to taste.
- Remove giblets from the whole chicken. Truss the chicken (recommended for even cooking; see notes). Pat the chicken dry.
- Option A: In a Rotisserie Oven
- Skewer the trussed chicken. Rub the spice mixture all over the outside of the chicken (no olive oil necessary).
- Insert the rotisserie skewers into the rotisserie. Cook according to rotisserie manufacturer’s instructions (typically one hour for a 4-5lb bird).
- Remove from rotisserie and let rest 10 minutes before carving.
- Option B: In a Standard Oven
- Move an oven rack to the lowest position and preheat oven to 425 degrees F (220C). Place the trussed chicken in a roasting pan, baking dish, or cast iron skillet.
- Brush the outside of chicken with olive oil. Rub the spice mixture all over the outside of the chicken.
- Bake uncovered until the internal temperature reaches 165 degrees F (74C), about 70 to 80 minutes. Baste the chicken periodically (every 15-20 minutes, see note 3) with accumulated juices or olive oil.
- Remove from oven and let rest 10 minutes before carving.
- To keep the rotisserie chicken warm (optional):
- Place in a slow cooker for up to 8 hours on the lowest possible heat setting. (Skin will not stay crispy).
- Carve and serve immediately.
Notes
FAQs: Your Top Rotisserie Chicken Questions, Answered!
Q: Can I use chicken pieces instead of a whole chicken?
A: Yes, absolutely! You can substitute 4 to 5 pounds of chicken pieces (such as breasts, thighs, or quarters) for the whole chicken. Apply the spice rub as directed. If oven-roasting, reduce the total baking time to 30 to 45 minutes, ensuring they reach 165°F (74°C). Rotisserie ovens are typically designed for whole birds.
Q: What is “trussing” and why is it recommended?
A: Trussing involves tying the chicken’s legs together and securing its wings close to its body with kitchen twine. It’s recommended because it helps the chicken cook more evenly (the legs and thighs cook slower, so bringing them closer to the body helps the breast not overcook), results in a juicier bird, and creates a more compact, attractive shape. While optional, it truly makes a difference!
Q: My oven-roasted chicken skin isn’t crispy. What went wrong?
A: This usually happens if the chicken wasn’t patted dry enough before cooking, or if it wasn’t basted regularly during baking (which helps keep the skin moist and prevents scorching at high temps). Ensure your oven is fully preheated to 425°F (220°C) and you give it those crucial bastes!
Q: How do I get extra crispy skin with the oven method?
A: Beyond patting it dry and basting, you can try starting the chicken breast-side down for the first 20-30 minutes, then flipping it breast-side up for the remainder of the cooking. Some also like to finish with a quick 5-10 minutes under the broiler (watch very closely!).
Q: Can I refrigerate the chicken with the spice rub overnight before cooking?
A: Yes, absolutely! This is actually a fantastic make-ahead tip. After applying the spice blend, you can refrigerate the chicken (covered loosely) for up to 24 hours before baking or rotisserie cooking. This allows the flavors to truly penetrate the meat, resulting in an even more delicious chicken!
And there you have it, my friends—your guide to crafting the most delightful, impressive, and truly satisfying Homemade Rotisserie Chicken! This WiseRecipes creation is more than just a meal; it’s a testament to how simple ingredients, when treated with a little love and smart steps, can come together to create something truly extraordinary. It’s a vibrant, exciting meal that you’ll genuinely look forward to eating, day after day.
I am genuinely so excited for you to try these and experience the delicious magic yourself. Please, please come back and let me know in the comments below what your favorite part of this homemade rotisserie chicken was, or any fun twists you tried! Happy cooking from WiseRecipes!