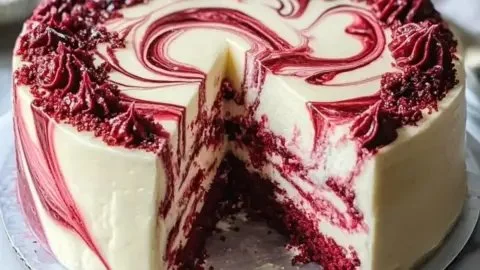
Irresistible Red Velvet Cheesecake Swirl Cake for Every Occasion
How I Discovered This Recipe A few years ago I showed up to a friend’s birthday with something I thought would be impressive: a hybrid of two classics that, for me, tastes like celebration and quiet Sunday afternoons at once. The Irresistible Red Velvet Cheesecake Swirl Cake for Every Occasion started as a curiosity—could the…
How I Discovered This Recipe
A few years ago I showed up to a friend’s birthday with something I thought would be impressive: a hybrid of two classics that, for me, tastes like celebration and quiet Sunday afternoons at once. The Irresistible Red Velvet Cheesecake Swirl Cake for Every Occasion started as a curiosity—could the tangy creaminess of cheesecake live inside the moist, cocoa-tinged crumb of red velvet? It turns out, yes, and it makes everyone who tries it ask for the recipe. The kitchen filled with the warm smell of cocoa and sugar as it baked; the red was so vivid it looked like a velvet ribbon had been folded into the batter. Seeing that first forkful—the silky cheesecake ribbon against tender cake—was what hooked me.
The Ingredient That Changes Everything
You don’t need an army of ingredients to make something that looks and tastes like a showstopper. For the cake part I usually measure everything out like this: 2 cups All-Purpose Flour, 1.5 cups Granulated Sugar, 1 tablespoon Unsweetened Cocoa Powder, 1 teaspoon Baking Soda, and 1 teaspoon Salt. The liquids are simple: 1 cup Buttermilk (I often substitute with yogurt or milk mixed with vinegar when I am out), 1 cup Vegetable Oil (melted butter can be used if you want a richer flavor), 2 large Eggs, 1 tablespoon White Vinegar, and 1 bottle Red Food Coloring (opt for gel food coloring for a more vibrant color without thinning the batter). For the cheesecake swirl you will need 16 oz Cream Cheese (full-fat block-style, room temperature), 1 cup Powdered Sugar, and 1 teaspoon Vanilla Extract. I say these out loud like a friendly checklist when I start, but I don’t lay them out like a cold list on a written recipe—this is how the flavors come together in my head.
Directions and the Way I Bake It
Directions: I always preheat the oven to 350 degrees Fahrenheit and grease a 9-inch springform pan well, lining the bottom with parchment if I have it. I whisk the dry things—2 cups All-Purpose Flour, 1.5 cups Granulated Sugar, 1 tablespoon Unsweetened Cocoa Powder, 1 teaspoon Baking Soda, and 1 teaspoon Salt—so they are evenly distributed. In another bowl I combine the wet: 1 cup Buttermilk, 1 cup Vegetable Oil, 2 large Eggs, 1 tablespoon White Vinegar, and the bottle of Red Food Coloring. The vinegar reacts subtly with the baking soda and keeps that classic red velvet tang. I gently fold the wet into the dry until just combined; the trick is to stop when you see no streaks of flour. Overmixing makes it heavy.
For the cheesecake swirl I beat 16 oz Cream Cheese until silky, then add 1 cup Powdered Sugar and 1 teaspoon Vanilla Extract until smooth. If your cream cheese is cold, you will wrestle lumps, so here is my favorite tip: let the cream cheese sit at room temperature for thirty minutes before you start. I spoon dollops of the red velvet batter into the prepared pan, then drop spoonfuls of the cream cheese mixture across the top. With a butter knife I swirl—think gentle figure-eights and short lifts—so there are visible ribbons but they remain distinct. Bake at 350 for about 35 to 45 minutes; ovens vary, so look for the edges to be set and the center to be mostly set with a slight jiggle. A toothpick should come out with a few moist crumbs but not wet batter. If you prefer, cover the top loosely with foil halfway through if it’s browning too quickly.
Once out of the oven I let it cool on a rack until nearly room temperature before releasing the pan. Chill it for at least a couple of hours; this helps the cheesecake swirl firm up and slice cleaner. When I slice it, the sound of the knife through the tender crumb and creamy ribbon is oddly satisfying.
Getting the Texture Just Right
Texture is everything here. The cake should be tender and moist, and the cheesecake swirling through it should be creamy but set. A few things I’ve learned: one, room-temperature ingredients matter—a cold egg or cream cheese will fight you. Two, gel food coloring gives you that deep, saturated red without adding too much liquid; that’s why I suggest a bottle of gel food coloring. Three, don’t rush the chill—if you try to serve it warm you will see the cheesecake smear rather than ribbon. Lastly, a gentle hand when combining wet and dry ingredients keeps the crumb light. If the center still seems underdone after 45 minutes, tent it with foil and give it an extra 5 to 10 minutes; patience beats a gummy center.
Making It Your Own: Variations and Serving
One of my favorite things about this cake is how adaptable it is. You can play with a couple of easy variations. If you want a richer, more chocolatey base, add an extra half tablespoon of Unsweetened Cocoa Powder or fold in a tablespoon of espresso powder to deepen the flavor. For a lighter, fresher twist, skip the red dye and use beet powder to tint the cake naturally. Another variation is to dollop a bit of whipped cream cheese frosting on top after it chills, or pour a thin chocolate ganache for a more decadent finish.
I usually serve slices with a spoonful of lightly whipped cream and fresh berries on the side; the berries add brightness that cuts through the richness. It pairs beautifully with coffee or a not-too-sweet tea. For holidays I might add a scattering of chocolate shavings and a few edible flowers for drama.
A Few Things I’ve Learned (and How to Keep Leftovers)
If you want to make this ahead, bake it the day before and chill it overnight. It actually slices neater after a good rest in the fridge, and flavors settle into something harmonious. When it comes to leftovers, wrap slices tightly in plastic wrap or keep them in an airtight container in the refrigerator; they stay great for up to four days. If you want longer storage, individual slices freeze well for up to two months—wrap each slice first in plastic and then in foil so nothing gets freezer-burned. When reviving frozen slices, thaw in the refrigerator overnight and bring to slightly cool-room temperature before serving so the cheesecake regains its creaminess. A quick tip: if you notice the cream cheese mixture got a little grainy because the sugar wasn’t fully incorporated, beat it a bit longer by hand and it smooths back out.
I love this recipe because it looks fancy even when the process feels homey. The first time I served it to my kids’ school potluck, classmates came back for seconds and asked the recipe like a secret handshake. It has that nostalgia of red velvet but the surprise of the cheesecake ribbon—comforting and slightly indulgent in the best way.
Conclusion
If you want a version to start from and compare notes, I adapted some ideas from a classic online version; you can see the inspiration I leaned on at Red Velvet Cheesecake Cake Recipe – Life Love and Sugar. Try it once, and I promise you will find excuses to make it again.
Red Velvet Cheesecake Swirl Cake
Ingredients
Method
- Preheat the oven to 350°F (175°C) and grease a 9-inch springform pan, lining the bottom with parchment if available.
- In a mixing bowl, whisk together the dry ingredients: flour, sugar, cocoa powder, baking soda, and salt.
- In another bowl, combine the wet ingredients: buttermilk, vegetable oil, eggs, vinegar, and red food coloring.
- Gently fold the wet ingredients into the dry ingredients until just combined to avoid overmixing.
- Beat the cream cheese until silky, then add the powdered sugar and vanilla extract until smooth.
- Let the cream cheese sit at room temperature for thirty minutes before mixing to avoid lumps.
- Spoon dollops of the red velvet batter into the prepared pan.
- Drop spoonfuls of the cream cheese mixture across the top.
- Using a butter knife, swirl the mixtures together gently to create visible ribbons.
- Bake for 35 to 45 minutes; the edges should be set and the center slightly jiggly.
- Let the cake cool on a rack until nearly room temperature before removing it from the pan.
- Chill the cake in the refrigerator for at least a couple of hours before slicing.
- Serve with a spoonful of whipped cream and fresh berries on the side.