The Ultimate Japanese Katsu Bowl Recipe: Crispy, Saucy Perfection!
Hello, WiseRecipes readers and fellow lovers of incredibly satisfying, crispy, and flavor-packed meals! Are you ready to bring one of Japan’s most beloved comfort foods right into your own kitchen? Today, I am beyond excited to share my Ultimate Japanese Katsu Bowl recipe, complete with that iconic, savory-sweet Tonkatsu Sauce! Imagine a perfectly golden-brown, panko-crusted…
Hello, WiseRecipes readers and fellow lovers of incredibly satisfying, crispy, and flavor-packed meals! Are you ready to bring one of Japan’s most beloved comfort foods right into your own kitchen? Today, I am beyond excited to share my Ultimate Japanese Katsu Bowl recipe, complete with that iconic, savory-sweet Tonkatsu Sauce!
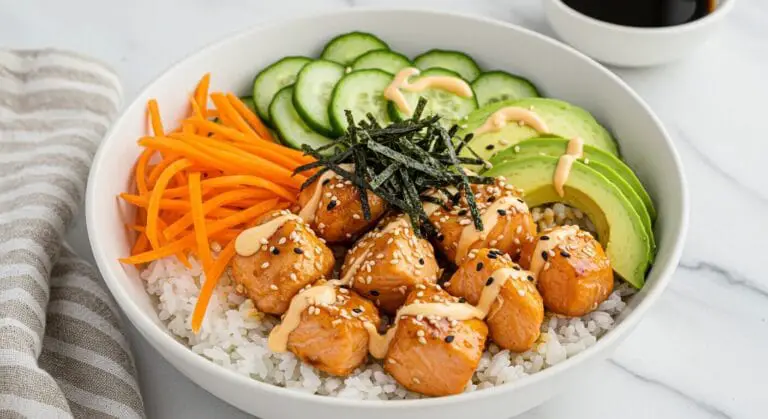
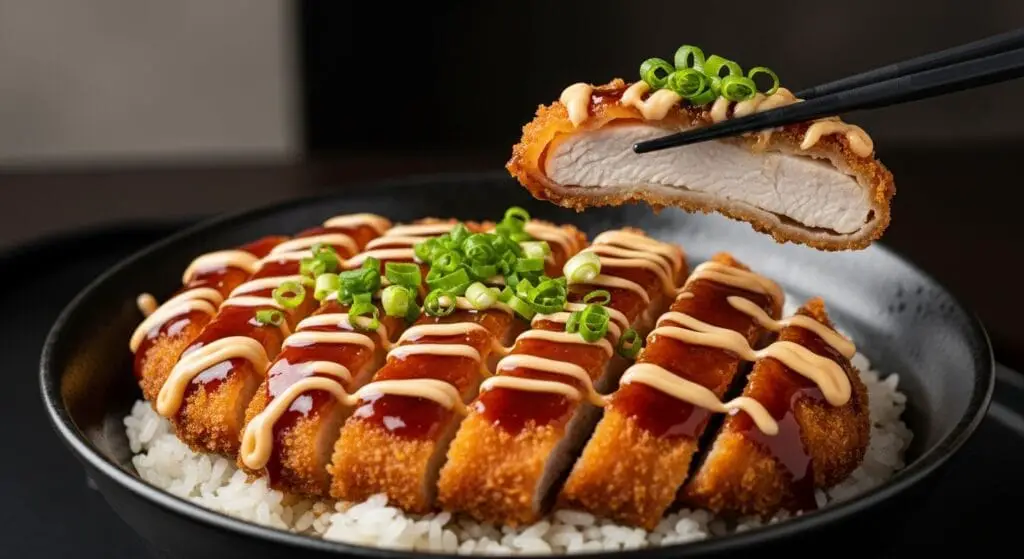
Imagine a perfectly golden-brown, panko-crusted cutlet – be it tender chicken or juicy pork – fried to an unbelievable crispiness, then sliced and served over a bed of fluffy steamed rice. It’s then generously drizzled with a rich, tangy Tonkatsu sauce and often a creamy counterpart. This easy chicken katsu bowl with tonkatsu sauce (or pork!) is a true culinary delight, offering a symphony of textures and tastes. It’s the best crispy homemade katsu rice bowl recipe you’ll find for achieving restaurant-quality results at home.
My journey to perfecting this Japanese Katsu Bowl recipe was all about nailing that ultra-crispy panko crust and a deeply flavorful, authentic-tasting Tonkatsu sauce. We’ll explore how to make authentic japanese katsu and tonkatsu sauce that will transport you straight to your favorite Japanese eatery. This dish has all the comforting vibes of a quick weeknight katsudon style bowl, but with a focus on that glorious crispy katsu.
So, if you’re craving a flavorful panko crusted chicken or pork katsu bowl that’s both incredibly satisfying and surprisingly achievable, let’s get our dredging stations ready for this amazing Japanese Katsu Bowl recipe!
Why This Japanese Katsu Bowl Recipe is an Absolute Must-Try
If “crispy, saucy perfection” isn’t enough, here’s why this Japanese Katsu Bowl recipe will become a new favorite:
- Ultra-Crispy Panko Crust: The panko breadcrumbs create an unbelievably light, airy, and shatteringly crisp coating that stays crunchy. This is the hallmark of a perfect Japanese Katsu Bowl recipe.
- Juicy & Tender Meat: Whether you choose chicken or pork, the katsu will be perfectly cooked, moist, and delicious inside.
- Iconic Tonkatsu Sauce: That sweet, savory, tangy, and slightly spiced Tonkatsu sauce is absolutely addictive and essential to the dish.
- Satisfying & Comforting: A hearty bowl of rice topped with crispy katsu and flavorful sauce is pure comfort food.
- Restaurant-Quality at Home: Impress your family and friends with a dish that tastes like it came from an authentic Japanese restaurant. This is the best crispy homemade katsu rice bowl recipe for that.
- Surprisingly Achievable: While it looks impressive, making katsu is a straightforward process, especially with clear instructions.
- Versatile Base: Easily adaptable with different toppings or a creamy drizzle for extra indulgence.
Gather Your Japanese Pantry Essentials: Ingredients You’ll Need
Let’s get our authentic and flavorful components ready for this delightful Japanese Katsu Bowl recipe.
For the Katsu (Chicken or Pork – Serves 2-4):
- Boneless, Skinless Chicken Breasts (2 large, pounded thin) OR Boneless Pork Loin Chops (4, about ½-inch thick, pounded thin): Approx. 1-1.5 lbs total.
- Salt and Black Pepper: To taste.
- All-Purpose Flour: ½ cup (for dredging).
- Large Eggs: 2, lightly beaten (for dredging).
- Panko Breadcrumbs (Japanese Breadcrumbs): 1 ½ – 2 cups. Do not substitute with regular breadcrumbs for best results!
- Neutral Frying Oil (Canola, Vegetable, Peanut): For shallow or deep frying (enough for at least ½-inch depth in your skillet).
For the Homemade Tonkatsu Sauce (Alternatively, use 1 cup store-bought):
- Ketchup: ½ cup.
- Worcestershire Sauce: ¼ cup.
- Oyster Sauce (Optional, for umami): 1 tablespoon. For vegetarian/vegan version, use vegetarian oyster sauce or omit.
- Soy Sauce (Low Sodium): 1 tablespoon.
- Granulated Sugar (or Brown Sugar): 1-2 tablespoons (to taste).
- Mirin (Japanese Sweet Cooking Wine, Optional): 1 tablespoon.
- Rice Vinegar: 1 teaspoon.
- Garlic Powder: ½ teaspoon.
- Ground Ginger (Optional): ¼ teaspoon.
For the Creamy Drizzle (Optional, as seen in image):
- Kewpie Mayonnaise (Japanese Mayo): ¼ cup. Or regular mayo.
- Milk or Rice Vinegar: 1-2 teaspoons (to thin to drizzle consistency).
- A touch of Sriracha or Tonkatsu Sauce (Optional): For flavor/color.
For Assembling the Bowls:
- Steamed Japanese Short-Grain Rice (or Calrose Rice): 3-4 cups, cooked.
- Green Onions (Scallions): Thinly sliced, for garnish.
- Toasted Sesame Seeds (Optional): For garnish.
- Shredded Cabbage (Optional): Thinly shredded, as a traditional side/base.
Crafting Your Crispy Katsu Masterpiece: Step-by-Step
Let’s create this incredible Japanese Katsu Bowl recipe!
Step 1: Prepare the Meat for Katsu
- Pound Meat Thin: If using chicken breasts, slice them horizontally to make thinner cutlets, or place between plastic wrap and pound to about ¼ to ½-inch thickness. If using pork loin chops, pound them to a similar even thickness. This ensures quick, even cooking for your Japanese Katsu Bowl recipe.
- Season Meat: Pat the chicken or pork cutlets dry with paper towels. Season both sides lightly with salt and black pepper.
Step 2: Set Up Your Breading Station & Bread the Katsu
- Breading Station: Prepare three shallow dishes or plates.
- Dish 1: ½ cup all-purpose flour.
- Dish 2: 2 lightly beaten eggs.
- Dish 3: 1 ½ – 2 cups Panko breadcrumbs.
- Dredge the Meat: Working with one cutlet at a time:
- First, lightly coat the cutlet in the flour, shaking off any excess.
- Next, dip the floured cutlet into the beaten eggs, ensuring it’s fully coated and letting any excess egg drip off.
- Finally, press the egg-coated cutlet firmly into the Panko breadcrumbs, covering all sides completely. Gently pat the Panko onto the meat to help it adhere.
- Rest Breaded Katsu (Optional but Recommended): Place the breaded cutlets on a wire rack or parchment-lined baking sheet. If time allows, let them rest for 10-15 minutes (or even in the fridge for 30 minutes). This helps the breading adhere better during frying, crucial for a flavorful panko crusted chicken or pork katsu bowl.
Step 3: Make the Homemade Tonkatsu Sauce (While Katsu Rests or Fries)
If using store-bought Tonkatsu sauce, you can skip this step.
- Whisk Ingredients: In a small bowl, whisk together the ½ cup ketchup, ¼ cup Worcestershire sauce, optional 1 tablespoon oyster sauce, 1 tablespoon soy sauce, 1-2 tablespoons sugar, optional 1 tablespoon mirin, 1 teaspoon rice vinegar, ½ teaspoon garlic powder, and optional ¼ teaspoon ground ginger until well combined and smooth.
- Taste and Adjust: Taste the sauce. Does it need more sweetness (sugar/mirin)? More tang (vinegar)? More savory depth (soy/Worcestershire)? Adjust to your liking. This is how to make authentic japanese katsu and tonkatsu sauce that suits your taste. Set aside.
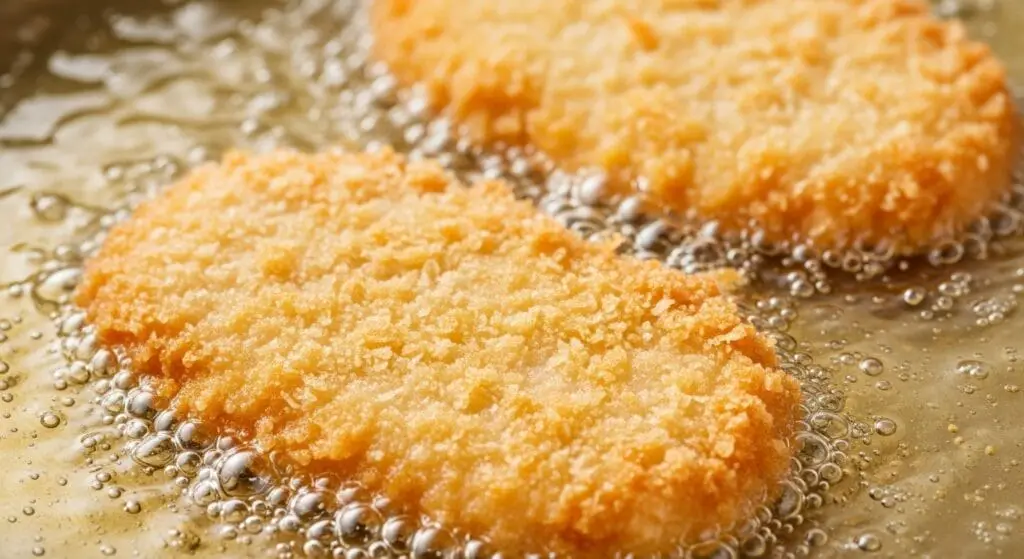
Step 4: Fry the Katsu to Crispy Golden Perfection
- Heat Oil: Pour about ½ to 1 inch of neutral frying oil into a large, heavy-bottomed skillet or Dutch oven. Heat the oil over medium-high heat until it reaches 325-350°F (160-175°C). If you don’t have a thermometer, a Panko breadcrumb dropped into the oil should sizzle vigorously and turn golden brown in about 30-60 seconds.
- Fry Katsu in Batches: Carefully place 1 or 2 breaded cutlets into the hot oil (do not overcrowd the pan).
- Cook Until Golden & Crispy: Fry for about 3-5 minutes per side, or until the Panko crust is a deep golden brown and beautifully crispy, and the meat is cooked through (165°F/74°C for chicken, 145-160°F/63-71°C for pork, followed by a rest). Adjust heat as needed to prevent the crust from browning too quickly before the inside is cooked.
- Drain Katsu: Remove the cooked katsu from the oil using tongs or a spider strainer and transfer to a wire rack set over a baking sheet to drain any excess oil. This helps keep the bottom crispy. Immediately sprinkle very lightly with salt if desired. Repeat with remaining cutlets. This is key for the best crispy homemade katsu rice bowl recipe.
Step 5: Prepare Creamy Drizzle & Assemble Katsu Bowls
- Make Creamy Drizzle (Optional): In a small bowl, whisk together the ¼ cup Kewpie mayonnaise (or regular mayo) with 1-2 teaspoons of milk or rice vinegar until it reaches a smooth, drizzle-able consistency. You can stir in a tiny bit of Sriracha or some of your Tonkatsu sauce for extra flavor.
- Slice Katsu: Once the katsu has rested for a minute or two, slice each cutlet into ½ to ¾-inch thick strips.
- Assemble Bowls:
- Divide the warm steamed Japanese short-grain rice among your serving bowls.
- Arrange the sliced katsu attractively over the rice.
- Generously drizzle the Tonkatsu sauce over the katsu.
- If using, add a drizzle of the creamy mayo-based sauce.
- Garnish & Serve: Sprinkle with thinly sliced green onions and optional toasted sesame seeds. Serve your incredible Japanese Katsu Bowl recipe immediately while the katsu is hot and crispy! This is your quick weeknight katsudon style bowl made easy.
Wise Tips for the Perfect Japanese Katsu Bowl
Achieve katsu perfection with these essential tips for your Japanese Katsu Bowl recipe:
- Panko is Non-Negotiable for Katsu: Japanese Panko breadcrumbs are essential for that signature light, airy, and ultra-crispy crust. Do not substitute with regular fine breadcrumbs.
- Pound Meat to Even Thickness: This ensures the chicken or pork cooks evenly and quickly without drying out.
- Proper Breading Technique: Follow the flour-egg-Panko sequence and press the Panko firmly to adhere well. Resting the breaded cutlets helps too.
- Correct Oil Temperature for Frying: Too low, and the katsu will be greasy. Too high, and the crust will burn before the meat is cooked. Aim for 325-350°F (160-175°C).
- Don’t Overcrowd the Frying Pan: This lowers the oil temperature and results in less crispy, potentially oily katsu. Fry in batches.
- Drain on a Wire Rack: This allows air to circulate, keeping the bottom of the katsu crispy, a must for any great Japanese Katsu Bowl recipe.
- Slice Katsu Just Before Serving: This helps retain its heat and crispness.
Delicious Variations & Serving Ideas
This Japanese Katsu Bowl recipe is fantastic, but here are some ways to customize:
- Katsudon: A classic variation! Simmer sliced katsu with onions, dashi, soy sauce, and mirin, then pour over rice with a lightly cooked egg on top.
- Katsu Curry: Serve the crispy katsu with a rich Japanese curry sauce over rice.
- Different Proteins: While chicken (Tori Katsu) and pork (Tonkatsu) are classic, you could try this with firm tofu or even large oyster mushrooms for a vegetarian version.
- Spicy Tonkatsu Sauce: Add a pinch of shichimi togarashi (Japanese seven spice) or a dash of Sriracha to your Tonkatsu sauce.
- Add Shredded Cabbage: Serve the katsu bowl with a side of very thinly shredded raw cabbage, as is traditional in Japan. It adds a refreshing crunch.
- Katsu Sando: Place a katsu cutlet between two slices of soft Japanese milk bread (shokupan) with Tonkatsu sauce for an amazing sandwich.
Storing & Reheating Your Crispy Katsu
Katsu is undeniably best when fresh, but here’s how to handle leftovers from your Japanese Katsu Bowl recipe:
- Storage: Store leftover cooked and sliced katsu separately from the rice and sauces in an airtight container in the refrigerator for up to 2-3 days. Store Tonkatsu sauce in a separate airtight container in the fridge.
- Reheating Katsu (to retain crispiness):
- Oven or Toaster Oven (Best): Preheat to 350-375°F (175-190°C). Place katsu on a wire rack set on a baking sheet and bake for 10-15 minutes, or until heated through and re-crisped.
- Air Fryer: Reheat at around 350°F (175°C) for 5-7 minutes until crispy.
- Avoid the microwave for katsu, as it will make the breading soggy.
- Rice & Sauce: Reheat rice and sauce separately.
Frequently Asked Questions (FAQ) – Japanese Katsu Bowl Recipe
Your common questions about this crispy, saucy delight:
- What is the difference between Tonkatsu and Chicken Katsu?
Tonkatsu specifically refers to a deep-fried pork cutlet (“Ton” means pork). Chicken Katsu (“Tori Katsu”) is the chicken version. Both use the same panko breading technique and are often served with Tonkatsu sauce in a Japanese Katsu Bowl recipe. - Can I bake the katsu instead of frying it?
Yes, you can bake panko-crusted cutlets for a lighter version, though they won’t be quite as uniformly crispy or golden as fried. Spray the breaded cutlets generously with cooking oil and bake at 400-425°F (200-220°C) for about 15-25 minutes (depending on meat and thickness), flipping halfway, until cooked through and golden. - Where can I find Panko breadcrumbs and Tonkatsu sauce?
Panko breadcrumbs are widely available in the international aisle or baking aisle of most supermarkets. Good quality store-bought Tonkatsu sauce can also be found in the international/Asian food section or at Asian markets. However, making homemade Tonkatsu sauce for your Japanese Katsu Bowl recipe is very easy! - My Panko breading isn’t sticking well. What can I do?
Ensure you pat the meat dry before flouring, press the Panko firmly onto the egg-coated meat, and let the breaded cutlets rest for at least 10-15 minutes (or longer in the fridge) before frying. This helps the coating set. - What kind of rice is best for a Katsu Bowl?
Japanese short-grain rice (like Calrose or Koshihikari) is traditional and perfect for its slightly sticky texture, which holds up well to the sauce and katsu.
This Japanese Katsu Bowl recipe is a true celebration of texture and flavor, bringing an iconic taste of Japan right to your home kitchen. It’s an easy chicken katsu bowl with tonkatsu sauce (or pork!) that proves you can achieve that best crispy homemade katsu rice bowl recipe perfection. The combination of flavorful panko crusted chicken or pork katsu bowl with rice and savory sauce is simply irresistible.
I am so excited for you to try this recipe and experience the joy of perfectly crispy katsu! If you make this Japanese Katsu Bowl recipe, please come back and share your delicious results in the comments below! Did you use chicken or pork? Happy frying!