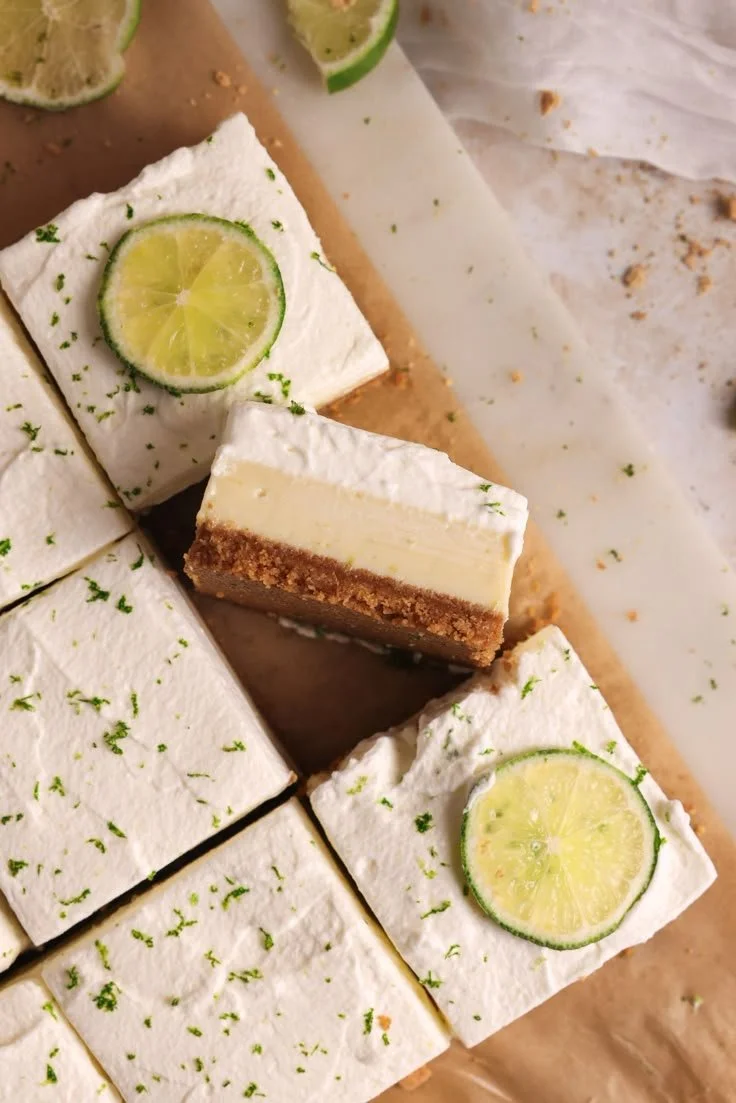
Key Lime Pie Bars
How I Stumbled on These Bars I grew up thinking Key lime pie was the only way to get that bright, sunshiny citrus hit, but one summer a neighbor brought a pan of Key Lime Pie Bars to a block party and my whole dessert map changed. They were the same zingy flavor, but easier…
How I Stumbled on These Bars
I grew up thinking Key lime pie was the only way to get that bright, sunshiny citrus hit, but one summer a neighbor brought a pan of Key Lime Pie Bars to a block party and my whole dessert map changed. They were the same zingy flavor, but easier to eat, perfect for picnics, and somehow even better chilled. If you’re the kind of person who enjoys delicate lime treats like the tiny meringue-sweet version I once tried, you might also like my riff on Key lime pie macarons, but these bars are what I reach for when I need something quick, reliable, and crowd-pleasing.
The Secret Behind the Bright Filling
What makes these bars sing is the balance between creamy tang and a buttery, crunchy base. For this recipe you’ll pull together 1 cup graham cracker crumbs, 1/2 cup unsalted butter melted, and 1/4 cup granulated sugar to form the crust. The filling is deceptively simple: 2 cups sweetened condensed milk, 3/4 cup fresh lime juice, the zest of 2 limes, 4 large egg yolks, and 1/4 teaspoon salt. Whipped cream is the classic topping and it’s non-negotiable in my book; its cloud-like softness calms the tartness and makes each bar feel like a little celebration.
When you smell the lime zest as you grate it, and then mix it into the velvety sweetened condensed milk, the kitchen brightens with a scent that’s almost floral. The texture of the filling should be glossy and smooth before it ever meets the oven.
Putting It Together (and a Few Tricks)
I always begin by preheating the oven to 350°F (175°C) and greasing a 9×9 inch baking pan so the bars don’t stick. While the oven warms, I mix the crust: in a bowl I combine the graham cracker crumbs with the melted butter and sugar until everything is evenly coated. Pressing that mixture into the bottom of the prepared pan is oddly satisfying; I use the bottom of a measuring cup to get an even, compact layer that will hold up under the filling.
In another bowl I whisk together the sweetened condensed milk, lime juice, lime zest, egg yolks, and salt until the mixture is silky and homogenous. You want no streaks of yolk or pulp; it should look almost custard-like. Pour that lime mixture over the crust and spread it evenly so every bite has the same balance of tang and crust. Then bake for 15-20 minutes, or until set. My tip here is to start checking at 15 minutes: the edges should look set and just barely golden while the center will still have a tiny, jelly-like wobble. That slight jiggle is your clue that it will finish firm and creamy as it cools.
Let it cool completely before cutting. If you try to slice them warm, the filling leaks and you lose that neat bar look. Once the pan is cool, I run a knife around the edges and cut into squares, then pile them on a plate and dollop a spoonful of whipped cream on each. The contrast of cool white cream over the pale green filling is beautiful and tastes even better than it looks.
A few tricks I rely on: always use fresh lime juice for brightness, chill the pan before cutting if you want perfectly clean slices, and if you like a firmer crust, add an extra tablespoon of melted butter to the crumbs. Also, if you ever wonder whether to use key limes or regular limes, the zest of two limes in this quantity gives plenty of aroma; key limes are sweeter and more floral, but regular limes work fine in a pinch.
When It’s Done Right (and What to Serve With)
You’ll know the bars are done right when the center no longer looks liquid but still has that slight wobble, the edges are set, and the aroma of baked lime and graham crackers fills the kitchen. Overbake and the filling becomes rubbery; underbake and it won’t slice cleanly. After cooling, the texture should be creamy and dense, with a snappy crust. I like to serve mine chilled straight from the fridge, topped with whipped cream and a thin curl of lime zest for show.
As for pairings, these are delightful with strong black coffee in the afternoon or with a fizzy soda on a hot day. They also make a lovely light finish to a heavy meal; after something rich like a garlicky roast, the brightness of the lime feels like a palate reset. If you want to build a dessert platter, they sit nicely next to other bars and cookies—try juxtaposing them with something chocolatey or nutty for contrast, or add a bowl of fresh berries for color.
If you are thinking about variations, you might enjoy these bars alongside my take on Easy Cherry Pie Bars at a potluck so guests can sample tart and sweet bar options.
Small Changes, Big Differences
Once you’ve made the basic version a couple of times, it’s fun to experiment. One easy variation is to swap in crushed vanilla wafers for half the graham crumbs and add a teaspoon of coconut extract to the filling for a tropical twist. If you like coconut, try leaning into that idea fully by riffing on a texture swap I adore in coconut Key lime crinkle cookies, where shredded coconut changes the mouthfeel completely. Another variation is to fold a tablespoon of mascarpone into the lime filling for an even silkier, less tang-forward result.
For make-ahead planning, these bars are surprisingly good kept chilled in an airtight container. I store leftovers in the refrigerator for up to four days; they actually taste better after a day when the flavors have settled. If I need to freeze them, I cut into bars, flash-freeze on a tray, and then wrap individually in plastic, keeping them in an airtight box for up to two months. Thaw in the refrigerator before serving and add whipped cream just before plating.
A few more personal tips: zest first and then juice the limes so you don’t lose any aromatic oils, press the crust evenly so it doesn’t crumble when cut, and warm the knife under hot water and dry it between slices to get tidy edges.
Conclusion
If you want a reliable, bright, and crowd-pleasing dessert that feels homemade without fuss, these Key Lime Pie Bars are a favorite of mine for good reason. For another straightforward version and additional tips, I like the resourceful approach in Easy Key Lime Pie Bars – Easy Recipe – Sally’s Baking Addiction.

Key Lime Pie Bars
Ingredients
Method
- Preheat the oven to 350°F (175°C) and grease a 9x9-inch baking pan.
- In a bowl, combine the graham cracker crumbs, melted butter, and sugar until evenly mixed.
- Press the mixture into the bottom of the prepared baking pan using the bottom of a measuring cup.
- In another bowl, whisk together the sweetened condensed milk, lime juice, lime zest, egg yolks, and salt until silky and homogenous.
- Pour the lime mixture over the crust and spread evenly.
- Bake in preheated oven for 15-20 minutes, or until the edges look set and golden with a slight wobble in the center.
- Let the bars cool completely before cutting to prevent the filling from leaking.
- Cut into squares and serve topped with a dollop of whipped cream.