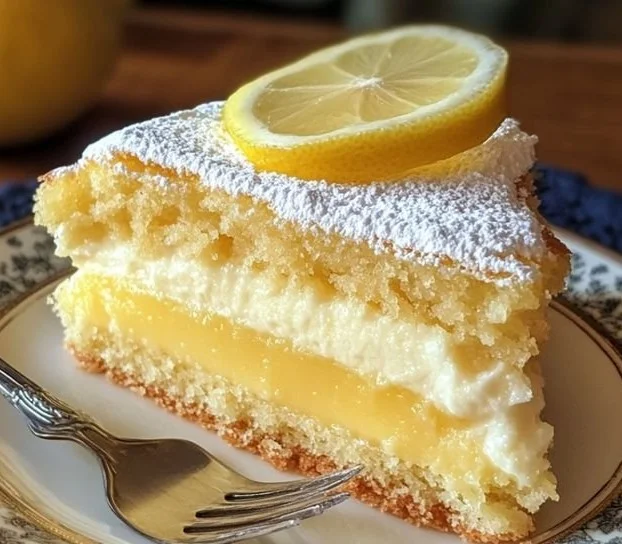
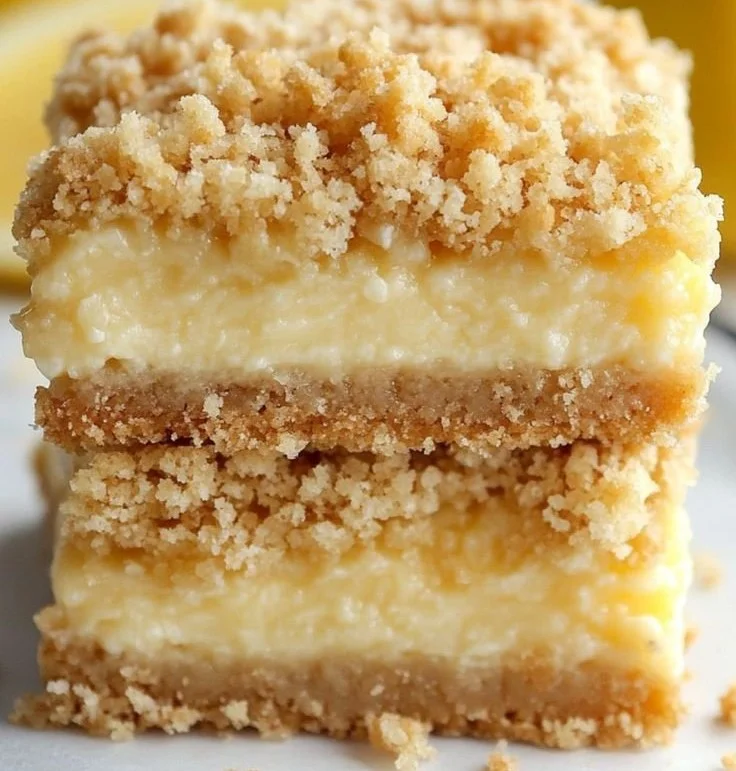
Lemon Crumb Bars
How I Stumbled Into Making Lemon Crumb Bars I have a memory of summer kitchens and a sun-soaked window sill where the scent of lemon used to hang like a promise, and that is exactly how I think of these Lemon Crumb Bars. They feel like an easy, bright shortcut to that memory — tart…
How I Stumbled Into Making Lemon Crumb Bars
I have a memory of summer kitchens and a sun-soaked window sill where the scent of lemon used to hang like a promise, and that is exactly how I think of these Lemon Crumb Bars. They feel like an easy, bright shortcut to that memory — tart and sweet at once, with a crumbly, buttery base that sings against the glossy lemon filling. If you ever want to convince someone that dessert can be refreshing instead of heavy, serve them one of these. If you like comparing versions, you might enjoy another take on lemon crumb bars I found while tinkering with the recipe, but the one I make most often is the one I’ll describe here.
The Little List You Need
When I teach this to friends I usually say, “You probably already have everything.” The recipe only asks for pantry staples: 1 cup all-purpose flour, 1/2 cup powdered sugar, 1/2 cup butter, softened, 1 cup granulated sugar, 2 large eggs, 1/3 cup fresh lemon juice, 1 tablespoon lemon zest, 1/2 teaspoon baking powder, 1/4 teaspoon salt. That one tablespoon of fresh lemon zest is the thing that really changes the song; bottled juice has its place but the oils in the rind are what give the top layer that lively, perfumed note.
Making the Crust and the Bright Filling
I always start by preheating the oven to 350°F (175°C) and greasing a baking dish so I’m not scrambling once the crust is ready. The crust is wonderfully simple: in a mixing bowl, combine the flour and powdered sugar, then cut in the butter until the mixture resembles coarse crumbs. I press that mixture firmly into the bottom of the prepared baking dish; you want an even foundation so each bar bakes the same. While you press the dough, it should feel drier than cookie dough but still hold together when you press it between your fingers.
For the lemon layer, I whisk together the granulated sugar, eggs, lemon juice, lemon zest, baking powder, and salt until smooth. It almost looks like a glossy custard at that point, thin enough to pour but thickening as it bakes. Pour the lemon mixture over the crust in the baking dish and slide it into the oven. Bake for about 20 to 25 minutes, or until the filling is set and the edges are slightly golden. One tip I always share is to peek at the 18-minute mark — if the center still ripples a little, it needs a few more minutes; if it jiggles like loose jelly, give it more time. When it comes out, let it cool completely before slicing into bars and serving; the filling firms up as it cools, and cutting too early makes a mess. I learned that the hard way the first time I tried to speed things up for company.
A trick I use for cleaner slices is chilling the pan briefly before cutting, or running a knife under hot water and drying it before each pass. It keeps the lemon layer from smearing and gives you those neat squares everyone likes on a dessert plate.
The Secret Behind the Texture and Flavor
I love how the crumbly base contrasts with the silky lemon layer. Pressing the crust firmly is the little detail that keeps the base from collapsing into the filling, so don’t be shy with your palm or the bottom of a measuring cup. Using softened butter rather than melted butter preserves a more sand-like crumb, which I prefer for mouthfeel. If you want a more rustic, denser crust, let the butter sit a touch longer until it’s almost at room temperature but not greasy.
Fresh lemon juice and zest are crucial here; that 1/3 cup fresh lemon juice gives a bright punch, and the tablespoon of zest releases fragrant citrus oils. If you ever wonder how to make the flavor pop without being overwhelmingly sour, try adding the zest and sugar to the eggs first and whisking; the sugar helps extract those oils for a brighter, rounder flavor.
A Few Things I’ve Learned (and Variations I Recommend)
Sometimes friends ask what to do if they want something different. I experiment a lot, and two of my favorite variations are to fold a handful of blueberries into the filling for a seasonal twist, or to sprinkle toasted coconut over the crust before pouring the lemon mixture for a tropical edge. If you want a heartier bar, I’ve adapted this into a lemon-oatmeal version by tweaking the crust and adding oats; if that sounds appealing, my notes over on the lemon oatmeal crumble bars page are a great starting point. For something entirely different I sometimes swap the citrus for baked apples and caramel, which is a fun swap when apples are in season and inspiration strikes; you can see a similar flavor idea at the caramel apple crumb bars post I love to reference.
A couple of quick tips I always pass along: first, zest before you juice, because zesting a squeezed lemon is a sad, limp experience. Second, if your kitchen is warm, chill the pan of crust for 10 minutes before adding the lemon mixture to reduce the chance of the crust melting into the filling. Third, to avoid overly sweet bars, taste the lemon mixture before baking and adjust sugar up or down slightly depending on how tart your lemons are.
When It’s Done, What to Serve, and How to Store the Rest
You’ll know these are done when the filling is set; the center should not wobble like a custard, and the edges will take on a subtle golden hue. The scent is also a dead giveaway — a clean, citrusy aroma that makes it obvious your oven did its job. I like to serve these slightly chilled or at room temperature. They pair beautifully with a cup of strong coffee in the morning, a cup of tea in the afternoon, or a dollop of lightly whipped cream for an evening treat.
If you want to make these ahead, bake them, cool them completely, then refrigerate the pan. They keep well for up to four days in the fridge, tightly covered. For longer storage, cut into squares and freeze them in a single layer on a tray; once frozen, stack with parchment between layers in an airtight container for up to two months. When I bring them to potlucks, I usually keep them chilled until serving so they look tidy and cut cleanly.
What I Love Most About This Recipe
What keeps me coming back is how forgiving and bright it is. A messy afternoon of baking can turn into a stunning tray of lemony joy with just a few simple motions. My mother used to bring a plate of lemon slices and a jar of powdered sugar to our summer gatherings, and slicing into these bars brings that same kind of shared pleasure. They are one of those desserts that manage to be both comforting and celebratory at the same time.
Conclusion
If you want to compare techniques or explore a slightly different crumble topping, I often look to external baking blogs for inspiration; for example, this version on Lemon Crumb Bars – Sugar Spun Run has some lovely photos and alternative ideas that inspired my own little tweaks. Give these a try on a sunny afternoon and tell me whether you like them chilled or at room temperature.
Lemon Crumb Bars
Ingredients
Method
- Preheat the oven to 350°F (175°C) and grease a baking dish.
- In a mixing bowl, combine the flour and powdered sugar. Cut in the softened butter until it resembles coarse crumbs.
- Press the mixture firmly into the bottom of the prepared baking dish.
- In a bowl, whisk together the granulated sugar, eggs, lemon juice, lemon zest, baking powder, and salt until smooth.
- Pour the lemon mixture over the crust in the baking dish.
- Bake for about 20 to 25 minutes, until the filling is set and the edges are slightly golden.
- Let it cool completely before slicing into bars.
- Serve slightly chilled or at room temperature.