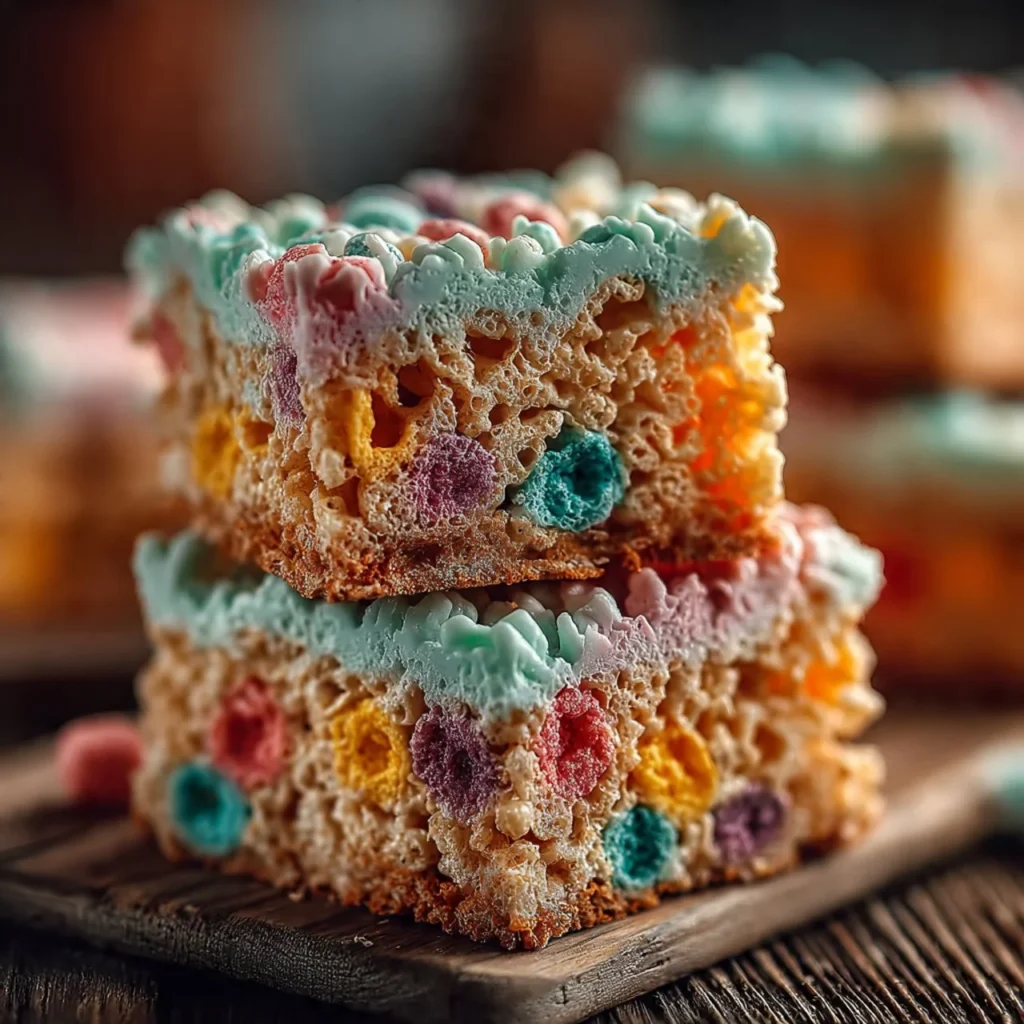
Lucky Charms Treats
There’s something magical about the combination of fluffy marshmallows and colorful cereal, and when it comes to Lucky Charms Treats, we’re diving into a delightful treat that packs nostalgia and pure deliciousness into every bite. Whether you’re reminiscing about childhood or introducing something new to your family, these gooey, glistening bars will have everyone smiling….
There’s something magical about the combination of fluffy marshmallows and colorful cereal, and when it comes to Lucky Charms Treats, we’re diving into a delightful treat that packs nostalgia and pure deliciousness into every bite. Whether you’re reminiscing about childhood or introducing something new to your family, these gooey, glistening bars will have everyone smiling. The cereal adds a playful crunch and a touch of whimsy, making them not just a treat but a joyful experience.
Why Lucky Charms Treats Deserves a Spot in Your Kitchen
- Squickly Sweet: These treats are a perfect balance of sweetness with a chewy texture that softens with each bite, making them utterly irresistible.
- Snack Time Fun: They’re not just delicious; they are colorful and fun! Each bar is studded with those iconic marshmallows that bring a smile to your face.
- Quick and Easy: As someone who’s always looking for ways to whip up something delightful in a flash, these treats come together in no time, making them perfect for spontaneous gatherings or a weekend treat.
- Customizable Delight: With flexible options for ingredients and flavors, you can make these treats your own. It’s like playing artist in the kitchen—freestyle to your heart’s content!
- Kid-Approved: Whether you’re making them for a party, lunchboxes, or just because, kids (and adults) alike can’t resist these tasty bars.
Gathering Your Ingredients
To make your Lucky Charms Treats, you’ll need a simple yet effective list of ingredients. Here’s what you’ll need and why they matter:
- 4 Tbsp butter (plus extra for greasing): The butter adds richness and helps everything hold together while also providing a scrumptious flavor.
- 1 1/2 bags mini marshmallows (15 oz bags): The star of the show! These marshmallows melt into a gooey, sweet cloud that binds the cereal and creates a lovely texture.
- 6 cups Lucky Charms cereal: This is where the magic happens! The cereal not only adds crunch but also a volume of colorful flecks that entice the eyes.
- 1 bag of white chocolate chips (12 oz): Melted to create a sweet coating, the white chocolate adds a creamy richness that elevates the bars to something extraordinary.
- 4 drops green food coloring: Just a little splash of green and—voilà!—you bring a festive touch right into your kitchen. Perfect for any cheerful occasion!
Crafting Your Perfect Lucky Charms Treats
Ready to get started? This simple recipe transforms those basic ingredients into a sweet masterpiece. Follow these straightforward steps, and you’ll be rewarded with a batch of treats that are certainly going to disappear fast!
- Begin by using a paper towel to butter the bottom of a 9×13-inch pan lightly. This ensures that nothing sticks to the bottom and helps your treats easily release when it’s time to slice them.
- In a large microwave-safe bowl, melt 4 tablespoons of butter. I find that a quick zap brings out the buttery aroma you can almost taste before you start!
- Pour the marshmallows into the melted butter, mixing gently to coat each fluffy morsel with the creamy goodness.
- Place the bowl in the microwave and heat it on high for 30 seconds. After that, give it a good stir before returning it to the microwave for another 30 seconds, until the marshmallows are completely melted and smooth. You might want to stir in a few extra marshmallows at this point for that gooey texture!
- Now, slowly pour the cereal into the marshmallow mixture, mixing carefully to evenly coat every delightful piece of Lucky Charms. The colors will dance together, creating a vibrant display.
- Transfer the mixed treats into your greased 9×13 pan. Here’s a little tip: wet your hands with water and press the mixture down firmly to create an even layer.
- Cover the pan and pop it in the fridge to cool for at least an hour. This is the hard part; the anticipation is real!
- Once cooled, take your treats out and cut them into 20-24 squares. I love to turn them upside down on wax paper—this allows the base to set perfectly.
- Melt the white chocolate in the microwave for 45 seconds, give it a stir, and pop it in for another 45 seconds until silky smooth. Now, add the green food coloring and stir it in until you have an enticing, vibrant shade.
- Dip the bottom of each treat into the green chocolate, ensuring a lovely coating. Place them back upside down on the wax paper to let them cool and harden.
- Lastly, serve and enjoy! Each bite is sure to bring a smile to your face.
Pro Tips for Perfect Treats
- Ensure Even Melting: When melting marshmallows and chocolate, ensure you stir at intervals to avoid scorching and achieve a lovely, velvety texture.
- Pressing Down: Don’t skip out on firmly pressing the mixture into the pan. This will help create substantial bars that hold together rather than crumble apart.
- Chill Time: Giving your treats time to cool and set in the fridge is critical for achieving the right texture and form. It’s worth the wait!
- Experiment with Add-Ins: Feel free to toss in extras like nuts, dried fruits, or alternative cereals for delightful surprises and different textures.
Creative Twists You Can Try
While the classic Lucky Charms treats are a total hit, believe me, the fun doesn’t stop there! Here are some delightful variations to make this treat even more exciting:
- Nutty Addition: Throw in some chopped nuts, like almonds or peanuts, for an added crunch and depth of flavor.
- Chocolate Lovers: Instead of white chocolate, use dark or milk chocolate for a rich, chocolaty twist.
- Rainbow Sprinkles: Mix in sprinkles for a festive touch that’s sure to liven up the presentation for birthday parties or celebrations.
- Fruit-Filled: Substitute some of the cereal with freeze-dried fruits for a fruity flavor that pairs beautifully with the marshmallows.
- Flavored Marshmallows: Keep an eye out for seasonal flavored marshmallows; raspberry or peppermint can make an interesting spin on the basics!
Perfect Ways to Serve Your Treats
When it comes to serving these delightful bites, a little flair goes a long way. Arrange the treats on a colorful platter for parties, stack them neatly in a mason jar for an inviting dessert display, or simply serve them on a fun plate that brings a smile. Pair these treats with a glass of ice-cold milk or a cup of hot cocoa for a cozy, heartwarming combination. You could even serve them at a movie night with friends, creating a sweet snack station that everyone will love.
Keeping Your Treats Fresh
To maintain the gooey goodness of your Lucky Charms Treats, follow these simple storage tips:
- Room Temperature: Store your treats at room temperature in an airtight container; they’ll stay fresh for about 3-5 days.
- Refrigeration for Longevity: If you want to keep them a bit longer, store them in the fridge where they can last up to 10 days.
- Freezing for Later: You can also freeze these treats for up to a month! Just wrap them tightly in plastic wrap and place them in a freezer-safe container. Thaw in the fridge before enjoying again.
- Reheat Carefully: If you prefer them warm, gently microwave for just a few seconds to soften them again—just don’t overdo it!
Your Questions Answered
- Can I use regular marshmallows instead of mini? Absolutely! Just chop them to speed up the melting process.
- What if I accidentally overcooked the marshmallows? If your marshmallows become too hard, try adding a splash of water and microwaving for a few seconds; this may soften them up a bit.
- Can I make these vegan? Yes! Substitute butter with coconut oil or vegan butter and use dairy-free chocolate chips. It’s a delicious alternative!
- Do these treats hold up well for travel? Yes, pack them in a sturdy container with parchment between layers to keep them fresh and prevent sticking while traveling.
There you have it—a step-by-step journey into creating those magical Lucky Charms Treats! These bars are not just a treat; they’re nostalgia wrapped in sweetness, perfect for sharing and enjoying with loved ones. So go ahead, gather your ingredients, and indulge in some kitchen magic. I promise it’ll be worth it!
Lucky Charms Treats
Ingredients
Method
- Butter the bottom of a 9x13-inch pan using a paper towel.
- In a large microwave-safe bowl, melt 4 tablespoons of butter.
- Add the marshmallows into the melted butter, mixing gently to coat.
- Microwave the mixture on high for 30 seconds, stir, then microwave for another 30 seconds until melted and smooth.
- Slowly pour the Lucky Charms cereal into the marshmallow mixture, mixing carefully to coat.
- Transfer the mixture into the greased pan and press down firmly with wet hands to create an even layer.
- Cover the pan and refrigerate for at least 1 hour to set.
- Once cooled, cut the treats into 20-24 squares and place them upside down on wax paper.
- Melt the white chocolate in the microwave for 45 seconds, stir, then melt for another 45 seconds until smooth.
- Stir in the green food coloring until the chocolate is even in color.
- Dip the bottom of each treat in the green chocolate and place them back upside down on the wax paper to cool and harden.
- Serve and enjoy, ideally paired with ice-cold milk or hot cocoa.