Magical Spiral Cookies
The First Time I Made Them The first time I made Magical Spiral Cookies I had a tiny counter full of flour, butter, and ambition, and a kitchen that smelled like vanilla and a little bit of nervousness. I was inspired by a cookie that my neighbor used to bring over during the holidays, which…
The First Time I Made Them
The first time I made Magical Spiral Cookies I had a tiny counter full of flour, butter, and ambition, and a kitchen that smelled like vanilla and a little bit of nervousness. I was inspired by a cookie that my neighbor used to bring over during the holidays, which reminded me of other festive treats I adore, like those almond ginger Christmas tree cookies I keep bookmarking because they feel so whimsical almond ginger Christmas tree cookies. This recipe — Magical Spiral Cookies — quickly became my go-to when I wanted something that looked like a party but was utterly simple to pull off.
The Ingredients and How I Use Them
You really don’t need exotic things to make these. I always start by gathering 2 cups all-purpose flour, 1/2 teaspoon baking powder, and 1/4 teaspoon salt. For the soft, tender base I use 1 cup unsalted butter, softened, and 1 cup granulated sugar, which I cream until it’s light and fluffy. Then comes 1 large egg and 1 teaspoon vanilla extract to bind and flavor. The fun part is the food coloring in whatever shades you love, and finally a little powdered sugar for dusting when they come out of the oven.
When I talk friends through this recipe I like to explain the flour, baking powder, and salt together first because I always whisk them in a bowl so the rising agent is evenly distributed. It’s a small step but it changes the texture in a nice way. If you are the sort who likes to browse other cookie ideas while you bake, I once found inspiration from a bakery gingerbread and white chocolate combo that helped me feel more playful with color and contrast bakery gingerbread white chocolate cookies.
How They Come Together
I preheat the oven to 350°F (175°C) as soon as I decide to make these. That way the oven is ready when my dough is shaped. In a bowl I whisk together the flour, baking powder, and salt so everything is evenly mixed. In another bowl the real magic happens: I cream the softened butter and granulated sugar until light and fluffy, which takes a few minutes and makes the kitchen smell unmistakably cozy. Then I beat in the egg and vanilla extract. After that I gradually add the dry ingredients to the wet ingredients and mix until combined. The dough is soft but firm enough to handle.
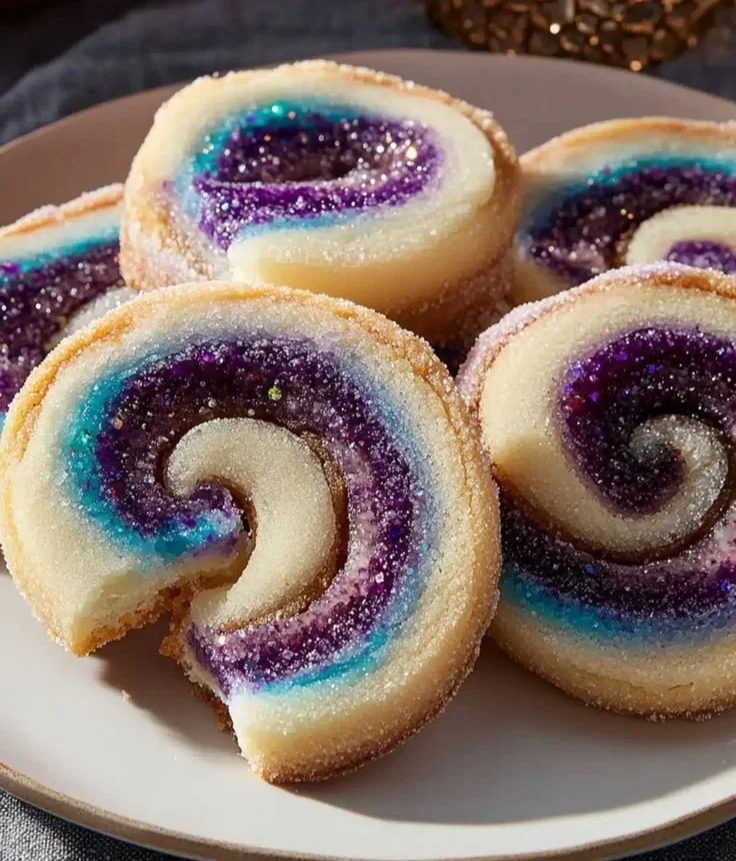
Next comes the playful stage. I divide the dough into portions and knead in food coloring until I get the desired colors. This is where you can be dramatic or subtle. I roll each colored dough into a log and then stack them together to form a spiral shape; sometimes I press gently with my palm to secure the layers, sometimes I roll the stacked log a little more to make the spiral tighter. Then I slice the log into rounds and place them on a baking sheet lined with parchment paper. Slide them into the oven and bake for 10 to 12 minutes or until lightly golden at the edges. When they come out they are still soft, with that tender crumb that feels almost like shortbread. I allow them to cool and then dust with powdered sugar before serving, because powdered sugar makes everything look like a tiny celebration.
Little Tricks That Save the Day
Over the years I have learned a few things that change the result, and I always tell friends these as we bake together. One tip is to not overwork the dough after the egg goes in; too much mixing makes cookies tougher. Another trick is to keep the logs chilled for 10 to 15 minutes if your kitchen is warm, which helps them slice cleaner and keeps the spiral defined. If the colors start to bleed a little while kneading, a short rest in the fridge fixes that. And if you want a perfectly even bake, space the rounds about an inch apart on the parchment.
If something goes wrong, like the spiral slipping, don’t worry. You can press the slices back into shape while they are still warm, and a light dusting of powdered sugar will hide imperfections. If you’re curious about other textures, I often think about how these compare with chewier cookies; I sometimes flip through recipes for big soft ginger cookies to remind myself how different ingredients and technique change a cookie’s personality big soft ginger cookies.
Storing them is simple: once fully cooled, I keep leftovers in an airtight container at room temperature for up to three days, or in the fridge for about a week if my butter was particularly soft. For longer storage, these freeze beautifully in a single layer for a couple of hours, then stacked with parchment between layers in a sealed container for up to a month. I find reheating a single cookie in a warm oven for a few minutes brings back that just-baked feeling.
When They’re Perfect and What to Serve With
You know these are done right when the edges are just beginning to blush golden and the centers still look tender. They should have a slight snap but melt in your mouth with a buttery finish. The smell is the giveaway: warm vanilla and browned butter notes if you used butter that had a chance to get a touch warm in the oven.
These cookies are beautiful with a simple cup of tea or a rich hot chocolate. I often bring a tin to potlucks and pair them with a cheese plate for a playful contrast. For brunch I serve them alongside yogurt and berries; for late-night treats I make them with espresso. If you’re serving kids, colorful milk is a hit.
As for variations, one delightful option is to fold a tablespoon of unsweetened cocoa into half the dough to create a classic chocolate-and-vanilla pinwheel. Another is to add a teaspoon of finely grated lemon zest to one color for a bright citrus note. If you want to get fancy, a thin ripple of Nutella between two colored layers creates a decadent surprise. For a holiday twist I sometimes add ground ginger and cinnamon to half the dough for a spiced spiral.
I also sprinkle in little memories as I bake. My aunt used to hum while she rolled dough and told stories about the town fair, and I find myself humming similar, and the act of pressing those colorful logs together feels like building something small but joyful. Those scents and small routines are why I love this recipe: it’s as much about the making as it is about the eating.
Conclusion
If you want a similar visual inspiration, I always enjoy revisiting pastry bloggers who celebrate simple, bold designs like Baba’s red and white spiral cookies, which remind me to keep my contrasts crisp. For another take on pinwheels and shaping techniques that inspired my first attempts, Barbara’s pinwheel recipes are a great reference Pinwheel Cookies – Barbara Bakes™.
Magical Spiral Cookies
Ingredients
Method
- Preheat your oven to 350°F (175°C).
- In a bowl, whisk together flour, baking powder, and salt to ensure even distribution.
- In another bowl, cream together the softened butter and granulated sugar until light and fluffy.
- Beat in the egg and vanilla extract, blending until smooth.
- Gradually add the dry ingredients to the wet mixture, mixing until combined.
- Divide dough into portions and knead in food coloring until the desired colors are achieved.
- Roll each colored dough into logs and stack them to form a spiral shape.
- Slice the log into rounds and place them on a parchment-lined baking sheet.
- Bake in the preheated oven for 10 to 12 minutes, or until the edges are lightly golden.
- Allow cookies to cool, then dust with powdered sugar before serving.