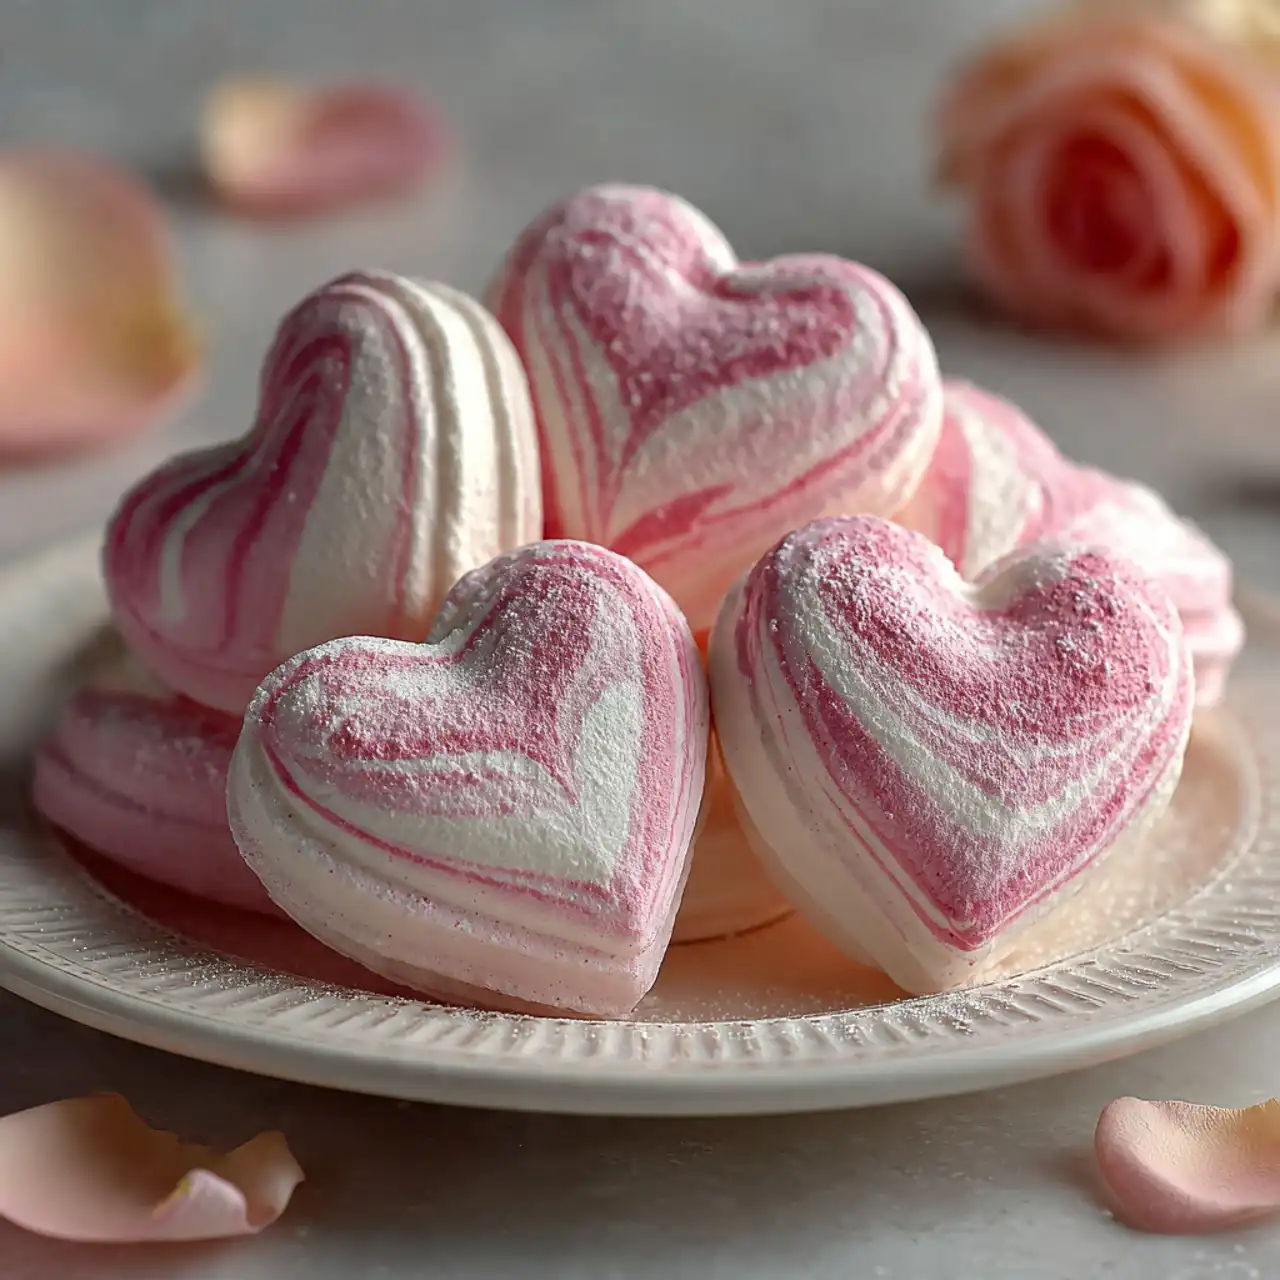
A Sweet Valentine’s Treat: Marbled Meringue Hearts
There is something utterly romantic and magical about a perfect meringue. It’s a sweet little cloud, crisp on the outside, with an airy, melt-in-your-mouth texture that feels like a whisper of a dessert. Now, imagine those little clouds piped into beautiful heart shapes, with delicate, artistic swirls of pink running through them. This, my friends,…
There is something utterly romantic and magical about a perfect meringue. It’s a sweet little cloud, crisp on the outside, with an airy, melt-in-your-mouth texture that feels like a whisper of a dessert. Now, imagine those little clouds piped into beautiful heart shapes, with delicate, artistic swirls of pink running through them. This, my friends, is not just a cookie; it’s a love letter you can eat. These Marbled Meringue Hearts are, without a doubt, the most elegant and impressive treat you can make for Valentine’s Day.
I know what you might be thinking—meringue seems fussy and intimidating. But I’m here to let you in on a secret: it’s one of the most rewarding and surprisingly simple things you can make, and it requires only a handful of ingredients. This recipe is my foolproof guide to creating a stable, glossy meringue that pipes beautifully every single time. The magic comes from the slow, low-heat bake and the long, patient cool-down in the oven, which is what creates that signature crisp, dry texture. It’s a process that feels like pure alchemy, transforming simple egg whites and sugar into something truly special.

Why These Meringue Hearts are a Perfect Valentine’s Gift
You are going to fall completely in love with this beautiful and delicious project. They are a true expression of affection. Here’s why:
- Stunningly Beautiful and Romantic: The delicate heart shape and the beautiful, artistic pink marble swirls make these cookies look like they came from a high-end French patisserie.
- Incredibly Light and Airy: These aren’t heavy or dense cookies. They are crisp, light as a feather, and literally melt in your mouth with a sweet vanilla flavor.
- Made with Just 5 Simple Ingredients: You only need egg whites, sugar, vanilla, cream of tartar, and a drop of food coloring to create this impressive confection.
- A Fun and Creative Baking Project: The process of creating the marble effect and piping the heart shapes is a wonderfully artistic and satisfying activity.
- Perfect for Gifting: Meringues have a great shelf life! Packaged in a beautiful box or clear bag, they make a stunning and thoughtful homemade gift for your Valentine.
Recipe Snapshot
| Prep Time | 25 minutes |
| Cook Time | 20 minutes (+ cooling time) |
| Total Time | ~3 hours |
| Servings | About 2 dozen hearts |
| Calories | 27 kcal per meringue |
| Course | Dessert |
| Cuisine | French-Inspired |
| Difficulty/Method | Intermediate / Baking |
Your Shopping List for These Sweet Hearts
The magic of meringue comes from just a few simple, powerful ingredients.
→ For the Meringues
- 3 large egg whites → It is crucial that they are at room temperature and have absolutely no trace of yolk in them.
- ¾ cup sugar → Regular granulated sugar works perfectly.
- ¼ teaspoon cream of tartar → A secret weapon that helps to stabilize the egg whites, making your meringue stronger and less likely to weep.
Let’s Get Whipping! Your Step-by-Step Guide
Ready to master the art of the perfect meringue? Let’s break it down into simple, manageable steps.
Part 1: The Foolproof Meringue
- Prep Your Station: Place your egg whites in a very clean, large bowl and let them stand at room temperature for 30 minutes. This is an important step! Line a couple of large baking sheets with parchment paper. Preheat your oven to a very low 200°F (93°C).
- Whip to Soft Peaks: Add the vanilla and cream of tartar to the room-temperature egg whites. Using an electric mixer on medium speed, beat until the mixture forms soft peaks (when you lift the beaters, a peak will form and then gently curl over on itself).
- Create the Glossy Meringue: Switch the mixer to high speed. Very gradually, add the sugar, just one tablespoon at a time, beating well after each addition. Continue to beat on high until the meringue is very thick, glossy, and holds “stiff peaks” (when you lift the beaters, the peak stands straight up).
Part 2: The Marble and Piping
- Create the Marble Effect: Scoop out about ¼ cup of the finished white meringue into a small, separate bowl. Add a drop or two of red food coloring to create a nice pink color. Gently fold this pink meringue back into the main bowl of white meringue with just one or two light swirls. Do not overmix! You want to see distinct ribbons of pink and white.
- Pipe the Hearts: Gently transfer the marbled meringue into a large pastry bag fitted with a star or round tip. On your prepared baking sheets, pipe 2-inch heart shapes, leaving about 2 inches of space between each one.
Part 3: The Low, Slow Bake and Dry
- Bake Until Dry: Place the baking sheets in the preheated oven and bake for about 20 minutes, until the meringues are set and feel dry to the touch.
- The Crucial Cool-Down: Turn the oven completely off, but do not open the door! Leave the meringues in the closed oven until it has completely cooled down. This could take a couple of hours. This long, slow drying period is what makes them perfectly crisp.
- Store or Serve: Once completely cool, you can serve your beautiful meringue hearts or store them in an airtight container.
Marbled Meringue Hearts
Ingredients
Equipment
Method
- Place egg whites in a large, clean bowl; let stand at room temperature for 30 minutes. Preheat oven to 200°F. Line baking sheets with parchment paper.
- Add vanilla and cream of tartar to the egg whites; beat on medium speed with an electric mixer until soft peaks form.
- Gradually beat in the sugar, 1 tablespoon at a time, on high speed until the meringue is thick, glossy, and holds stiff peaks.
- Remove 1/4 cup of the meringue and tint it pink with red food coloring. Gently fold the pink mixture back into the remaining white meringue with just one or two swirls to create a marbled effect.
- Transfer the meringue to a pastry bag. Pipe 2-inch heart shapes onto the prepared baking sheets, about 2 inches apart.
- Bake until the meringues are set and feel dry to the touch, about 20 minutes.
- Turn the oven off completely and leave the meringues inside the closed oven until it has completely cooled. This is a crucial step for drying them out.
- Store in an airtight container at room temperature.
Notes
WiseRecipes’ Top Tips for Meringue Mastery
Meringue can be delicate, but these tips will guarantee your success.
- A Completely Clean, Dry Bowl is a MUST. Meringue’s number one enemy is any trace of fat or grease (including egg yolk!). This will prevent your egg whites from whipping up to their full, airy volume. Make sure your bowl and beaters are impeccably clean and dry.
- Room Temperature Egg Whites Whip Higher. Letting your egg whites sit out for 30 minutes before you start allows them to whip up to a greater volume, resulting in a lighter, airier meringue.
- Add the Sugar SLOWLY. This is the most important step for a stable meringue. Adding the sugar one tablespoon at a time allows it to fully dissolve into the egg whites, creating a strong, glossy, and smooth structure that won’t collapse.
- Don’t Overmix the Marble! For that beautiful, artistic swirl effect, less is more. Just one or two gentle folds of the colored meringue back into the white is all you need to create the marbled look without turning the whole batch a uniform pink.
- The Oven Cool-Down is Essential. Don’t be tempted to pull the meringues out of the oven early. Letting them cool down slowly with the oven is what prevents them from cracking and ensures they dry out completely to become perfectly crisp.
Keep Them Fresh! Storing Your Delicate Creations
Meringues have a great shelf life if stored properly, making them a perfect make-ahead holiday treat.
- Storage: The key to storing meringues is keeping them away from moisture. Once they are completely cool, store them in a single layer in a completely airtight container at room temperature. They will stay crisp and delicious for up to two weeks! Do not refrigerate them, as the humidity will make them soft and sticky.
FAQs: Your Meringue Heart Questions, Answered!
Why is my meringue chewy instead of crisp?
This is almost always due to humidity or not being dried out for long enough. Meringues are like sponges for moisture in the air. Try to make them on a dry day if possible, and don’t skip that long, slow cool-down in the oven. If they are still chewy, you can pop them back into a 200°F oven for another 10-15 minutes to help dry them out further.
Can I make these without cream of tartar?
You can, but the cream of tartar provides a huge advantage. It’s an acid that helps to stabilize the egg whites, making your meringue stronger, more voluminous, and less likely to collapse or “weep.” A small amount of lemon juice or white vinegar can be used as a substitute in a pinch.
How do I know when I’ve reached “stiff peaks”?
It’s a visual cue. Stop the mixer and lift the beaters straight up out of the meringue. The peak that forms should stand up straight and tall, without the tip flopping over. The meringue should also be very thick and glossy.
Can I add other flavors to the meringue?
Yes! You can swap the vanilla extract for another oil-free extract, like ½ teaspoon of peppermint extract for a festive twist, or even almond extract. Just be sure not to use anything oil-based, as it will deflate your meringue.
Final Thoughts: A Sweet Declaration of Love
There is something truly special about creating a treat that is as delicate and beautiful as it is delicious. These Marbled Meringue Hearts are a perfect project for showing a little extra love and care. They are a light, elegant, and stunning confection that will make anyone feel special. I hope they bring a little bit of sweet, airy magic to your Valentine’s Day. Happy Baking!