Mary Berry Soda Bread Recipe
The Simple Joy of Mary Berry Soda Bread There’s something incredibly comforting about the smell of freshly baked bread wafting through your home. It’s like a warm hug that instantly makes everything feel better. I remember the first time I tried making Mary Berry’s Soda Bread. I had the TV on, and there she was,…
The Simple Joy of Mary Berry Soda Bread
There’s something incredibly comforting about the smell of freshly baked bread wafting through your home. It’s like a warm hug that instantly makes everything feel better. I remember the first time I tried making Mary Berry’s Soda Bread. I had the TV on, and there she was, elegantly demonstrating this simple yet delightful recipe. Her easy smile and reassuring tone made me think, “I can give that a go!” And I’m so glad I did.
The Beauty of Simple Ingredients
The beauty of this soda bread lies in its simplicity. You don’t need any fancy equipment or a long list of ingredients to whip it up. In fact, you’ll only need a few staple items that you probably already have in your pantry. We’re talking about 225 grams each of whole wheat flour and white flour, a teaspoon of baking soda, a teaspoon of salt, a tablespoon of pure honey, an egg, and 400 ml of buttermilk. Simple, right?
When you combine these ingredients, you create a dough that’s soft and easy to work with. Some days, when I’m in a rush or just craving a cozy loaf, this recipe comes to mind. The honey adds a subtle sweetness that’s just divine, so don’t skip it!
Getting the Oven Ready
Before diving headfirst into mixing, I always make sure to preheat my oven to 220°C (or 425°F for my friends across the pond). A hot oven is crucial for achieving that perfectly crusty exterior, one of the hallmarks of a great soda bread. While it’s heating up, I take a moment to prepare my baking sheet—greasing it or lining it with parchment paper to ensure nothing sticks.
Once that’s sorted, I grab a large bowl and start sifting together the flours, baking soda, and salt. It’s a satisfying task that evenly distributes the baking soda, ensuring every bite of bread rises perfectly. Speaking of rising, that’s an interesting point about soda bread: unlike traditional yeast bread, whose leavening depends on yeast, this one relies on baking soda reacting with the buttermilk. It means you can go from mixing to eating in no time!
Kneading and Shaping
Once I have my dry ingredients nicely incorporated, it’s time to bring in the wet ones. I beat an egg and mix it with enough buttermilk and that delightful honey until I get a lovely soft dough. If you’ve got little ones around, they love to help out at this stage. There’s something so magical about the feel of dough in your hands—it’s one of those grounding experiences that remind you of simpler times.
Now, kneading the dough is crucial. I give it a brief knead on a floured board just enough to bring it all together, but I keep it gentle. Remember, soda bread is meant to be rustic and hearty, not fussy.
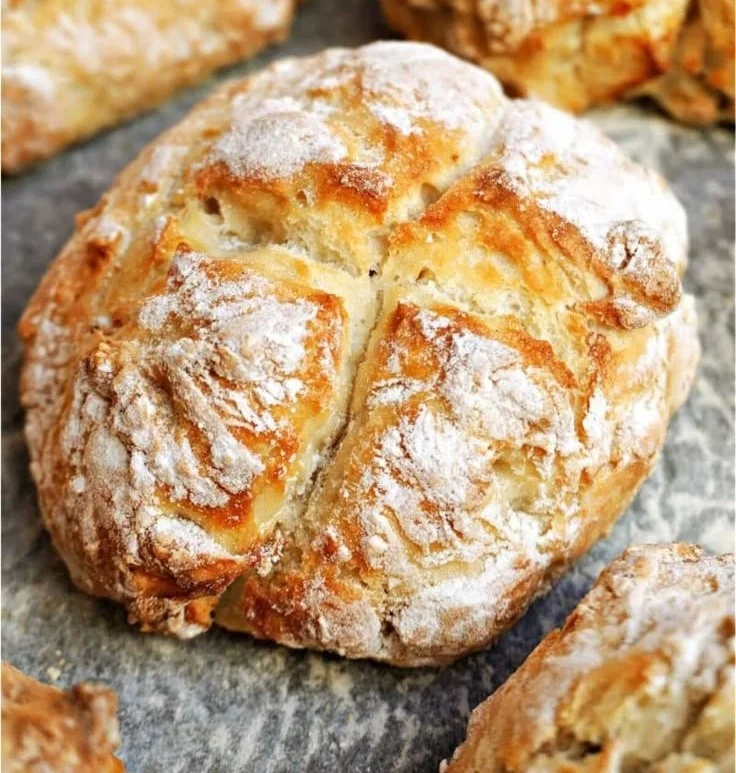
For a little fun and character, I shape the dough into a circular loaf, probably about an inch high. The next step is a crucial one: before placing it onto the prepared baking sheet, I cut a deep cross into its top. Some say this is to help the bread rise, but I like to think of it as giving it a bit of personality!
A Stone-Cold Classic: The Bake
Once it’s in the oven, I wait with bated breath. The aroma that fills my kitchen as it bakes is nothing short of amazing. After 30 to 35 minutes—timed perfectly for a quick chat with a friend or a cup of tea—I gently tap the bottom of the loaf. If it sounds hollow, I know it’s done. The first time I tried this, it felt magical to hear that sound; it was like a secret song of success!
As I take the bread out of the oven, I place it on a wire rack to cool. The golden crust glistens, and I can hardly resist breaking into it before it cools completely.
The Final Touches
I can’t help but smile when the soda bread’s ready to slice. It’s golden, crusty on the outside, and soft on the inside. One of my favorite ways to enjoy it is with a bit of butter and homemade jam, but it pairs beautifully with soups, stews, or even alongside a hearty cheese platter.
And, if you happen to have leftovers (though that’s rare in my household), you can easily wrap them up and store them in a bread bag or even tightly in plastic wrap for a couple of days. Just a quick note, it’s best served fresh, but it also makes for a delightful toast the next morning!
Making Variations Your Own
While Mary Berry’s original recipe is fantastic, don’t hesitate to make it your own. Perhaps you might want to add some seeds like sunflower or pumpkin for a nutty crunch, or even some dried herbs mixed into the dough for an aromatic twist. I’ve tried incorporating a bit of cheese, and it turned out delightful!
The thing I love the most about this recipe is that it’s forgiving. There’s a freedom in baking soda bread that can make even the most novice baker feel accomplished.
Sharing the Joy
Every time I make Mary Berry’s Soda Bread, I feel a sense of nostalgia and warmth as I remember the joy of baking. If you’re looking for a comforting kitchen project that yields delicious results, this soda bread is the way to go. Sharing it with friends and family enhances the experience tenfold. You can even turn this into a fun activity, inviting a friend over to bake together.
So there you have it! Mary Berry’s Soda Bread recipe has won a permanent place in my heart and kitchen, and I hope it finds the same spot in yours. Just remember to savor each moment, enjoy the process of baking, and, most importantly, embrace the deliciousness that follows!
Bon Appétit!
Mary Berry's Soda Bread
Ingredients
Method
- Preheat the oven to 220°C (425°F) and prepare your baking sheet by greasing it or lining it with parchment paper.
- In a large bowl, sift together the whole wheat flour, white flour, baking soda, and salt.
- In a separate bowl, beat the egg and combine it with buttermilk and honey, then mix into the dry ingredients until a soft dough forms.
- Knead the dough gently on a floured surface just enough to bring it together.
- Shape the dough into a circular loaf about an inch high and cut a deep cross into the top.
- Place the loaf on the prepared baking sheet and bake for 30 to 35 minutes.
- Check if it’s done by tapping the bottom; it should sound hollow.
- Remove the bread from the oven and place it on a wire rack to cool before slicing.