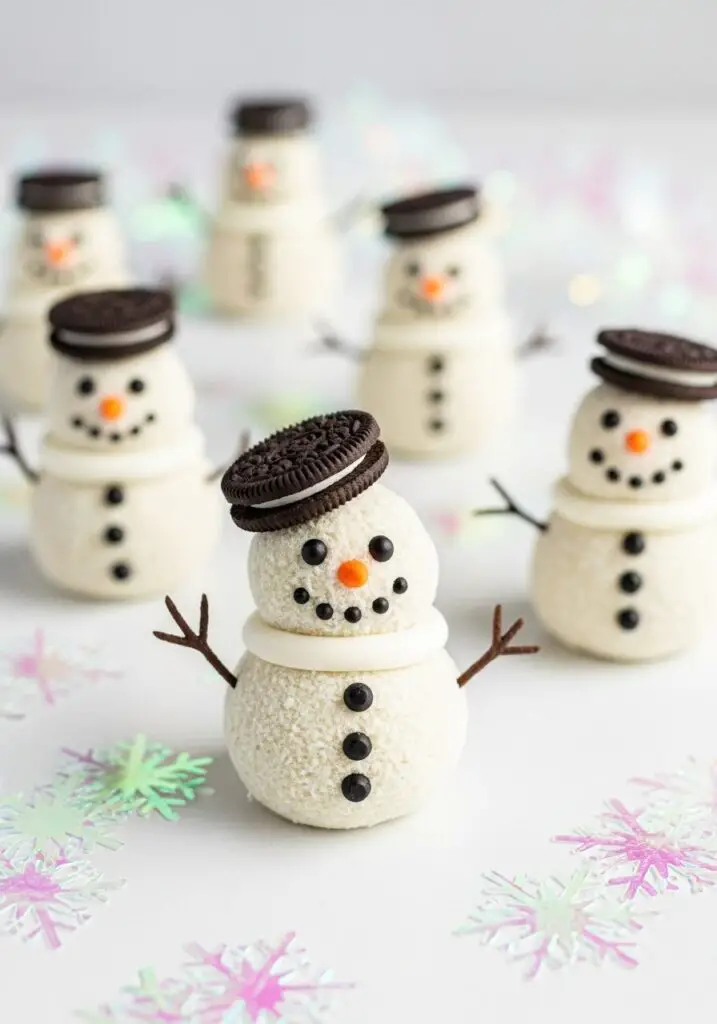
The Ultimate Melting Snowman Oreo Balls (Easy & No-Bake!)
Imagine a holiday treat so adorable it makes everyone smile before they even take a bite—a charming little snowman, complete with a mini Oreo hat, that looks like it’s playfully melting into a sweet puddle. That, my friends, is the irresistible magic of these Melting Snowman Oreo Balls. They are, without a doubt, the most…
Imagine a holiday treat so adorable it makes everyone smile before they even take a bite—a charming little snowman, complete with a mini Oreo hat, that looks like it’s playfully melting into a sweet puddle. That, my friends, is the irresistible magic of these Melting Snowman Oreo Balls. They are, without a doubt, the most festive and fun-to-make treat you will add to your holiday dessert platter.
Here’s the thing about holiday baking: we want impressive results without spending all day in the kitchen. I created this recipe as the ultimate no-bake solution. It’s my go-to for a kid-friendly activity that results in a truly show-stopping treat. You don’t need any baking skills, just a love for Oreos and a little bit of creative fun.
I promise you, there is no greater party win than a treat that disappears from the dessert table in minutes. The rich, creamy, cookies-and-cream truffle center, enrobed in a sweet vanilla shell, is a classic flavor combination that everyone loves. They are the perfect bite-sized indulgence for cookie exchanges, classroom parties, or a cozy family night.
Get ready to create the cutest, most delicious snowmen that will melt everyone’s heart (before they melt in their mouths!).
Why These Snowman Oreo Balls Are a Holiday Must-Have!
You are going to have so much fun making (and eating!) these adorable treats. This recipe is a guaranteed holiday hit. Here’s why:
- Completely No-Bake: Free up your oven for other dishes! This entire recipe comes together with just a food processor and your refrigerator.
- Incredibly Fun to Decorate: This is the perfect holiday project to do with kids or friends. Everyone can have fun creating their own unique snowman faces.
- The Star of the Party: These snowman truffles are always the first thing to disappear from a holiday dessert spread. They are a total conversation starter!
- Classic Cookies-and-Cream Flavor: The irresistible combination of crushed Oreos and cream cheese is a crowd-pleasing flavor that never fails.
- Perfect for Gifting: Packaged in a festive box, these adorable snowmen make a wonderful and delicious homemade gift for neighbors, teachers, and friends.
Recipe Snapshot
| Prep Time | 40 minutes |
| Chill Time | 1 hour 20 minutes |
| Total Time | 2 hours |
| Servings | 40 truffles |
| Calories | ~135 kcal per truffle |
| Course | Dessert |
| Cuisine | American |
| Difficulty/Method | Easy / No-Bake |
Your Shopping List for These Festive Truffles
This simple, no-bake recipe uses just a few key ingredients to create something truly magical. Here’s what you’ll need:

→ For the Oreo Truffles
- 1 (8 ounce) package cream cheese → Make sure it’s fully softened to room temperature for smooth, easy mixing.
- 36 OREO Cookies → Regular size. The heart and soul of our truffle base!
- 16 oz vanilla candy coating → Also known as Candiquick or almond bark. It melts smoothly and sets up perfectly.
→ For Decorating Your Snowmen
- 48 Mini OREO Bite Size Cookies → These make the most adorable little snowman hats!
- Decorating icing or gel → You’ll need black for the smile, and other colors like blue and orange for the eyes and nose.
- Multi-colored sprinkles → Optional, but fun for adding buttons or other details.
Let’s Make Some Snowmen! Your Step-by-Step Guide
Get ready for some no-bake fun! The key to this recipe is working with chilled ingredients, so your refrigerator is your best friend.
Part 1: The Oreo Truffle Base
- Crush the Oreos: Place all 36 regular-sized OREO cookies in a food processor and pulse until they become fine crumbs.
- Mix the Dough: Add the softened cream cheese to the food processor with the crumbs. Process until the mixture is well blended and starts to form a large ball. (If you don’t have a food processor, you can crush the cookies in a sealed plastic bag with a rolling pin and then mix with the cream cheese by hand in a bowl).
- Shape the Balls: Roll the mixture into 48 uniform (about 1-inch) balls. Place them in a single layer on a shallow pan or baking sheet lined with waxed paper.
Part 2: Chilling and Dipping
- Freeze!: Freeze the Oreo balls for at least 20 minutes. This step is crucial! It helps them hold their shape perfectly when you dip them in the warm candy coating.
- Melt the Coating: While the balls are freezing, melt the vanilla candy coating according to the package directions until it’s smooth and fluid.
- Dip the Truffles: Place a frozen Oreo ball on a fork and dip it into the melted coating, turning to cover it completely. Lift it out and gently tap the fork on the side of the bowl to allow any excess coating to drip off.
- Create the “Melted” Puddle: Place the coated ball back on the waxed paper-lined pan. The excess coating that runs off will naturally form a small “puddle” at the bottom, creating the perfect “melting snowman” effect!

Part 3: Decorate Your Snowmen
- Add the Hat: While the coating is still wet, gently press a Mini OREO cookie onto the top of each ball to create the hat. You can also wait for it to set and use a dab of leftover candy coating as “glue.”
- Chill to Set: Place the pan in the refrigerator to allow the candy coating to set completely.
- Create the Face: Once the coating is firm, use your decorating icing or gels to draw on the eyes, a carrot nose, and a happy smile.
- Final Chill: Refrigerate the finished snowmen for at least 1 hour, or until they are completely firm, before serving.
WiseRecipes’ Top Tips for Perfect Snowman Truffles
Follow these simple secrets to ensure your Oreo balls are adorable and delicious every single time.
- Use a Food Processor for the Crumbs. For the best truffle texture, you want very fine, uniform Oreo crumbs. A food processor is the easiest and fastest way to achieve this.
- Don’t Skip the Freezing Step. This is the most important tip! Dipping warm or room-temperature balls into melted coating will be a messy disaster. Freezing them makes them firm, so they dip cleanly and the coating sets up quickly.
- The Fork Trick is Your Best Friend. The best way to dip truffles is by placing one on the tines of a fork. This allows you to fully submerge it and lets the excess coating drip off cleanly through the tines.
- Work in Batches. To keep the Oreo balls firm, it’s best to work in small batches. Keep the main tray in the freezer and only take out a few at a time to dip.
- Keep Them Cold! These are cream cheese-based truffles, so they must be kept refrigerated. They will soften quickly at room temperature.
Keep Them Chilly! Storing Your Snowmen
These treats must be kept cold to maintain their shape and freshness.
- Refrigerator: Store the finished Snowman Oreo Balls in a single layer in an airtight container in the refrigerator. They will keep for up to 1-2 weeks. Placing small sheets of waxed paper between layers can prevent sticking.
- Freezing: You can freeze the undecorated, dipped truffles for up to 2 months. Thaw them in the refrigerator before decorating and serving.
Melting Snowman Oreo Balls
Ingredients
Equipment
Method
- In a food processor, pulse the 36 regular OREO Cookies until they form fine crumbs. Add the softened cream cheese and process until the mixture is well blended and forms a ball.
- Shape the mixture into 48 (1-inch) balls. Place them in a single layer on a shallow pan lined with waxed paper.
- Freeze the Oreo balls for at least 20 minutes until firm.
- Melt the vanilla candy coating according to package directions. Dip the frozen balls in the melted coating using a fork, tapping the fork on the side of the bowl to remove excess.
- Place the dipped balls on the waxed paper, allowing the excess coating to pool at the bottom to create a ‘melted’ look. While the coating is still wet, press a Mini OREO on top for the hat.
- Chill the balls until the coating is completely set.
- Use decorating icing to create the eyes, nose, and smile on each snowman.
- Refrigerate for at least 1 hour or until firm. Keep refrigerated in an airtight container.
Notes
FAQs: Your Oreo Ball Questions, Answered!
What is vanilla candy coating and where do I find it?
Vanilla candy coating (also sold as almond bark or Candiquick) is a confectionary coating made with sugar and vegetable oils. It’s fantastic for dipping because it melts smoothly and sets up harder and with a better sheen than white chocolate. You can find it in the baking aisle of most grocery stores.
My candy coating is too thick for dipping. How can I fix it?
If your coating is too thick, you can stir in a very small amount (start with just ½ teaspoon) of coconut oil or solid vegetable shortening. This will help to thin it out for a smoother dipping consistency. Be careful not to add any water-based liquids like milk, as this will cause the coating to seize and become unusable.
Can I use white chocolate instead of candy coating?
You can, but it can be trickier. Real white chocolate is more sensitive to heat and can be harder to temper for a smooth, hard finish. Candy coating is much more forgiving for beginners and gives a more reliable result for these truffles.
Can I make these ahead of a party?
Absolutely! They are the perfect make-ahead treat. You can make them completely 2-3 days in advance and keep them stored in an airtight container in the refrigerator until you’re ready to serve.
Final Thoughts: Your Cutest Holiday Creation
There is such joy in creating a treat that brings a smile to everyone’s face. These Melting Snowman Oreo Balls are more than just a dessert; they’re a fun holiday activity and a delicious memory in the making. I hope you and your family have a wonderful time creating these adorable characters. Happy Holidays!