Million Dollar Deviled Eggs Chicks
Million Dollar Deviled Eggs Chicks: The Recipe That Wins Hearts Every time I think of potlucks, parties, or even casual Sunday brunches, my mind instantly drifts to one of my all-time favorite party pleasers: Million Dollar Deviled Eggs Chicks. There’s something undeniably special about these adorable little bites. You see, they’re not just your average…
Million Dollar Deviled Eggs Chicks: The Recipe That Wins Hearts
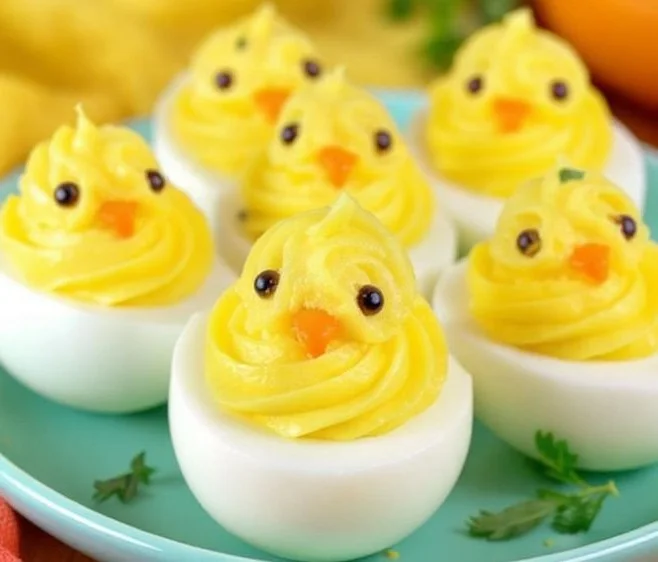
Every time I think of potlucks, parties, or even casual Sunday brunches, my mind instantly drifts to one of my all-time favorite party pleasers: Million Dollar Deviled Eggs Chicks. There’s something undeniably special about these adorable little bites. You see, they’re not just your average deviled eggs; they have a whimsical chick design that brings a smile to everyone’s face.
Finding this delightful recipe was like discovering hidden treasure in my cookbook collection. I knew I had to make it for my family gathering last spring when the sunny yellow of the egg yolks was the perfect choice to welcome the season. The compliments I received made it evident that these were going to become a regular feature on my table.
Getting the Basics Just Right
Let’s start with the essentials. You’re going to need six large eggs, as that’s the foundation of our dish. Oh, and don’t forget about the creamy goodness: you’ll want three tablespoons of mayonnaise and the same amount of softened cream cheese. A teaspoon of mustard is a must for that zing, paired with salt and pepper to taste. We can’t forget the finishing touches: a sprinkle of paprika and a couple of chives to bring our little chicks to life.
Now, here’s the fun part: hard-boiling the eggs. Place them in a pot—just pile them in there, no need to be fancy—cover them with cold water, and bring it all to a gentle boil. As the water bubbles, it’s almost therapeutic, isn’t it? Once it reaches a boil, turn off the heat, cover everything up, and let it sit for about 12 minutes. I’ve found that using this method gives me perfect eggs every time without that greenish-gray ring around the yolk.
Once that time’s up, get a bowl of ice water ready. Transferring the eggs to this icy bath right away is crucial—it halts the cooking process beautifully and makes peeling a breeze. When they’re cool enough, you can get your hands on them to peel off that shell.
The Chick Transformation
Now to the magic: cutting those eggs in half lengthwise. Gently scoop out the yolks and put them in a bowl because this is where the creamy filling gets exciting. Mash those yolks with your mayonnaise, cream cheese, and mustard. I really like to add just a sprinkle of salt and pepper at this point—you want that filling to be bursting with flavor!
And here’s where things can get a little creative. To fill the egg whites with that tasty yolk mixture, you could just use a spoon, but I always opt for a piping bag. If you don’t have one handy, a Ziploc bag with a corner snipped off works perfectly too. Not only does it look more professional, but when you pipe it into the egg whites, you can shape it into a little nest or a basket effect. Trust me, presentation is everything!
Crafting Those Cute Little Chicks
Now, onto the decorating! The best part, in my opinion. Grab some paprika and lightly sprinkle it over your filled eggs for that warm pop of color. And if you’re feeling adventurous and want to add some flair to your chicks, snip a few tiny pieces of chives to decorate them as eyes or little wings. It’s like they’re chirping right off the plate!
Timing Is Everything
One of the common questions I get is how to know when your deviled eggs are done right. The real answer? Taste it! And the key factor here is creaminess: it should be smooth, but not runny. Trust me, nobody wants a dry yolk mixture. You can adjust your mayonnaise and cream cheese until you hit that perfect creamy consistency.
Storing and Serving
If you’re wondering about leftovers, I’d recommend serving them right after making them for the best taste. But, if you do have some left, they can be refrigerated for a day or two. Just remember to cover them tightly because no one wants sad, dried-out deviled eggs.
Making It Your Own
One of the best things about these Million Dollar Deviled Eggs Chicks is how versatile they are. Feeling a little spicy? Try stirring in some sriracha or hot sauce to the yolk mixture for a kick. Or maybe some diced pickles for crunch? The world is your oyster—or should I say, your egg? Each variation can take these eggs in a fun new direction.
Final Thoughts
The first time I served these cute little chicks at my son’s birthday party, they practically disappeared in minutes. Watching my little one beam with pride, insisting that his friends try his "special eggs," was an unforgettable moment.
Whenever I make these Million Dollar Deviled Eggs Chicks, it not only brings a sense of joy to my table but also nostalgia. Each bite is a lovely reminder of gatherings past. So, whether you’re preparing for a festive gathering, a casual get-together, or simply want to treat yourself, I can assure you: this recipe is a guaranteed crowd-pleaser.
Now that you’ve heard the story of my delightful deviled eggs, I hope you give them a try. Trust me, you’ll find joy in every little chick-shaped bite!
Million Dollar Deviled Eggs Chicks
Ingredients
Method
- Place the eggs in a pot, cover with cold water and bring to a gentle boil.
- Once boiling, turn off the heat, cover, and let sit for about 12 minutes.
- Prepare a bowl of ice water to cool the eggs immediately after cooking.
- Transfer the eggs to the ice bath until cool, then peel the shells.
- Cut the eggs in half lengthwise and scoop the yolks into a bowl.
- Mash the yolks with mayonnaise, cream cheese, mustard, salt, and pepper until smooth.
- Fill the egg whites with the yolk mixture using a piping bag or a Ziploc bag.
- Sprinkle paprika over the filled eggs for color.
- Use chives pieces to decorate as eyes or wings.