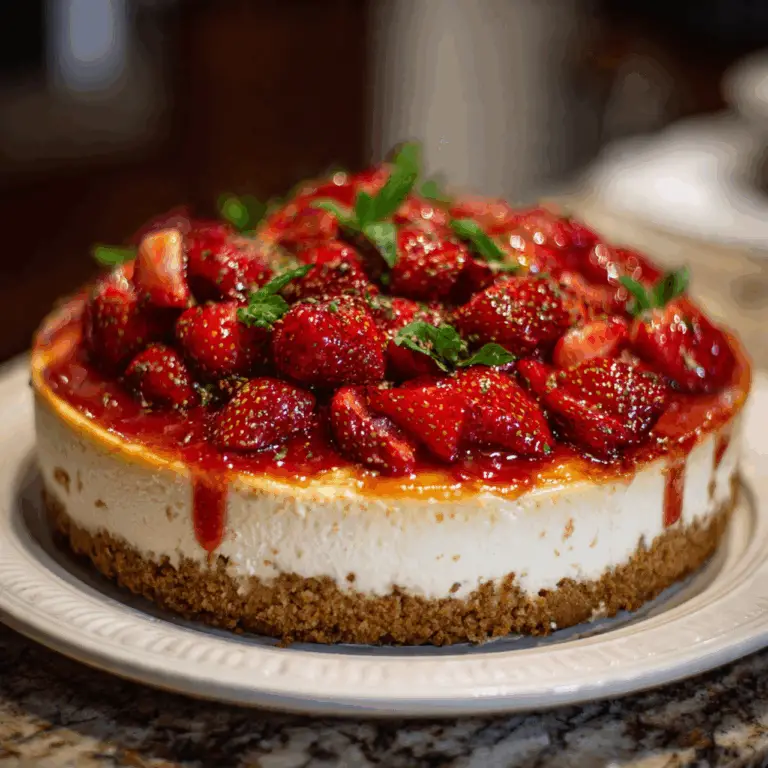
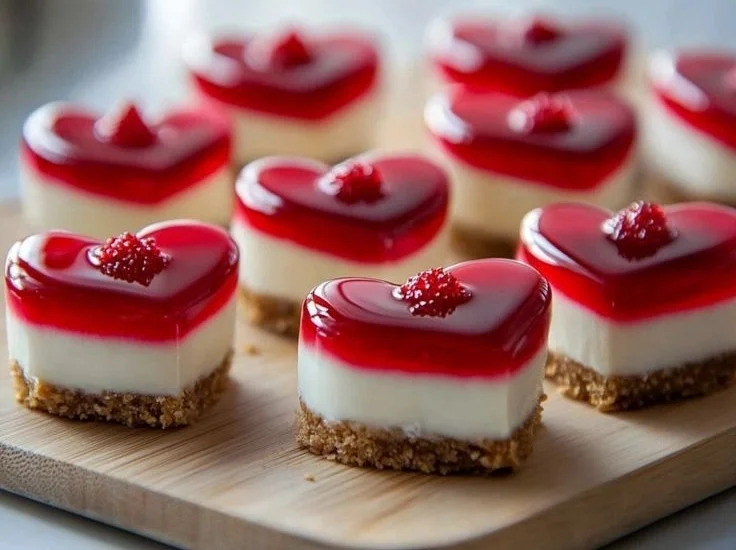
Mini Cheesecake Hearts: A Sweet Symphony of Love
Mini Cheesecake Hearts: A Sweet Symphony of Love There’s something undeniably delightful about mini desserts. Maybe it’s the portion control or perhaps it’s simply the charm of something that looks as fabulous as it tastes. Recently, I stumbled upon a recipe for Mini Cheesecake Hearts, and let me tell you, it’s not just a recipe;…
Mini Cheesecake Hearts: A Sweet Symphony of Love
There’s something undeniably delightful about mini desserts. Maybe it’s the portion control or perhaps it’s simply the charm of something that looks as fabulous as it tastes. Recently, I stumbled upon a recipe for Mini Cheesecake Hearts, and let me tell you, it’s not just a recipe; it’s a sweet symphony of love! Each little heart is not only delicious but gives a warm invitation to share and celebrate any occasion, whether it’s a special date, a fun get-together, or just because you want a sweet treat that’s as cute as it is creamy.
The Allure of Cream Cheese
The creamy, tangy goodness of cheesecake captivates me every time. To make these delights, I started by gathering my ingredients. For the crust, you’ll need about a cup of graham cracker crumbs and a quarter cup of melted butter. This forms that delightful crunchy bottom that contrasts so beautifully with the smooth filling. If I could advise you on one thing, it’s to ensure your butter is thoroughly melted but not too hot. You want to keep that crust tender yet firm.
Crafting the Perfect Crust
With the crust on my mind, I nervously preheated the oven to 350°F (175°C) because a well-preheated oven is the secret to even baking and avoiding those dreaded cracks on your cheesecake. While the oven warmed up, I took a medium bowl, combined the graham cracker crumbs and melted butter, and mixed it until it resembled wet sand—just like how I’d make a sandcastle at the beach, but trust me, this one’s infinitely tastier!
Then came the fun part. I pressed the buttery crumb mixture firmly into heart-shaped molds—how cute is that? If you can’t find heart-shaped ones, mini muffin tins or even ramekins work beautifully. Just don’t forget to lightly grease them or line with cupcake liners to avoid any sticking disasters. And if your heart is set on creating a crispy crust, you can bake those crusts for about 5 to 7 minutes before adding that luscious filling. It’s a little extra work, but let me tell you, it’s worth it!
A Creamy Dream Filling
Now, onto the star of the show: the cheesecake filling. In a large bowl, I whipped together 16 ounces of softened cream cheese and half a cup of granulated sugar, and oh didn’t that smell divine? Ensure your cream cheese is soft enough to mix without lumps. There’s nothing worse than biting into a chunk of cold cream cheese in your warm cheesecake.
Once the mixture was silky smooth, I added in two large eggs—one at a time—beating well after each addition. Don’t rush this step! Overmixing can incorporate too much air, leading to cracks as it bakes. I also stirred in a teaspoon of vanilla extract because, let’s face it—vanilla adds that warm, comforting aroma that complements desserts perfectly.
Painting with Love
Here comes the fun creative twist! I divided the cheesecake mixture into two bowls. For that romantic red hue, I added red gel food coloring to one bowl. You don’t need much; a little goes a long way, so start small and mix until you reach that perfect shade of pink or red that brings a smile to my face every time. I danced a little in my kitchen while swirling the colors together—it’s a delicious play of hues!
To layer them, I used a spoonful of one color followed by the other so the heart molds would have that beautiful two-tone effect. If you’re feeling crafty, you can swirl them together for a marbled look. This is where you can get truly creative!
Know When to Pull Them Out
Once filled, I slid my little heart-shaped beauties into the oven and let them bake for 20 minutes. Trust me, it’s the hardest part—waiting. You can tell they’re done when they’re set around the edges but still a bit jiggly in the center. The gentle wiggle test helps to avoid overbaking.
Then came my grandmother’s trick: turning off the oven, leaving the cheesecakes inside with the door slightly ajar to cool slowly. This added step is crucial for avoiding cracks. After what felt like a lifetime of waiting, I finally took them out, letting them cool completely before transferring them to the refrigerator where they needed to chill for at least two hours, though overnight works best.
The Simple Joy of Sharing
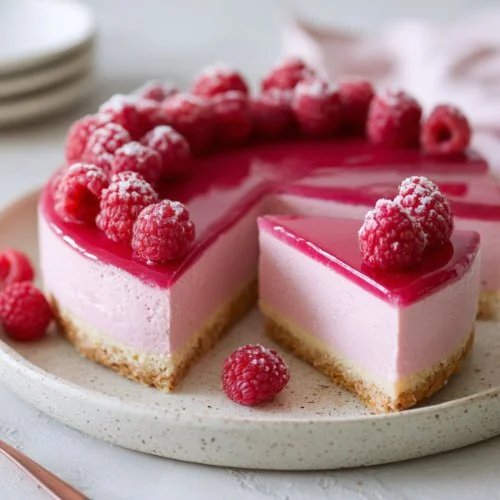
Once they were chilled and ready to serve, my heart nearly did a little jig! I carefully removed them from their molds and admired their lovely shape. These mini cheesecakes are not only impressive but they’re also convenient. Ideally, I’d love to serve them with a drizzle of raspberry sauce or a dollop of whipped cream on top. You can even add fresh strawberries for a burst of color.
Here’s a quick note on storing those precious leftovers: simply place them in an airtight container in the fridge, and they’ll keep beautifully for about 3-4 days. If, of course, you manage to have any leftovers!
Custom Creations
Now, while I adore the red and white combination, you can absolutely play with colors and flavors! How about adding crushed Oreos for a cookies-and-cream effect, or lemon zest for a zesty, bright taste? There’s so much room to wander creatively with these cheesecakes, and every variation will hold its own charm.
A Personal Touch
I’ll share a little memory with you—this recipe reminds me of a Valentine’s Day surprise I made for my partner a few years ago. I was a nervous wreck but seeing his eyes light up upon tasting one of those cheesecakes was priceless. Those little hearts became the highlight of our evening, bringing forth laughter and love.
These Mini Cheesecake Hearts represent the essence of love—sweet, rich, and thoughtfully crafted. They’ve become a reliable recipe in my kitchen repertoire, just like that old family recipe for chocolate chip cookies or a comforting bowl of chicken soup. They are perfect for sharing, and that’s what makes them all the more special. So the next time you’re in need of a sweet treat, I encourage you to whip up a batch of these delightful mini cheesecakes and perhaps, you’ll find yourself surrounded by love too!
Mini Cheesecake Hearts
Ingredients
Method
- Preheat the oven to 350°F (175°C).
- In a medium bowl, combine graham cracker crumbs and melted butter until it resembles wet sand.
- Press the crumb mixture firmly into heart-shaped molds (or mini muffin tins), greasing them lightly to prevent sticking.
- Optional: Bake the crusts for 5 to 7 minutes before adding filling for a crispier texture.
- In a large bowl, whip together softened cream cheese and granulated sugar until smooth.
- Add eggs one at a time, mixing well after each addition to avoid lumps.
- Stir in vanilla extract and mix until fully incorporated.
- Divide the mixture into two bowls and color one with red gel food coloring.
- Layer the cheesecake mixture in the molds, using spoons for a two-tone effect.
- Bake for 20 minutes until set around edges but slightly jiggly in the center.
- Turn off the oven and leave the cheesecakes inside with the door slightly ajar to cool, avoiding cracks.
- Once cool, refrigerate for at least 2 hours or overnight for best results.
- Carefully remove the mini cheesecakes from molds.
- Serve with raspberry sauce, whipped cream, or fresh strawberries.