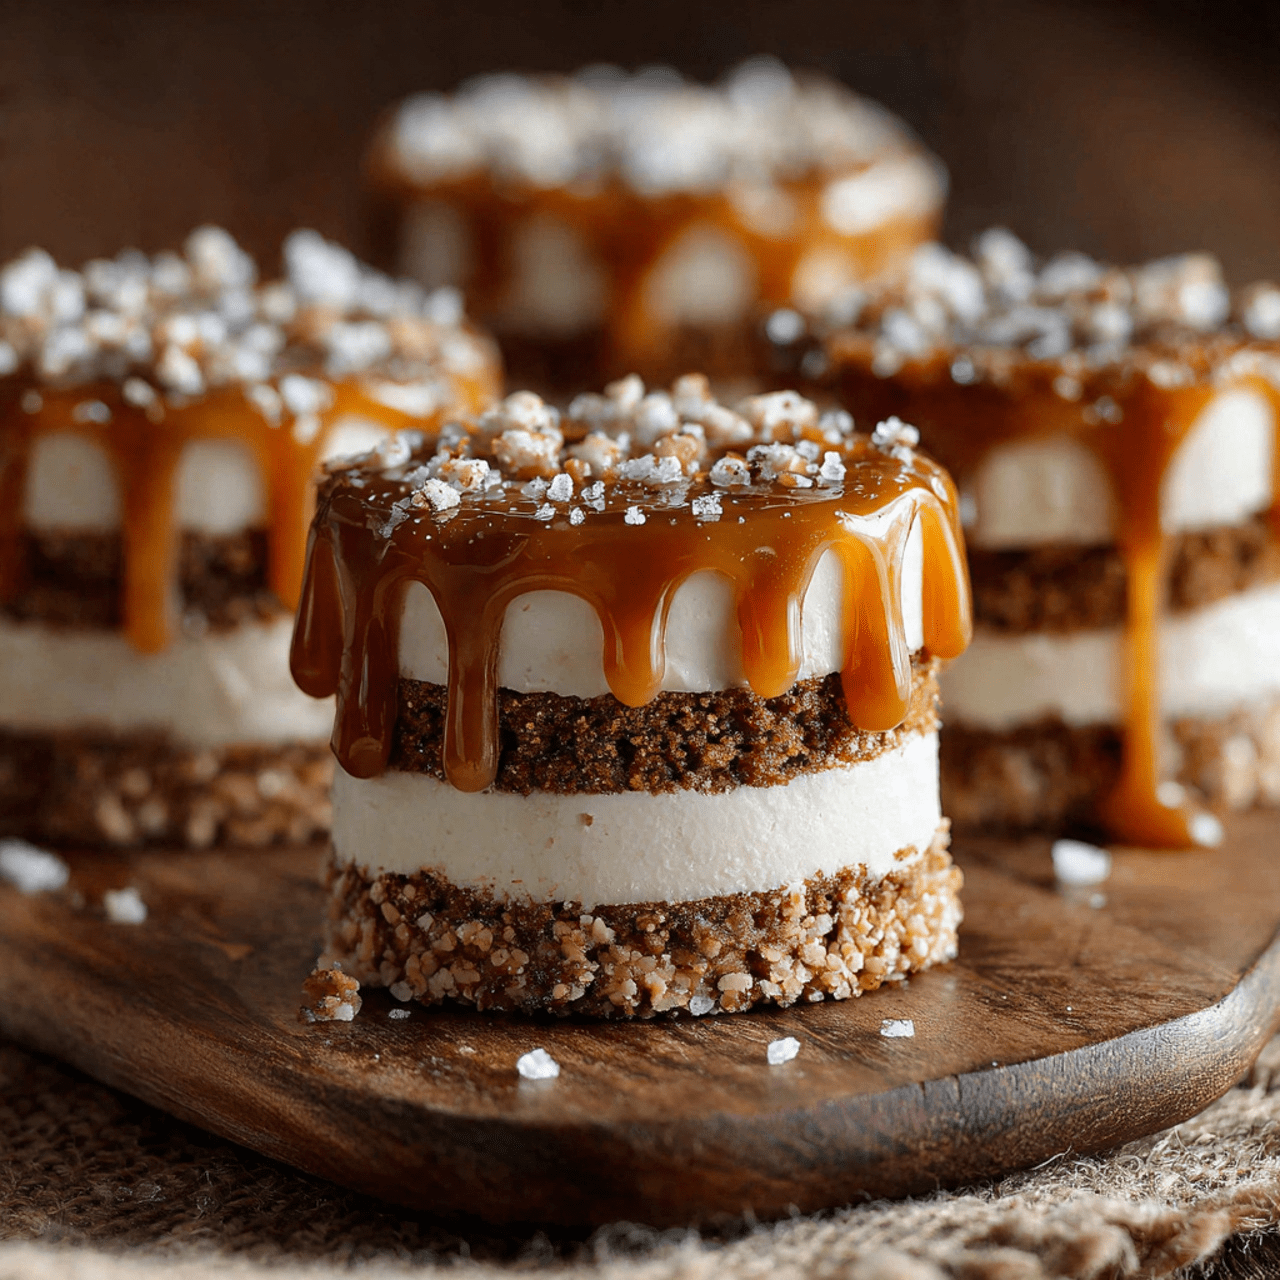
The Ultimate Mini Gingerbread Icebox Cakes (No-Bake Holiday Treat!)
Imagine a stunning, individual holiday dessert that requires absolutely no baking, looks incredibly elegant, and tastes like a dream. That, my friends, is the sophisticated, effortless magic of these Mini No-Bake Gingerbread Icebox Cakes. This is, without a doubt, the most impressive and stress-free dessert you will make for your Christmas festivities. I promise you,…
Imagine a stunning, individual holiday dessert that requires absolutely no baking, looks incredibly elegant, and tastes like a dream. That, my friends, is the sophisticated, effortless magic of these Mini No-Bake Gingerbread Icebox Cakes. This is, without a doubt, the most impressive and stress-free dessert you will make for your Christmas festivities.
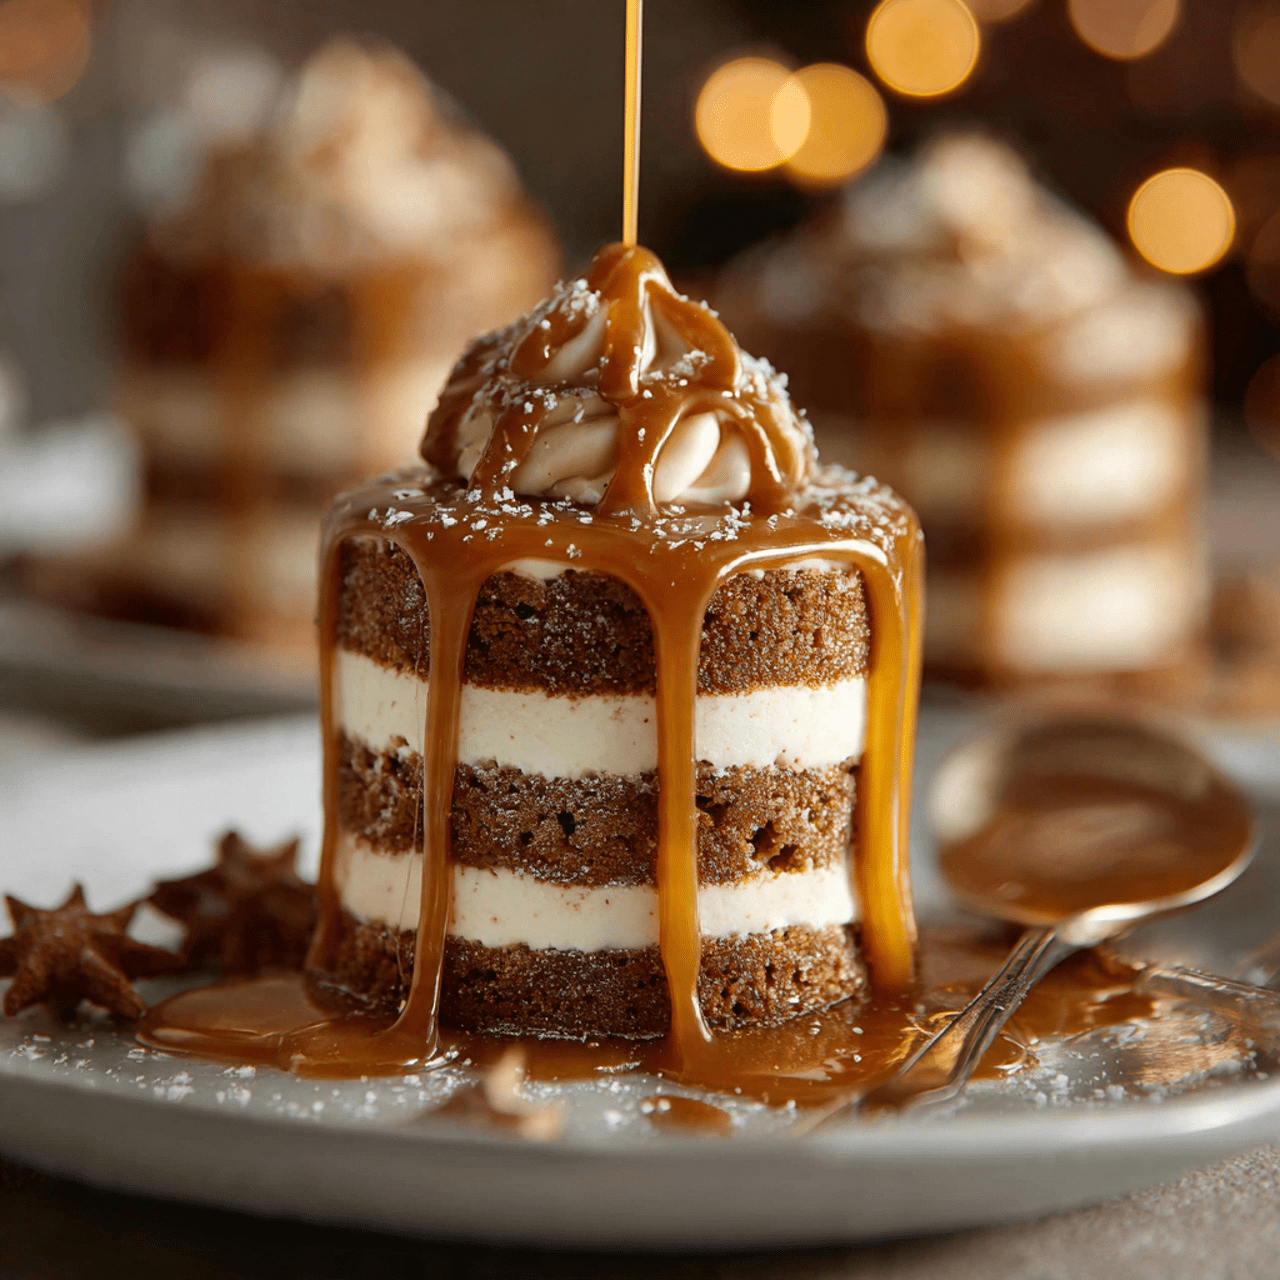
I promise you, there is no greater entertaining triumph than serving these beautiful little towers. The spiced caramel cream, whipped to fluffy perfection, infuses every layer of the gingersnaps, creating a harmonious blend of warm spice, sweet caramel, and tangy cream cheese. They are a true gourmet experience with shockingly little effort.
Get ready to master the art of the icebox cake and create a stunning, make-ahead holiday treat that will have all of your guests swooning.

Why These Mini Icebox Cakes are a Holiday Dream
You are going to be completely smitten with this elegant and easy dessert. It’s a true holiday game-changer. Here’s why:
- Completely No-Bake & Stress-Free: Free up your oven for the main course! This entire dessert is assembled and chilled, making it the ultimate low-stress holiday prep.
- The Perfect Make-Ahead Dessert: These cakes require chilling for several hours (or overnight!), making them the ideal dessert to prepare a day before your party.
- Stunning Individual Portions: Serving mini, individual cakes makes every guest feel special and adds a touch of elegance to your dessert table.
- Incredible Holiday Flavor: The combination of spicy gingersnaps with a creamy, caramel-and-spice-infused filling is the absolute taste of Christmas.
- Magical Texture Transformation: It’s culinary magic! The crisp cookies soften into tender, cake-like layers as they absorb the delicious cream filling.
Recipe Snapshot
| Prep Time | 20 minutes |
| Chill Time | 4 hours |
| Total Time | 4 hours 20 minutes |
| Servings | 12 servings |
| Calories | 310 kcal per serving (estimated) |
| Course | Dessert |
| Cuisine | American |
| Difficulty/Method | Easy / No-Bake |
Your Shopping List for This Elegant Treat
This impressive dessert comes together with a surprisingly short list of ingredients.

→ For the Spiced Caramel Cream & Assembly
- 4 oz. cream cheese → Must be softened to room temperature for a perfectly smooth, lump-free filling.
- 2 Tbsp. confectioners’ sugar → To add a touch of sweetness.
- 2 Tbsp. jarred caramel or dulce de leche → For a rich, sweet, buttery flavor. Plus more for drizzling!
- ¼ tsp. pumpkin pie or gingerbread spice blend → The perfect shortcut to warm, cozy holiday spice.
- 1 ½ cups cold heavy whipping cream → This is what makes the filling light, airy, and voluminous.
- 2 (5.25-oz.) boxes thin gingersnap cookies → You’ll need about 60 cookies in total. The thin and crispy kind works best!
Let’s Get Stacking! Your No-Bake Guide
Ready to assemble the easiest, most elegant dessert of the season? Let’s whip it up.
Part 1: The Luscious Spiced Caramel Cream
- Beat the Base: In the large bowl of a stand mixer fitted with the whisk attachment, combine the softened cream cheese, confectioners’ sugar, caramel sauce, and pumpkin pie spice. Beat on medium speed for about 2 minutes until everything is completely smooth and combined.
- Whip the Cream: With the mixer still on medium speed, slowly pour in the cold heavy whipping cream. Continue to beat for about 3 minutes, until the mixture thickens and holds medium peaks. It should be light, fluffy, and pipeable.
- Prep for Piping: Transfer the finished cream into a large piping bag fitted with a large open star or French star tip.

Part 2: Assemble the Mini Cakes
- Start the Base: Arrange 12 gingersnap cookies in a single layer on a baking sheet lined with parchment paper.
- Pipe and Stack: Pipe a layer of the cream filling onto each of the 12 base cookies. You can do this in a zigzag motion or a spiral. Gently place a second cookie on top of the cream.
- Repeat the Layers: Pipe another layer of cream onto the second cookie. Repeat this process two more times, so you have a total of five cookies and four layers of cream, ending with the fifth cookie on top.
- The Final Flourish: On the very top cookie of each stack, pipe a large, decorative rosette or a few mini rosettes.
Part 3: The Magic of Chilling
- Initial Set: Place the baking sheet with the assembled cakes into the refrigerator, uncovered, for about 1 hour. This helps the cream set and stabilize.
- The Long Chill: After the first hour, loosely cover the cakes with plastic wrap and continue to refrigerate for at least 3 more hours, or ideally, overnight. This is where the magic happens and the cookies soften to a cake-like texture.
- Serve and Garnish: Just before serving, drizzle the tops of the cakes with a little extra caramel sauce.
Mini No-Bake Gingerbread Icebox Cakes with Caramel Cream
Ingredients
Equipment
Method
- In the large bowl of a stand mixer, beat the softened cream cheese, confectioners’ sugar, caramel sauce, and pumpkin pie spice on medium speed until smooth, about 2 minutes.
- Add the cold heavy cream and continue to beat on medium speed until the mixture is thick and holds medium peaks, about 3 minutes more. Transfer to a piping bag fitted with a star tip.
- Arrange 12 cookies on a parchment-lined baking sheet. Pipe a layer of cream filling on each cookie. Top with a second cookie and gently press down.
- Repeat the layering process two more times, ending with a fifth cookie on top. You will have 5 cookies and 4 layers of cream per stack.
- Pipe a large decorative rosette on the top cookie of each stack. Refrigerate the cakes, uncovered, for 1 hour to set.
- Loosely cover the cakes with plastic wrap and continue to refrigerate until the cookies are very soft, at least 3 more hours or up to overnight.
- Drizzle the cakes with more caramel sauce just before serving.
Notes
WiseRecipes’ Top Tips for Icebox Cake Success
These simple secrets will ensure your no-bake cakes are absolutely perfect.
- Cold Cream is Key. For the filling to whip up properly into stable, fluffy peaks, your heavy whipping cream must be very cold, straight from the refrigerator.
- Softened Cream Cheese is a Must. Just like with the cream, temperature matters! Your cream cheese must be fully softened to room temperature to ensure it blends into a perfectly smooth, lump-free base.
- Don’t Under-Whip (or Over-Whip!). Beat the cream until it holds “medium peaks.” This means when you lift the whisk, a peak will form that holds its shape but the very tip curls over slightly. If you under-whip, it will be runny; if you over-whip, it can become grainy.
- The Long Chill is Non-Negotiable. The magic of an icebox cake is the transformation of the cookies. You need at least 4 hours total for the cookies to absorb the moisture from the cream and become soft and cake-like. Overnight is even better!
- No Piping Bag? No Problem. If you don’t have a piping bag, you can spoon the filling into a large zip-top bag and snip off a corner. You won’t get the fancy star shape, but you can still pipe neat layers. Alternatively, you can simply use a small spoon to add dollops of cream between the layers.
Keep It Fresh! Storing Your Mini Cakes
These cakes are designed to be made ahead and stored with care.
- Refrigerator: The finished cakes must be stored in the refrigerator. Keep them loosely covered with plastic wrap or in an airtight container. They are best enjoyed within 2-3 days of making them.
FAQs: Your Icebox Cake Questions, Answered!
Can I make this as one large cake instead of minis?
Absolutely! You can arrange the gingersnap cookies in a single layer in the bottom of a square baking dish or a loaf pan, top with a layer of cream, and repeat. Chill as directed and serve in slices. It’s just as delicious!
Can I use homemade gingersnaps?
Yes, but for the best results, they should be very thin and crispy. Softer, chewier homemade gingerbread cookies won’t work as well for the layered icebox effect.
Can I freeze these cakes?
Yes, these freeze surprisingly well! You can place the finished cakes on a baking sheet in the freezer until firm, then wrap them individually in plastic wrap and store them in a freezer-safe container for up to a month. Let them thaw in the refrigerator for a few hours before serving.
What other cookies could I use for this?
This recipe is very adaptable! For a different flavor profile, you could try it with thin, crispy chocolate wafers for a chocolate-gingerbread version, or even speculoos (Biscoff) cookies for a different spiced flavor.
Final Thoughts: Your Most Elegant No-Bake Treat
There is nothing more satisfying than serving a dessert that looks like it took hours of painstaking work, when you know it was actually a simple, stress-free assembly. These Mini No-Bake Gingerbread Icebox Cakes are the ultimate holiday hosting secret weapon. I hope they bring a touch of elegance and delicious, spicy-sweet joy to your Christmas table. Happy Holidays!