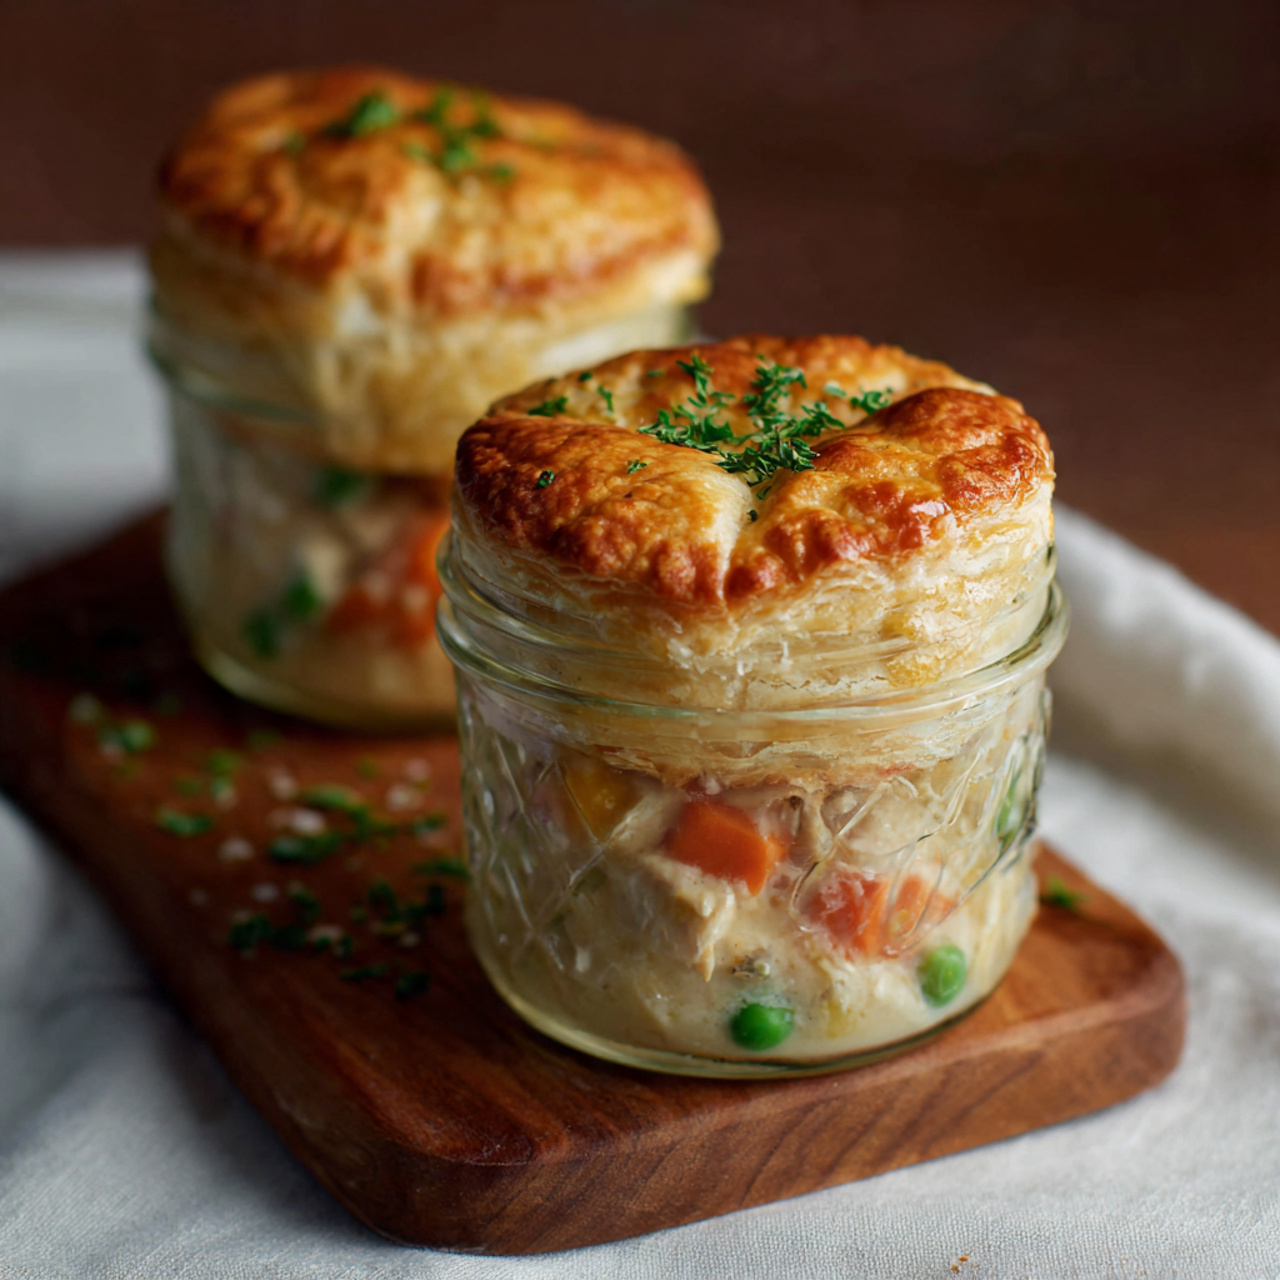
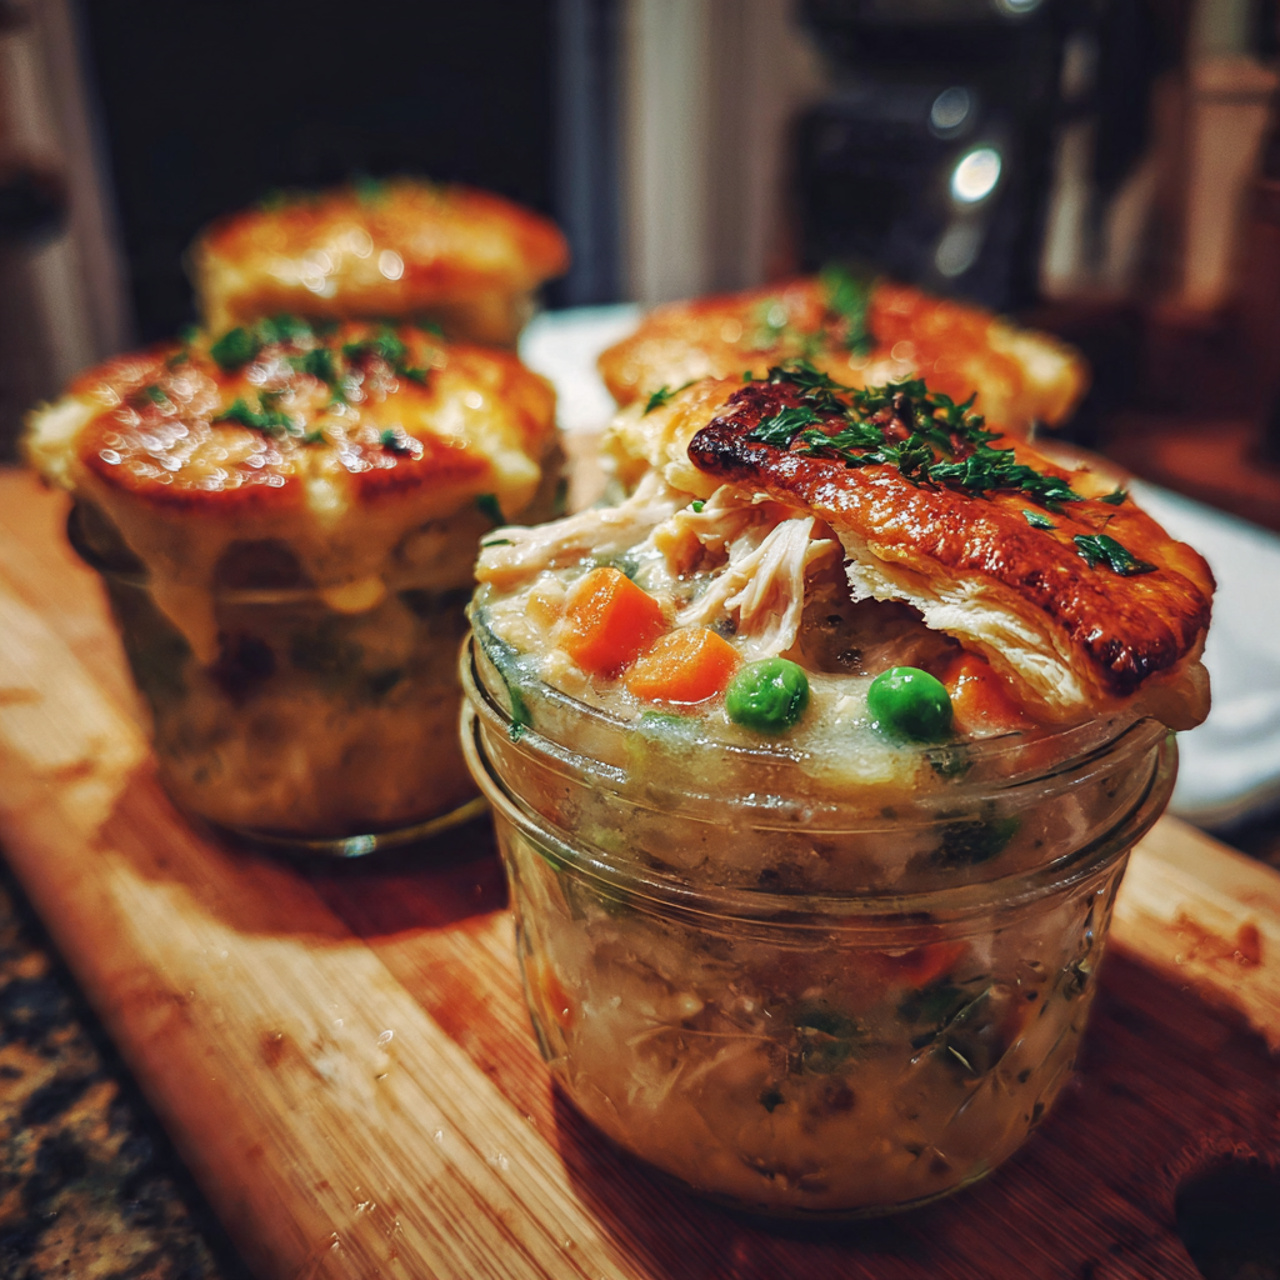
The Ultimate Mini Mason Jar Chicken Potpies (So Adorable & Easy!)
Imagine the ultimate comfort food—a classic, creamy chicken pot pie, with its rich, savory filling of tender chicken and vegetables—but reinvented into the most charming, individual-sized portion you’ve ever seen. Picture a personal pot pie, baked right in a rustic little mason jar, and topped with a perfectly golden-brown, flaky pastry crust. That, my friends,…
Imagine the ultimate comfort food—a classic, creamy chicken pot pie, with its rich, savory filling of tender chicken and vegetables—but reinvented into the most charming, individual-sized portion you’ve ever seen. Picture a personal pot pie, baked right in a rustic little mason jar, and topped with a perfectly golden-brown, flaky pastry crust. That, my friends, is the adorable, party-perfect magic of these Mini Mason Jar Chicken Potpies. This is, without a doubt, the most delightful and impressive way to serve a beloved classic.
I promise you, from the moment your guests see these charming little jars, they will be in awe. The filling is a classic, made-from-scratch gravy that’s rich, herby, and packed with rotisserie chicken and sweet vegetables. Topped with a simple, buttery pie crust, it’s a complete, satisfying meal that feels both rustic and incredibly sophisticated. They are a true show-stopper for a dinner party, a holiday gathering, or a cozy Sunday supper.
Get ready to reinvent a classic and create a stunning, unforgettable meal that will have everyone raving.

Why These Will Be Your New Favorite Potpies!
You are going to be so incredibly proud of these beautiful and delicious little pies. They are a guaranteed sensation. Here’s why you have to make them:
- An Adorable and Elegant Presentation: Serving pot pies in individual mason jars is an incredibly charming and unique idea that is perfect for impressing guests and making any meal feel special.
- Rich, Creamy, and Made from Scratch: The homemade gravy is silky, savory, and packed with fresh herbs like thyme and rosemary for a truly authentic, comforting flavor.
- Perfectly Portioned for Entertaining: These individual pies are easy to serve, require no messy slicing, and ensure every guest gets their own perfect, piping-hot portion.
- A Fantastic Shortcut: Using store-bought rotisserie chicken and refrigerated pie crusts makes this gourmet-tasting meal surprisingly easy and quick to assemble.
- The Ultimate Comfort Food: There is nothing more comforting than a warm, bubbling pot pie with a flaky, golden crust. This recipe delivers that classic experience in a delightful new way.
Recipe Snapshot
| Prep Time | 20 minutes |
| Cook Time | ~50 minutes |
| Chill Time | 20 minutes |
| Total Time | 1 hour 30 minutes |
| Servings | 6 mini pies |
| Calories | ~450 kcal per pie |
| Course | Main Course |
| Cuisine | American |
| Difficulty/Method | Easy / Baking |
Your Shopping List for These Cozy Potpies
This recipe uses classic comfort food ingredients and a couple of smart shortcuts. Here’s what you’ll need:
→ For the Creamy Chicken Filling
- 1 tablespoon unsalted butter
- ½ onion, 1 carrot, 1 celery stalk → The classic “mirepoix” for a deep, savory flavor base.
- 1 garlic clove, minced → For that essential aromatic kick.
- 2 tsp fresh thyme & 1 tsp fresh rosemary → Finely chopped, for an incredible herbaceous aroma.
- 2 tablespoons all-purpose flour → The thickener for our luscious gravy.
- 1½ cups chicken broth
- 2 cups chopped rotisserie chicken → The ultimate time-saving and flavorful shortcut!
- 1 cup frozen peas → For a pop of sweetness and color.
→ For the Flaky Crust
- 1 refrigerated pie crust → You will need one crust from a standard 2-crust package.
- 1 large egg → Whisked with a little water for a perfect, golden egg wash.
Let’s Get Baking! Your Step-by-Step Guide
Ready to create the most charming pot pies ever? This process is so fun and rewarding.
Part 1: The Rich and Creamy Filling
- Preheat and Prep: Preheat your oven to 400°F (200°C). Place six ½-pint (that’s the small 4-ounce size) mason jars on a baking sheet.
- Sauté the Vegetables: In a medium saucepot, melt the butter over medium heat. Add the chopped onion, carrot, and celery. Cook for 7 to 9 minutes, until the vegetables are tender and sweet.
- Build the Flavor: Stir in the minced garlic, chopped thyme, and rosemary, and season with salt and pepper. Cook for one more minute until fragrant.
- Make the Gravy: Sprinkle the flour over the vegetables and stir constantly for 2 minutes until the flour smells toasty. This cooks out the raw flour taste. Gradually whisk in the chicken broth until there are no lumps.
- Simmer and Thicken: Bring the mixture to a simmer and let it cook, stirring occasionally, for 10-15 minutes, until the gravy has thickened nicely.
- Finish the Filling: Stir in the chopped rotisserie chicken, frozen peas, and heavy cream. Return the mixture to a simmer and cook for 4 more minutes.

Part 2: Assemble and Bake
- Fill the Jars: Ladle the hot stew evenly into the six mini mason jars. Let the jars sit and cool to room temperature while you prep the crust.
- Prepare the Crusts: On a lightly floured surface, unroll your pie crust. Cut out six 3-inch circles. Gently place one circle on top of each jar. Tuck the edges of the dough down inside the jar so the crust meets the rim, and crimp the edges with a fork for a decorative seal.
- Chill, Wash, and Vent: Place the assembled pies in the refrigerator for 20 minutes to chill the pastry. Whisk the egg with 1 tablespoon of water to create an egg wash. Brush the egg wash over each pie crust, then use a small knife to cut a couple of small vents into the top of each pie to allow steam to escape.
- Bake to Golden Perfection: Bake for 20 to 25 minutes, until the filling is bubbly and the pie crusts are a beautiful, deep golden brown.
- Cool and Serve: Let the mini potpies cool for at least 10 minutes before serving, as the filling will be very hot.

WiseRecipes’ Top Tips for Perfect Mini Potpies
These simple secrets will ensure your charming little pies are flawless and delicious.
- Use Rotisserie Chicken. This is the best shortcut for this recipe. It’s already cooked, tender, and seasoned, which adds a fantastic layer of flavor to your filling and saves you a ton of time.
- Toast the Flour. Don’t just dump the flour in. Cooking it in the butter and vegetables for a couple of minutes (creating a “roux”) is crucial for two reasons: it cooks out the raw, pasty flour taste and it helps to thicken the gravy smoothly.
- Cool the Filling Before Topping. Letting the hot filling cool down in the jars before you add the cold pie crust is an important step. Placing cold pastry on a steaming hot filling can cause it to melt and become tough.
- Don’t Skip the Chill Time. Chilling the assembled pies for 20 minutes before baking is a classic pastry trick. It firms up the butter in the crust, which will result in a much flakier, more tender final product.
- The Egg Wash is Key for Color. A simple brush of beaten egg over the pastry before it bakes is the secret to achieving that beautiful, shiny, deep golden-brown crust that you see in bakeries.
Mini Mason Jar Chicken Potpies
Ingredients
Equipment
Method
- Preheat the oven to 400°F. Place six ¼-pint mason jars on a baking sheet. In a saucepot, melt butter over medium heat. Add the onion, carrot, and celery; cook until tender, 7 to 9 minutes.
- Stir in the garlic, thyme, and rosemary; season with salt and pepper. Stir in the flour and cook, stirring constantly, for 2 minutes.
- Gradually whisk in the broth until smooth. Bring to a simmer and cook until thickened, 10 to 15 minutes.
- Stir in the chicken, peas, and heavy cream. Return to a simmer and cook for 4 minutes. Ladle the stew into the mason jars and let cool to room temperature.
- On a floured surface, roll out the pie crust and cut into six 3-inch circles. Place one circle over each jar, tucking the edges inside to meet the rim. Crimp the edges with a fork.
- Chill the assembled pies in the refrigerator for 20 minutes.
- In a small bowl, whisk the egg with 1 tablespoon of water. Brush this egg wash over each pie crust. Use a paring knife to cut small vents into each top.
- Bake until the crusts are golden brown and the filling is bubbly, 20 to 25 minutes. Cool for at least 10 minutes before serving.
Notes
Keep Them Fresh! Storing Your Potpies
These individual potpies are fantastic for making ahead for an easy, impressive dinner.
- Make-Ahead: You can fully assemble the potpies (without the egg wash and baking) and store them in the refrigerator for up to 24 hours. When ready, just apply the egg wash, cut the vents, and bake as directed, possibly adding a few extra minutes since they are starting from cold.
- Refrigerator: Store any leftover baked potpies, covered, in the refrigerator for up to 3 days.
FAQs: Your Mason Jar Potpie Questions, Answered!
Are mason jars safe to bake in?
Yes, most standard canning mason jars (like those from Ball or Kerr) are designed to withstand the high temperatures of boiling and pressure canning, so they are perfectly safe for baking in the oven. Just be sure to avoid sudden, extreme temperature changes (like taking a cold jar from the fridge and placing it on a very hot surface) to prevent thermal shock. Placing them on a baking sheet provides a good buffer.
Can I use a different kind of crust?
Absolutely! Puff pastry would be a fantastic and extra-flaky alternative to the pie crust. You could also top these with a simple drop biscuit dough for a more rustic, cobbler-style topping.
Can I make this vegetarian?
Yes, very easily! To make a vegetarian version, simply omit the chicken and use a rich vegetable broth. To make the filling heartier, you can add a can of drained white beans and some sliced cremini mushrooms (sauté them with the other vegetables at the beginning).
Can I freeze these?
Yes, these freeze beautifully. It’s best to freeze them unbaked. Assemble them completely (without the egg wash), cover them tightly, and freeze for up to 3 months. You can bake them directly from frozen, adding about 20-25 extra minutes to the baking time.
Final Thoughts: A Jar Full of Comfort
There is something so special about a personal-sized meal that feels like it was made just for you. These Mini Mason Jar Chicken Potpies are a true celebration of classic comfort food, presented in a fun, charming, and elegant way. They are a rewarding, delicious, and deeply satisfying dish that I know will bring warmth and smiles to your dinner table. Happy baking!