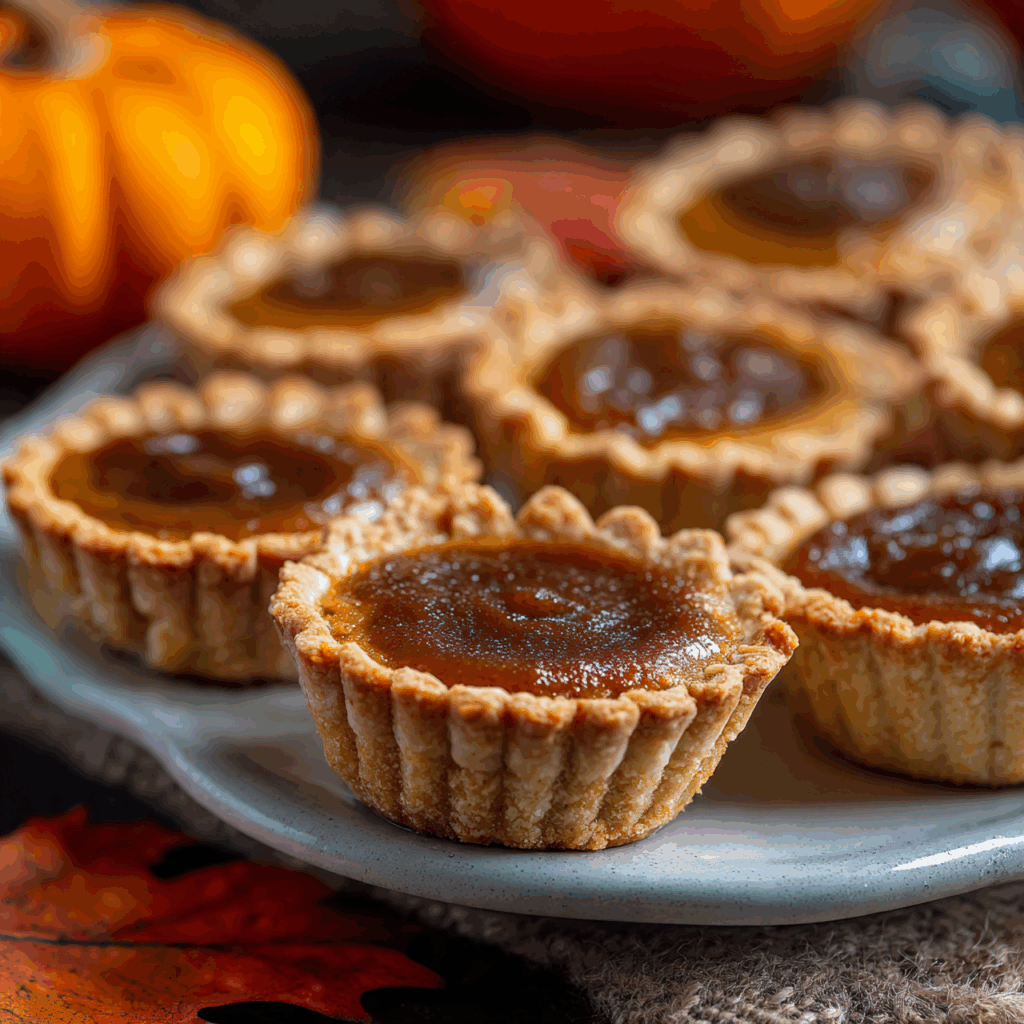
The Ultimate Mini Pumpkin Pies (Bite-Sized Holiday Perfection!)
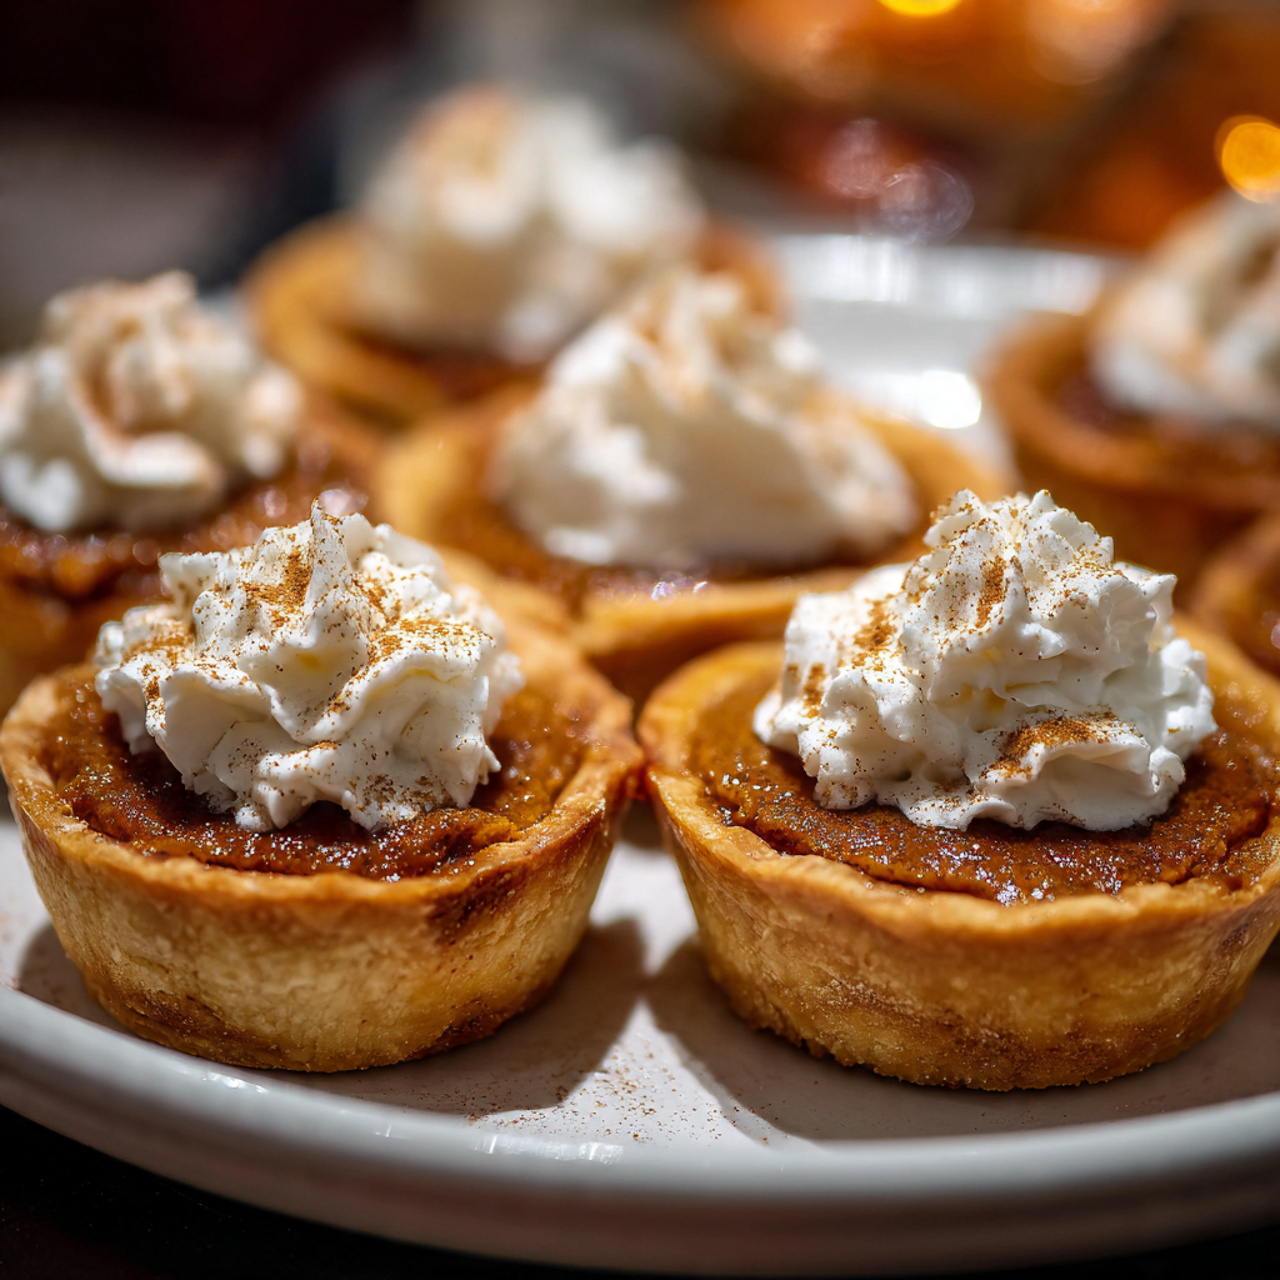
Imagine all the classic, comforting, and perfectly spiced flavor of a traditional pumpkin pie, but transformed into an adorable, two-bite treat that’s almost too cute to eat. Picture a tiny, flaky, buttery pie crust, filled with a silky-smooth pumpkin custard, and topped with a dollop of fluffy whipped cream and a sprinkle of crunchy, homemade…
Imagine all the classic, comforting, and perfectly spiced flavor of a traditional pumpkin pie, but transformed into an adorable, two-bite treat that’s almost too cute to eat. Picture a tiny, flaky, buttery pie crust, filled with a silky-smooth pumpkin custard, and topped with a dollop of fluffy whipped cream and a sprinkle of crunchy, homemade candied pecans. That, my friends, is the irresistible, party-perfect magic of these Mini Pumpkin Pies. This is, without a doubt, the most charming and delicious way to serve a holiday classic.
I promise you, these mini pies are a true show-stopper that will be the star of your Thanksgiving or Christmas dessert table. They deliver all the nostalgic flavor you crave in a beautiful, convenient package. They’re a fun baking project that yields the most delightful results, perfect for making your holiday celebration feel extra special.
Get ready to create the most popular and talked-about dessert of the season, a batch of stunning, bite-sized pies that are pure holiday joy.

Why These Mini Pumpkin Pies Will Steal the Show!
You are going to be so incredibly proud of these beautiful and delicious little pies. They are a guaranteed sensation. Here’s why you have to make them:
- Perfectly Portioned and Party-Ready: These individual, bite-sized pies are incredibly easy to serve to a crowd, with no messy slicing required. They are the ultimate elegant party dessert!
- Classic Flavor in a Cute Package: You get all the beloved, perfectly spiced flavor of a classic pumpkin pie in an adorable, two-bite format that everyone loves.
- Incredible Candied Pecan Topping: The simple, homemade candied pecans add a wonderful, crunchy, sweet-and-salty texture that is the perfect contrast to the creamy pie.
- Foolproof Silky Filling: The pumpkin custard is made with heavy cream and sweetened condensed milk, ensuring a rich, smooth, and perfectly set filling every single time.
- A Fun and Rewarding Baking Project: From cutting the mini crusts to making the quick candied pecans, this is a super fun and satisfying recipe to make for the holidays.
Recipe Snapshot
| Prep Time | 35 minutes |
| Cook Time | 35 minutes |
| Total Time | 1 hour 10 minutes |
| Servings | 24 mini pies |
| Calories | ~150 kcal per pie |
| Course | Dessert |
| Cuisine | American |
| Difficulty/Method | Easy / Baking |
Your Shopping List for These Bite-Sized Beauties
This recipe uses classic pie ingredients to create a holiday masterpiece. Here’s what you’ll need:

→ For the Pies
- 1 (14.1-oz.) pkg. refrigerated piecrusts → A fantastic time-saver! You’ll need both crusts in the package.
- 1 cup canned pumpkin puree → Make sure it’s 100% pure pumpkin, not pie filling.
- 1/2 cup heavy whipping cream → For a rich and silky custard.
- 1/3 cup granulated sugar
- 1 large egg
- 1 Tbsp. all-purpose flour → To help the filling set perfectly.
- 1 tsp. vanilla extract
- Spices: 2 tsp. pumpkin pie spice, 1/8 tsp. ground nutmeg, 1/8 tsp. ground cloves
→ For the Candied Pecans & Garnish
- 1/2 cup pecan halves → To be transformed into our crunchy, sweet topping.
- 1 1/2 Tbsp. light brown sugar
- 1 1/2 tsp. water
- A pinch of salt & pumpkin pie spice
- Whipped cream → For the perfect finishing dollop.
Let’s Get Baking! Your Step-by-Step Guide
Ready to create the cutest pies of the season? We’ll break it down into the crusts, the filling, the topping, and the final, beautiful assembly.
Part 1: The Mini Pie Crusts
- Preheat and Prep: Preheat your oven to 400°F (200°C). Lightly spray a 24-well mini muffin pan with cooking spray.
- Cut the Dough: On a lightly floured surface, unroll one of the piecrusts. Using a 3-inch round cookie cutter, cut out 12 dough rounds, re-rolling the scraps as needed. Repeat with the second piecrust to get a total of 24 rounds.
- Form and Blind Bake: Gently press one dough round into the bottom and up the sides of each muffin well. Place a paper mini muffin liner inside each crust and fill it with pie weights or dried beans. This “blind baking” step is crucial to prevent the crusts from puffing up.
- First Bake: Bake for 8 to 10 minutes, until the edges are golden brown. Carefully remove the liners and weights. Let the crusts cool in the pan for 10 minutes. Reduce the oven temperature to 375°F (190°C).
Part 2: The Filling and Final Bake
- Make the Pumpkin Filling: In a small bowl, whisk together the pumpkin purée, heavy cream, granulated sugar, flour, vanilla, nutmeg, cloves, egg, 1 1/2 teaspoons of the pumpkin pie spice, and 1/4 teaspoon of salt until completely smooth.
- Fill and Bake: Spoon the pumpkin mixture evenly into each pre-baked piecrust (about 1 heaping tablespoon each). Bake at 375°F for 12 to 15 minutes, until the filling is set and doesn’t jiggle when the pan is gently shaken. Let the mini pies cool completely in the pan.
Part 3: The Candied Pecans and Assembly
- Make the Candied Pecans: While the pies cool, combine the brown sugar, water, the remaining 1/2 teaspoon pumpkin pie spice, and 1/8 teaspoon salt in a small saucepan over medium heat. Cook, stirring constantly, for about 2 minutes, until the sugar has dissolved and the mixture is bubbly.
- Coat and Cool: Add the pecan halves and continue to cook, stirring constantly, for 2 more minutes, until they are evenly coated and fragrant. Spread the hot, sticky pecans in a single layer on a parchment-lined baking sheet and let them cool completely. Once cool, roughly chop them.
- Garnish and Serve: Carefully transfer the cooled mini pumpkin pies to a serving platter. Top each pie with a dollop or swirl of whipped cream and a generous sprinkle of the chopped candied pecans.
Bite-Sized Mini Pumpkin Pies
Ingredients
Equipment
Method
- Preheat oven to 400°F. Lightly coat a 24-well mini muffin pan with cooking spray.
- Unroll piecrusts and cut out 24 rounds using a 3-inch cutter. Press one dough round into each muffin well.
- Place a paper mini muffin liner inside each piecrust and fill with pie weights or dried beans. Bake for 8 to 10 minutes until golden. Remove liners and weights. Let cool for 10 minutes.
- Reduce oven temperature to 375°F. Whisk together pumpkin, cream, sugar, flour, vanilla, spices, egg, and 1/4 tsp salt until smooth.
- Pour pumpkin mixture evenly into each piecrust. Bake at 375°F until filling is set, 12 to 15 minutes. Let cool completely in the pan.
- Meanwhile, combine brown sugar, water, remaining pumpkin pie spice, and remaining salt in a small saucepan over medium heat. Cook, stirring, until bubbly, about 2 minutes.
- Add pecans and cook, stirring constantly, until evenly coated, about 2 minutes. Spread on a parchment-lined sheet to cool completely, then chop.
- Transfer cooled pies to a platter. Top with whipped cream and a sprinkle of the chopped candied pecans.
Notes
WiseRecipes’ Top Tips for Perfect Mini Pies
These simple secrets will ensure your bite-sized beauties are flawless and delicious.
- Don’t Skip Blind Baking. Using pie weights or dried beans to weigh down the mini crusts during their first bake is a non-negotiable step. It prevents the bottom of the crust from puffing up, leaving you with plenty of room for that delicious filling.
- Use Refrigerated Pie Crust as a Shortcut. While homemade is lovely, a good quality store-bought refrigerated pie crust is a fantastic time-saver for this recipe and yields a wonderfully flaky result.
- Don’t Overfill the Crusts. The pumpkin filling will puff up slightly as it bakes. Fill each crust just to the top edge to prevent it from spilling over and making a mess in your muffin tin.
- The Candied Pecans are Worth It! This extra 5-minute step is what takes these mini pies from great to absolutely spectacular. The sweet, salty, spiced crunch is the perfect textural contrast to the creamy pie.
- Cool Completely Before Garnishing. You must let the mini pies cool completely before you try to remove them from the pan or top them with whipped cream. A warm pie will melt the whipped cream instantly.
Keep It Fresh! Storing Your Mini Pies
These are a fantastic make-ahead dessert for a busy holiday!
- Make-Ahead: You can bake the pies completely and make the candied pecans a day in advance. Store the pies in an airtight container in the refrigerator, and the pecans in an airtight container at room temperature.
- Storage: Garnish with whipped cream and the candied pecans just before serving for the best texture. Store any leftovers in an airtight container in the refrigerator for up to 3 days.
FAQs: Your Mini Pumpkin Pie Questions, Answered!
Can I make this in a regular 9-inch pie pan?
Yes, you can adapt this recipe for a single, larger pie. You would press one of the pie crusts into a 9-inch pie plate. You may not need to blind bake it fully, but it’s a good idea to “par-bake” it for about 10 minutes. The filling amount should be just right. The baking time for a full-sized pie will be much longer, closer to 50-60 minutes.
Can I use a different kind of nut for the topping?
Absolutely! Candied walnuts would be a fantastic substitute for the pecans. For a nut-free option, you could top the pies with a sprinkle of toasted pumpkin seeds (pepitas) instead.
What if I don’t have a 3-inch cookie cutter?
No problem. The wide mouth of a drinking glass or a large canning jar lid is often around 3 inches and can work perfectly as a makeshift cutter for the dough rounds.
Can I freeze these mini pies?
Yes, they freeze quite well! For best results, freeze the baked and cooled pies before adding the whipped cream and pecan topping. Place them on a baking sheet to freeze solid, then transfer them to a freezer-safe bag or container. Thaw in the refrigerator and garnish just before serving.
Final Thoughts: A Bite of Holiday Joy
There is something so incredibly charming about a miniature dessert. These Mini Pumpkin Pies capture all the nostalgic warmth and spice of a holiday classic in one perfect, elegant bite. They are a fun, rewarding, and utterly delicious project that is guaranteed to bring a little extra sparkle to your celebration. Happy baking!