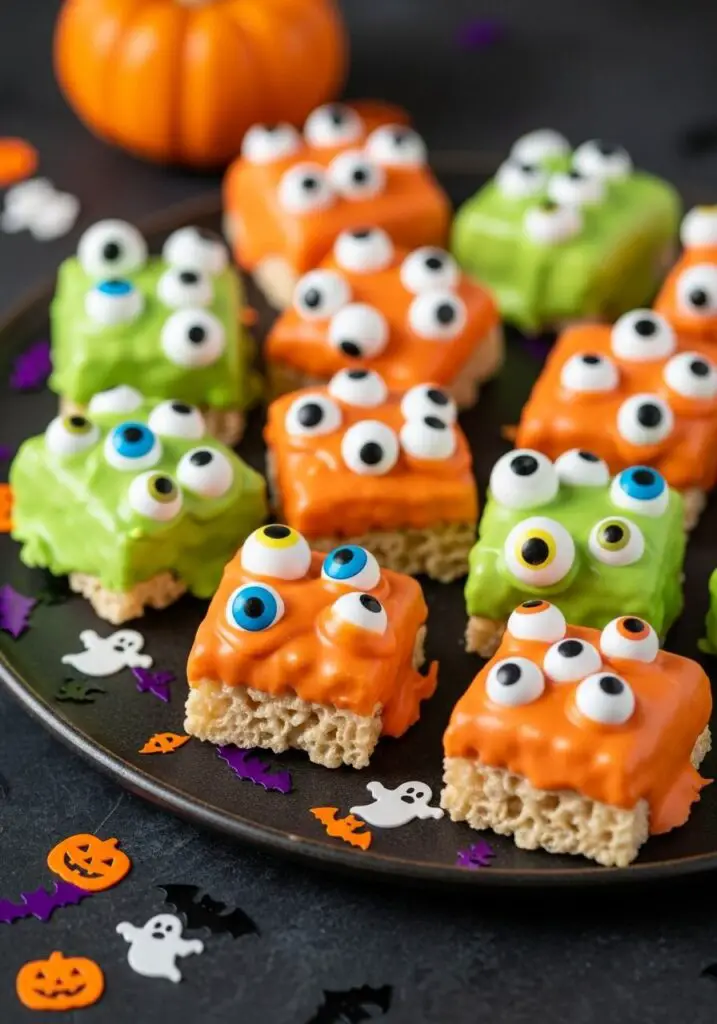
Googly-Eyed Monster Rice Krispies: The Cutest Halloween Snack for Kids!
There’s a special kind of joy that comes with making Halloween treats with kids. It’s a flurry of sprinkles, a little bit of mess, and a whole lot of laughter. But let’s be honest, we don’t always have time for complicated, multi-step baking projects. That’s why I am absolutely obsessed with these Googly-Eyed Monster Rice…
There’s a special kind of joy that comes with making Halloween treats with kids. It’s a flurry of sprinkles, a little bit of mess, and a whole lot of laughter. But let’s be honest, we don’t always have time for complicated, multi-step baking projects. That’s why I am absolutely obsessed with these Googly-Eyed Monster Rice Krispies Treats! They are the perfect Halloween snack: brilliantly easy, completely no-bake, and more silly than spooky, making them perfect for little ones. We start with the classic, can’t-go-wrong base of a chewy, gooey Rice Krispies treat. Then, the real fun begins. We dip them in vibrant orange and green candy melts and, while the coating is still wet, we go wild with the candy googly eyes! Some can have one eye, some can have five—there are no rules in monster making! The result is a platter of the most charming, goofy, and completely delicious little monsters you’ve ever seen. This is the ultimate, stress-free recipe for a class party, a Halloween movie night, or just a fun afternoon kitchen project that will create the sweetest memories.
Why These Little Monsters Will Be a Smash Hit!
- Completely No-Bake: No need to even turn on your oven! This entire recipe comes together on the stovetop and the counter, making it a perfect easy project.
- A Fun, Kid-Friendly Activity: The decorating part is pure, creative fun. Kids will absolutely love dipping the treats and giving their little monsters a unique, googly-eyed personality.
- Classic, Beloved Flavors: At its heart, it’s a crispy, chewy, buttery Rice Krispies treat—a nostalgic flavor that everyone, from toddlers to adults, adores.
- Perfect for Parties: This recipe makes a generous batch, and the individual squares are easy for guests to grab and enjoy. They look incredible on a Halloween party spread!
- Adorable, Not Scary: With their bright colors and goofy eyes, these monsters are all treat and no trick, making them perfect for younger children.
Recipe Snapshot
| Prep Time | 45 minutes |
| Cook Time | 5 minutes |
| Total Time | 50 minutes |
| Servings | 12 servings |
| Calories | See recipe card for details |
| Course | Dessert, Snack |
| Cuisine | American, Halloween |
| Method | No-Bake |
Your Mad Scientist Shopping List
Creating these adorable monsters requires just a handful of simple, easy-to-find ingredients. It’s all about the decorating fun!
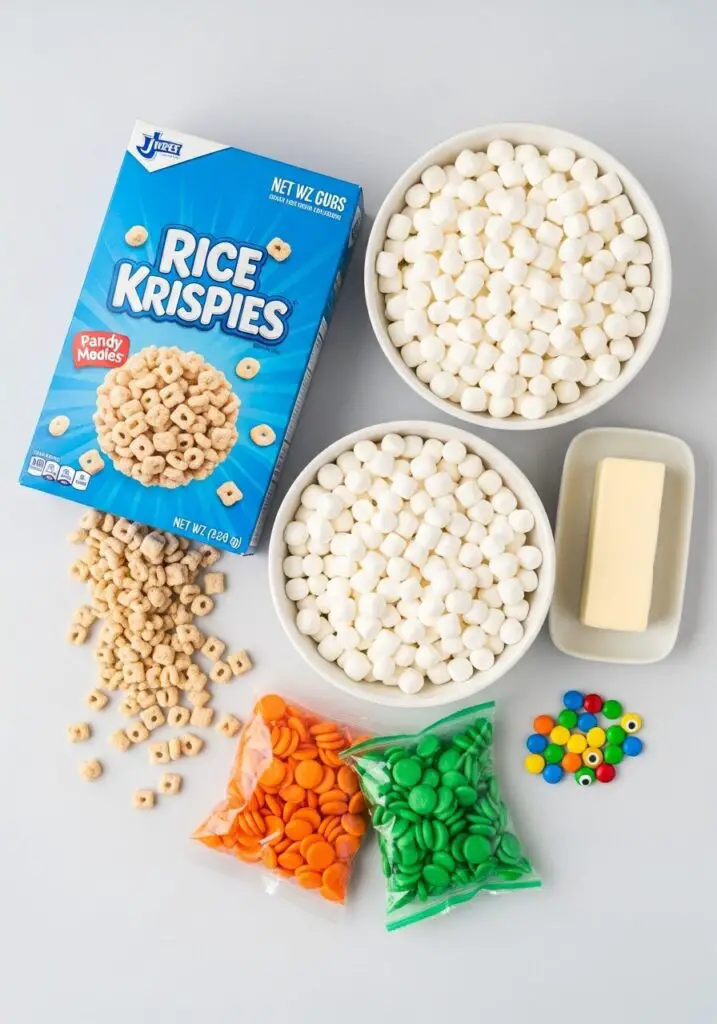
→ For the Rice Krispies Treat Base
- Unsalted Butter: 3 tablespoons. The key to that rich, classic flavor.
- Mini-Marshmallows: 5 1/2 cups. The minis melt faster and more evenly than the large ones.
- Rice Krispies Cereal: 6 cups of the classic puffed rice cereal.
- Cooking Spray: For greasing the pan to prevent any sticking.
→ For the Monster Decorations
- Orange Candy Melts: One 12-ounce package. These provide a vibrant, spooky color and a sweet coating.
- Green Candy Melts: One 12-ounce package. For our other set of colorful monsters!
- Small Candy Googly Eyes: The essential ingredient! These give our monsters their charming, goofy personalities.
Let’s Make Some Monsters! A Step-by-Step Guide
This is one of the easiest and most fun recipes you’ll make all season. Let’s create our goofy goblin gang!
Phase 1: Make the Crispy-Chewy Base (Time: ~10 minutes + cooling)
First, we’ll create the classic, irresistible Rice Krispies treat foundation.
- Prep Your Pan. Lightly coat a 9-by-13-inch pan with cooking spray.
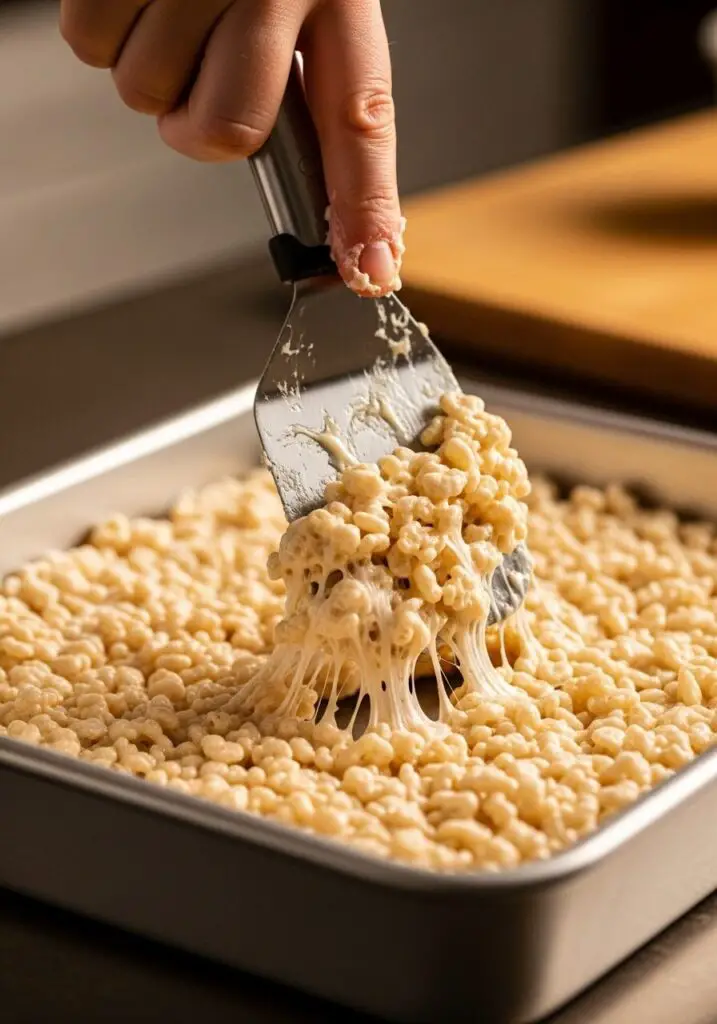
- Melt Butter and Marshmallows. In a large saucepan or Dutch oven, melt the butter over low heat. Add the mini-marshmallows and stir until they are completely melted and smooth. Remove the pan from the heat.
- Mix and Press. Add the Rice Krispies cereal to the pot with the melted marshmallows. Stir until the cereal is evenly and completely coated. Transfer the mixture to your prepared pan.
- Press Gently. Use a buttered spatula or a piece of wax paper to gently press the mixture into an even layer in the pan.
Pro Tip: Don’t press down too hard! A gentle press will keep your treats light and chewy. Compacting them too much can make them dense and hard. - Cool Completely. Let the pan cool completely at room temperature. Once cool, turn the slab out onto a cutting board and cut it into 12 even rectangles.
Phase 2: Decorate Your Little Monsters (Time: ~20 minutes)
Now for the most fun part! It’s time to bring our colorful creatures to life.
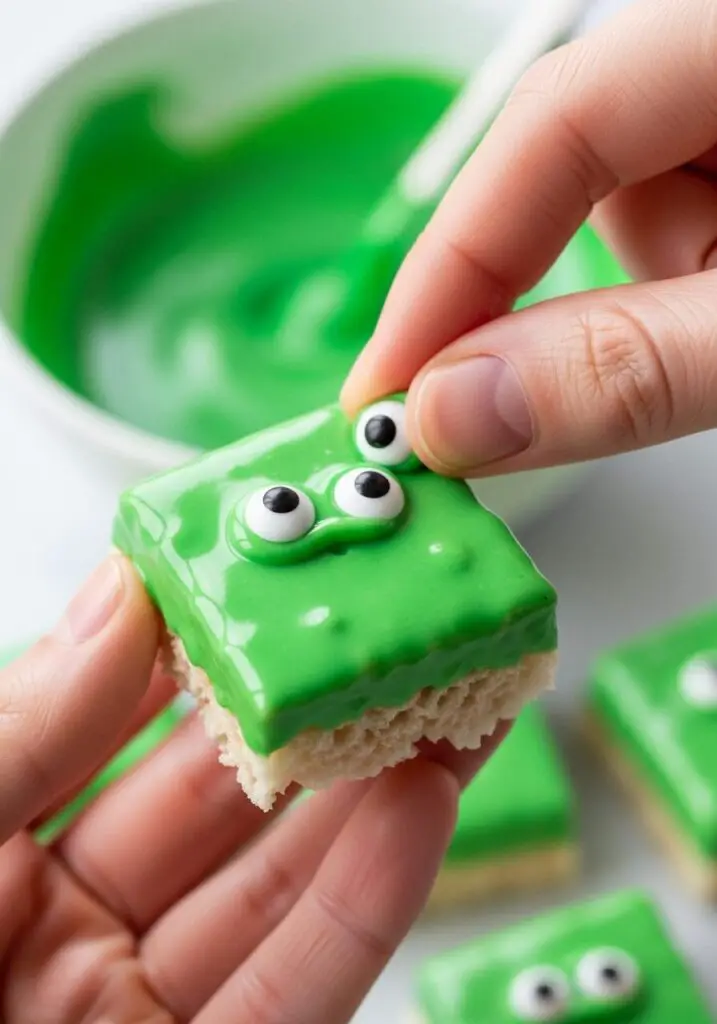
- Prep Your Station. Line a large, rimmed baking sheet with parchment paper. This is where your finished monsters will set.
- Melt the Candy Melts. Place the orange and green candy melts in two separate, microwave-safe bowls. Melt them according to the package directions, stirring until smooth.
- Dip the Treats. Working with one treat at a time, dip one end about halfway into either the orange or green melted candy, letting any excess drip back into the bowl.
- Add the Eyes! Place the dipped treat on your prepared baking sheet. While the candy coating is still wet, haphazardly place the candy googly eyes onto the melted candy. Use one, two, three, or five—have fun with it!
- Let Them Set. Repeat with the remaining treats, dipping half in orange and half in green. Let the monsters sit at room temperature until the candy coating is completely firm and set before serving.
WiseRecipes’ Top Tips for Monster-Making Success!
- Low and Slow for Marshmallows: Melt your butter and marshmallows over low heat. High heat can cause the marshmallows to caramelize and become hard when they cool.
- Butter Your Spatula: A classic trick for a reason! A light coating of butter or cooking spray on your spatula will prevent the sticky marshmallow mixture from clinging to it as you press it into the pan.
- Don’t Press Too Hard: The secret to soft, chewy Rice Krispies treats is a gentle press. If you compact the mixture too firmly into the pan, the treats will be thin, dense, and hard.
- Work Quickly with Candy Melts: The candy coating will start to set fairly quickly, so have your googly eyes ready to place on the treats as soon as you dip them.
- Use a Sharp Knife: For clean, even rectangles, use a large, sharp knife to cut the cooled slab of treats. You can lightly butter the knife to help prevent sticking.
Googly-Eyed Monster Rice Krispies Treats
Ingredients
Equipment
Method
- Lightly coat a 9- by 13-inch pan with cooking spray. Melt butter in a large saucepan over low heat. Add mini-marshmallows and stir until completely melted. Remove from heat.
- Add the cereal and stir until well coated. Transfer the mixture to the prepared pan and gently press into an even layer with a buttered spatula. Cool completely.
- Once cool, cut the treats into 12 rectangles.
- Line a rimmed baking sheet with parchment paper. Melt the orange and green candy melts in separate microwave-safe bowls according to package directions.
- Dip one end of each treat in either the orange or green candy melts, letting the excess drip off. Place on the prepared baking sheet.
- While the candy coating is still wet, haphazardly place candy googly eyes onto the candy. Let them set completely at room temperature before serving.
Notes
Creative Monster Mash-Ups: Fun Variations!
- Try Different Colors: Use purple, black, or even pink candy melts to create a whole rainbow of monsters.
- Add Sprinkles: While the candy coating is still wet, add some festive Halloween sprinkles for extra color and texture.
- Monster Shapes: Use Halloween-themed cookie cutters (like ghosts or pumpkins) to cut out shapes from the cooled slab of treats before you dip them.
- Use Different Cereals: Try making the base with Cocoa Krispies or other puffed cereals for a different flavor and look.
- Add Monster “Hair”: Stick a few sprinkles into the top of the wet candy melts to look like crazy monster hair.
- Mummy Treats: Dip the treats in white candy melts, let them set, and then use a fork to drizzle thin lines of more melted white candy over the top to look like mummy bandages. Add two eyes peeking out!
Keep Your Monsters Fresh! Storing Your Treats
These treats are great for making a day or two ahead of your Halloween party!
Room Temperature Storage
Store the finished Monster Rice Krispies Treats in a single layer in an airtight container at room temperature. They will stay fresh and delicious for up to 3 days. Do not refrigerate them, as this can make them hard.
FAQs: Your Monster Treat Questions, Answered!
Can I use large marshmallows instead of mini ones?
Yes, you can. You will need one standard 10-ounce bag of large marshmallows. They will just take a little longer to melt completely. Just be sure to keep the heat low and stir patiently.
Why are my Rice Krispies treats hard instead of chewy?
This usually happens for one of two reasons: either the marshmallows were cooked over too high of a heat, or the mixture was pressed too firmly into the pan. A gentle heat and a light touch are the secrets to a soft, chewy treat.
Can I make these gluten-free?
Yes! Kellogg’s Rice Krispies cereal itself is not certified gluten-free (it contains malt flavor). However, you can easily make this recipe gluten-free by using a brand of puffed rice cereal that is specifically labeled as gluten-free. The rest of the ingredients are typically gluten-free, but always check your labels.
What if I don’t have candy melts?
You can use white chocolate chips as a substitute. Melt them and then use gel food coloring to dye them orange and green. Note that white chocolate can sometimes be a bit thicker than candy melts, so you may want to stir in a tiny bit of coconut oil to help thin it out for easier dipping.
These Monster Rice Krispies Treats are the perfect blend of spooky, silly, and sweet. They are a wonderful, no-stress way to create a memorable treat for your little goblins and ghouls. It’s a recipe that’s all about having fun in the kitchen and creating something that brings a smile to everyone’s face. I hope you and your family have a blast making your own little monster crew. Happy Halloween!