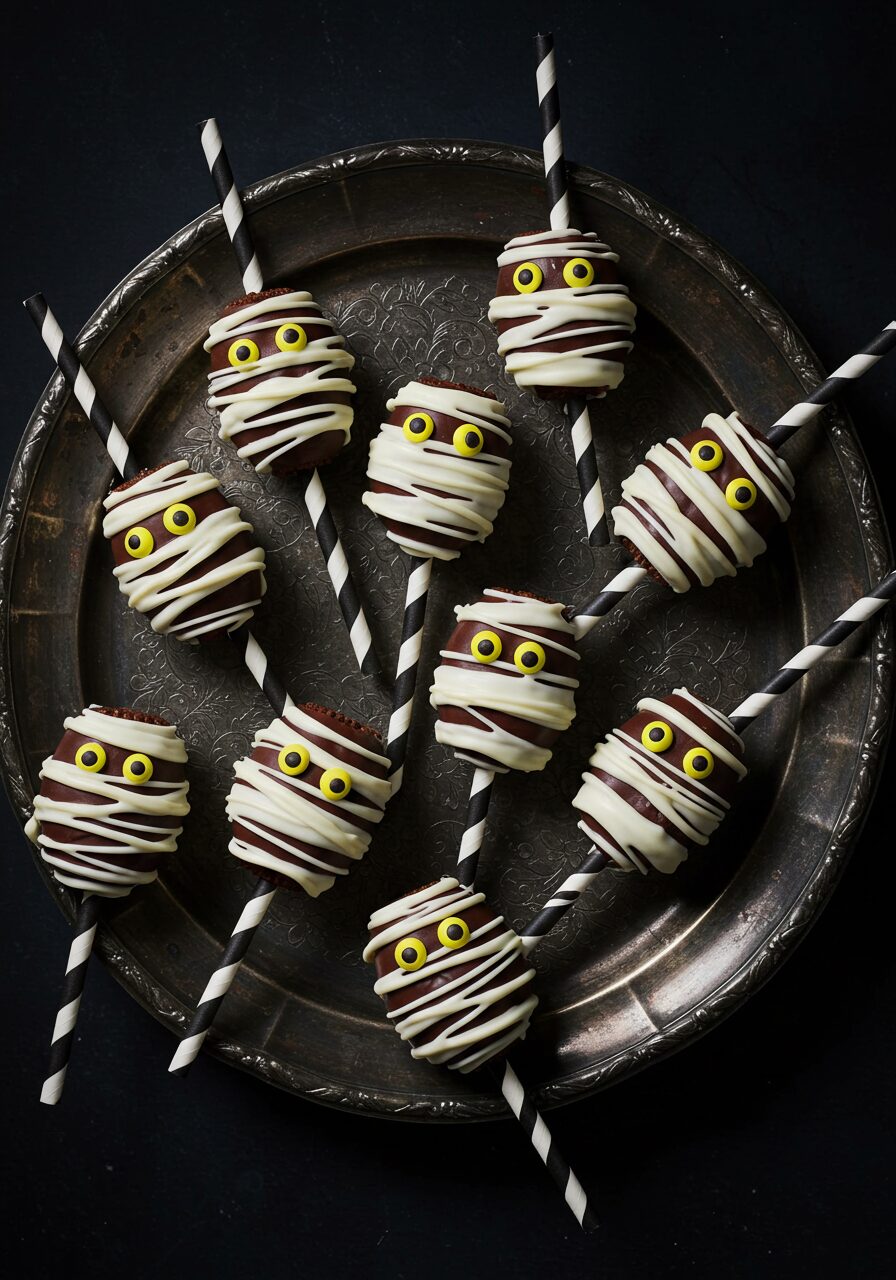
The Best Easy Mummy Pops (The Cutest Halloween Treat!)
Hello, my spooky friends! When it comes to Halloween, I believe the treats should be just as fun as the costumes. Today, we are unwrapping one of my all-time favorite edible craft projects, a recipe that is guaranteed to bring smiles (and a few delighted shrieks!) to any gathering. Get ready to create these adorable,…
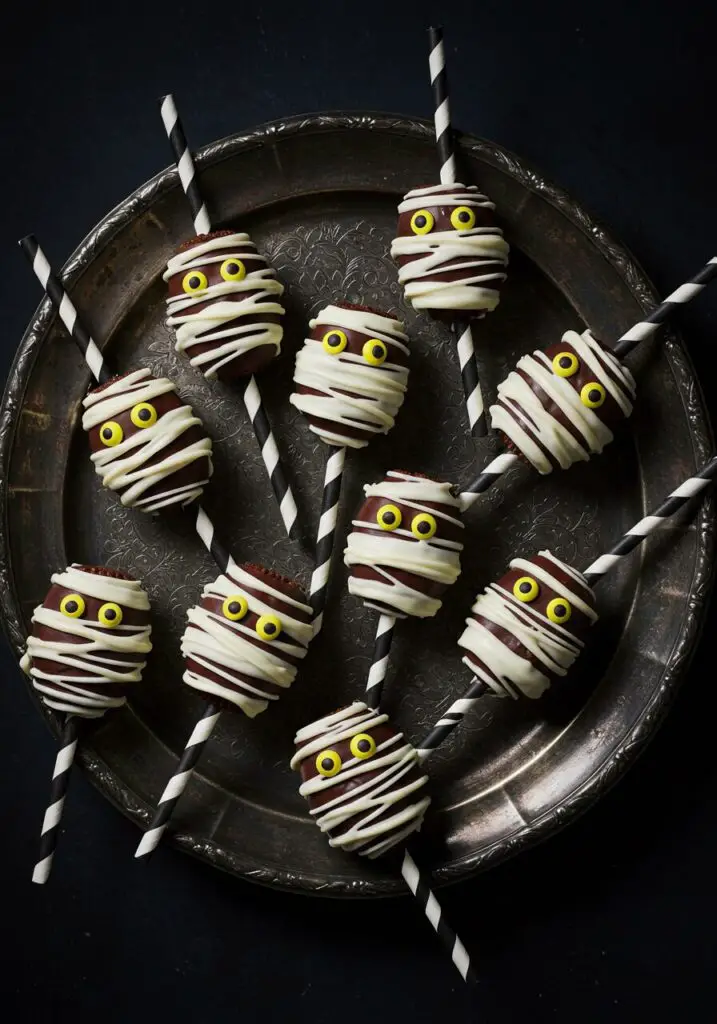
Hello, my spooky friends! When it comes to Halloween, I believe the treats should be just as fun as the costumes. Today, we are unwrapping one of my all-time favorite edible craft projects, a recipe that is guaranteed to bring smiles (and a few delighted shrieks!) to any gathering. Get ready to create these adorable, and incredibly easy, Mummy Pops. Imagine a crunchy, peanut-buttery Nutter Butter cookie, dipped in rich chocolate, and then artfully wrapped in sweet “bandages” with a pair of spooky eyes peeking out.
This isn’t just a recipe; it’s a ticket to becoming a Halloween legend. It’s a completely no-bake project that is perfect for getting the kids involved in the kitchen. Using a few clever shortcuts, we can create a whole army of these charming little mummies with minimal effort. They are the perfect, delicious centerpiece for your Halloween party table.
Why These Mummy Pops Are a Spooky Season Staple
This recipe is pure, simple, Halloween joy. It’s a guaranteed hit that’s as much fun to create as it is to eat. Here’s why it’s a must-make.
- Unbelievably Adorable: Let’s be honest, these little mummies are just the cutest! Their little peeking eyes and wrapped bandages are full of personality and charm.
- A True No-Bake Wonder: No oven required! This entire treat comes together with just a microwave and your refrigerator, making it a perfect, low-stress activity.
- Classic, Irresistible Flavors: At its core, this is a chocolate-covered peanut butter cookie. The combination of salty, creamy peanut butter and rich chocolate is a timeless favorite.
- A Fun, Kid-Friendly Project: This is the ultimate recipe for getting little hands involved. Kids will have a blast dipping the cookies and, of course, giving each mummy its own unique set of eyes and bandages.
- The Perfect Party Food: These pops are perfect for making ahead and look so impressive arranged on a platter or standing up in a foam block. They are the ultimate grab-and-go party sweet.
Gather Your Spooky Ingredients: What You’ll Need
Let’s get our simple, delicious ingredients ready for this fun project.

- 8 Nutter Butter Cookies
- 8 Straws or Lollipop Sticks
- 11 oz. Chocolate, for melting: Semi-sweet or dark chocolate works great for the base.
- 1 cup Buttercream Frosting (homemade or store-bought): For the bandages.
- M&M’s Minis or Candy Eyes: For decorating.
Crafting Your Mummies: Step-by-Step Guide
Let’s assemble these adorable creatures of the night.
- Prep and Assemble the Pops: Line a large baking sheet with parchment paper. Carefully open each Nutter Butter cookie. Lightly dip the end of a straw or lollipop stick into a little bit of the melted chocolate (this acts as a glue!) and press it into the cream filling of one half. Gently press the cookie back together.
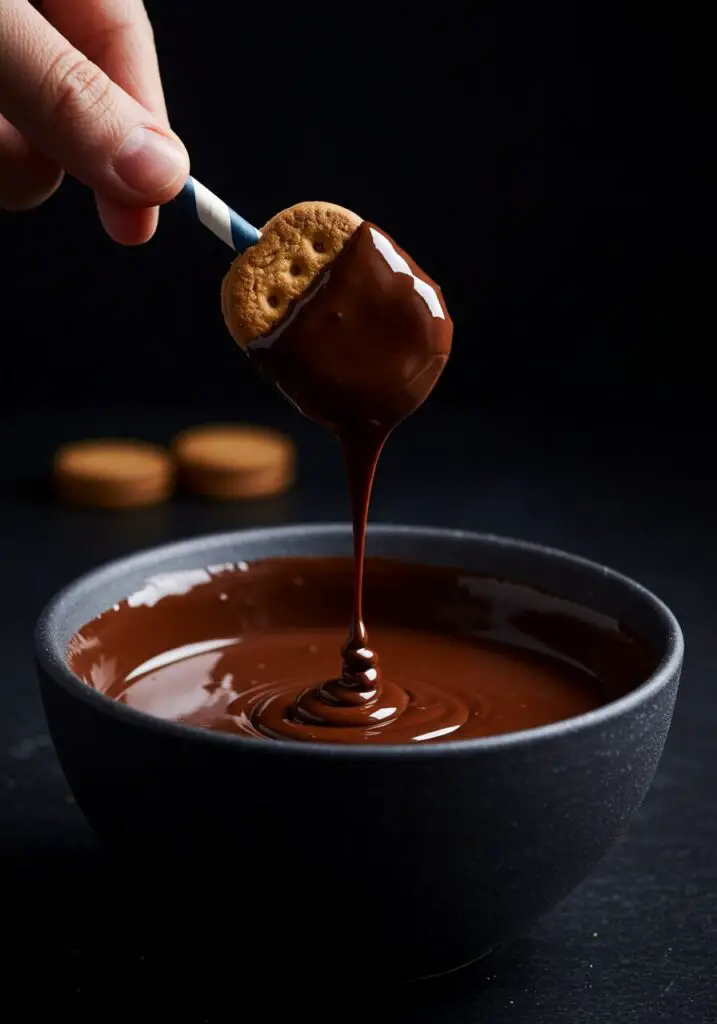
- Dip in Chocolate: Melt your chocolate in the microwave in 30-second increments, stirring between each, until smooth. Holding a Nutter Butter pop by its stick, dip it into the melted chocolate, using a spoon to help cover it completely. Gently tap the stick on the side of the bowl to let any excess chocolate drip off.
- Chill to Set: Place the chocolate-covered pop on your prepared baking sheet. Repeat with all the pops. Place the baking sheet in the refrigerator for about 10-15 minutes, or until the chocolate is completely hardened.
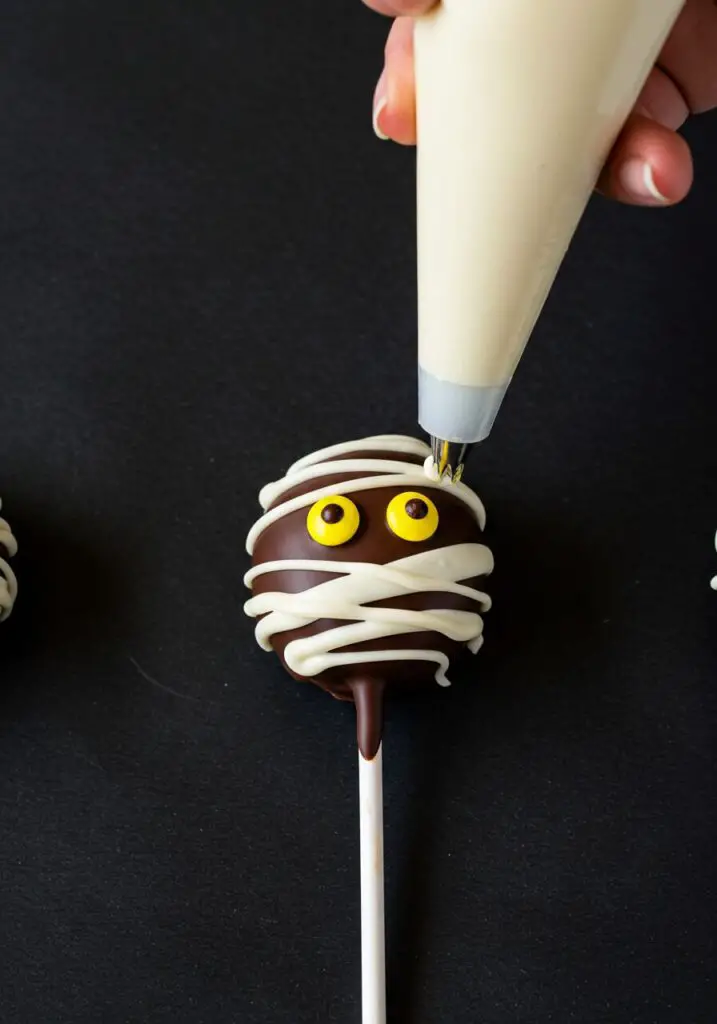
- Create the Bandages: Now for the fun part! Fill a pastry bag fitted with a straight, flat tip (like a basketweave tip) with your buttercream frosting. Pipe the frosting back and forth across the chocolate-covered Nutter Butter, leaving a small gap for the eyes. Crisscross the “bandages” to give it that classic, wrapped mummy look.
- Add the Eyes and Serve: Use a little dab of the leftover melted chocolate or a bit of the frosting as glue to stick on two M&M’s Minis or candy eyes in the gap you left. You can even use a toothpick to dot the M&M’s with a little chocolate to create pupils. Let the pops set for at least an hour before serving.
Wise Tips & A Note on Decorating
- Two Ways to Make Your Mummy Bandages: The recipe above uses buttercream frosting, which is super easy, delicious, and great for kids. For a look that’s more like the inspiration photos, you can use melted white chocolate instead! Simply melt 1 cup of white chocolate chips with 1-2 teaspoons of coconut oil. Let it cool slightly, then transfer it to a piping bag or a zip-top bag, snip off a tiny corner, and drizzle the “bandages” back and forth over your dark chocolate-coated pops.
- Chill Your Nutter Butters: For an easier time inserting the sticks, you can pop your Nutter Butters in the freezer for 10-15 minutes beforehand. This helps firm them up and prevents them from breaking.
- The Best Eyes: While M&M’s Minis work great, using pre-made yellow or white candy eyeballs (as seen in the photos) really takes these mummies to the next level of spooky cuteness!
Easy Halloween Mummy Pops
Ingredients
Method
- Line a baking sheet with parchment paper. Lightly dip a straw or lollipop stick into melted chocolate and press it onto the filling of an open Nutter Butter. Press the cookie back together.
- Dip the entire Nutter Butter pop into the remaining melted chocolate until completely coated. Place on the prepared baking sheet and refrigerate for 10-15 minutes, until the chocolate is set.
- Fill a pastry bag fitted with a straight flat tip with buttercream frosting. Pipe the frosting back and forth across the pop to create ‘bandages’, leaving a small gap for the eyes.
- Use a dab of frosting or chocolate to glue on two M&M’s Minis or candy eyes. Let the pops set for at least 1 hour before serving.
Frequently Asked Questions (FAQ) – Mummy Pops Recipe
- Can I make these without a piping bag?
Yes! If you don’t have a piping bag, you can simply spoon your frosting or melted white chocolate into a sturdy zip-top bag, press it into one corner, and snip off a tiny bit of the corner to create a DIY piping bag. - My chocolate is too thick for dipping. What can I do?
If your melted chocolate is too thick, you can stir in about a teaspoon of coconut oil or vegetable shortening. This will thin it out and make it the perfect consistency for dipping. - Can I use a different kind of cookie?
While the oblong shape of Nutter Butters is perfect for a “mummy” body, you could definitely try this with round cookies like Oreos for a cute, round mummy pop. - How do I store these?
Store your finished Mummy Pops in a single layer in an airtight container in the refrigerator for up to a week. They are best served chilled so the chocolate stays nice and firm.
Conclusion
These Mummy Pops are a perfect example of how a few simple ingredients and a little bit of creativity can result in a truly memorable and fun Halloween treat. They are a delightful, no-bake project that is guaranteed to be the star of any spooky celebration. I hope you have a blast bringing these adorable little monsters to life!