My Ultimate Piñata Cake (The Birthday Surprise Everyone Will Love!)
Oh, my friends, who here doesn’t absolutely adore a birthday cake that brings gasps of delight and squeals of excitement? I know I do! And if you’re looking for a dessert that’s not just delicious but also delivers a jaw-dropping, colorful surprise with every slice, then today at WiseRecipes, I’m absolutely thrilled to share the…
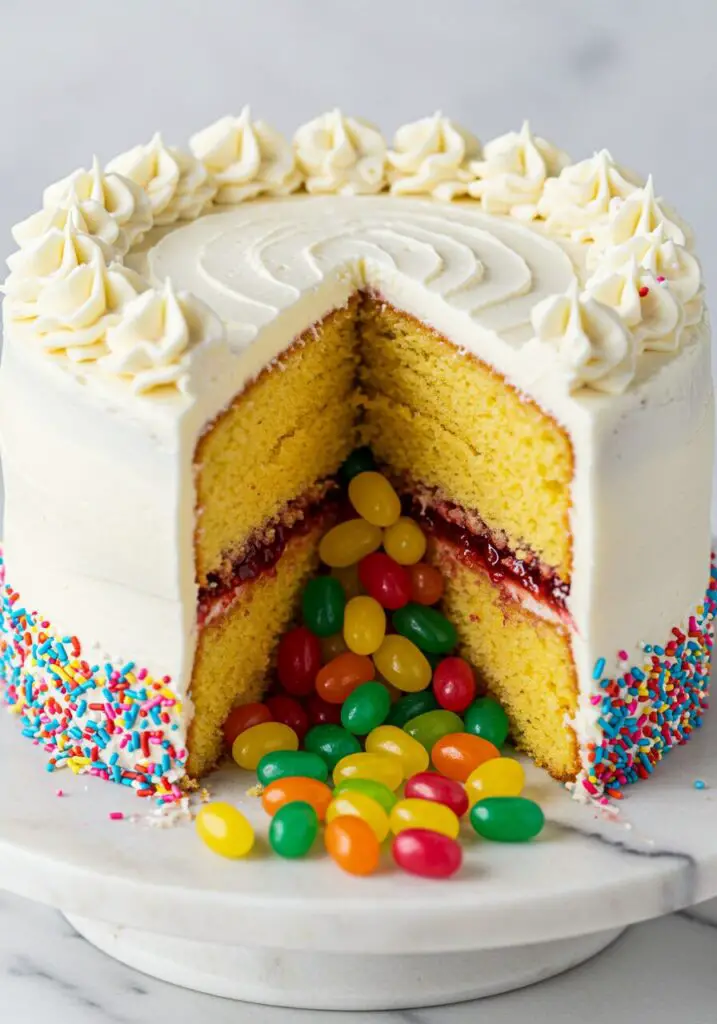
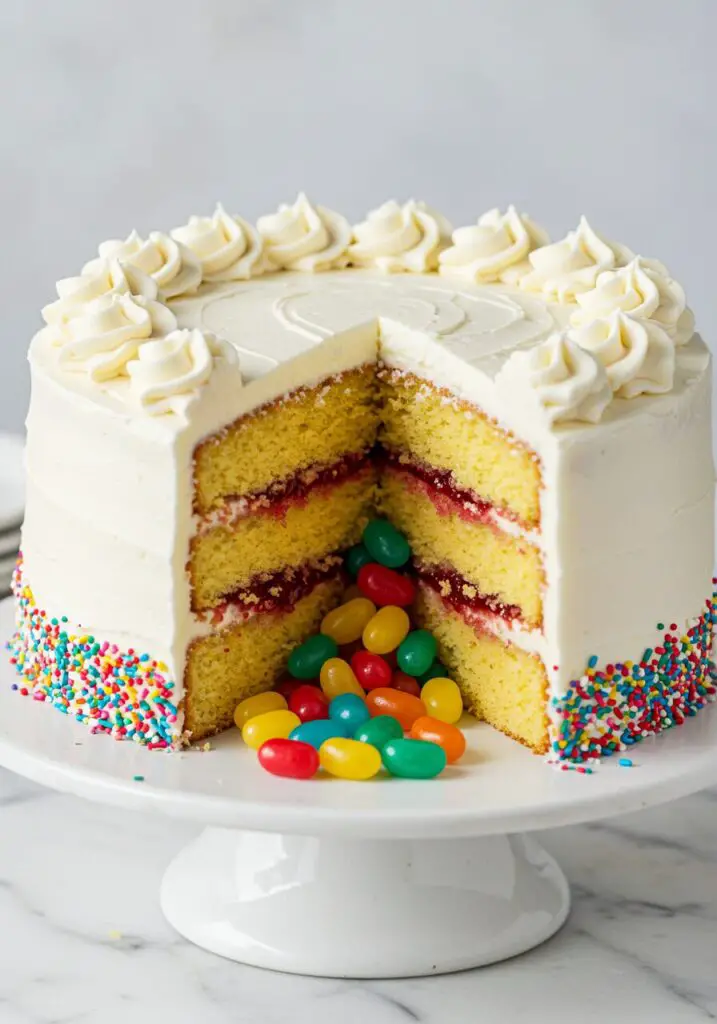
Oh, my friends, who here doesn’t absolutely adore a birthday cake that brings gasps of delight and squeals of excitement? I know I do! And if you’re looking for a dessert that’s not just delicious but also delivers a jaw-dropping, colorful surprise with every slice, then today at WiseRecipes, I’m absolutely thrilled to share the recipe for my incredible Piñata Cake! Seriously, prepare for pure magic – a beautifully layered sponge cake, filled to the brim with a cascade of vibrant jelly beans (or your favorite sweets!), topped with dreamy buttercream and festive sprinkles. It’s a party in every slice, and it is pure joy in every single bite!
I just adore a recipe that feels incredibly special and memorable, perfect for celebrating those precious milestones. This cake is exactly that! It’s a fantastic way to transform a simple birthday celebration or special occasion into something truly unforgettable, creating a “wow” moment that kids (and adults!) will talk about long after the candles are blown out. Forget ordinary cakes; this is an interactive, flavor-packed, and visually stunning masterpiece that delivers sheer delight. While it looks elaborate, I promise you, with my detailed step-by-step guide, you can confidently create this impressive Piñata Cake. Serving a generous 20-24 people, it’s the ultimate centerpiece for any celebration. Trust me, once you see those happy faces when the sweets tumble out, you’ll be making it again and again!
Why This Piñata Cake Is About to Become Your New Celebration Favorite!
This isn’t just another cake recipe; it’s a truly memorable experience that’s deceptively easy to create. Here’s why I’m absolutely smitten with it:
- The Ultimate Surprise Factor: The hidden cavity filled with sweets is the absolute star of the show! That burst of color and cascading candy when you cut the first slice creates an unforgettable “wow” moment that kids (and adults!) adore.
- Light & Fluffy Sponge Perfection: We’re baking four tender, golden-brown sponge layers, ensuring a wonderfully moist and airy cake that’s perfectly complemented by our creamy buttercream.
- Dreamy Buttercream Layers: Layers of luscious, smooth buttercream (both white and a vibrant pink!) add richness and elegance, making every bite feel truly special.
- Customizable Candy Fun: While jelly beans are fantastic for that colorful burst, you can fill the cavity with any sweets you like – M&Ms, sprinkles, small chocolates – making it perfectly tailored to the birthday star!
- Impressive, Yet Achievable: This cake looks incredibly elaborate and professional, but my step-by-step guide breaks it down into manageable tasks. You’ll impress everyone with your baking prowess, even if you’re not a seasoned decorator!
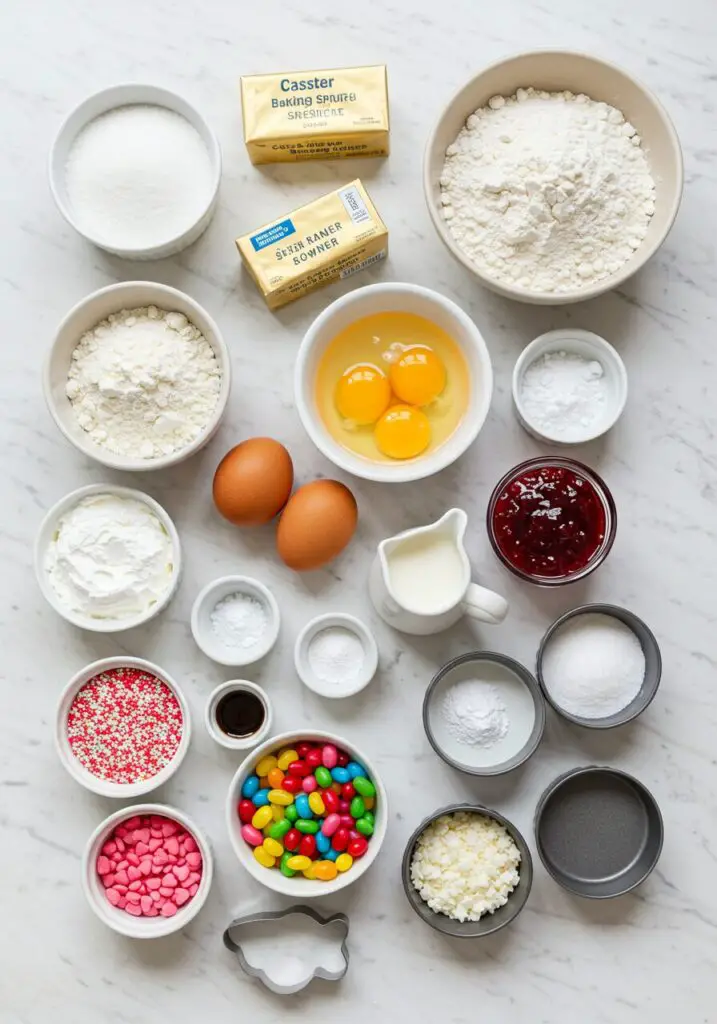
Your Shopping List for Piñata Cake Magic: Gather What You’ll Need
Creating this show-stopping Piñata Cake uses classic baking ingredients and a fun assortment of sweets. Here’s what you’ll want to grab to get started!
→ For the Light & Fluffy Sponge Cake Layers
- 500g (1lb 2oz) caster sugar: For sweetness and a fine crumb.
- 500g (1lb 2oz) baking spread: Plus extra for greasing. Ensures a moist, tender sponge.
- 9 free-range eggs, beaten: Binds the batter and adds richness.
- 500g (1lb 2oz) self-raising flour: Our leavening agent for a beautifully risen sponge.
- 2 tsp baking powder: Works with the self-raising flour for extra fluffiness.
→ For the Dreamy Buttercream Frosting
- 280g (10oz) unsalted butter, softened: The base for our rich, creamy frosting.
- 550g (1lb 4oz) icing sugar, sifted: For sweetness and smooth consistency.
- 1–2 tbsp full-fat milk: To achieve a smooth, spreadable buttercream.
- Red gel or paste food colouring: For creating that vibrant pink buttercream for swirls!
→ For the Colorful Surprise Filling
- 200g (7oz) raspberry jam: Adds a sweet, fruity layer between the cake sponges.
- 400g (14oz) mixed jelly beans: Or any sweets of your choice! This is our hidden treasure.
→ For Decorating Our Show-Stopper
- 4 tbsp pink cake sprinkles: Such as stars or strands, for festive flair.
- 2 tbsp white chocolate shapes: Such as stars or hearts, for elegant edible toppers.
→ Essential Equipment
- 4 x 20cm/8in cake tins: Crucial for baking our even cake layers.
- A large piping bag fitted with a large star nozzle: For piping beautiful swirls on top.
- An 8–9cm/3¼–3½in round biscuit cutter (or a small bowl to cut around): For creating the cavity in our cake.
Let’s Bake! Crafting Your Perfect Piñata Cake, Step-by-Step
This cake requires a few specific steps, but they are all very manageable. Take your time, enjoy the process, and you’ll create a truly unforgettable birthday masterpiece!
Part 1: Baking Our Fluffy Cake Layers
- Preheat Oven & Prep Tins: First things first! Preheat your oven to 180°C / 160°C Fan / Gas 4 (or 350°F / 325°F convection). Grease and line the bases of four 20cm (8-inch) cake tins with baking paper.
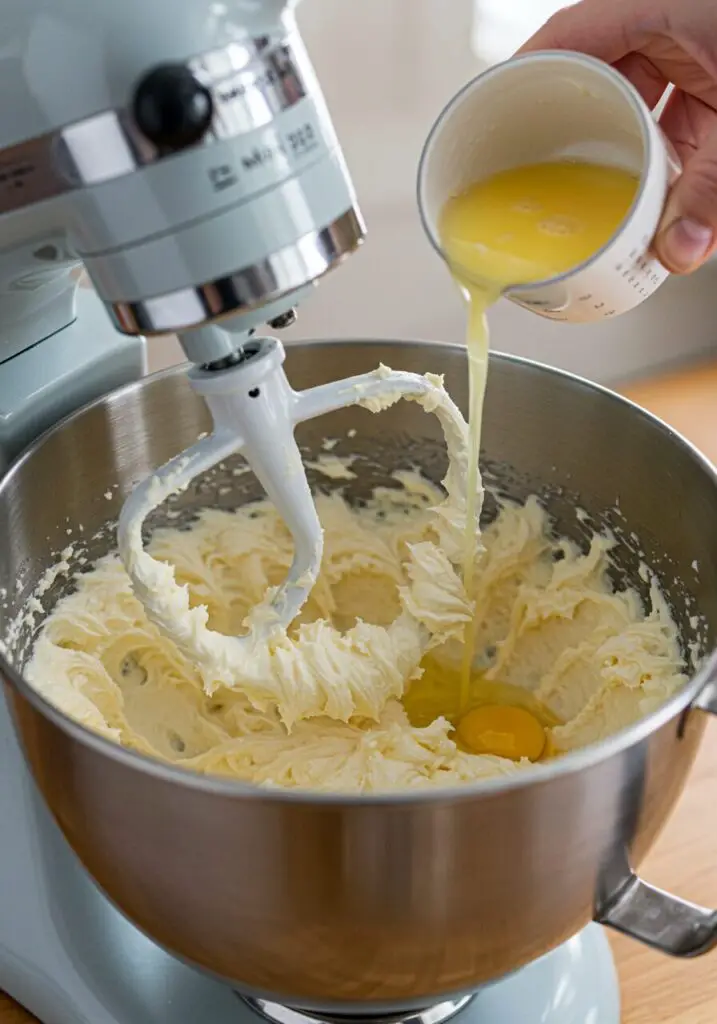
- Cream Butter & Sugar: In a freestanding mixer (with a paddle attachment) or a large bowl (using an electric hand whisk), cream the 500g caster sugar and 500g baking spread together until the mixture is beautifully pale and fluffy.
- Add Eggs: Gradually add the 9 beaten free-range eggs to the sugar mixture, little by little, ensuring you combine well after each addition until fully incorporated.
- Add Flour & Baking Powder: Sift in the 500g self-raising flour and 2 teaspoons baking powder. Continue to mix gently until everything is well combined and you have a smooth, cohesive cake batter.
- Bake Cake Layers: Divide the cake mixture equally between your four prepared cake tins. Bake for 30–35 minutes, or until well risen, golden brown, and springy to the touch. A skewer inserted into the center should come out clean.
- Cool Completely: Remove the cakes from the oven and leave them to cool in their tins for a few minutes before turning them out onto cooling racks. Let them cool completely here – this is crucial before assembly and frosting!
Part 2: Preparing the Creamy Buttercream
- Beat Butter: For the buttercream, in a freestanding mixer (with a paddle attachment) or a large bowl (using an electric hand whisk), beat the 280g softened unsalted butter for a full 5 minutes until it’s really soft, light, and pale.
- Add Icing Sugar & Milk: Gradually add the 550g sifted icing sugar in batches, mixing well between each addition, until it’s fully combined and forms a smooth frosting. Once combined, add a tablespoon of full-fat milk and mix until smooth. If the buttercream is still too stiff, add a little more milk, a tiny bit at a time, until you reach a perfect, spreadable consistency.
- Color Pink Buttercream: Transfer a quarter of the white buttercream (about 1.5 cups) to a separate bowl. Add a drop of red gel or paste food colouring to it. Mix until you achieve an even, vibrant pink color, adding more red coloring if you desire a darker shade. Leave the other larger bowl of buttercream white.

Part 3: Assembling Our Piñata Cake Masterpiece
- Level Cakes & Cut Holes: When the cakes are completely cool, use a large serrated knife to carefully remove any domed tops from the cakes, making them as flat as possible. Set aside one uncut cake layer. Using an 8–9cm (3¼–3½in) round pastry cutter (or a small bowl as a guide), cut out the center from three of the remaining cake layers. These holes need to be in the exact same place on each cake to create a continuous cavity.
- Stack & Fill Cavity: Place one cake layer (with a hole in it) on your chosen cake board, stand, or flat serving plate. Top this layer with a generous layer of white buttercream, spreading it evenly. Then, spread a layer of 200g raspberry jam over the buttercream. Continue stacking the cakes with holes in the same way, layering with white buttercream and jam, until you have three layers of cake on top of each other, all with a cavity in the center. Carefully fill this central cavity completely with your 400g mixed jelly beans (or chosen sweets!). Finally, place the uncut cake layer on top, ensuring the sides are straight and the top is flat.
- Crumb Coat the Cake: Crumb coat your cake! Spread a thin, even layer of the white buttercream all over the sides and top of the assembled cake, using a large palette knife. Don’t worry about perfection here; this layer is just to seal in any loose crumbs. Chill the cake in the refrigerator for 15–20 minutes to firm up the crumb coat.
- Final Icing & Sprinkles: When ready, take the chilled cake from the fridge. Decorate it by spreading the rest of the white buttercream all over the cake in a smooth, even layer, using a cake smoother or large palette knife. Don’t worry too much about the very top, as it will be covered with swirls of pink buttercream later. Arrange the 4 tablespoons of pink cake sprinkles around the bottom of the sides of the cake, coming about halfway up. Chill for another 30 minutes to set the buttercream.
- Pipe Swirls & Decorate Top: Place the pink buttercream into a large piping bag fitted with a large star nozzle. Pipe beautiful swirls of pink buttercream all over the top of the cake. Top each pink swirl with a white chocolate shape (like stars or hearts). Decorate the very top of the cake with a few more sprinkles. Serve and watch the magic unfold!
WiseRecipes’ Top Tips for Piñata Cake Success
This impressive cake is simpler than you think, but these WiseRecipes tips will help you achieve Piñata Cake mastery every single time!
- Accurate Cake Tins: Using four even 8-inch cake tins is crucial for creating the perfect height and stable layers for your piñata cake.
- Leveling is Key: Don’t skip leveling your cakes! Removing any domed tops with a serrated knife ensures your cake layers stack flat and straight, creating a neat cavity for your sweets.
- Consistent Cavity Cuts: When cutting the holes in three of your cake layers, make sure the cuts are in the exact same spot on each layer. This creates a uniform cavity for the sweets to burst out of. Use a cookie cutter or small bowl as a guide.
- The Power of the Crumb Coat: A crumb coat is your absolute best friend for a smooth, professional-looking cake! It traps all those pesky loose crumbs, ensuring your final layer of icing is perfectly pristine. Don’t rush this chilling step!
- Chill, Chill, Chill! The chilling steps (after the crumb coat and after the final icing) are vital. They firm up the buttercream, stabilize the cake, and make the final decorating much easier and neater.
- Room Temperature Butter: For both the sponge and the buttercream, ensure your butter is softened to room temperature. This is crucial for creaming it properly and achieving smooth, fluffy results.
Creative Twists: Delicious Ways to Customize Your Piñata Cake
This Piñata Cake is already a show-stopper, but it’s also a fantastic canvas for your culinary creativity! Here are some ideas I love to play with:
- Candy Mix: While jelly beans are fun, you can use any small, firm sweets you like! M&Ms, Skittles, mini chocolate chips, or even colorful sprinkles would be fantastic for that bursting effect.
- Different Cake Flavors: Feel free to experiment with the sponge! A chocolate sponge, funfetti sponge, or even a lemon sponge would be delicious alternatives. Just ensure they are moist and hold their shape.
- Fruit Puree Filling: Instead of raspberry jam, you could use a strawberry puree or a blueberry compote for a different fruity layer.
- Color Theme: Match your sprinkles, buttercream color, and even jelly beans to a specific party theme or the birthday person’s favorite colors!
- Hidden Messages: For an extra personal touch, you could even include a small, edible paper message (food-safe ink!) inside the candy cavity.
- Vegan/Nut-Free Options: For a vegan version, swap baking spread for vegan butter, eggs for flax eggs, milk for plant milk, and use vegan buttercream/jam/sweets. To make it nut-free, ensure all ingredients (especially sprinkles/chocolate shapes) are certified nut-free.
Keep It Fresh: Storing Your Spooktacular Piñata Cake
You’ve created something truly special, so let’s make sure it stays fresh and delicious!
- Refrigerator Storage: This Piñata Cake, once fully assembled and frosted, will keep beautifully, covered, in the refrigerator for up to 3-4 days. Allow it to sit at room temperature for about 30 minutes before serving for the best flavor and texture.
- Freezing Baked Cake Layers (Un-frosted): You can freeze the baked and completely cooled cake layers (before leveling or frosting!). Wrap each layer tightly in plastic wrap, then in foil. Freeze for up to 1-2 months. Thaw overnight in the refrigerator, then bring to room temperature before leveling, frosting, and assembling.
- Freezing Buttercream: The buttercream (both white and pink) can be frozen in airtight containers for up to 1 month. Thaw overnight in the fridge, then bring to room temperature and re-whip with an electric mixer until fluffy again before piping.
- Assembling Fresh: For the absolute best presentation and “wow” factor, I highly recommend assembling and decorating the cake within a day or two of serving.
Piñata Cake (Pure Joy! The Birthday Surprise Everyone Will Love!)
Ingredients
Equipment
Method
- Preheat the oven to 180C/160C Fan/Gas 4. Grease and line the bases of four 20cm/8in cake tins with baking paper.
- In a freestanding mixer or large bowl, cream the sugar and baking spread until pale and fluffy. Gradually add the eggs, combining well after each addition. Sift in the flour and baking powder and continue to mix until well combined.
- Divide the cake mixture equally between the prepared cake tins and bake for 30–35 minutes, until well risen, golden brown and springy to the touch. Remove and leave to cool completely on cooling racks.
- For the buttercream, beat the butter for 5 minutes. Add the icing sugar in batches, mixing well. Once combined, add a tablespoon of milk and combine until smooth, adding more milk if too stiff.
- Transfer a quarter of the buttercream to a separate bowl and add a drop of red food colouring. Mix until an even color. Leave the larger bowl of buttercream white.
- When cakes are cool, use a serrated knife to remove any domed tops (level them). Set aside the uncut cake. Using a 8–9cm/3¼–3½in round cutter, cut out the centre from three of the cakes.
- Place one cake (with a hole) on a cake board. Top with white buttercream and jam. Continue stacking three layers (each with buttercream/jam) to create a cavity. Fill cavity with jelly beans. Place the final uncut cake layer on top.
- Crumb coat the cake by spreading a thin layer of white buttercream all over the sides and top. Chill for 15–20 minutes.
- Spread the rest of the white buttercream all over the cake in a smooth layer. Arrange the pink sprinkles around the bottom of the sides (halfway up). Chill for about 30 minutes.
- Place the pink buttercream into a large piping bag fitted with a large star nozzle. Pipe swirls of pink buttercream all over the top. Top each swirl with a white chocolate shape. Decorate top with more sprinkles. Serve.
Notes
FAQs: Your Top Piñata Cake Questions, Answered!
Q: Can I use fewer cake tins if I only have two?
A: Yes, you can! If you only have two cake tins, you can bake two thicker cake layers, then slice each cooled layer horizontally in half to create four thinner layers. This will add a step but achieve the same layered effect. Ensure your tins are the correct size (20cm/8in).
Q: My buttercream is too stiff/runny. How do I fix it?
A: If your buttercream is too stiff, gradually beat in a tiny bit more milk (½ teaspoon at a time) until it reaches a smooth, spreadable, and pipeable consistency. If it’s too runny, gradually beat in more sifted icing sugar, a tablespoon at a time, until it thickens.
Q: What kind of sweets are best for the piñata filling?
A: Small, relatively light, and colorful candies are best! Jelly beans, M&Ms, Skittles, small gumballs, or even nonpareil sprinkles work wonderfully. Avoid anything too heavy (which could break the cake structure) or anything sticky that might adhere to the cake.
Q: How do I get my cake layers completely flat?
A: After baking and cooling, use a long, sharp serrated knife to carefully slice off any domed tops from your cake layers. Place the cake upside down on a flat surface to help guide you, ensuring you create a perfectly flat top for easy stacking.
Q: Can I make this a chocolate piñata cake?
A: Absolutely! To make a chocolate sponge, you would adjust the flour quantity by replacing about 50g of the self-raising flour with unsweetened cocoa powder. Ensure to keep the leavening agents the same. The rest of the assembly and decoration would remain the same, perhaps with chocolate sprinkles!
And there you have it, my friends—your guide to crafting the most delightful, impressive, and truly unforgettable Piñata Cake! This WiseRecipes creation is more than just a dessert; it’s a testament to how simple ingredients, when treated with a little love and smart steps, can come together to create something truly extraordinary. It’s a vibrant, exciting meal that you’ll genuinely look forward to eating, day after day.
I am genuinely so excited for you to try these and experience the delicious magic yourself. Please, please come back and let me know in the comments below what your favorite part of this spectacular birthday cake was, or any fun twists you tried! Happy cooking from WiseRecipes!