The Ultimate Neapolitan Drip Cake (A Show-Stopper Recipe!)
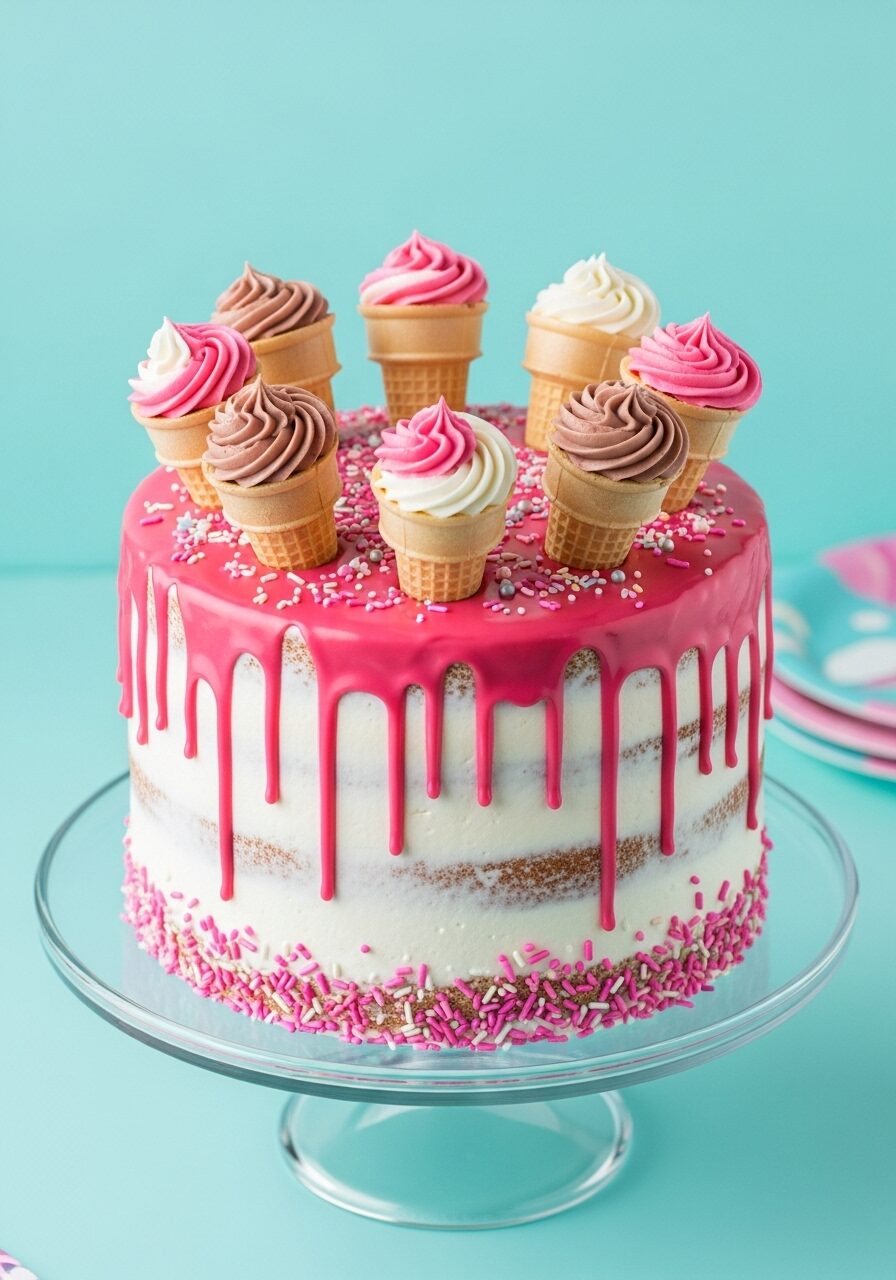
Imagine a cake that is a true feast for the eyes and the palate: four tall layers of moist, marbled chocolate, vanilla, and strawberry cake, enveloped in a silky-smooth Swiss meringue buttercream. Now, picture a vibrant pink ganache dripping artfully down the sides, all crowned with a whimsical rosette of miniature ice cream cones. This,…
Imagine a cake that is a true feast for the eyes and the palate: four tall layers of moist, marbled chocolate, vanilla, and strawberry cake, enveloped in a silky-smooth Swiss meringue buttercream. Now, picture a vibrant pink ganache dripping artfully down the sides, all crowned with a whimsical rosette of miniature ice cream cones. This, my friends, is the magic of the Neapolitan Drip Cake, and it is, without a doubt, the most spectacular and joyful cake you will ever create.
Here’s the thing about a cake like this: it looks like it came from a high-end boutique bakery, and it can feel incredibly intimidating. I used to be daunted by multi-layered cakes, Swiss meringue buttercream, and perfect ganache drips. But I’ve learned that the secret isn’t about being a professional pastry chef; it’s about breaking down a grand project into a series of simple, manageable steps. This recipe is your foolproof guide to doing just that.
I promise you, there is no greater baking triumph than presenting a cake that makes everyone gasp. The classic, nostalgic flavors of Neapolitan ice cream are reborn in this sophisticated, stunning creation. It is a true show-stopper, perfect for a milestone birthday, a special celebration, or any time you want to create a truly unforgettable dessert moment.
Get ready to demystify the art of the celebration cake and create a stunning, professional-looking masterpiece that will have everyone convinced you’re a baking genius.

Why This Neapolitan Cake Is an Absolute Masterpiece!
You are going to be so incredibly proud of this cake. It’s a true labor of love that is worth every single step. Here’s why this recipe is the one to try:
- A Stunning Show-Stopper: From the tall layers and the vibrant pink drip to the adorable mini ice cream cone decorations, this cake is a true work of art that will be the centerpiece of any party.
- Classic Flavors, Elevated: The beloved combination of strawberry, vanilla, and chocolate is beautifully represented in both the tender marbled cake and the swirl of fluffy buttercream.
- Silky, Not-Too-Sweet Buttercream: Swiss meringue buttercream is famously smooth, stable, and less sweet than traditional American buttercream, allowing the cake’s flavors to shine.
- A Step-by-Step Foolproof Guide: We’re breaking down what looks like a complex process into clear, easy-to-follow steps with all the tips you need for success.
- Perfect for Any Celebration: This cake’s fun, whimsical design makes it perfect for birthdays, baby showers, or any occasion that calls for a truly special and memorable dessert.
Recipe Snapshot
| Prep Time | 1 hour |
| Cook Time | 40 minutes |
| Rest & Chill Time | 1 hour |
| Total Time | 2 hours 40 minutes |
| Servings | 8-16 servings |
| Course | Dessert |
| Cuisine | American |
| Difficulty/Method | Advanced / Baking |
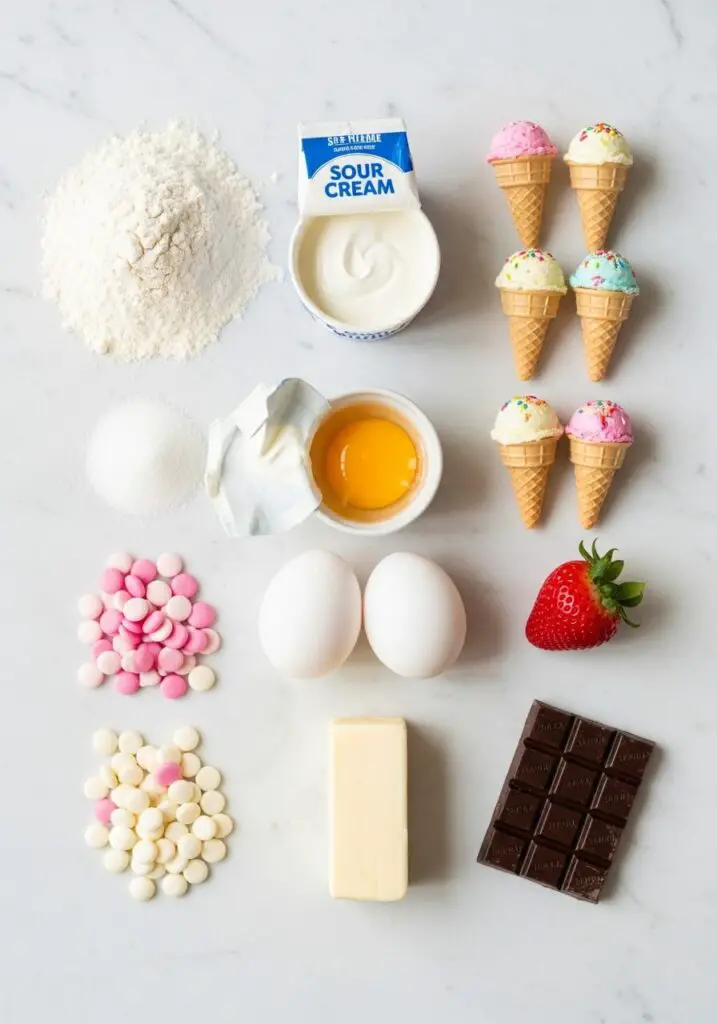
Your Shopping List for This Celebration Cake
A show-stopper cake requires a specific set of ingredients. Precision is key, so a kitchen scale can be very helpful here!
→ For the Marbled Neapolitan Cake Layers
- 1 box white cake mix (16.25 oz.) → Our secret shortcut for a reliably moist and tender crumb.
- 1 cup all-purpose flour → To add structure and a more homemade taste.
- 1 cup granulated sugar → For sweetness.
- Generous pinch of salt → To balance the sweetness.
- 1 cup sour cream → The key ingredient for a rich, moist, and tender cake.
- 1 cup cold water → For hydration.
- 3 large eggs → The binder that gives our cake structure.
- 1 teaspoon vanilla extract → For the vanilla layer.
- 1 tablespoon strawberry extract → For the authentic strawberry layer.
- 2-4 drops neon pink gel food color → To give the strawberry layer its beautiful color.
- 1/4 cup unsweetened dark cocoa powder, sifted → For a rich, deep chocolate layer.
- 2 tablespoons water → To help incorporate the cocoa powder.
→ For the Silky Swiss Meringue Buttercream
- 8 large egg whites (about 1 cup) → The foundation of our stable, fluffy meringue.
- 2 cups granulated sugar → To sweeten and stabilize the meringue.
- 1/4 teaspoon fine grain salt → To enhance the flavor.
- 3 cups unsalted butter → Must be at room temperature, but still cool to the touch.
- 1 teaspoon vanilla extract → For the vanilla portion.
- 1 teaspoon strawberry extract & 2 drops pink gel food color → For the strawberry portion.
- 1/4 cup semisweet chocolate chips, melted and cooled → For the chocolate portion.
→ For the Drip and Decors
- 8 miniature ice cream cones → For the adorable topping.
- 6 oz. bright pink candy melting wafers → The base for our perfect, easy drip.
- 2 oz. white candy melting wafers → To lighten the pink to the perfect shade.
- 1/4 cup heavy cream → To create the ganache.
- 3 drops strawberry candy flavoring oil → Crucial for flavoring the ganache without causing it to seize!
- Pink jimmies & white nonpareils → For the final festive touch!
Let’s Get Baking! Your Step-by-Step Cake Guide
Ready to create a masterpiece? This is a project, so read through all the steps, take a deep breath, and let’s have some fun!
Part 1: The Marbled Neapolitan Cake Layers
- Prep Oven and Pans: Preheat your oven to 350°F. Thoroughly grease and flour four 6-inch round cake pans.
- Mix the Batter: In a large bowl, whisk the cake mix, flour, sugar, and salt. In a separate large measuring cup, whisk the sour cream, water, eggs, and vanilla. With your mixer on low, slowly pour the wet ingredients into the dry. Scrape the bowl and mix again until just combined.
- Divide and Flavor: Divide the batter evenly among 3 bowls. To the first, stir in the strawberry extract and pink food color. To the second, stir in the sifted cocoa powder and 2 tbsp water. Leave the third bowl plain (vanilla).
- Marble and Bake: Place alternating dollops of the three batters into each of the four prepared pans. Use a butter knife to gently swirl the batters together once or twice to create a marbled effect. Bake for 25-30 minutes, or until a toothpick inserted in the center comes out clean. Cool completely on a wire rack, then level the tops with a serrated knife.
Part 2: The Silky Swiss Meringue Buttercream
- Heat the Meringue Base: Set a saucepan with a few inches of simmering water on the stove. In a large, heatproof bowl, combine the egg whites, sugar, and salt. Place the bowl over the simmering water (like a double boiler) and whisk intermittently until the sugar has completely dissolved and the mixture is hot (110°F).
- Whip to Stiff Peaks: Transfer the hot mixture to the bowl of a stand mixer fitted with the whisk attachment. Beat on high speed for about 10 minutes, until a thick, glossy, stiff-peaked meringue has formed and the outside of the bowl is cool to the touch.
- Add the Butter: Switch to the paddle attachment. With the mixer on medium-low, add the room temperature butter one cube at a time. The meringue will deflate and may look curdled—this is normal! Keep mixing.
- Whip Until Fluffy: Once all the butter is added, turn the mixer up to high and beat for about 5 minutes until the buttercream comes together and is light, white, and fluffy. Beat in the vanilla extract.
Part 3: Assemble, Frost, and Chill
- Fill and Crumb Coat: Place your first cake layer on a turntable or serving plate. Spread a thin layer of the vanilla buttercream on top. Repeat with the remaining layers. Apply a thin, even “crumb coat” of buttercream over the entire outside of the cake to trap any loose crumbs. Chill the cake in the fridge for 20 minutes until firm.
- Final Coat: Apply a final, generous coat of buttercream to the chilled cake. Use a bench scraper or large offset spatula to get the sides and top as smooth as possible. Chill again until firm.
Part 4: The Adorable Mini Ice Creams
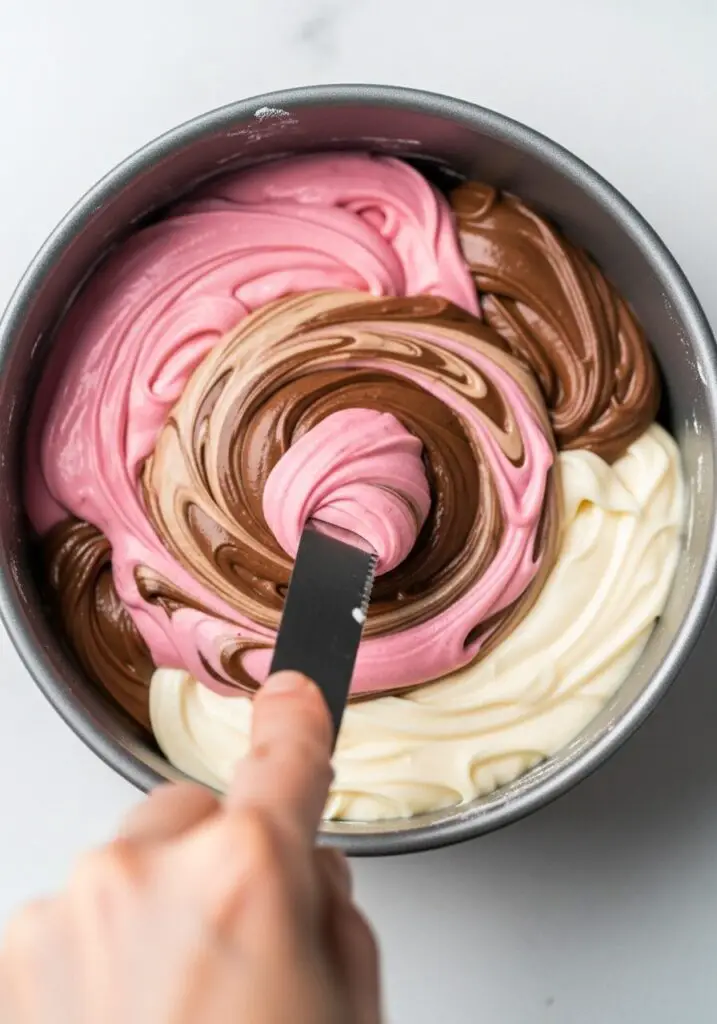
- Flavor the Buttercream: Reserve about 1 cup of the buttercream. Divide it evenly between 3 small bowls. Stir the pink food color and strawberry extract into one, the melted chocolate into the second, and leave the third plain.
- Create the Swirl: Layer the three flavored buttercreams side-by-side on a sheet of plastic wrap and roll it into a tube. Snip one end and place it into a piping bag fitted with a large open star tip.
- Pipe and Decorate: Pipe a beautiful three-colored swirl into each of your 8 miniature ice cream cones. Top with white nonpareils and refrigerate until set.
Part 5: The Perfect Pink Drip and Final Touches
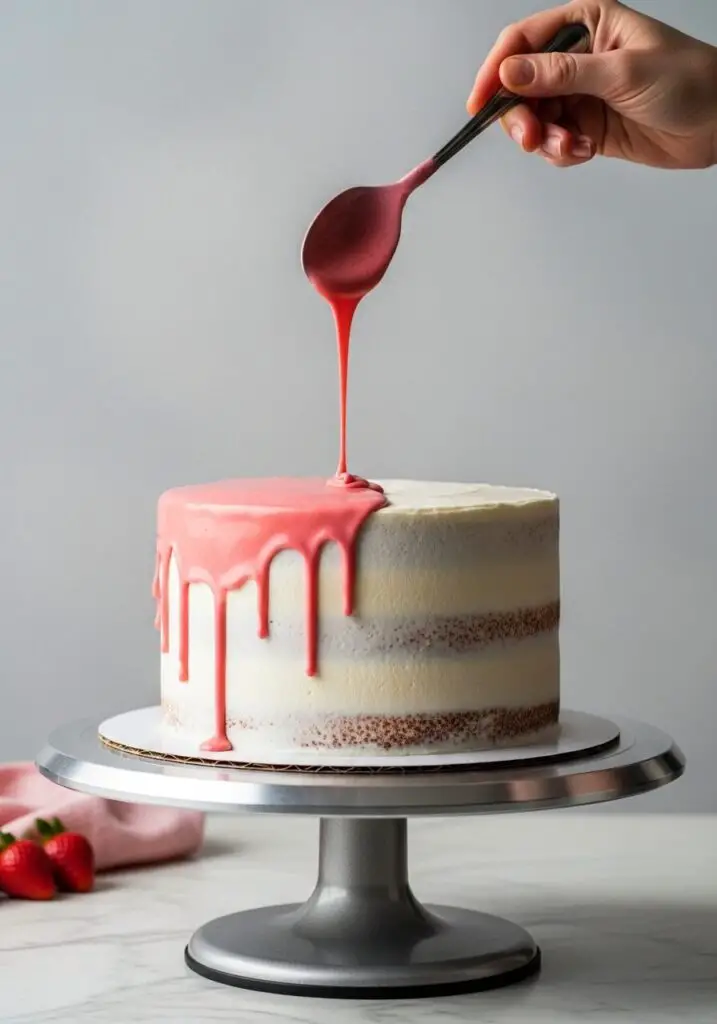
- Make the Ganache: In a microwave-safe bowl, combine the pink and white candy melts with the heavy cream. Heat for 1 minute, let stand for 1 minute, then whisk until smooth. Stir in the strawberry candy flavoring oil. Let the ganache cool until it’s barely warm but still pourable.
- Apply the Drip: Remove the chilled cake from the fridge. Spoon the ganache around the top edge of the cake, gently nudging it over the side to create drips. Then, pour the remaining ganache in the center and spread it to the edges.
- Decorate!: Arrange the chilled mini ice cream cones on top of the cake in a circle. Scatter the pink jimmies and white nonpareils over the top and sides of the cake. Refrigerate until you’re ready to serve!
WiseRecipes’ Top Tips for Cake Mastery
This is a project cake, but these essential tips will guide you to a stunning success.
- Room Temperature is Key (Usually). For the cake batter, having your sour cream and eggs at room temperature will result in a smoother, more uniform batter. For the buttercream, the butter must be at room temperature—cool to the touch but not soft or greasy—to incorporate properly.
- Don’t Fear the Curdle! When you add the butter to the meringue, the buttercream will look like a curdled, separated mess. This is a normal and expected part of the process! Just keep the mixer running on high, and it will magically come together into a silky, smooth frosting.
- Chilling is Your Best Friend. Chilling the cake is a non-negotiable step. A firm crumb coat is essential for a smooth final coat of frosting. A cold, firm cake is also essential for a perfect ganache drip—if the cake is warm, the drips will run all the way to the bottom.
- Use Oil-Based Candy Flavoring. The recipe note is crucial: you must use an oil-based candy flavoring for the ganache. A regular water- or alcohol-based extract will react with the fats in the candy melts and cause your beautiful ganache to “seize” into a thick, unusable paste.
- Test Your Ganache Temperature. Before you pour it on your cake, test the drip. Let a small spoonful drip down the side of a cold glass. If it runs too fast, the ganache is too warm. If it’s too sluggish, it’s too cold. Wait until it creates the perfect speed drip on your test glass.
Show-Stopper Neapolitan Drip Cake
Ingredients
Method
- Preheat oven to 350°F. Grease and flour four 6-inch round cake pans.
- Whisk together cake mix, flour, sugar, and salt in a mixer bowl. In a separate bowl, whisk together sour cream, water, eggs, and vanilla. On low speed, gradually pour wet ingredients into dry until just combined.
- Divide batter evenly between 3 bowls. To the first, add strawberry extract and pink food color. To the second, stir in cocoa powder and 2 tbsp water. Leave the third plain.
- Place alternating dollops of each batter into the prepared pans. Use a butter knife to gently swirl the batters once or twice.
- Bake for 25-30 minutes, or until a toothpick comes out clean. Cool completely on a wire rack, then level the cakes.
- In a heatproof bowl over simmering water, whisk egg whites, sugar, and salt until sugar dissolves and mixture is hot (110°F).
- Transfer to a stand mixer with the whisk attachment. Beat on high for 10 minutes until a thick, glossy, cool meringue forms.
- Switch to the paddle attachment. On medium-low, beat in the room temperature butter one cube at a time. Once all butter is added, beat on high for 5 minutes until light and fluffy. Beat in vanilla extract.
- Assemble the cake by alternating cake layers and thin layers of buttercream. Apply a thin crumb coat to the entire cake and chill for 20 minutes until firm. Apply a final smooth coat of buttercream and chill again.
- Reserve 1 cup of buttercream and divide it into 3 bowls. Flavor one with strawberry extract and pink color, one with melted chocolate, and leave one plain. Layer these on plastic wrap, roll into a tube, and place in a piping bag with a star tip.
- Pipe swirled frosting into the miniature ice cream cones, top with nonpareils, and refrigerate for 10 minutes.
- To make the ganache, microwave the pink and white candy melts with the heavy cream for 1 minute. Let stand 1 minute, then whisk until smooth. Stir in the strawberry candy oil. Let cool until barely warm but still pourable.
- Spoon the ganache over the top edge of the chilled cake to create drips, then fill in the center.
- Arrange the chilled ice cream cones on top of the cake. Decorate with pink jimmies and white nonpareils. Refrigerate until 1-2 hours before serving.
Notes
Keep It Fresh! Storing Your Masterpiece
A cake this special deserves to be stored properly to maintain its beauty and flavor.
- Refrigerator: Because of the Swiss meringue buttercream, this cake should be stored in the refrigerator. It will keep well in a cake box or covered container for up to 4 days.
- Serving: For the best flavor and texture, this is very important! Remove the cake from the refrigerator 1-2 hours before you plan to serve it. This allows the buttercream to soften from rock-hard to silky-smooth and brings out the flavor of the cake layers.
FAQs: Your Neapolitan Cake Questions, Answered!
This seems like a lot of work. Can I make parts of it ahead of time?
Absolutely! This is the best way to tackle a project cake. You can bake, cool, and level the cake layers up to a month in advance—just wrap them well and freeze them. You can also make the full batch of Swiss meringue buttercream and store it in an airtight container in the fridge for up to a week (you will need to let it come to room temperature and re-whip it until smooth before using).
Can I make this in 8-inch or 9-inch pans instead?
Yes, but you will need to adjust. This recipe is designed for four 6-inch layers to create a tall cake. You could bake the batter in two 8-inch or 9-inch pans instead. The baking time will likely be longer (start checking around 35-40 minutes), and you will have a shorter, wider cake with two layers instead of four.
Where can I find miniature ice cream cones?
Miniature cones can sometimes be found in the ice cream aisle of larger grocery stores. The recipe also mentions “Mellow Cones candies,” which are marshmallow-filled candy cones that can be used. If you can’t find either, you could decorate the top with beautiful swirls of the Neapolitan buttercream instead.
Can I use regular American buttercream?
You can, but the result will be much sweeter and the texture will be different. Swiss meringue buttercream is known for being incredibly silky and stable, which is ideal for a tall layer cake like this one. If you use American buttercream, you may want to reduce the sugar slightly to avoid it being overly sweet.
Final Thoughts: Your Sweetest Celebration
There is no feeling quite like creating a truly spectacular celebration cake from scratch. This Neapolitan Drip Cake is a joyous, whimsical, and utterly delicious project that is worth every moment. I hope this guide empowers you to create a stunning centerpiece that will make your next celebration even more memorable. Happy baking!