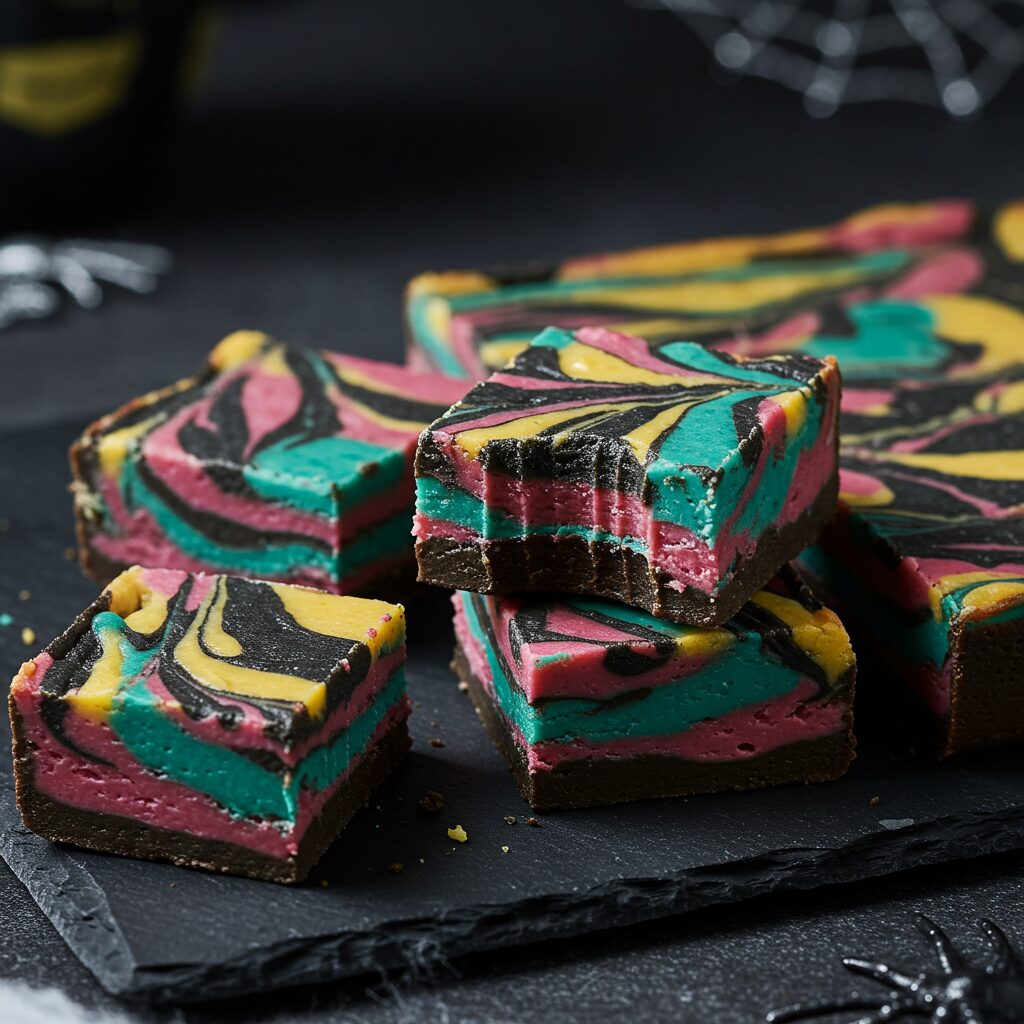
The Ultimate Nightmare Before Christmas Fudge (A Spooky, Swirly Treat!)
Hello, my friends, and welcome to a recipe that is pure, whimsical, spooky fun! If you, like me, believe that the magic of Halloween Town can be celebrated all year long, then you are in for an absolute treat. Today, we are creating a delicious tribute to one of our favorite characters with this incredible…
Hello, my friends, and welcome to a recipe that is pure, whimsical, spooky fun! If you, like me, believe that the magic of Halloween Town can be celebrated all year long, then you are in for an absolute treat. Today, we are creating a delicious tribute to one of our favorite characters with this incredible Nightmare Before Christmas Fudge. I want you to imagine a rich, creamy, and decadent white chocolate fudge, swirled with the beautiful, moody colors of Sally’s iconic patchwork dress—black, pink, yellow, and teal.
This isn’t just a dessert; it’s an edible piece of art that is so much fun to make. And the best part? It’s an incredibly simple, no-bake fudge that comes together right on your stovetop. It has a wonderfully sweet, creamy flavor with a cool hint of peppermint that makes it perfect for both Halloween and Christmas celebrations. This is the recipe that will have everyone at your party marveling at your creative genius!
Why This is The Perfect Themed Treat
This recipe is a true joy to make and share. It’s a guaranteed showstopper that’s as delicious as it is beautiful.
- A Perfect Tribute to Sally: The four-color swirl is a beautiful, edible nod to Sally’s patchwork dress, making it instantly recognizable and beloved by any fan of the movie.
- Deceptively Easy to Make: While it looks incredibly impressive, this is a very simple no-bake fudge recipe. The base comes together in one pot in about 5 minutes!
- Incredibly Creamy & Delicious: The combination of white chocolate, sweetened condensed milk, and a touch of marshmallow fluff creates a fudge that is perfectly soft, creamy, and never grainy.
- A Fun, Artistic Process: Dividing and coloring the fudge, then dropping and swirling it in the pan is a really fun, creative process. It’s a fantastic project to do with older kids!
- The Perfect Party Centerpiece: A platter of these colorful, spooky-chic fudge squares is the ultimate centerpiece for any Halloween party, Christmas gathering, or movie-watching night.
Gather Your Magical Ingredients: What You’ll Need
Let’s get our simple, colorful ingredients ready for this fun project.
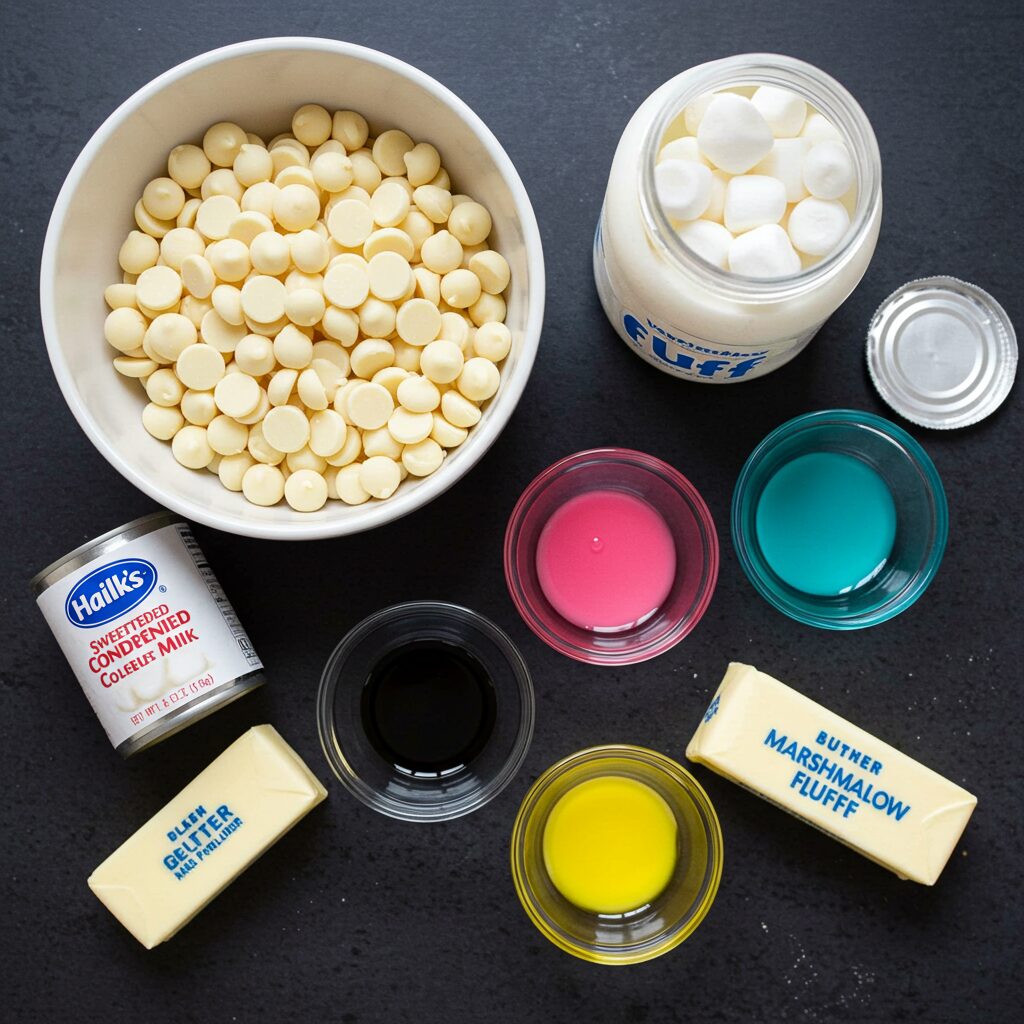
- 3 ½ cups White Chocolate Chips
- 1 (14-oz.) can Sweetened Condensed Milk
- 3 Tbsp. Marshmallow Fluff (or Creme)
- 2 Tbsp. Unsalted Butter
- ¼ tsp. Vanilla Bean Paste or ½ tsp. Vanilla Extract
- ½ tsp. Peppermint Extract
- Gel Food Coloring: Black, pink, yellow, and teal. Gel coloring is a must for vibrant colors!
Crafting Your Fudge: Step-by-Step Guide
Let’s make some spooky, swirly magic. Remember to work quickly once the fudge is made!
- Prep Your Pan: First, let’s get our pan ready. Line an 8×8-inch baking pan with two pieces of parchment paper, creating a “cross” shape with overhang on all four sides. This will create a “sling” that makes it incredibly easy to lift the finished fudge out of the pan. You can use binder clips to hold the parchment in place.
- Melt the Fudge Base: In a medium saucepan over low heat, combine the white chocolate chips and the sweetened condensed milk. Cook, stirring occasionally, until the chips are completely melted and the mixture is smooth. This should take about 5 minutes. It’s important to use low heat to prevent the white chocolate from seizing.
- Add the Final Touches: Stir in the Marshmallow Fluff, butter, vanilla, and peppermint extract. Continue to cook and stir for about one more minute until everything is well combined, heated through, and perfectly smooth.
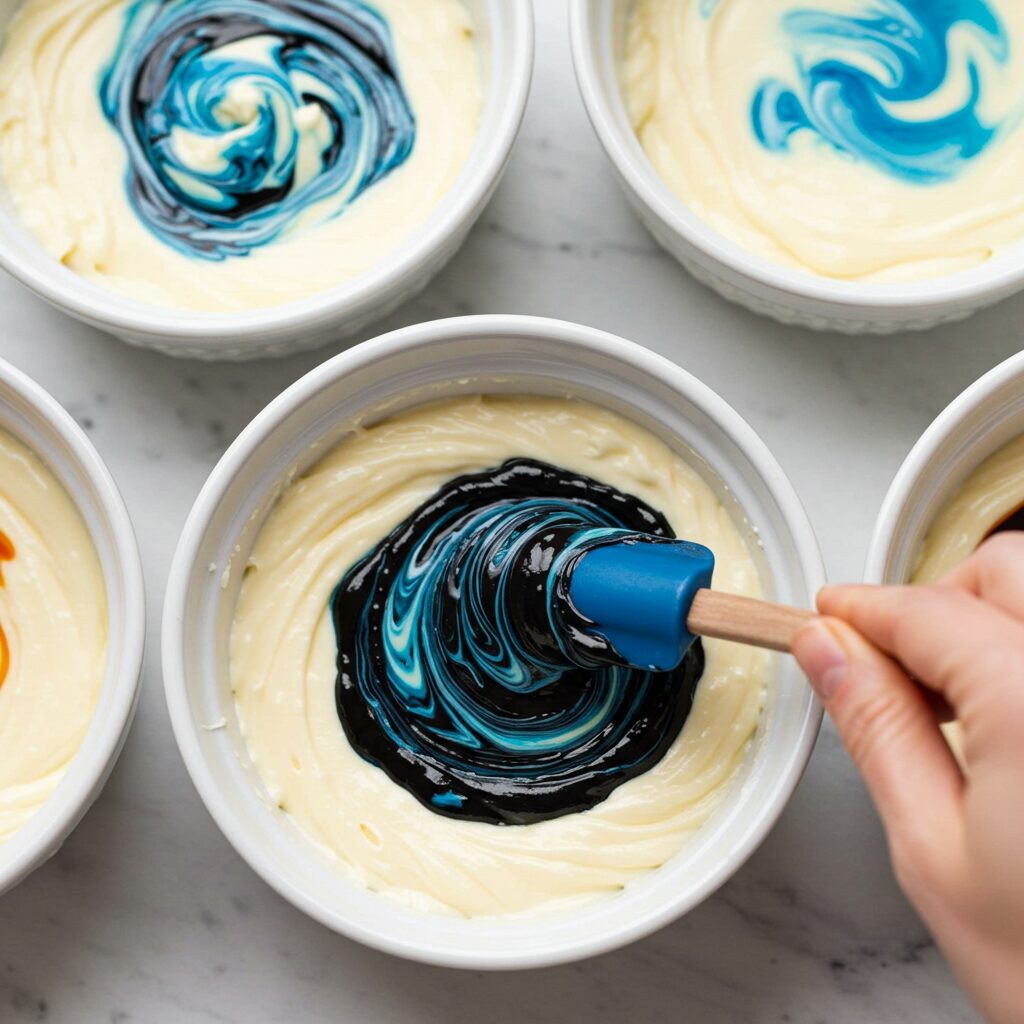
- Divide and Color (Work Quickly!): Now for the fun, artistic part! Working quickly so the fudge doesn’t set, divide the hot fudge mixture evenly among four medium bowls (it will be about 1 cup per bowl). Add about 4 drops of black gel food coloring to one bowl, and about 2 drops of pink, yellow, and teal to the remaining three bowls, one color per bowl. Stir each bowl well to combine, adding a drop or two more of food coloring until you reach your desired vibrant, spooky colors.
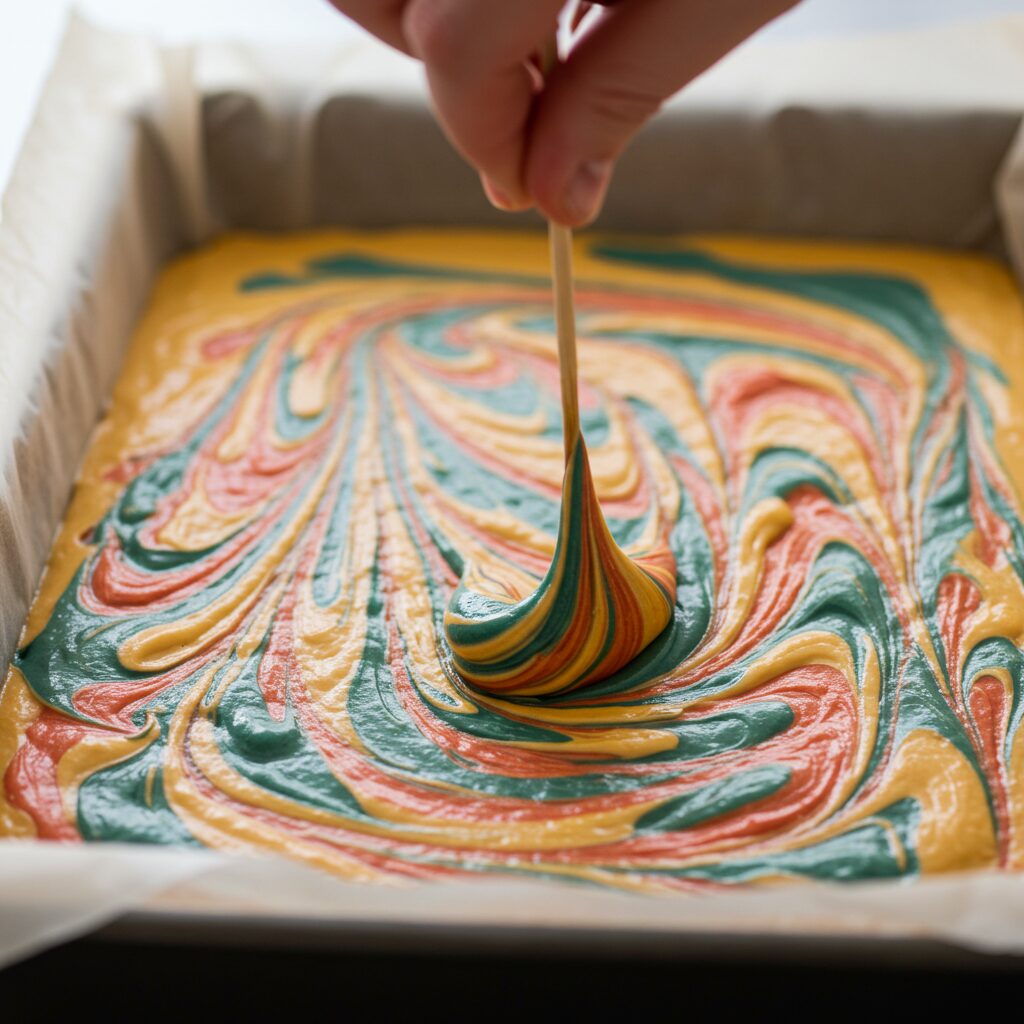
- Create the Patchwork: Drop a few large spoonfuls of each of the four colored fudges randomly into your prepared pan. Continue alternating colors until all the fudge is in the pan, creating a random, patchy pattern.
- Swirl and Chill: Take a toothpick or a paring knife and gently drag it through the fudge a few times to swirl the colors together and create a beautiful, marbled, patchwork effect. Be careful not to over-swirl, or the colors will become muddy. Refrigerate the fudge until it is completely set, at least 2 hours or up to overnight.
- Cut and Serve: Once the fudge is firm, use the parchment paper overhang to lift the entire block out of the pan and onto a cutting board. Cut into small, 1-inch squares and serve.
Wise Tips for Fudge Success
- Low Heat is Your Best Friend: White chocolate can be delicate and is prone to seizing or becoming grainy if it gets too hot. The key to a perfectly smooth fudge is to melt everything over a consistent, low heat.
- Use Gel Food Coloring: For the most vibrant, intense colors without watering down your fudge, gel food coloring is a non-negotiable. Liquid food coloring will add too much moisture and can affect how your fudge sets.
- The Art of the Swirl: When you’re swirling the colors together, less is more! Just a few gentle drags with a toothpick is all you need to create a beautiful effect. Over-mixing will cause the beautiful colors to blend into a murky brown.
Nightmare Before Christmas Fudge
Ingredients
Method
- Line an 8″ x 8″ pan with two pieces of parchment paper in a cross shape, with overhang on all sides.
- In a medium pot over low heat, cook white chocolate chips and sweetened condensed milk, stirring, until melted and smooth, about 5 minutes. Add Marshmallow Fluff, butter, vanilla, and peppermint extract and stir for 1 minute until well combined.
- Working quickly, divide the fudge among 4 medium bowls. Add a few drops of a different gel food coloring to each bowl (black, pink, yellow, teal) and mix until the desired color is reached.
- Drop spoonfuls of each colored fudge randomly into the prepared pan. Use a toothpick to gently swirl the colors together. Refrigerate until set, at least 2 hours. Use the parchment overhang to lift the fudge out and cut into squares.
Frequently Asked Questions (FAQ) – Nightmare Before Christmas Fudge
- Can I use a different kind of chocolate?
For this specific recipe, you need to use white chocolate because it’s the only kind that can be colored to create the patchwork effect. - What if I can’t find Marshmallow Fluff?
You can substitute the Marshmallow Fluff by melting down about 1 cup of mini marshmallows with the butter and extracts. The fluff just adds a wonderful, soft texture. - Can I use different colors?
Absolutely! This swirling technique is perfect for any occasion. You could use red and green for a more traditional Christmas fudge, or orange and black for a classic Halloween theme. - How do I store this fudge?
Store the fudge in an airtight container in the refrigerator for up to two weeks. It’s best served chilled, as it will be nice and firm.
Conclusion
This Nightmare Before Christmas Fudge is such a fun, creative, and delicious way to celebrate your favorite spooky-sweet movie. It’s a simple, no-bake project that results in a truly impressive and memorable treat. That creamy, peppermint-kissed bite and the beautiful, artistic swirls are a perfect tribute to the magic of Halloween Town. I hope you have a blast creating your own little edible work of art!