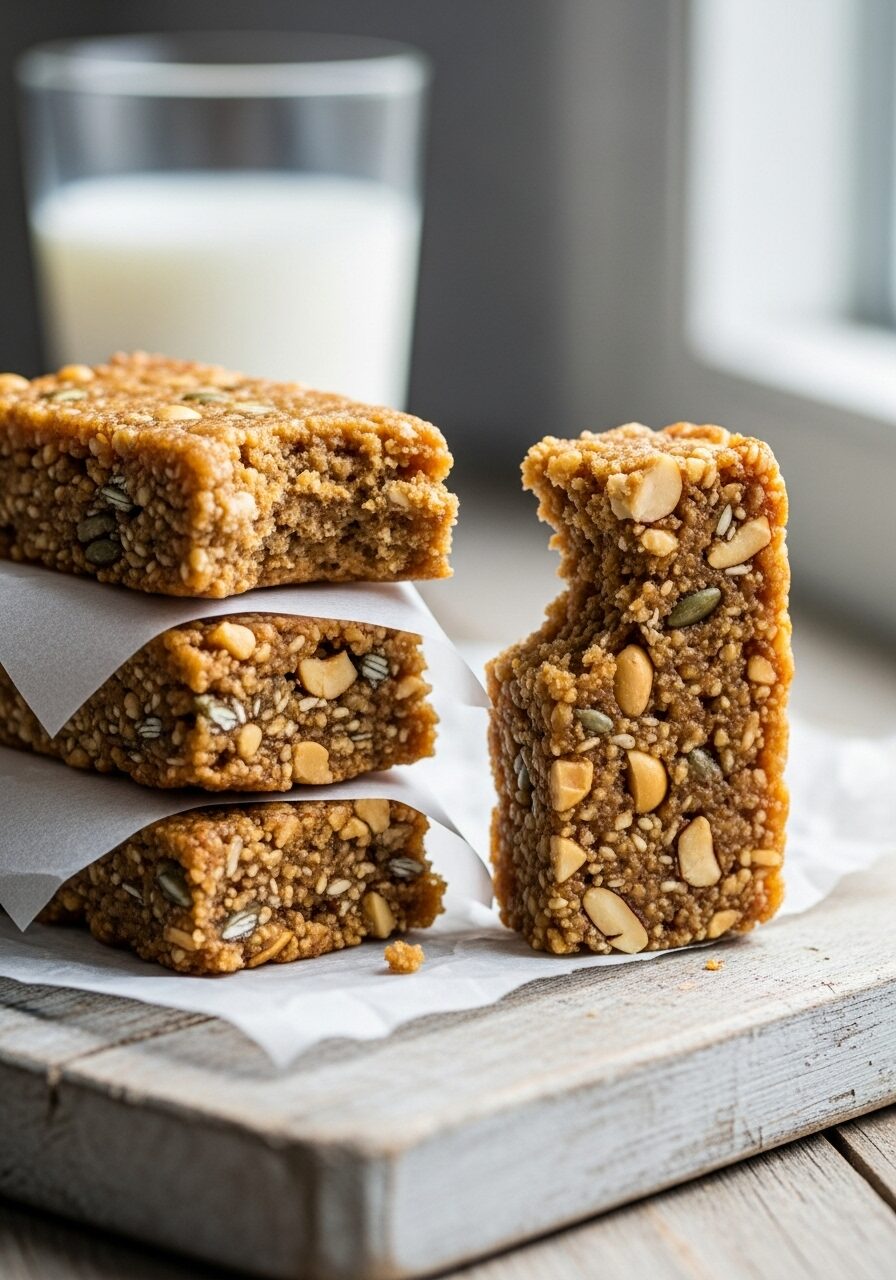
The Best No-Bake Apple Peanut Butter Granola Bars (So Easy!)
Let’s talk about that 3 PM slump. You know the one—when you need a snack that’s both satisfying and genuinely good for you. These no-bake apple peanut butter granola bars are the answer. Imagine the perfect blend of a chewy granola bar and a classic peanut butter and apple sandwich, all packed into a convenient,…
Let’s talk about that 3 PM slump. You know the one—when you need a snack that’s both satisfying and genuinely good for you. These no-bake apple peanut butter granola bars are the answer. Imagine the perfect blend of a chewy granola bar and a classic peanut butter and apple sandwich, all packed into a convenient, grab-and-go bar that tastes like an absolute treat.
My kitchen is always on a mission to create the perfect homemade snack bar, and this recipe was a total breakthrough. I wanted something that didn’t require turning on the oven, was naturally sweetened, and had that incredible chewy texture I love. The secret weapon? Medjool dates! They blend into a sweet, caramel-like paste that holds everything together perfectly, no baking required.
I promise you, these bars are ridiculously easy to make and are packed with wholesome ingredients like oats, seeds, and fruit to keep you energized. The flavor is a beautiful balance of salty roasted peanuts, sweet apples, and rich peanut butter. They are the ultimate meal-prep snack for lunchboxes, after-school fuel, or your own personal pick-me-up.
Get ready to master a simple, no-bake technique that will have you ditching store-bought bars for good.

Why These No-Bake Bars Are a Total Game-Changer!
You are going to be absolutely hooked on these bars. They are a staple in my fridge, and I’m so excited for you to discover why. Here’s the scoop:
- Absolutely No Baking Required: Your oven gets to take the day off! This recipe comes together with just a little toasting, mixing, and chilling. It’s perfect for warm days or when you just don’t want to bake.
- Naturally Sweetened & Wholesome: We’re using the natural, caramel-like sweetness of Medjool dates and a touch of honey. No refined sugars here, just wholesome, feel-good ingredients.
- Incredibly Chewy & Satisfying: The date paste binder creates the most amazing, chewy texture that holds together perfectly. These are hearty, substantial bars that will actually keep you full.
- Perfect for Meal Prep: Make one batch and you have healthy, delicious snacks ready to go for up to two weeks! They are a lifesaver for busy schedules.
- Packed with Flavor & Texture: From the crunchy roasted peanuts to the chewy dried apples and seedy goodness, every single bite is interesting and delicious.
Recipe Snapshot
| Prep Time | 15 minutes |
| Cook Time | 3 minutes |
| Chilling Time | 2 hours |
| Total Time | 2 hours 18 minutes |
| Servings | 12 bars |
| Calories | 306 kcal per bar |
| Course | Snack, Breakfast |
| Cuisine | American |
| Difficulty/Method | Easy / No-Bake |
Your Shopping List for These Healthy Bars
This recipe uses a handful of simple, wholesome ingredients. Here’s everything you’ll need.
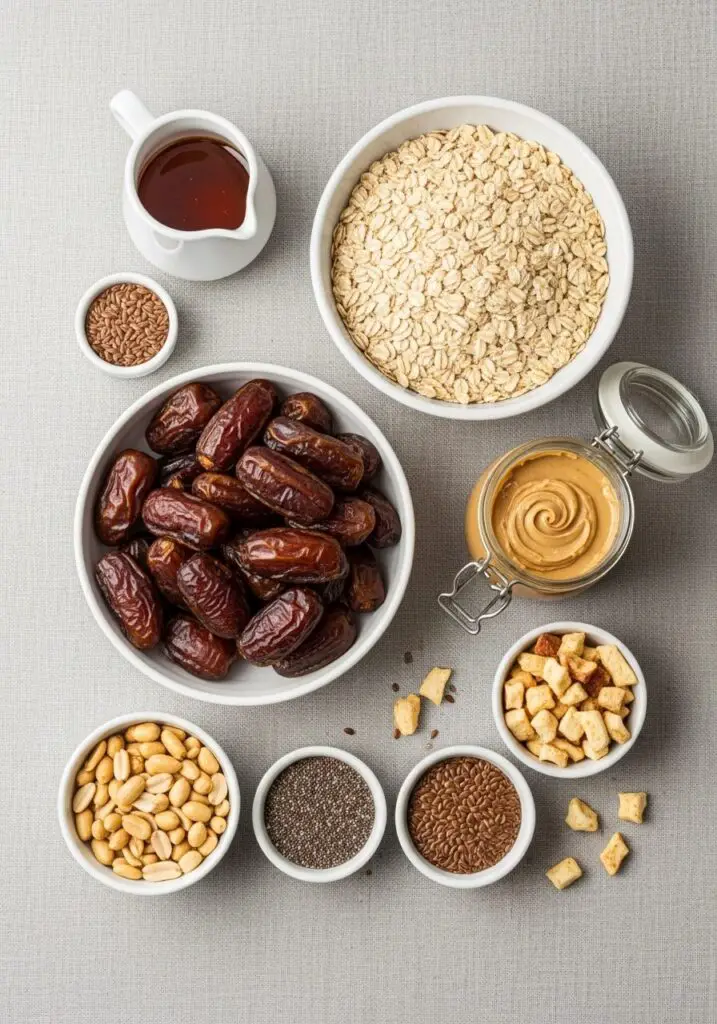
→ The Dry Mix
- ½ cup dry-roasted peanuts → Toasting them is a quick step that adds so much flavor!
- 1 ½ cups old-fashioned rolled oats → The hearty, chewy backbone of our bars.
- ½ cup dried apples, chopped → For those wonderful, sweet and chewy bites of apple pie flavor.
- ¼ cup flax seeds → A fantastic source of fiber and omega-3s.
- 2 tablespoons chia seeds → These little seeds add a nutritional punch and help bind the bars.
→ The Sticky Binder
- 1 cup Medjool dates, pitted → Our natural, caramel-like “glue.” Make sure they’re soft and sticky!
- ½ cup natural creamy peanut butter → Provides healthy fats, protein, and that irresistible flavor.
- ¼ cup honey → For a little extra sweetness and binding power.
Let’s Make Some Bars! (No Oven Needed)
Alright, this process is so simple and satisfying. You’re just a few steps away from a batch of the best homemade granola bars.
Part 1: Toast the Peanuts & Mix the Dry Goods
- Prep Your Pan: First, line an 8×8-inch baking pan with parchment paper, leaving a little overhang on two sides to act as “handles.” This will make it super easy to lift the bars out later.
- Toast the Peanuts: Place a small, dry saucepan over medium heat. Add the peanuts and toast them for 3-5 minutes, stirring frequently, until they’re lightly browned and you can smell that amazing roasted aroma. This quick step is a total flavor booster!
- Combine the Dry Ingredients: Let the toasted peanuts cool for a minute, then give them a rough chop. In a large bowl, combine the chopped peanuts, rolled oats, dried apples, flax seeds, and chia seeds. Give it all a good stir.
Part 2: Create the Binder, Press, and Chill
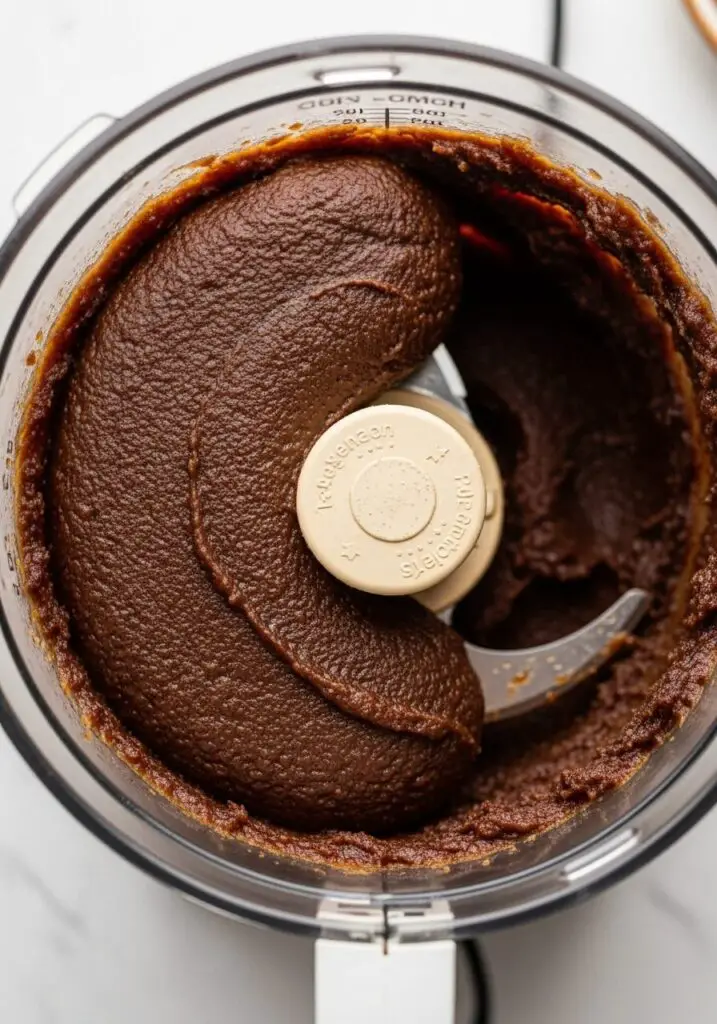
- Make the Date Paste: Place your pitted Medjool dates in a food processor. Process them until they break down and form a smooth, sticky ball of paste. It might be loud for a second, but it will come together!
- Combine Everything: Add the date paste, peanut butter, and honey to the large bowl with your dry ingredients. Now comes the fun part! Use a sturdy spatula or your hands to mix and knead everything together until it’s very well combined and no dry spots remain.
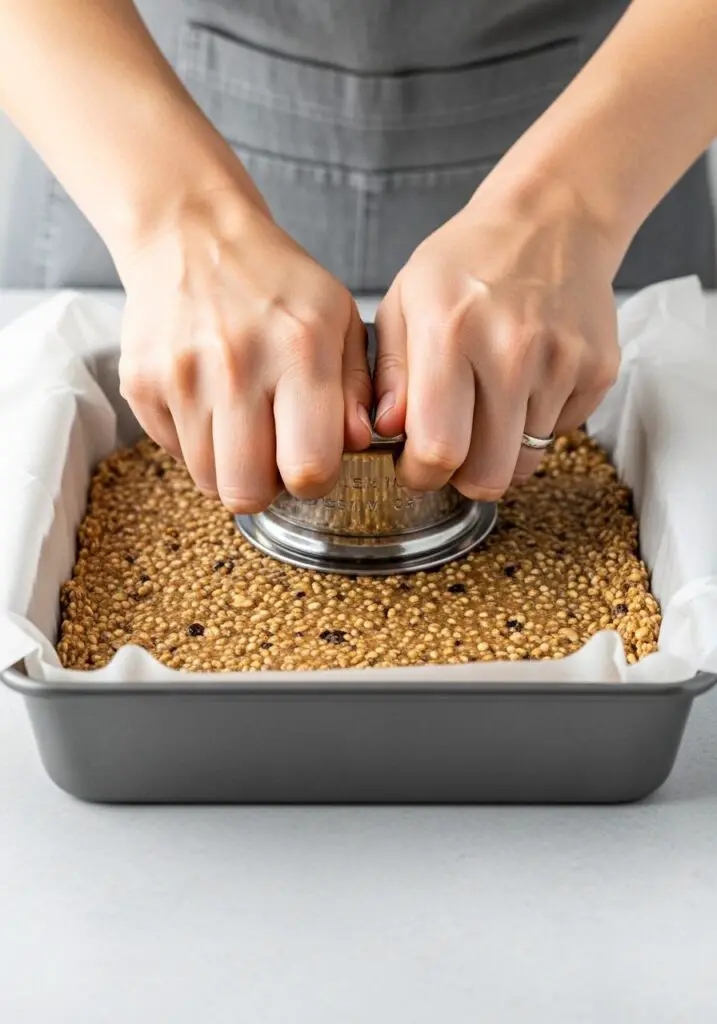
- Press Firmly: Transfer the sticky mixture to your prepared baking pan. Here’s the most important step: press it down FIRMLY and evenly. I like to use the bottom of a measuring cup or glass to really pack it in there. A tightly packed bar is a bar that holds together.
- Chill Out: Cover the pan with plastic wrap and place it in the fridge to chill for at least 2 hours. This time is essential for the bars to firm up and set.
- Slice and Serve: Once chilled, use the parchment paper handles to lift the entire block out of the pan. Place it on a cutting board and slice into 12 bars. All done!
WiseRecipes’ Top Tips for Perfect No-Bake Bars
I’ve made my share of crumbly, sad no-bake bars. These are the crucial tips that guarantee a chewy, perfect bar every time.
- Use Soft, Sticky Medjool Dates. They are the key to a perfect binder. If your dates feel a little dry, just soak them in hot water for 10 minutes, drain them well, and then proceed with the recipe. It makes a huge difference.
- You Really Have to Press Firmly. I can’t say this enough! The difference between a bar that holds its shape and one that crumbles is how well you pack it into the pan. Use your body weight and really press it down into a dense, even layer.
- The Parchment Paper “Sling” is Your Best Friend. Leaving that parchment paper overhang on the sides makes removing the bars for slicing so incredibly easy. No digging them out of the pan!
- Don’t Rush the Chill Time. That 2-hour chill in the fridge is mandatory. It allows the peanut butter, honey, and date paste to firm up and bind everything together. Patience is a virtue here!
- Chop Your Dried Apples. Don’t just toss in whole dried apple rings. Taking a minute to chop them into smaller, raisin-sized pieces ensures you get a little bit of sweet apple flavor in every single bite.
Creative Twists: Delicious Ways to Customize Your Bars
This recipe is an amazing base for all sorts of delicious experiments. Here are a few ideas:
- Add Chocolate Chips: Fold in a half-cup of mini dark chocolate chips for a classic, irresistible flavor combination.
- Swap the Nut Butter: Creamy almond butter or cashew butter would be fantastic instead of peanut butter.
- Change the Dried Fruit: Not an apple fan? Try using chopped dried apricots, cherries, or cranberries.
- Boost the Crunch: Add a quarter-cup of puffed rice cereal or sunflower seeds for a lighter, crispier texture.
- Make it Vegan: Simply swap the honey for an equal amount of pure maple syrup or brown rice syrup.
- Vanilla Infusion: Add a teaspoon of pure vanilla extract to the peanut butter and honey mixture for extra depth of flavor.
- Add a Chocolate Drizzle: After slicing the chilled bars, drizzle them with a little melted dark chocolate for a more decadent finish.
No-Bake Apple Peanut Butter Granola Bars
Ingredients
Method
- Line an 8×8-inch baking pan with parchment paper, leaving an overhang on the sides.
- In a small saucepan over medium heat, toast peanuts for 3-5 minutes until fragrant. Cool slightly and chop coarsely.
- In a large bowl, combine the chopped peanuts, rolled oats, dried apples, flax seeds, and chia seeds.
- In a food processor, process the pitted dates until a smooth, sticky ball forms.
- Add the date paste, peanut butter, and honey to the bowl with the dry mixture. Use a spatula or your hands to mix until thoroughly combined.
- Transfer the mixture to the prepared pan. Press down very firmly and evenly to create a dense layer.
- Cover and chill in the refrigerator for at least 2 hours to set.
- Use the parchment handles to lift the block out of the pan. Slice into 12 bars and store in the fridge.
Notes
Keep Them Fresh! Storing Your Granola Bars
One of the best things about these bars is how well they keep. They’re the perfect meal-prep snack!
- Refrigerator Storage: Store the bars in an airtight container in the refrigerator. They will stay fresh and delicious for up to 2 weeks. They are meant to be eaten chilled, as they will soften at room temperature.
- Freezing: These bars freeze wonderfully! You can wrap individual bars in plastic wrap and place them in a freezer-safe bag. They will keep for up to 3 months. They make a fantastic, quick snack straight from the freezer (they soften quickly) or thawed for a few minutes.
FAQs: Your No-Bake Bar Questions, Answered!
My dates aren’t forming a smooth ball. What’s wrong?
This usually just means your dates are a little on the dry side! It’s a super easy fix. Just place your pitted dates in a bowl, cover them with hot water, and let them soak for about 10 minutes. Drain the water thoroughly, pat them dry, and then proceed with the recipe. They’ll be soft and ready to blend into a perfect paste.
My bars are falling apart and crumbly. Why?
There are two likely culprits here. First, and most common, is that the mixture wasn’t pressed into the pan firmly enough. You have to really compact it down to make it dense. The second possibility is that your dates were too dry and didn’t create a sticky enough binder (see the tip above!).
Can I use a different kind of oats?
Old-fashioned rolled oats provide the best chewy, classic granola bar texture. Quick oats can be used in a pinch, but they will result in a softer, less chewy, and slightly denser bar because they absorb more moisture.
Can I make this recipe vegan?
Yes, easily! The only non-vegan ingredient is the honey. Simply swap it out for an equal amount of pure maple syrup or brown rice syrup. The bars will be just as delicious.
My Final Thoughts: The Perfect Homemade Snack
These No-Bake Apple Peanut Butter Granola Bars are proof that a healthy, homemade snack can be incredibly easy and way more delicious than anything you can buy in a box. They are a simple joy to make and an even bigger joy to eat. I hope this recipe helps you conquer those afternoon slumps and makes your week just a little bit easier and tastier!