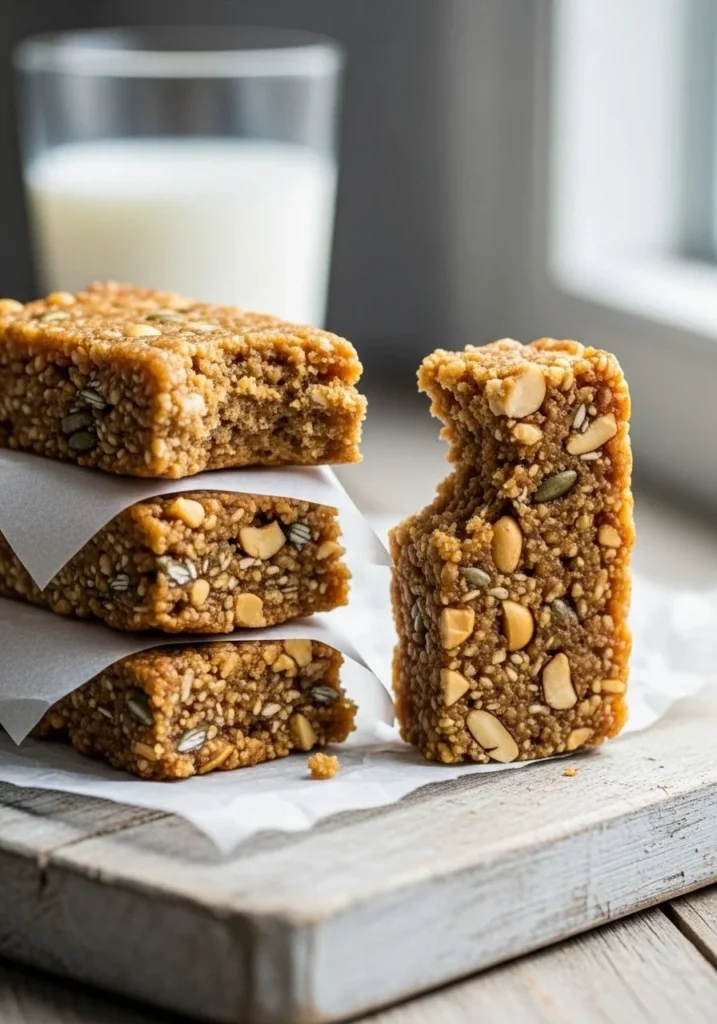
No-Bake Apple Peanut Butter Granola Bars
I have a confession: I make these No-Bake Apple Peanut Butter Granola Bars almost every week. They started as a desperate pantry raid on a rainy Sunday when I had a jar of natural creamy peanut butter and a sad little bag of dried apples, and now they are the thing my partner asks for…
I have a confession: I make these No-Bake Apple Peanut Butter Granola Bars almost every week. They started as a desperate pantry raid on a rainy Sunday when I had a jar of natural creamy peanut butter and a sad little bag of dried apples, and now they are the thing my partner asks for when the snack drawer gets low. If you want the exact version I riff off of sometimes, I once bookmarked a similar idea online and compared notes with my tweaks here: my favorite no-bake apple peanut butter granola bars recipe.
The smell that fills the kitchen while you make these is worth the whole process: warm peanuts toasting, the faint sweetness of dates as you pulse them into a sticky paste, and underneath it all the cozy apple-ness from the dried fruit. For this batch you only need ½ cup dry-roasted peanuts, 1 ½ cups old-fashioned rolled oats, ½ cup dried apples chopped if they are in big pieces, ¼ cup flax seeds, 2 tablespoons chia seeds, 1 cup Medjool dates pitted, ½ cup natural creamy peanut butter, and ¼ cup honey. That’s it. Honest, simple, and almost addictive.
The Secret Behind Why This Works
What makes these come together so easily is the date paste. In the food processor the pitted dates transform into a smooth, sticky ball that acts as the glue holding everything together. In a food processor, process the pitted dates until a smooth, sticky ball forms. I like Medjool dates because they are plump and naturally caramel-like, but if your dates are dry soak them in warm water for ten minutes and drain before processing.
How I Make Them (and the little tweaks I do)
I start by lining an 8×8-inch baking pan with parchment paper so the bars lift out easily later. While that’s sitting on the counter I warm a small saucepan and toast the peanuts. In a small saucepan over medium heat, toast the peanuts for 3-5 minutes until fragrant. Let cool slightly and chop coarsely. The toasting step is small but it gives the peanuts that roasted, savory pop that pairs with the apples and honey. Then I toss everything together: in a large bowl, combine the toasted peanuts, rolled oats, dried apples, flax seeds, and chia seeds.
After the dates are processed, I add the date paste, peanut butter, and honey to the bowl with the dry mixture. Mix thoroughly until combined. It will feel a little sticky and wet, but that’s okay. Press the mixture firmly into the prepared pan so the bars will hold their shape. Pressing firmly is important because it eliminates air pockets and helps the bars slice cleanly later. Cover and chill in the refrigerator for at least 2 hours to set. I usually leave them a little longer if the fridge is very full. When you’re ready, lift the block out of the pan using the parchment paper and slice into 12 bars. The first cut of a chilled bar has a satisfying thunk and a clean edge if you used a sharp knife warmed under hot water and dried first.
A Few Things I’ve Learned
Tip one: if your peanut butter is a little runny, chill the jar for a few minutes so it binds better with the oats and dates. Tip two: chop the peanuts coarsely rather than fine; I like the texture contrast of a few big crunchy pieces against the soft, chewy body of the bar. Tip three: when pressing the mixture into the pan I use the bottom of a measuring cup to really compact it—works every time. These are simple tricks but they make the bars hold together and eat like a proper little meal.
How To Know When It’s Done Right
You will know the bars are set when they feel firm to the touch through the parchment and the block lifts out cleanly from the pan. Sound silly? It’s true: you can gently press the surface and if it springs back slightly and doesn’t leave a big indentation, it is set. The texture should be chewy with some tooth from the oats and a crunchy note from the peanuts. If you slice too early the bars can crumble, so give them the full chilling time unless you like crumbly snacks.
What I Serve Them With (and when I reach for them)
These are my go-to breakfast-on-the-go. I’ll grab one with a cup of coffee and a banana, or I’ll pair it with Greek yogurt and a few fresh apple slices for a mid-morning pick-me-up. They also travel well in lunch boxes and are a favorite post-run treat because of the quick natural sugars from the dates and honey combined with protein from peanut butter and peanuts.
Variations I Play With All The Time
If you want to switch things up, try stirring in a teaspoon of cinnamon for an apple-pie vibe or a tablespoon of cocoa powder for a deep chocolate notebook. Swap the natural creamy peanut butter for almond butter if you need a different nut profile. And if you like more chocolate, I sometimes fold in a handful of dark chocolate chips right before pressing the mixture into the pan. If you want inspiration for a chocolate-forward sibling to this bar, I often peek at a recipe for a different bar I love: no-bake chocolate peanut butter protein bars for ideas on how to balance cocoa, protein powder, and sweeteners.
When Things Don’t Go As Planned
If your mixture feels too dry and won’t stick, add a teaspoon or two of warm water or a touch more honey and knead until it comes together. If it feels too wet, add a tablespoon of oats and press again. If your dates were dry and the paste is crumbly, a splash of warm water while processing will coax them into a smoother ball.
How I Store the Leftovers
I make a double batch and keep extras in an airtight container. They last well in the refrigerator for up to a week, wrapped or layered with parchment so they do not stick together. For longer storage I freeze them individually wrapped and pop them out when I need a quick snack; they thaw in about 20 minutes at room temperature but also make a satisfying frozen nibble if you’re feeling indulgent.
Why I Love This Recipe
There is something deeply comforting about foods that feel homemade and are still easy. These bars are honest: they show you everything that’s in them and they don’t hide behind processed junk. They are nutty, a little sweet, chewy, and pleasantly textured from the flax and chia. I love that my small changes—extra chopped peanuts, a spoonful more peanut butter, a dash of cinnamon—change the mood of the bars without making the process any harder.
When I make these for friends they almost always ask for the recipe, and when someone takes a bite and closes their eyes, I know I’ve nailed the balance. If you give them a try, follow the steps—Line an 8×8-inch baking pan with parchment paper so you can lift the block out later; toast the peanuts and process the dates as described; press firmly and chill—and then make it your own. That is the fun part: these bars are a template for a dozen small experiments that are all winners.
Conclusion
If you want to compare variations or see a slightly different take on the same flavor combination, this Apple Peanut Butter Granola Bars | Girl Versus Dough recipe is a lovely companion to what I’ve described here.
No-Bake Apple Peanut Butter Granola Bars
Ingredients
Method
- Line an 8×8-inch baking pan with parchment paper.
- In a small saucepan over medium heat, toast the peanuts for 3-5 minutes until fragrant. Let cool slightly and chop coarsely.
- In a large bowl, combine the toasted peanuts, rolled oats, dried apples, flax seeds, and chia seeds.
- In a food processor, process the pitted dates until a smooth, sticky ball forms.
- Add the date paste, peanut butter, and honey to the bowl with the dry mixture. Mix thoroughly until combined.
- Press the mixture firmly into the prepared pan to eliminate air pockets.
- Cover and chill in the refrigerator for at least 2 hours to set.
- Lift the block out of the pan using the parchment paper and slice into 12 bars.