The Best Homemade Protein Bars (Easy, No-Bake & So Delicious!)
Hello, my healthy-snacking friends! If you are tired of spending a fortune on store-bought protein bars with long, questionable ingredient lists, then I have the most incredible recipe for you. Get ready to make the best, easiest, and most delicious Homemade Protein Bars right in your own kitchen. This is a no-bake, mix-and-press recipe that…
Hello, my healthy-snacking friends! If you are tired of spending a fortune on store-bought protein bars with long, questionable ingredient lists, then I have the most incredible recipe for you. Get ready to make the best, easiest, and most delicious Homemade Protein Bars right in your own kitchen. This is a no-bake, mix-and-press recipe that is a true game-changer for healthy, on-the-go snacking.
These aren’t your typical dry, chalky protein bars. They are wonderfully soft, perfectly chewy, and packed with wholesome, natural ingredients like rolled oats, peanut butter, and ground flaxseed. They are completely customizable with your favorite protein powder and mix-ins, and they come together in about 10 minutes of active time. This is the perfect recipe for meal prepping a week’s worth of healthy, satisfying, and energizing snacks.

Why These Are The BEST Homemade Protein Bars
This is guaranteed to be your new go-to recipe for healthy snacks. Here’s why:
- Incredibly Easy & No-Bake: This is a one-bowl wonder! You simply mix all the ingredients together, press the mixture into a pan, and chill. No oven required!
- Wholesome, Natural Ingredients: You control everything that goes into them. There are no artificial ingredients, preservatives, or weird sweeteners—just wholesome goodness.
- Perfectly Chewy Texture: The combination of oats, nut butter, and honey creates a wonderfully soft and chewy texture that is so much better than dry, store-bought bars.
- Completely Customizable: This is a fantastic base recipe. You can use your favorite protein powder, your preferred nut butter, and any mix-ins you love to create your perfect protein bar.
Gather Your Simple, Wholesome Ingredients: What You’ll Need
This impressive snack comes together with just a handful of powerful, pantry-friendly ingredients.

- 1 1/2 cups (135g) old-fashioned rolled oats
- 3/4 cup (180g) peanut butter (or your favorite nut/seed butter)
- 1 banana, mashed (about 120g)
- 1/3 cup (110g) honey (or agave/maple syrup)
- Pinch of salt
- ½ cup (55g) ground flax seed
- 1 cup (120g) protein powder (vanilla or chocolate work great)
- 2 teaspoons vanilla extract
- 3/4 cup (about 90g) of your favorite mix-ins (chopped dates, dried cranberries, mini chocolate chips, nuts, etc.)
Crafting Your No-Bake Protein Bars: Step-by-Step Guide
Let’s make this incredibly easy and delicious snack. You’re just a few minutes away from a week of healthy treats!
- Combine Everything in One Bowl: This is the best part! In a large mixing bowl, combine all of your ingredients: the rolled oats, peanut butter, mashed banana, honey, salt, ground flaxseed, protein powder, vanilla extract, and your chosen mix-ins.

- Mix Well: Use a sturdy spatula or your hands to mix everything together until it’s very well combined. The mixture should be fairly soft and sticky, but not overly dry or crumbly. If it seems too dry (this can happen with some protein powders), add a small splash of water or milk, or an extra drizzle of honey to bring it together.
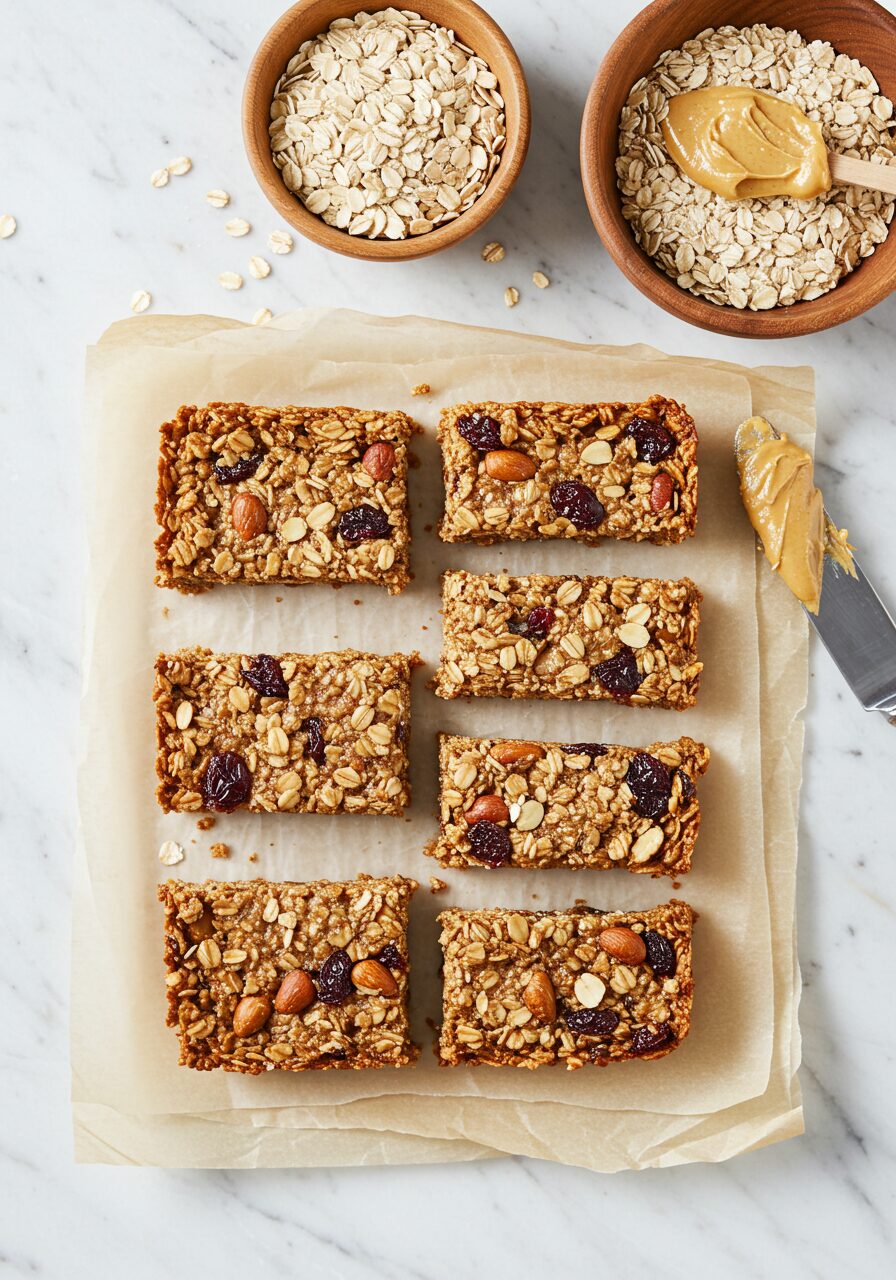
- Press Firmly Into the Pan: Line an 8×8-inch pan with parchment paper, leaving an overhang on the sides to act as handles. Transfer the protein bar mixture into the pan. This next step is key: press the mixture down very firmly into the pan. You can use the bottom of a measuring cup or your hands to really compact the mixture into a dense, even layer.

- Chill and Cut: Place the pan in the refrigerator for at least 1 hour to allow the bars to firm up and set completely.
- Slice and Store: Once chilled, use the parchment paper handles to lift the entire block out of the pan. Place it on a cutting board and slice it into your desired number of bars (16 is a great size). Store the bars in the fridge and enjoy!
Wise Tips for the Perfect Protein Bars
- Press Firmly! I can’t say this enough. The key to bars that hold together beautifully and don’t crumble is to press the mixture into the pan as firmly and compactly as you possibly can.
- Adjust for Your Protein Powder: Different types and brands of protein powder can absorb liquid differently. If your mixture feels too dry and crumbly, don’t be afraid to add a tablespoon of water or milk to help it come together into a sticky dough.
- The Chill Time is Non-Negotiable: The time in the refrigerator is what allows the bars to solidify and become firm enough to slice cleanly. Don’t skip it!
- Parchment Paper is Your Friend: Using a parchment paper “sling” in your pan is a game-changer for easy removal and slicing.
The BEST Homemade Protein Bars
Ingredients
Equipment
Method
- Line an 8×8 inch pan with parchment paper, leaving an overhang on the sides.
- In a large bowl, mix all ingredients together until well combined. The mixture should be fairly soft and sticky, not dry or crumbly. Add a splash of water or milk if needed.
- Press the mixture VERY firmly into the prepared pan, creating a dense, even layer.
- Refrigerate for at least 1 hour to allow the bars to firm up before cutting into 16 bars.
- Store the bars in an airtight container in the fridge for up to 2 weeks, or freeze for up to 3 months.
Notes
Delicious Variations & Creative Twists
- Chocolate Protein Bars: Use your favorite chocolate-flavored protein powder and mini chocolate chips as your mix-in for a double chocolate treat.
- Vegan Protein Bars: This recipe is easily made vegan! Just use a plant-based protein powder and maple syrup or agave instead of honey.
- Nut-Free Version: For a school-safe or nut-free option, use sunflower seed butter instead of peanut butter and choose mix-ins like seeds, coconut flakes, or dried fruit.
- Gluten-Free Version: Ensure you are using certified gluten-free rolled oats and a gluten-free protein powder.
Frequently Asked Questions (FAQ) – Homemade Protein Bars
How do I store these protein bars?
They are best stored in an airtight container in the refrigerator. They will stay fresh and delicious for up to 2 weeks.
Can I freeze these?
Yes! These are fantastic for freezing. Layer the bars in a freezer-safe bag or container with a small piece of parchment paper between the layers to prevent them from sticking. They will last for up to 3 months.
What kind of protein powder is best?
Any kind you enjoy the taste of will work! Vanilla, chocolate, or even unflavored whey, casein, or plant-based protein powders are all great choices.
Conclusion
These Homemade No-Bake Protein Bars are a true game-changer for healthy, convenient snacking. They are a delicious, wholesome, and incredibly easy way to fuel your body and satisfy your cravings. Enjoy making your own perfect, customized protein bars!