The Ultimate No-Bake White Chocolate-Peppermint Pie (Holiday Treat!)
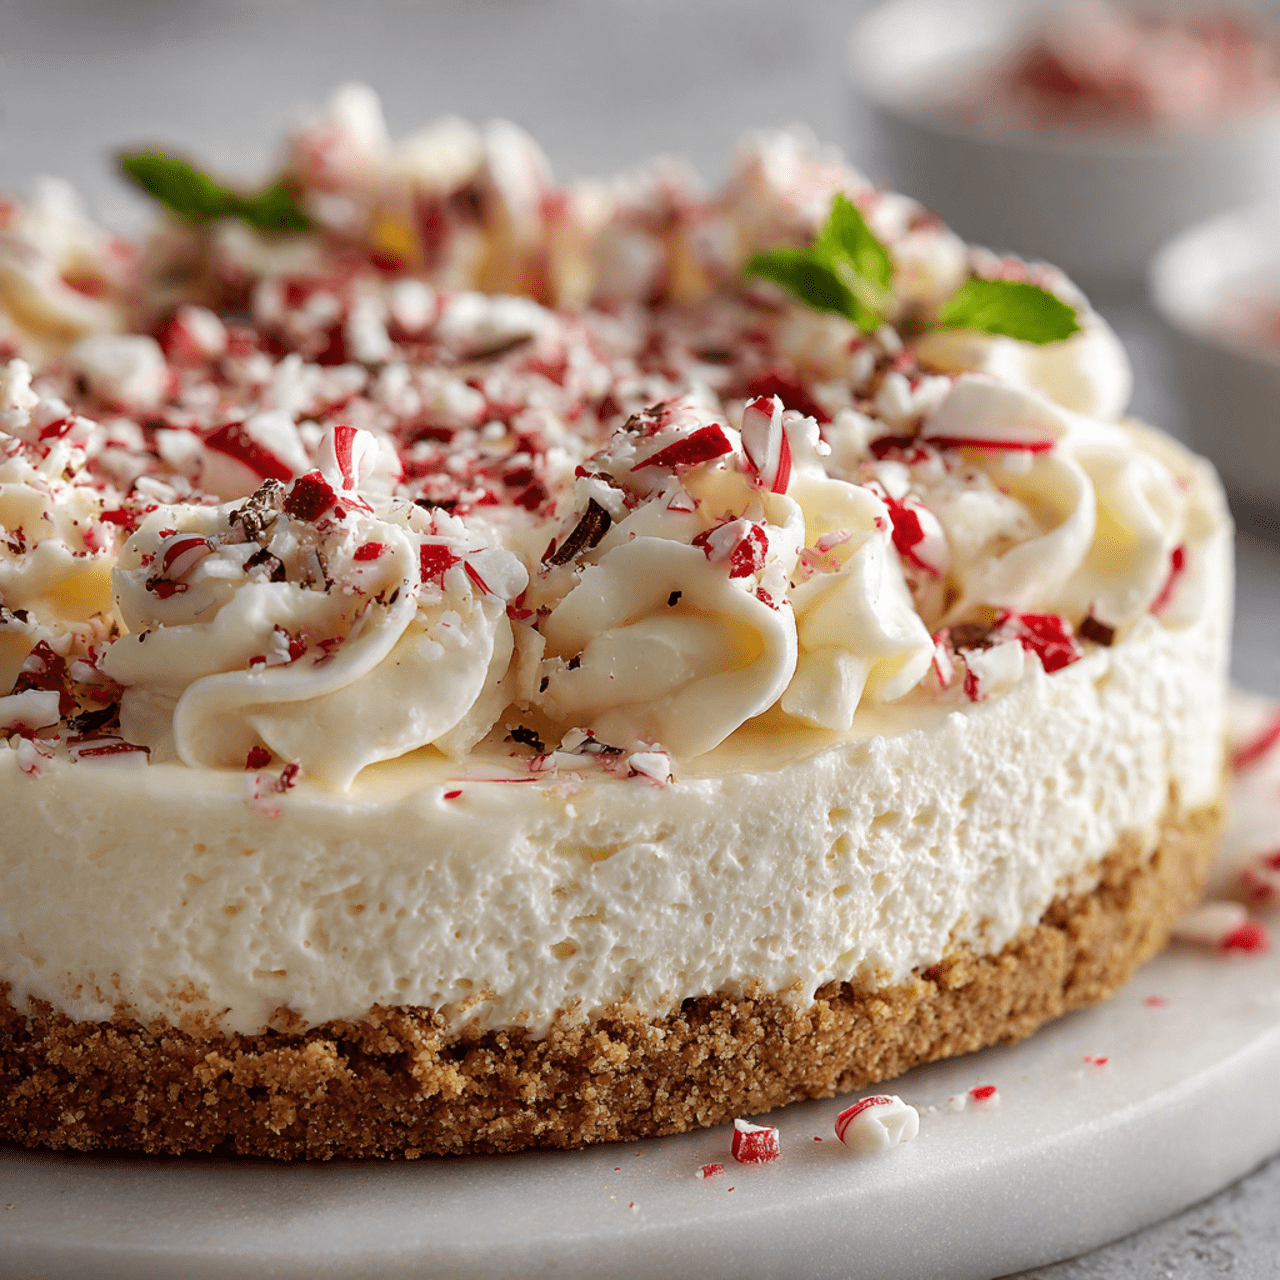
Imagine the perfect Christmas dessert: a crisp, buttery crust made from graham crackers and crushed candy canes, holding a light, impossibly fluffy, and cloud-like peppermint-white chocolate mousse, all chilled to perfection. That, my friends, is the cool, creamy, and completely enchanting magic of this No-Bake White Chocolate-Peppermint Pie. This is, without a doubt, the most…
Imagine the perfect Christmas dessert: a crisp, buttery crust made from graham crackers and crushed candy canes, holding a light, impossibly fluffy, and cloud-like peppermint-white chocolate mousse, all chilled to perfection. That, my friends, is the cool, creamy, and completely enchanting magic of this No-Bake White Chocolate-Peppermint Pie. This is, without a doubt, the most elegant and refreshing no-bake dessert you will make this holiday season.
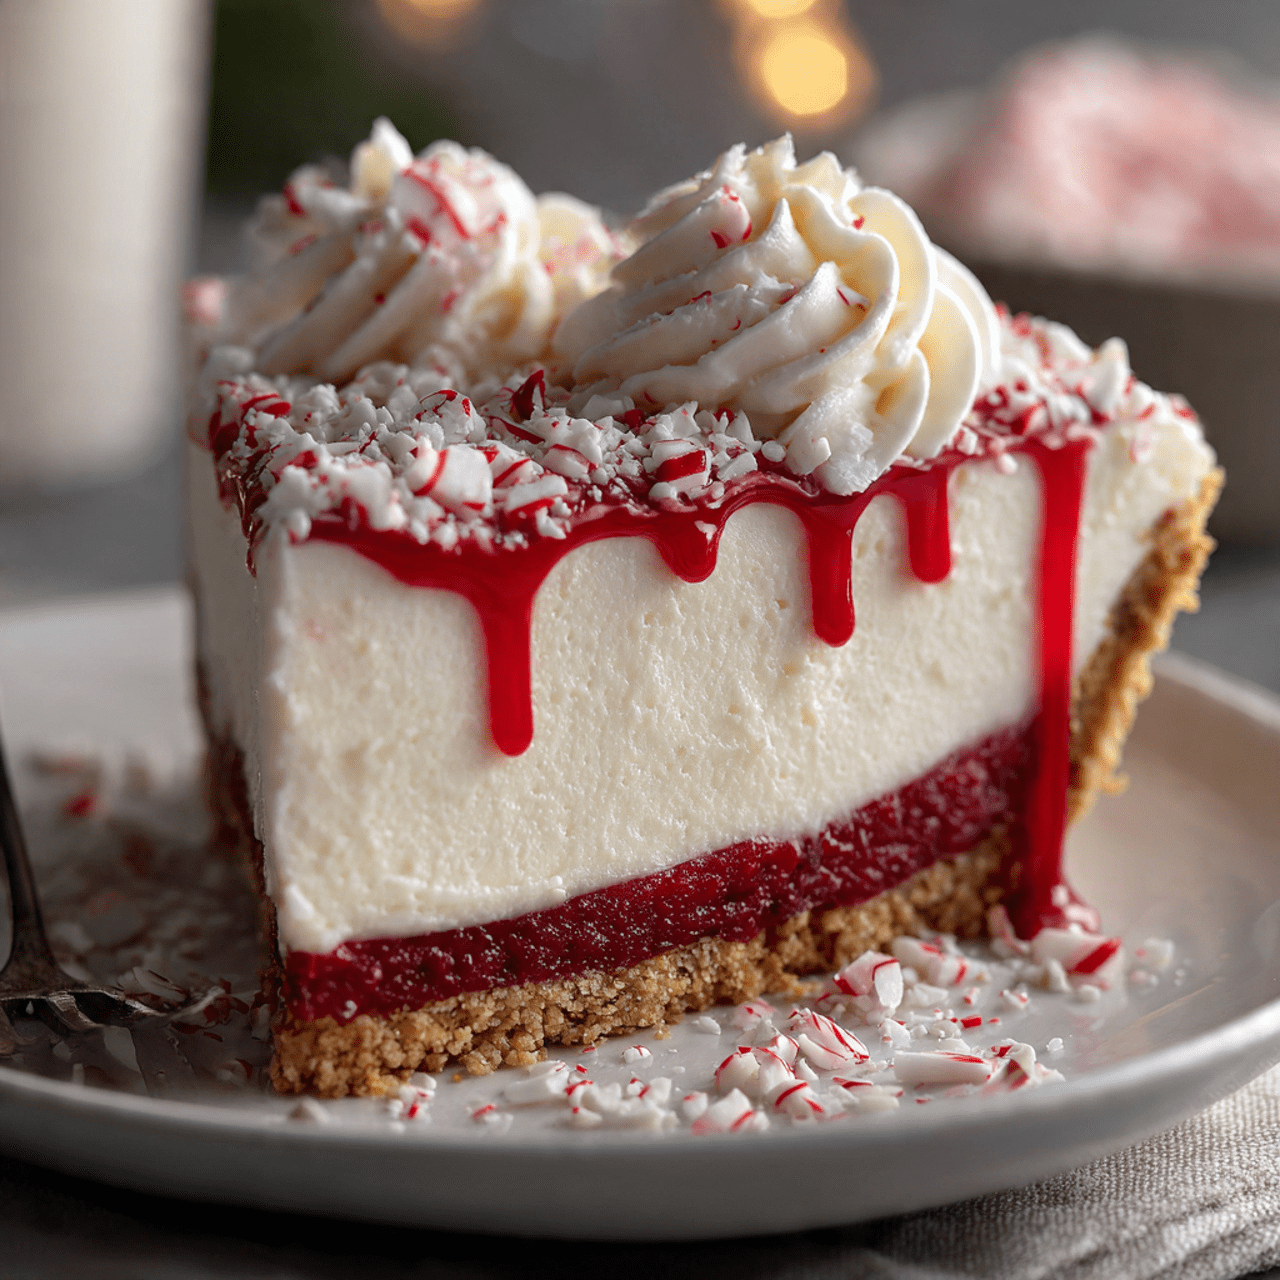
I promise you, there is no greater holiday delight than slicing into this beautiful, pale pink pie. The crust is a revelation—the hint of peppermint in it is a surprise and delight. The filling is a dream, a perfect balance of sweet white chocolate, tangy cream cheese, and cool peppermint, all whipped into a texture that simply melts in your mouth. It’s a true taste of Christmas magic.
Get ready to create the star of your holiday dessert table, a make-ahead masterpiece that will have every candy-cane lover’s dream come true.

Why This No-Bake Pie is a Holiday Essential
You are going to be completely captivated by the light, airy texture and festive flavor of this pie. It’s a true holiday show-stopper. Here’s why:
- Completely No-Bake & Stress-Free: Keep your oven free for the main course! This entire, stunning dessert is made without any baking, making it the ultimate low-stress holiday prep.
- The Perfect Make-Ahead Dessert: This pie needs to chill for at least 4 hours (and is even better overnight!), making it the ideal dessert to prepare a day before your Christmas gathering.
- Light, Fluffy Mousse Texture: The filling is a true mousse—light, airy, and incredibly creamy. It’s a wonderfully refreshing counterpoint to heavy holiday meals.
- A Genius Peppermint Crust: Infusing the graham cracker crust with finely crushed candy canes adds a surprising and delightful layer of crisp, minty flavor.
- Stunningly Elegant Presentation: The pale pink hue of the filling and the beautiful striped peppermint garnish create a sophisticated and beautiful dessert that’s perfect for a special occasion.
Recipe Snapshot
| Prep Time | 25 minutes |
| Chill Time | 4 hours 15 minutes |
| Total Time | 4 hours 40 minutes |
| Servings | 8-12 servings |
| Calories | 420 kcal per serving (estimated for 10 servings) |
| Course | Dessert |
| Cuisine | American |
| Difficulty/Method | Easy / No-Bake |
Your Shopping List for This Peppermint Dream
This elegant, no-bake pie comes together with a handful of simple, high-quality ingredients.

→ For the Peppermint Graham Cracker Crust
- 12 full sheets of graham crackers → To create our buttery, crisp crust.
- 4 candy canes → Finely crushed, to infuse the crust with a wonderful minty flavor. Plus more for garnish!
- ¼ tsp kosher salt → To balance the sweetness of the crust.
- ½ cup (1 stick) unsalted butter → Melted, to bind the crust together.
→ For the White Chocolate-Peppermint Mousse Filling
- 8 oz. white chocolate → Chopped from a bar, or use high-quality chips.
- 1 ⅓ cups cold heavy cream → Divided. This is the key to our light, airy mousse.
- 1 (8-ounce) package cream cheese → Must be at room temperature for a smooth, lump-free filling.
- ½ tsp pure peppermint extract → For that bright, cool, classic Christmas flavor.
- 2 drops red gel food coloring → To give the filling its beautiful, pale pink hue.
Let’s Get Chilling! Your No-Bake Pie Guide
Ready to whip up the most refreshing dessert of the season? Let’s go!
Part 1: The Peppermint-Infused Crust
- Make the Crumbs: In a food processor, pulse the graham cracker sheets until they form fine crumbs. Transfer them to a medium bowl.
- Crush the Candy Canes: In the now-empty food processor, pulse the 4 candy canes until they form fine crumbs (you should have about ⅓ cup). Add these to the bowl with the graham cracker crumbs.
- Combine and Press: Stir the salt and melted butter into the crumb mixture until everything is evenly moistened. Press this mixture firmly and evenly onto the bottom and up the sides of a 9-inch pie plate.
- Freeze to Set: Place the crust in the freezer for at least 15 minutes (or up to overnight) to firm up completely.
Part 2: The Fluffy Peppermint Mousse
- Melt the White Chocolate: In a microwave-safe bowl, combine the chopped white chocolate and ⅓ cup of the heavy cream. Microwave on high in 30-second intervals, stirring after each, until melted and smooth. Set aside to cool for about 15 minutes.
- Whip the Cream: In a large bowl using an electric mixer, beat the remaining 1 cup of cold heavy cream at medium-high speed until it holds stiff peaks.
- Mix the Base: In a separate large bowl, beat the room temperature cream cheese, peppermint extract, and a pinch of salt until perfectly smooth. Add the cooled white chocolate mixture and the red food coloring. Beat on low speed just until combined.
- Fold it All Together: Using a spatula, gently fold about a third of the whipped cream into the cream cheese mixture to lighten it. Then, fold in the remaining whipped cream until the mousse is smooth and no white streaks remain.
Part 3: Fill, Chill, and Decorate
- Fill the Crust: Spoon the light, fluffy mousse filling into your chilled crust and spread it into an even, beautiful layer.
- The Long Chill: Cover the pie with plastic wrap and chill it in the refrigerator until the filling is completely set and firm. This will take at least 4 hours, but overnight is even better.
- Decorate and Serve: Just before serving, unwrap the pie. For a beautiful, modern garnish, use a ruler as a guide to sprinkle straight rows of additional crushed peppermints on top. Slice and serve chilled!
No-Bake White Chocolate-Peppermint Mousse Pie
Ingredients
Equipment
Method
- Make the crust: Pulse graham crackers in a food processor until fine crumbs form. Pulse candy canes separately until fine crumbs form. In a bowl, stir together graham cracker crumbs, candy cane crumbs, 1/4 tsp. salt, and melted butter.
- Press the mixture evenly on the bottom and up the sides of a 9-inch pie plate. Freeze for at least 15 minutes.
- Make the filling: Combine white chocolate and 1/3 cup heavy cream in a microwave-safe bowl. Microwave in 30-second intervals, stirring, until melted and smooth. Let cool for 15 minutes.
- In a large bowl, beat the remaining 1 cup of heavy cream with an electric mixer until stiff peaks form.
- In a second large bowl, beat the room temperature cream cheese, peppermint extract, and a pinch of salt until smooth. Add the cooled white chocolate mixture and red food coloring; beat just until combined.
- Gently fold the whipped cream into the cream cheese mixture until no white streaks remain.
- Spoon the mousse into the prepared crust and smooth the top. Cover with plastic wrap and chill until set, at least 4 hours or up to 12 hours.
- Just before serving, sprinkle crushed peppermints on top of the pie in decorative rows.
Notes
WiseRecipes’ Top Tips for Perfect No-Bake Pie
These simple secrets will ensure your peppermint pie is a flawless, festive success.
- Room Temperature Cream Cheese is a MUST. For a perfectly smooth, velvety mousse with no lumps, your cream cheese absolutely must be softened to room temperature before you start.
- Cold Heavy Cream is Also a MUST. Conversely, your heavy cream must be very cold, straight from the fridge, to whip up into stable, voluminous stiff peaks. Using a chilled bowl and beaters also helps!
- Fold Gently! When you combine the whipped cream with the cream cheese base, use a gentle folding motion with a spatula. This is how you keep all the air you whipped into the cream, which is the secret to a light, airy mousse texture.
- Don’t Skip the Chill Times. The initial freeze for the crust is what makes it firm and sturdy. The long, 4-hour (or overnight) chill for the filling is essential for it to set up properly so you can get clean, beautiful slices.
- Finely Crush the Candy Canes. For the crust, you want the candy canes to be processed into a fine, almost sand-like texture so they incorporate smoothly with the graham crackers. For the topping, a coarser crush is great for texture!
Keep It Fresh! Storing Your Peppermint Pie
This pie is the perfect make-ahead dessert for a busy holiday schedule.
- Refrigerator: The finished pie must be stored, covered, in the refrigerator. It will keep beautifully for up to 4 days, although the crust may soften slightly over time.
FAQs: Your Peppermint Pie Questions, Answered!
Can I use a pre-made graham cracker crust?
You can in a pinch, but you will miss out on the wonderful, subtle peppermint flavor in the homemade crust, which really elevates the whole pie! If you do use a pre-made crust, I recommend freezing it for 30 minutes before filling to make it extra sturdy.
My mousse seems a little runny. Will it set up?
Don’t worry! The mousse will be quite soft right after you fold it together. As long as you whipped your cream to stiff peaks and used full-fat cream cheese, the chill time is what will work the magic. The fats in the cream, cream cheese, and white chocolate will all firm up in the cold, setting your pie beautifully.
Can I make this with a different kind of crust?
Yes! An Oreo cookie crust would be fantastic with the peppermint filling for a classic “peppermint bark” flavor profile.
Can I freeze this pie?
Yes, this pie freezes very well! You can freeze the whole pie or individual slices. Wrap it tightly in plastic wrap and then foil. It will keep in the freezer for up to a month. Let it thaw in the refrigerator for several hours before serving.
Final Thoughts: Your Coolest Holiday Dessert
There is nothing more refreshing at the end of a rich holiday meal than a cool, creamy, minty dessert. This No-Bake White Chocolate-Peppermint Pie is the perfect combination of elegance, ease, and festive flavor. It’s a show-stopper that will delight your guests and save you precious oven space. I hope it brings a little bit of cool, creamy magic to your Christmas celebration. Happy Holidays!