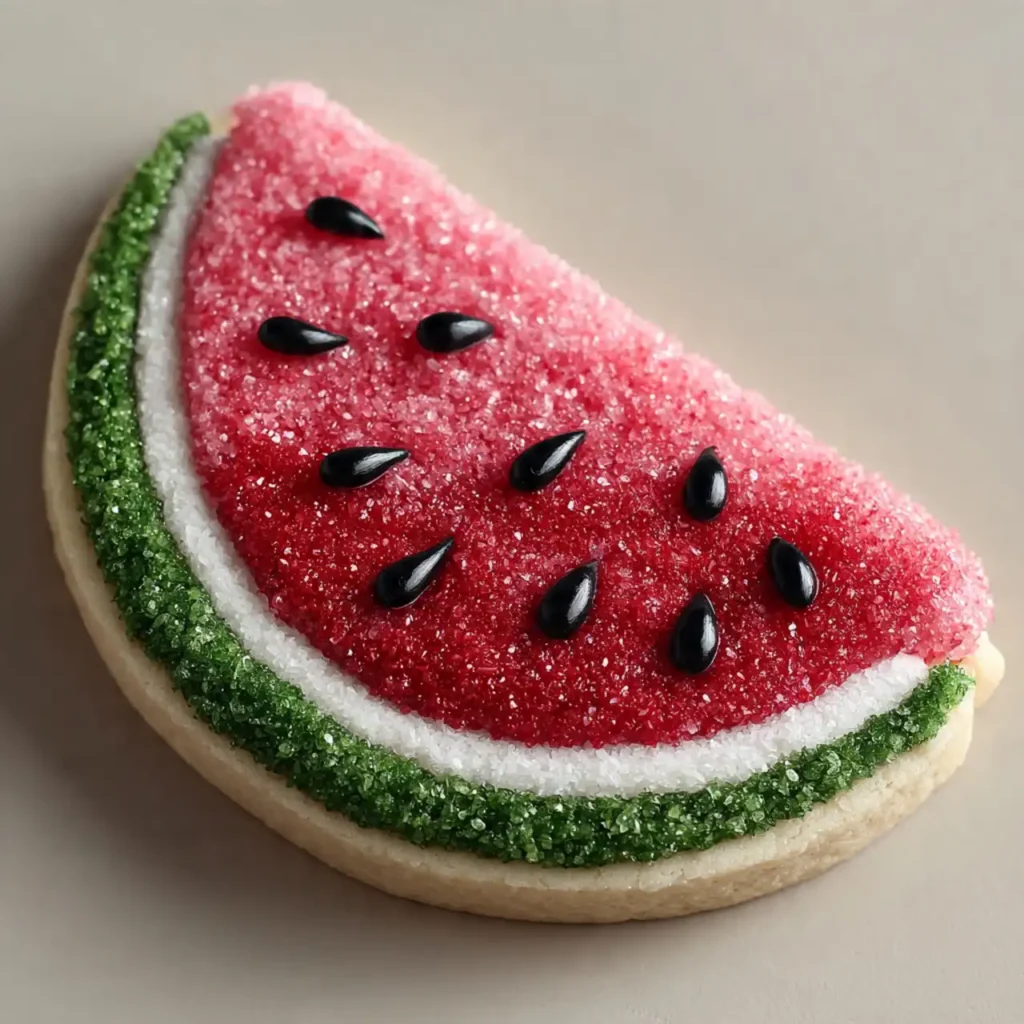
One in a Melon’ Cookies: A Sweet Valentine’s Pun: ‘One in a Melon’ Cookies
Sometimes, the best way to say “I love you” is with a little bit of playful charm. While classic hearts and flowers are lovely, there’s a special kind of joy in a treat that’s clever, cute, and completely unexpected. Allow me to introduce you to your new favorite Valentine’s project: these “One in a Melon”…
Sometimes, the best way to say “I love you” is with a little bit of playful charm. While classic hearts and flowers are lovely, there’s a special kind of joy in a treat that’s clever, cute, and completely unexpected. Allow me to introduce you to your new favorite Valentine’s project: these “One in a Melon” Cookies. It’s a cookie that’s as much a delightful pun as it is a delicious dessert, transforming a simple sugar cookie into an adorable, edible slice of watermelon, complete with tiny heart-shaped “seeds.”
This isn’t just about baking; it’s about creating a little piece of edible art. The process is a wonderfully fun and creative journey into the world of royal icing. We start with a classic, no-fail sugar cookie, sturdy enough to hold its shape and provide the perfect canvas. Then, we use a simple but impressive royal icing technique to pipe the green rind, flood the pink “melon,” and add those final, charming details. It’s a project that looks incredibly intricate but is surprisingly meditative and achievable for any enthusiastic baker ready to play with icing.
Why These Cookies are the Sweetest Valentine’s Message
You are going to fall completely in love with this fun, festive, and incredibly creative cookie recipe. It’s a true holiday gem. Here’s why:
- A Fun and Adorable Pun: Telling someone they are “One in a Melon” with a cookie is a unique, charming, and memorable way to show you care.
- Stunning, Professional-Looking Results: The clean lines and vibrant colors of the royal icing give these cookies a beautiful, polished look that is perfect for gifting.
- A Perfect Introduction to Cookie Decorating: The simple steps of outlining, flooding, and adding details make this a fantastic project for anyone looking to try their hand at royal icing.
- Durable for Gifting: Royal icing dries to a hard, candy-like finish, which means these cookies are sturdy and won’t get smudged if you package them in a treat bag or box.
- A Classic, Delicious Sugar Cookie Base: Underneath all that beautiful decoration is a delicious, buttery, and crisp vanilla sugar cookie that is a treat in itself.
Recipe Snapshot
| Prep Time | 1 hour |
| Cook Time | 12 minutes |
| Decorating/Drying Time | ~14 hours |
| Total Time | ~16 hours |
| Servings | 2 dozen cookies |
| Calories | 165 kcal per cookie (estimated) |
| Course | Dessert |
| Cuisine | American |
| Difficulty/Method | Intermediate / Baking & Decorating |
Your Shopping List for This Edible Art
This impressive cookie comes together with classic baking staples and a few key decorating supplies.
→ For the Roll-Out Sugar Cookies
- 1 cup (2 sticks) unsalted butter → Softened to room temperature.
- 1 cup granulated sugar
- 1 large egg → At room temperature.
→ For the Royal Icing & Decorations
- 4 cups confectioners’ sugar → Sifted, to ensure a smooth icing.
- 3 Tbsp meringue powder → An essential ingredient for royal icing that dries hard and is food-safe.
Let’s Get Baking! Your Step-by-Step Guide
Ready to create the most adorable cookies for your Valentine? Let’s get started.
Part 1: The Perfect Cut-Out Cookies
- Make the Dough: In a large bowl, cream the softened butter and granulated sugar until light and fluffy. Beat in the egg and vanilla. In a separate bowl, whisk together the flour, baking powder, and salt. Gradually add the dry ingredients to the wet, mixing on low until just combined.
- Chill the Dough: Divide the dough in half, form into flat disks, wrap in plastic, and chill for at least 1 hour until firm.
- Roll and Cut: Preheat your oven to 375°F (190°C). On a lightly floured surface, roll out one disk of dough to about ¼-inch thickness. Using a large, round cookie cutter, cut out as many circles as you can.
- Shape the “Slices”: Using a ruler and a knife, measure and cut each circle into a large semi-circle, creating the classic watermelon slice shape. Re-roll scraps as needed. Place the shapes on parchment-lined baking sheets.
- Bake and Cool: Bake for 8-10 minutes, or until the edges are just barely golden. Let them cool on the sheets for a few minutes before transferring to a wire rack to cool completely.
Part 2: The Royal Icing
- Make the Icing: In a large bowl, whisk together the confectioners’ sugar and meringue powder. Add the warm water and beat with an electric mixer, starting on low and increasing to high, for about 5-7 minutes, until the icing is very stiff and forms peaks.
- Tint the Colors: Tint about 1 cup of the icing a vibrant watermelon pink using the red food coloring. Tint about ½ cup of the icing green by combining the Kelly Green and Leaf Green colors. Tint a small amount (about ¼ cup) of the icing black.
- Thin to Consistency: For the green and pink icing, you’ll want a “20-second” flood consistency. Add water, a tiny bit at a time, until a ribbon of icing dropped into the bowl disappears in about 20 seconds. For the black icing, you’ll want a slightly thicker “25-second” or piping consistency.
Part 3: Decorating Your “Melons”
- Pipe the Rind: Transfer your green icing to a decorating bag fitted with a small round tip (like a #5). Pipe a thick green line along the curved edge of each cookie to create the watermelon rind. Let this dry and set for about 15-20 minutes.
- Flood the Melon: Transfer your pink icing to a decorating bag. Fill in the area inside the green rind with the pink icing. Use a toothpick or a scribe tool to guide the icing into the corners and pop any air bubbles.
- The Long Dry: This is a crucial step! Let the pink icing dry, completely undisturbed, for at least 8 to 10 hours, or overnight, until it is completely hard to the touch.
- Add the “Seeds”: Prepare a third decorating bag with the black icing and a very small round tip (like a #2). Carefully pipe small, delicate heart shapes onto the dried pink surface to create the adorable “seeds.”
- Final Dry: Let the black icing dry completely, about 4 to 5 hours, before handling or packaging the cookies.
‘One in a Melon’ Watermelon Sugar Cookies
Ingredients
Equipment
Method
- Prepare cookie dough: Cream butter and sugar. Beat in egg and vanilla. Gradually add whisked dry ingredients (flour, baking powder, salt). Chill dough for at least 1 hour.
- Preheat oven to 375°F. Roll out dough to ¼ in. thickness. Use a large round cutter to cut circles. Cut each circle into a large semi-circle to create the ‘slice’ shape. Bake on parchment-lined sheets for 8-10 minutes. Cool completely.
- Make icing: Whisk confectioners’ sugar and meringue powder. Beat in warm water with an electric mixer until stiff peaks form.
- Divide and tint icing: Tint 1 cup pink (with red), ½ cup green (with Kelly Green + Leaf Green), and ¼ cup black. Thin the pink and green icings to a ’20-second’ flood consistency. Thin the black icing to a ’25-second’ piping consistency.
- Transfer icings to decorating bags. Using the green icing with a #5 tip, pipe a thick line along the curved edge of each cookie to create the rind. Let dry for 15-20 minutes.
- Using the pink icing with a #5 tip, fill (flood) the area inside the green rind. Let the pink icing dry completely, about 8 to 10 hours or overnight.
- Using the black icing with a #2 tip, pipe small heart shapes on the dried pink surface to create ‘seeds’. Let the black icing dry completely, about 4 to 5 hours.
Notes
WiseRecipes’ Top Tips for Cookie Decorating Success
This beautiful technique is all about patience. These tips will help you master it.
- Chill Your Dough Thoroughly. For cut-out cookies that hold their shape and have clean, crisp edges, chilling the dough until it’s firm is a non-negotiable step.
- Master Icing Consistency. The “count” method (e.g., “20-second icing”) is the professional secret to perfect royal icing. It’s the key to an outline that holds and a flood that settles smoothly. If your icing is too thick, add water by the drop. Too thin? Add more sifted powdered sugar.
- Let Each Step Dry Completely. Patience is a virtue in cookie decorating! Letting the green rind dry first creates a “dam” to hold the pink flood. And the pink flood must be rock-hard before you attempt to pipe the black hearts on top, or they will bleed and sink.
- Use a Scribe Tool or Toothpick. A simple toothpick is your best friend when flooding with royal icing. Use it to pop any pesky air bubbles and gently guide the icing into tight corners for a perfect, smooth finish.
- Use Gel Food Coloring. For the most vibrant, intense colors like a deep green and bright pink without thinning out your icing, gel-based food coloring is far superior to the liquid kind.
Keep Them Fresh! Storing Your Works of Art
Once fully dry, these cookies store beautifully, making them a perfect make-ahead gift.
- Storage: Once the royal icing is 100% hard to the touch, you can store the cookies in an airtight container at room temperature. For maximum protection, it’s best to stack them in a single layer or with sheets of parchment paper between the layers. They will stay fresh and crisp for up to two weeks.
FAQs: Your “One in a Melon” Cookie Questions, Answered!
Do I have to use Royal Icing?
For the sharp, clean lines and the hard, durable finish that is perfect for gifting, royal icing is the best choice. A simple buttercream frosting would be delicious but would not dry hard and would be easily smudged.
What if my icing is too thick or thin?
This is the most common royal icing issue! The fix is simple. If it’s too thick, add water literally one drop at a time and stir well. If it’s too thin, add more sifted powdered sugar, one teaspoon at a time, until you reach the right consistency.
Can I make these with a different cookie base?
A classic sugar cookie is ideal because it’s sturdy and provides a neutral, buttery flavor. You could also try this with a simple shortbread cookie, but avoid softer cookies like chocolate chip, as they won’t provide a good, flat canvas for decorating.
Can I freeze these cookies?
Yes, but with care. You can freeze the undecorated, baked cookies very well. Freezing finished royal icing cookies can sometimes cause the colors to bleed or the icing to get a little spotty upon thawing due to condensation. If you do freeze the finished cookies, let them thaw in the open air, not in a sealed container.
Final Thoughts: A Cookie from the Heart
There is nothing more special than a homemade cookie that is a true work of art and carries a sweet, clever message. These “One in a Melon” Cookies are a perfect project for expressing your creativity and affection in a fun and unique way. I hope you have a wonderful time creating these edible valentines. Happy Baking!