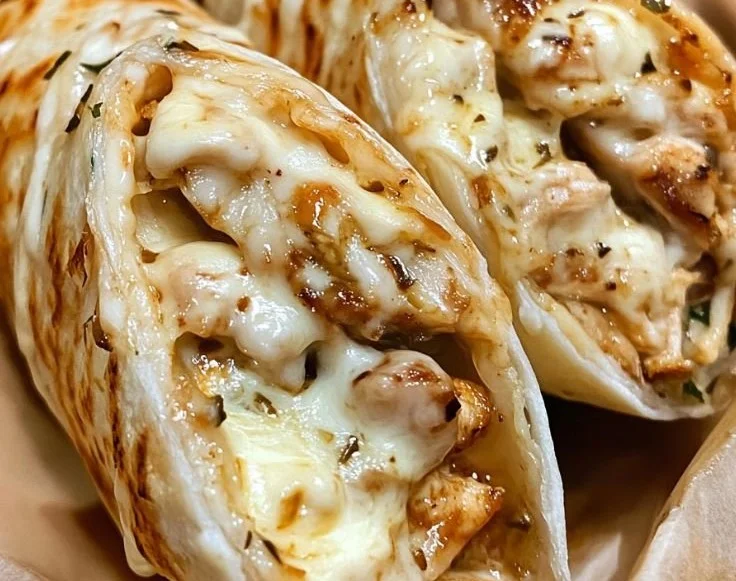
Ooey-Gooey Cheesy Garlic Chicken Wraps
I still remember unwrapping the first one, the warm tortilla giving way to a ribbon of melty cheese and garlicky chicken that smelled like a cozy weekend kitchen. These Ooey-Gooey Cheesy Garlic Chicken Wraps are the kind of comfort food that feels indulgent but comes together in a snap. If you love crispy edges, melty…
I still remember unwrapping the first one, the warm tortilla giving way to a ribbon of melty cheese and garlicky chicken that smelled like a cozy weekend kitchen. These Ooey-Gooey Cheesy Garlic Chicken Wraps are the kind of comfort food that feels indulgent but comes together in a snap. If you love crispy edges, melty centers, and garlic that hums in the background, you are in for a treat—this is the kind of recipe I make when friends drop by unexpectedly or when I want a delicious weeknight dinner without fuss. For another cheesy, handheld favorite, try my take on cheesy chicken and veggie quesadillas for inspiration.
Why You’ll Fall for These Wraps
- Perfect balance of textures: a crispy, golden exterior meets a soft, gooey interior that makes every bite satisfying.
- Fast and forgiving: this recipe is great for using leftover chicken and whatever veg you have on hand.
- Aromatic garlic and cheese: the garlic brightens the chicken while the cheese creates that comforting, stretchy pull we all secretly love.
- Crowd-pleaser: kids, roommates, and guests will all reach for seconds; they work equally well for lunchboxes or casual dinner parties.
- Versatile and customizable: swap cheeses or add a sauce to match your mood.
Ingredients for the Ooey-Gooey Magic
- 2 cups cooked chicken, shredded — a great way to use roast chicken or leftover rotisserie; provides hearty protein and texture.
- 1 cup shredded cheese (e.g., mozzarella or cheddar) — melts into that signature ooze; mozzarella gives stretch, cheddar gives flavor.
- 3 cloves garlic, minced — the aromatic backbone; sautéing mellows its bite and releases sweet, savory notes.
- 4 large tortillas — the canvas for everything; choose flour tortillas for pliability and browning.
- 1 cup mixed vegetables (e.g., bell peppers, spinach, onions) — adds color, crunch, and nutrition; cook until tender.
- Salt and pepper to taste — simple seasonings that bring all the components together.
- Cooking oil or butter for frying — butter creates a nutty, golden crust while oil is forgiving at higher heat. If you want a baked alternative, consider preparing the chicken as in this baked garlic parmesan chicken for extra flavor.
Let’s Get Cooking: Follow These Steps
I find it helpful to have everything prepped and within arm’s reach before you start; the smell of garlic hitting warm oil is the best motivator.
- In a skillet, heat a little cooking oil over medium heat. Add minced garlic and sauté until fragrant.,
- Add the shredded chicken and mixed vegetables, and season with salt and pepper. Cook until heated through.,
- Place a tortilla on a flat surface, and spoon some of the chicken mixture in the center. Top with shredded cheese.,
- Fold in the sides of the tortilla and roll it up tightly.,
- In the same skillet, add a little more oil or butter, and place the wraps seam-side down. Cook until golden brown and crispy on both sides.,
- Serve warm and enjoy!
A small note: if your skillet is crowded, cook the wraps in batches so they crisp beautifully. If you prefer a lighter method, try warming them in a nonstick pan with minimal oil or crisping them under the broiler for a minute per side, watching carefully. If you want an air-fried crunch, this air fryer garlic parmesan chicken skewers technique can inspire timing and crisping ideas.
My Go-To Tips for Perfect Wraps
- Use hot pan, moderate heat: medium heat lets the cheese melt without burning the tortilla. I always preheat the skillet until a drop of water dances.
- Press gently while toasting: using a spatula to press the wrap ensures even contact for a crisp, golden exterior.
- Keep fillings warm: cold chicken can cool the wrap and slow melting; briefly reheat the filling in the skillet before assembling.
- Cheese ratio matters: I do about 1/4 to 1/3 cup per wrap so each bite has cheesy stretch without being soupy.
- Make ahead tip: assemble but do not brown; wrap in parchment and refrigerate up to 24 hours, then pan-fry just before serving. For a playful pastry twist, try experimenting with a savory pastry experiment like this cheesy garlic cruffin to inspire laminated layers and buttered finishes.
Fun Ways to Mix It Up
- Swap cheese: try pepper jack for a spicy kick or Gruyere for a deeper, nuttier profile.
- Change the protein: shredded turkey or pulled pork are delicious substitutes; for a vegetarian option, use marinated tofu or chickpeas.
- Add a sauce: a smear of pesto, chipotle mayo, or a drizzle of buffalo sauce brings big flavor quickly.
- Mediterranean twist: add olives, feta, and roasted red peppers for bright, tangy notes.
- Stuff with roasted veg: for heartier veg-focused wraps, fold in roasted asparagus or stuffed flavors reminiscent of this cheesy asparagus stuffed chicken idea.
How I Like to Serve Them
I love presenting these wraps sliced at a jaunty angle so the melted cheese and colorful filling peek out like a warm promise. Plate them on a simple wooden board with a small bowl of cooling yogurt dip or salsa on the side. For a picnic, wrap each one in parchment and tie with twine; the residual warmth keeps the cheese inviting rather than congealed. Pair them with a crisp green salad dressed lightly in lemon and olive oil, or go all in with sweet potato fries for a weekend treat. The contrast of textures—the glistening, gooey interior and the flaky, toasted exterior—really sings when accompanied by something tangy, like pickled red onions or a squeeze of fresh lime.
Keeping Them Fresh and Tasty
- Refrigeration: store cooled wraps in an airtight container for up to 3 days. Reheat in a skillet to restore crispness, adding a splash of oil if needed.
- Freezing: wrap individually in plastic wrap and foil; freeze up to 2 months. Thaw overnight in the fridge before reheating.
- Reheating: for best texture, reheat in a skillet over medium-low heat, flipping until warmed through and crisp. Avoid microwaving unless you are in a rush; the microwave will soften the tortilla and make the cheese rubbery.
- Travel tip: if taking them on a trip, keep cold items chilled in an insulated bag and warm them briefly on a portable skillet just before eating.
Your Questions, Answered
Q: Can I make these gluten free?
A: Absolutely. Use gluten-free tortillas or large lettuce leaves for a low-carb wrap. Note that cooking time is the same, but some gluten-free wraps brown faster, so watch the skillet.
Q: What cheese melts best for that stringy, ooey-gooey effect?
A: Mozzarella is classic for stretch, while a mild cheddar melts well and gives more flavor. A blend often gives the best of both worlds.
Q: How do I prevent the tortilla from becoming soggy?
A: Make sure fillings are warm and not overly wet. Sauté vegetables until most moisture has evaporated, and don’t overstuff the wraps. Toasting seam-side down first seals them and helps prevent leaking.
Q: Can I assemble these ahead for a party?
A: Yes. Assemble the wraps and keep them chilled. Just toast them right before serving to achieve that golden, crispy exterior and hot, melty interior.
Conclusion
I hope these Ooey-Gooey Cheesy Garlic Chicken Wraps become one of your go-to weeknight pleasures, the kind of food that comforts you and impresses friends without a lot of fuss. For another version to compare techniques, check this take on Cheesy Garlic Chicken Wraps – Cooked & Loved, or see a similar spin at Ooey-Gooey Cheesy Garlic Chicken Wraps – RecipesXpert. If you like collecting variations, there is another helpful recipe worth reading at Recipe: Cheesy Garlic Chicken Wraps. Give these a try, have fun with the fillings, and let me know which variation becomes your new favorite.
Ooey-Gooey Cheesy Garlic Chicken Wraps
Ingredients
Method
- Prep all ingredients and have them ready.
- In a skillet, heat a little cooking oil over medium heat and sauté minced garlic until fragrant.
- Add shredded chicken and mixed vegetables to the skillet, seasoning with salt and pepper. Cook until heated through.
- Place a tortilla on a flat surface, spoon chicken mixture in the center, and top with shredded cheese.
- Fold in the sides of the tortilla and roll it up tightly.
- In the same skillet, add more oil or butter and place the wraps seam-side down. Cook until golden brown and crispy on both sides.
- Serve warm and enjoy!