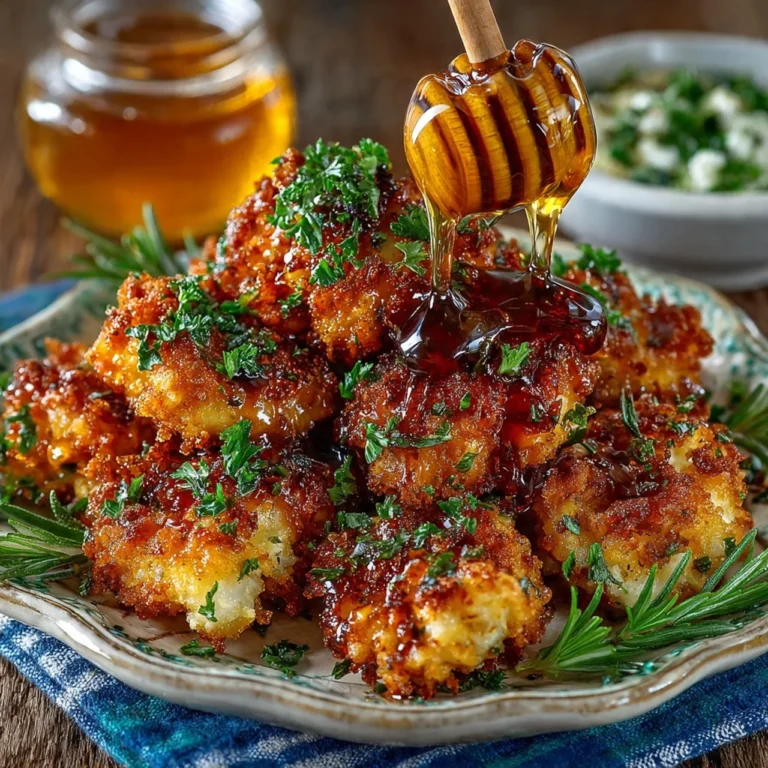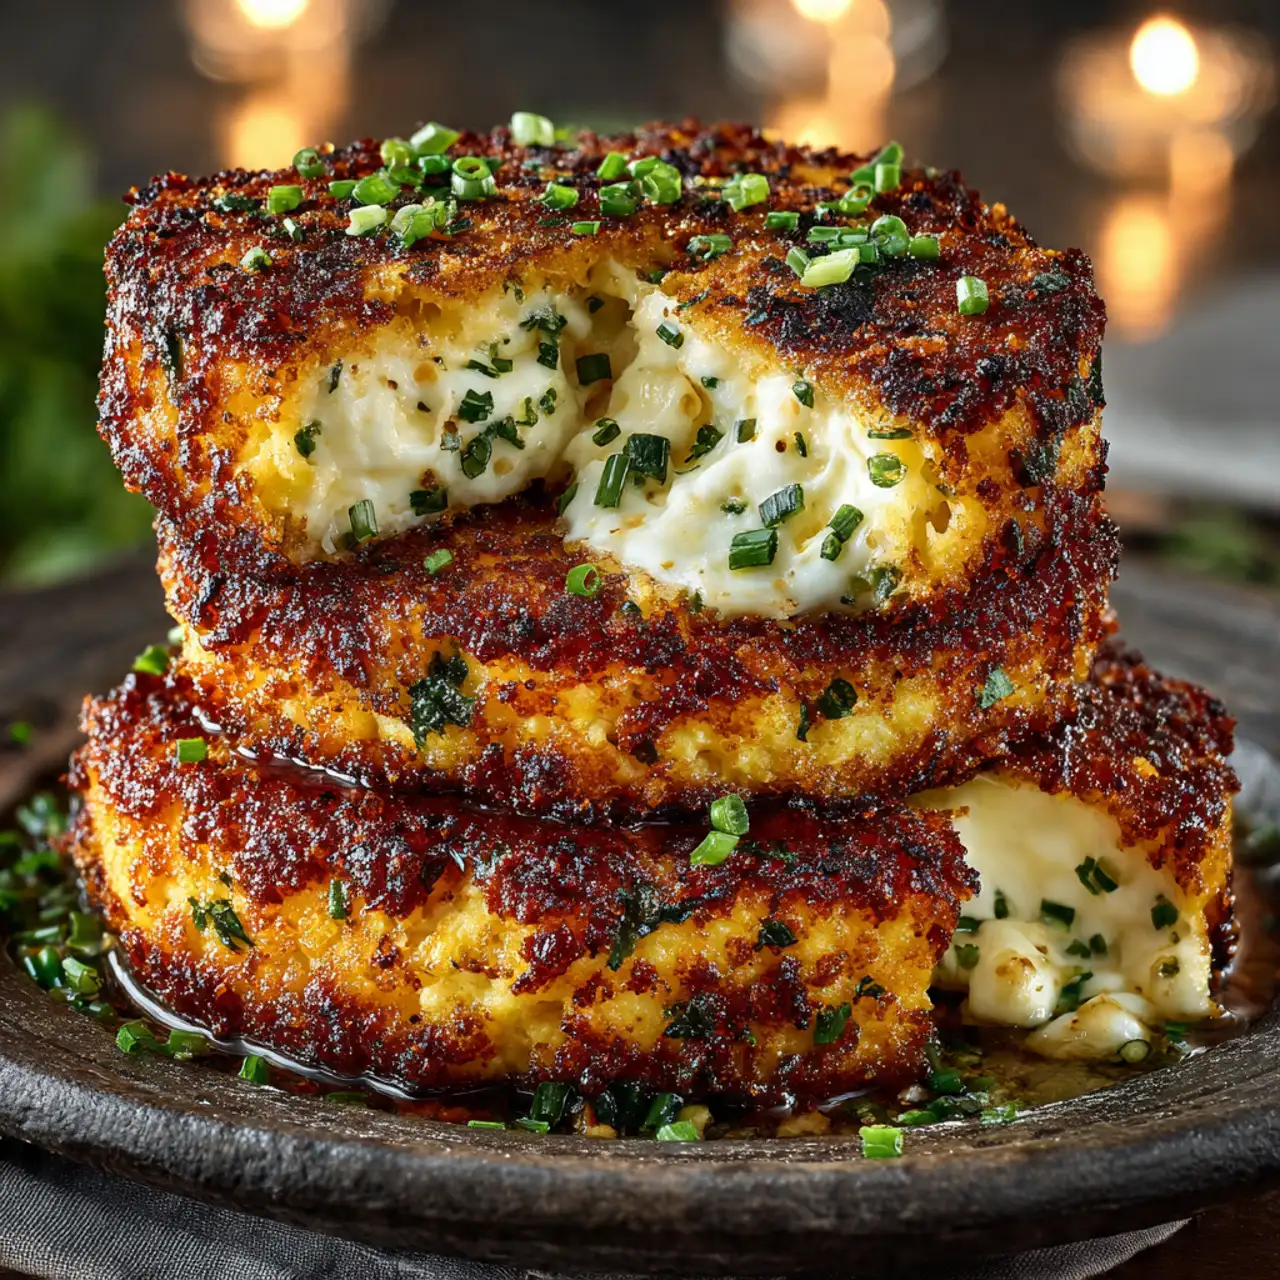
Pan-Fried Grit Cakes with Cheese: Crispy on the Outside, Creamy Inside
Take the most comforting bowl of stone-ground grits you have ever tasted and turn it into something even better. These Crispy Fried Grit Cakes are a total revelation in texture, featuring a shatteringly crisp, golden-brown crust that gives way to an impossibly creamy and cheesy center. By chilling the grits and pan-frying them to perfection,…
Take the most comforting bowl of stone-ground grits you have ever tasted and turn it into something even better. These Crispy Fried Grit Cakes are a total revelation in texture, featuring a shatteringly crisp, golden-brown crust that gives way to an impossibly creamy and cheesy center. By chilling the grits and pan-frying them to perfection, you transform a humble southern staple into a sophisticated and utterly addictive treat. It is a soul-warming dish that works just as well for a decadent brunch as it does for a savory dinner side.
Get ready to master a Southern classic, a recipe so delicious and impressive, it’s destined to become a go-to in your entertaining and comfort food repertoire.

Why These Grit Cakes are a Comfort Food Masterpiece
You are going to be completely obsessed with the incredible texture and rich, cheesy flavor of these grit cakes. They are a true game-changer. Here’s why:
- The Ultimate Texture Contrast: The perfectly crisp, golden-brown exterior giving way to a soft, ultra-creamy, and cheesy interior is a truly unforgettable eating experience.
- Incredibly Rich and Flavorful: These aren’t plain grits! They’re slow-simmered in chicken broth and milk with garlic, then enriched with cheddar cheese and butter for a deep, savory flavor.
- A Perfect Make-Ahead Recipe: The grits must be made and chilled for at least 3 hours (or up to 3 days!), making this an absolutely perfect, stress-free dish to prep for a party or special meal.
- Endlessly Versatile: Serve them as an appetizer, a side dish for steak or pork, or as the base for an incredible Shrimp and Grits or Eggs Benedict.
- A True Southern Classic, Perfected: This recipe breaks down the process into simple, foolproof steps, ensuring you get perfect, restaurant-quality grit cakes every single time.
Recipe Snapshot
| Prep Time | 10 minutes |
| Cook Time | 25 minutes |
| Chill Time | 3 hours 30 minutes |
| Total Time | 4 hours 5 minutes |
| Servings | 12-16 cakes |
| Calories | 285 kcal per cake (estimated for 16 cakes) |
| Course | Appetizer, Side Dish, Brunch |
| Cuisine | American, Southern |
| Difficulty/Method | Easy / Stovetop & Frying |
Your Shopping List for These Cheesy, Crispy Cakes
This impressive dish comes together with a beautiful array of wholesome, classic ingredients.
→ For the Cheesy Grits
- 4 cups chicken broth & 3 cups milk → A combination that creates a rich, flavorful, and creamy base for our grits.
- 2 garlic cloves → Grated, to infuse the liquid with a subtle garlic flavor.
- 2 tsp kosher salt, divided → To season the grits and the flour dredge.
- 2 cups stone-ground grits → For the best texture and authentic corn flavor. Not instant grits!
- 1 large egg → Tempered in at the end to add richness and help the grits set firmly.
- 2 cups shredded cheddar cheese → Use a sharp cheddar for the best, boldest flavor.
- 4 Tbsp salted butter → Cubed and softened, for a final touch of richness.
- ¾ tsp ground black pepper, divided → For a little bit of spice.
→ For Frying and Serving
- Nonstick cooking spray → To prepare the pan for chilling.
- ½ cup all-purpose flour → For a light, crisp dredging crust.
- Vegetable oil → For frying to golden-brown perfection.
- Chopped fresh chives → For the perfect, fresh, oniony garnish.
Let’s Get Cooking! Your Step-by-Step Guide
Ready to create the most delicious grit cakes of your life? The secret is all in the chill.
Part 1: The Creamy, Cheesy Grits
- Simmer the Liquids: In a large pot, bring the chicken broth, milk, grated garlic, and ½ teaspoon of salt to a gentle simmer over medium heat.
- Cook the Grits: Gradually whisk in the stone-ground grits. Once they are all incorporated, reduce the heat to low, cover the pot, and cook, stirring frequently, for 15 to 20 minutes, or until the grits are thick and tender.
- Temper the Egg: In a small bowl, lightly beat the egg. While whisking the egg constantly, slowly spoon in about ¼ cup of the hot grits. This is called “tempering” and it prevents the egg from scrambling. Pour the tempered egg mixture back into the pot of grits, stirring until well combined.
- Add the Good Stuff: Stir in the shredded cheese and the softened butter until they are completely melted and the grits are ultra-creamy. Stir in ½ teaspoon of pepper and taste for salt.
Part 2: Chill and Cut
- Chill to Set: Spray a 13×9-inch baking pan with cooking spray. Spoon the hot grits into the prepared pan and use a rubber spatula to smooth them into an even layer. Press a large piece of plastic wrap directly onto the surface of the grits to prevent a skin from forming.
- Refrigerate: Let the grits cool at room temperature for at least 30 minutes before placing the pan in the refrigerator. Chill for at least 3 hours, or up to 3 days, until the grits are completely firm and set.
- Cut the Cakes: Once chilled and firm, turn the slab of grits out onto a cutting board. Use a 2- or 2 ½-inch round biscuit cutter to cut the grits into rounds. Alternatively, you can simply slice them into 2-inch squares with a knife.
Part 3: Fry to Golden Perfection
- Dredge in Flour: In a shallow dish, whisk together the flour with the remaining ½ teaspoon of salt and ¼ teaspoon of pepper. Lightly dredge each grit cake in the seasoned flour, shaking off any excess.
- Fry the Cakes: In a large cast-iron skillet, add about ½ inch of vegetable oil. Heat the oil over medium-high heat to 350°F. Working in batches, carefully place the grit cakes in the hot oil.
- Get Them Golden: Cook the cakes without moving them for 2 to 4 minutes per side, until they are a deep golden brown and wonderfully crisp. They are fragile, so flip them carefully.
- Drain and Serve: Use a spatula to transfer the fried grit cakes to a plate lined with paper towels to drain. Immediately sprinkle with a little salt and fresh chopped chives. Serve hot!
Crispy Pan-Fried Cheesy Grit Cakes
Ingredients
Equipment
Method
- In a large pot, bring chicken broth, milk, garlic, and ½ teaspoon of salt to a simmer. Gradually whisk in the grits. Reduce heat to low, cover, and cook, stirring frequently, until tender, 15 to 20 minutes.
- In a small bowl, beat the egg. Slowly spoon ¼ cup of the hot grits into the egg, stirring constantly to temper it. Add the egg mixture back to the pot, stirring until combined.
- Stir in the cheese and butter until melted. Season with ½ teaspoon of pepper and more salt to taste.
- Spray a 13-by-9-inch baking pan with cooking spray. Spoon the grits into the pan, smoothing into an even layer. Press plastic wrap directly onto the surface. Chill until firm, at least 3 hours.
- Place the flour in a shallow dish and whisk in the remaining ½ teaspoon salt and ¼ teaspoon pepper.
- Cut the chilled grits into rounds with a biscuit cutter or into squares. Dredge each cake in the seasoned flour, shaking off any excess.
- Heat about ½ inch of oil in a large cast-iron skillet over medium-high heat to 350°F. Working in batches, fry the grit cakes until golden brown on one side, 2 to 4 minutes.
- Flip carefully and cook the other side until golden brown, 2 to 3 minutes more. Drain on paper towels, sprinkle with salt and chives, and serve hot.
Notes
WiseRecipes’ Top Tips for Perfect Grit Cakes
These simple secrets will ensure your grit cakes are crispy, creamy, and flawless.
- Use Stone-Ground Grits. For the best texture and authentic, robust corn flavor, you must use stone-ground grits. Do not use instant or quick-cooking grits, as they will not have the same creamy, hearty texture.
- The Chill Time is Non-Negotiable. This is the most crucial part of the recipe. The grits must be completely cold and firm before you can cut and fry them. This is what makes it such a great make-ahead recipe!
- Temper Your Egg! Don’t skip the step of slowly adding a bit of the hot grits to your beaten egg before adding it back to the pot. If you dump the cold egg directly into the hot grits, you’ll end up with scrambled egg grits!
- Don’t Crowd the Frying Pan. For the crispiest crust, fry the grit cakes in batches, ensuring there is plenty of space around each one. Overcrowding the pan will lower the oil temperature and lead to soggy, greasy cakes.
- Be Gentle When Flipping. The grit cakes are delicate when they are hot. Use a thin, wide spatula (like a fish spatula) to carefully flip them in the pan to prevent them from breaking.
Keep Them Fresh! Storing and Reheating
These are fantastic for making ahead, but best enjoyed fresh from the skillet.
- Make-Ahead: The best part of this recipe is that the grits must be made ahead! You can keep the chilled, uncut slab of grits in the refrigerator for up to 3 days. When you’re ready to serve, just cut, dredge, and fry!
- Reheating: Leftover fried grit cakes are best reheated in an air fryer or a hot oven (400°F) for a few minutes to re-crisp the exterior. Microwaving will make them soft.
FAQs: Your Grit Cake Questions, Answered!
Can I make these with a different kind of cheese?
Absolutely! While sharp cheddar is classic, these would also be delicious with Gruyère, smoked Gouda, or a spicy Pepper Jack for a kick.
Can I bake these instead of frying them?
You can! For a lighter version, place the dredged grit cakes on a parchment-lined baking sheet. Spray them generously with cooking spray and bake at 425°F for about 15-20 minutes, flipping halfway through, until golden and crisp. The texture won’t be quite as crunchy as pan-frying, but they will still be delicious.
What should I serve with grit cakes?
They are incredibly versatile! Serve them as a base for shrimp and grits, top them with a poached egg and hollandaise for a Southern-style Benedict, or serve them as a side dish with braised short ribs, pork chops, or a juicy steak.
Why are my grit cakes falling apart in the pan?
This usually happens for two reasons: either the grits were not chilled for long enough and weren’t fully firm, or the oil wasn’t hot enough when you added them to the pan. Make sure they are cold and solid, and that your oil is shimmering at 350°F before you start frying.
Final Thoughts: A True Taste of Southern Comfort
There is nothing more satisfying than mastering a classic comfort food dish that can be dressed up or down for any occasion. These Crispy Fried Grit Cakes are a true celebration of texture and flavor—a perfect project that delivers a truly special and memorable result. I hope they bring a little bit of Southern charm and deliciousness to your table. Happy Cooking!