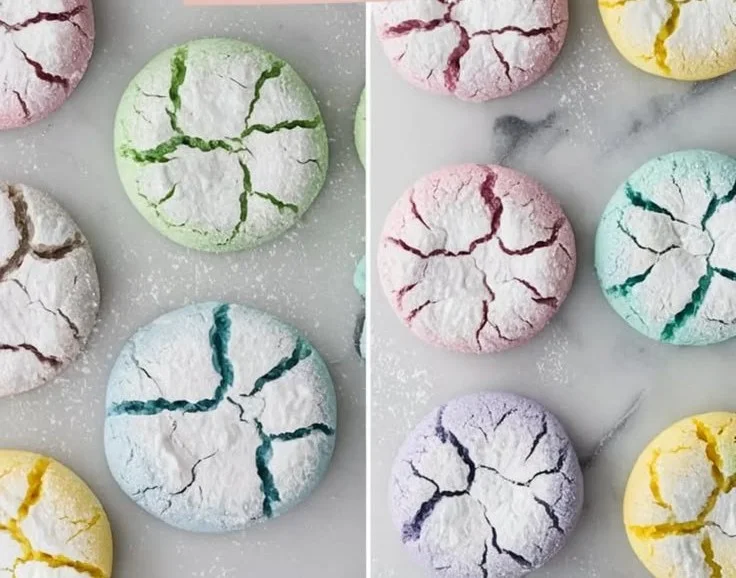
Pastel Crinkle Cookies
A Rainbow of Flavor: My Go-To Pastel Crinkle Cookies You know that moment when you walk into a room and the sweet scent of freshly baked cookies hits you, and suddenly all your worries seem to float away? That’s what happens every time I whip up a batch of my favorite Pastel Crinkle Cookies. Whenever…
A Rainbow of Flavor: My Go-To Pastel Crinkle Cookies
You know that moment when you walk into a room and the sweet scent of freshly baked cookies hits you, and suddenly all your worries seem to float away? That’s what happens every time I whip up a batch of my favorite Pastel Crinkle Cookies. Whenever I feel like lifting my spirits or impressing friends, I turn to these colorful delights. Trust me, the first bite is pure magic—soft, chewy, and just sweet enough to make you reach for another.
I stumbled upon this recipe a few years ago during a cooking marathon with my kids. We spent an entire afternoon experimenting with colors and flavors, and from that point on, these cookies became a staple in our household. It’s not just the way they look—those beautiful pastel colors that brighten up any cookie platter—but also the amazing taste that wraps you in nostalgia.
Gathering the Essentials
So, before I dive into the cooking details, let’s talk about what you’ll need. You won’t require anything out of the ordinary—just your basic groceries. Here’s the rundown: you’ll need 1 cup of granulated sugar for sweetness, 1/2 cup of brown sugar to amplify that depth of flavor, and 1/2 cup of softened butter to create that deliciously rich texture. Then there are 2 large eggs, a splash of vanilla extract, and all-purpose flour—2 cups of it. Don’t forget the baking powder (1 teaspoon), a sprinkle of salt (1/2 teaspoon), and a pinch of baking soda (1/4 teaspoon) to help the cookies rise. Finally, get some food coloring in various pastel shades and powdered sugar for that signature crinkle effect.
The Art of Mixing
To get started, the first thing I do is preheat the oven to 350°F (175°C). This ensures that my cookies begin baking as soon as the dough is ready. While that’s going on, I grab a large bowl and start creaming together the granulated sugar, brown sugar, and softened butter. It’s crucial to beat these ingredients until the mixture is light and fluffy—this is where the magic happens! The more air you incorporate, the softer your cookies will be.
Once I’ve reached that perfect creaminess, I add the eggs one at a time. This step is essential; it helps to keep the dough moist and is a joy to whip up as you can almost feel the love going into it. Then, in goes the splash of vanilla extract, which infuses a comforting warmth into the mix.
Dry Ingredients—The Backbone of the Dough
Next, it’s time to whisk together the dry ingredients in another bowl. I combine 2 cups of all-purpose flour, 1 teaspoon of baking powder, 1/2 teaspoon of salt, and 1/4 teaspoon of baking soda. This part may feel tedious, but trust me, it’s crucial for achieving that impeccable balance. Gradually, I add the dry mixture to the creamy wet ingredients and mix until just combined. Overmixing can lead to tougher cookies, so be gentle here.
Now comes the fun part! I usually divide the dough into portions and start adding food coloring until I achieve those dreamy pastel shades—think soft pink, baby blue, mint green, and a gentle lavender. The kids love to help with this part, and it brings out their creativity. Each portion becomes a little ball of color, and you can feel the excitement in the air.
Shaping and Baking: The Best Part
After coloring, I roll the dough into small balls—about a tablespoon each. Here’s a little tip: rolling them in powdered sugar not only gives these cookies that iconic crinkle appearance but also adds a delightful sugary crust that contrasts beautifully with the soft interior. You’ll want to ensure your cookies are spaced about 2 inches apart on a baking sheet lined with parchment paper. They do tend to spread a bit!
When I pop them in the oven, that’s when the spell of anticipation begins. I bake them for about 10 to 12 minutes, keeping an eye on them. You can tell they’re done when the edges are set but the tops still look a bit puffy; don’t worry, they’ll crinkle as they cool down. Once they come out, I let them cool for just a few minutes on the baking sheet before gently transferring them to a wire rack to cool completely.
Why This Recipe Stands Out
There’s something utterly special about these cookies. The initial crunch yields to the soft, tender crumb, and the vibrant colors never fail to elicit gasps of delight from friends and family alike. They’re perfect for parties, bake sales, or even just on a gloomy afternoon when you need a little pick-me-up.
A little while ago, I decided to try adding some chocolate chips to one of the pastel doughs. Let me tell you, that was a game changer! The mix of chocolatey goodness with the pastel softness brought a whole new layer of indulgence. You could also try mixing in some citrus zest for a refreshing twist or even replace some of the vanilla extract with almond extract for a nutty flavor.
Storing Your Sweet Creations
If, by chance, you find yourself with leftover cookies—though it’s rare—I usually store them in an airtight container. They keep well for about a week, though I must admit, they rarely last that long in our household! On the occasion they do, the cookies still maintain their soft texture, but you can always pop them in the microwave for a few seconds to bring back the fresh-baked warmth.
Final Thoughts: The Love Baked In
What I adore most about pastel crinkle cookies, beyond their charming appearance and delightful taste, is how they bring people together. Every time I bake them, I’m creating not just treats but also wonderful memories to share with family and friends. So next time you’re looking to create something delightful and colorful in your kitchen, I wholeheartedly recommend giving these cookies a try. After all, happiness can often be found in the simplest of things—like a warm cookie fresh from the oven.
Pastel Crinkle Cookies
Ingredients
Method
- Preheat the oven to 350°F (175°C).
- In a large bowl, cream together the granulated sugar, brown sugar, and softened butter until light and fluffy.
- Add the eggs one at a time, mixing well after each addition.
- Stir in the vanilla extract.
- In another bowl, whisk together the flour, baking powder, salt, and baking soda.
- Gradually add the dry mixture to the creamy wet ingredients, mixing until just combined. Avoid overmixing.
- Divide the dough into portions and add food coloring to achieve desired pastel shades.
- Roll the dough into small balls (about 1 tablespoon each).
- Roll the balls in powdered sugar to coat.
- Place the coated balls on a baking sheet lined with parchment paper, spaced about 2 inches apart.
- Bake for 10-12 minutes until edges are set and tops are puffy; they will crinkle as they cool.
- Let them cool on the baking sheet for a few minutes before transferring to a wire rack.