Pastel White Chocolate Cookies
The Joy of Baking Pastel White Chocolate Cookies Baking has always had a magical quality for me. It’s like alchemy: taking simple ingredients and transforming them into delightful creations that warm the heart and satisfy the sweet tooth. One of my favorite recipes that perfectly embodies this enchantment is for Pastel White Chocolate Cookies. These…
The Joy of Baking Pastel White Chocolate Cookies
Baking has always had a magical quality for me. It’s like alchemy: taking simple ingredients and transforming them into delightful creations that warm the heart and satisfy the sweet tooth. One of my favorite recipes that perfectly embodies this enchantment is for Pastel White Chocolate Cookies. These dainty, colorful treats look just as wonderful as they taste, bringing a cheerful touch to any gathering or simply a cozy afternoon at home.
Let me take you through the delightful experience of making these cookies. You’ll need a handful of ingredients that you probably already have at home, creating a beautiful rainbow of flavor that’s just too irresistible. First things first, gather your tools. You’ll want some basic baking essentials like a mixing bowl, baking sheets, and a bit of patience.
Why Pastels?
You might be wondering, “Why pastel?” Well, pastel colors inject a playful vibe into the kitchen. Plus, it makes them perfect for celebrations or even just a whimsical afternoon tea. To start, preheat your oven to 350°F (175°C). The warm air will soon fill your kitchen with sweet, buttery aromas, but first, we’ve got some mixing to do.
In a large mixing bowl, cream together one cup of softened unsalted butter, three-quarters of a cup each of granulated and powdered sugar. The goal here is to achieve a light and fluffy consistency; it’s all about that delicate texture. I like to use a hand mixer, as it gives me the control to watch the mixture become the perfect creaminess without overdoing it.
Once you’ve got that fluffy texture, it’s time to add in one large egg and a teaspoon of vanilla extract. Oh, the scent of vanilla is simply wonderful—it adds depth and warmth to the cookies. Make sure to beat it in until everything is well combined. This is where the magic starts.
Now, let’s introduce some structure to the dough! In another bowl, whisk together two and a quarter cups of all-purpose flour, half a teaspoon of baking powder, and a quarter teaspoon of salt. Gradually add these dry ingredients to your creamed mixture. Just mix until it’s barely combined—overmixing can lead to tougher cookies, and nobody wants that.
Coloring the Dough
Here comes the fun part: adding color! I usually divide the dough into four sections; then, using pastel food coloring, I mix in the colors to create a lovely assortment. You can go with soft pinks, blues, yellows, or whatever suits your fancy. Each dough ball should be vibrant but not overwhelmingly saturated. Seeing those hues come together makes my heart sing, and I can already imagine how adorable these cookies will be!
Once your dough is colored to your liking, roll them into small balls. I aim for about a tablespoon each; just a nice, bite-sized treat. Arrange them on a baking sheet lined with parchment paper, flattening each ball slightly to ensure even baking. You don’t need the cookies to be perfect little discs, but a gentle press helps them spread evenly.
Baking to Perfection
Now for the waiting game! Pop those beauties into your preheated oven and bake for about 10 to 12 minutes, or until the edges are lightly golden. Don’t be surprised if the aroma starts to fill your home with sweetness—it happens fast! Keep an eye on them; you want that perfect balance of soft centers and just crispy edges.
Once you take the cookies out, allow them to cool for a few minutes on the baking sheet before transferring them to a wire rack. Meanwhile, let’s talk about the white chocolate—because these cookies wouldn’t be the same without it. Melt one cup of white chocolate chips in the microwave or over a double boiler, stirring intermittently until smooth. This is your secret weapon, adding rich creaminess that pairs beautifully with the buttery cookie.
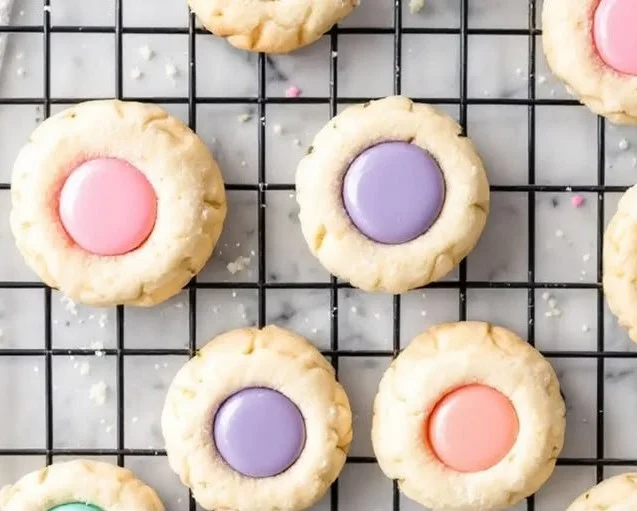
The Art of Sandwiching
Now comes the fun assembly part! Once your cookies have cooled completely, spread a thin layer of the melted white chocolate on the bottom of one cookie and sandwich it with another. You can also do this with just one color if you prefer, and it’s lovely either way. Allow the cookies to set before showcasing them on a plate.
These pastel white chocolate cookies are not only delightful to look at, but they’re also just the right amount of chewy and soft, with that luscious white chocolate providing an unexpected touch. I love serving them at gatherings because they never fail to elicit charm and compliments.
My Personal Tips and Tricks
Through some trial and error, I’ve picked up a few tricks to elevate this recipe. Make sure your butter is softened to room temperature—that’s a game-changer for the creaming process. If you’d like a bit of crunch, toss in some finely chopped nuts or maybe even a sprinkle of sea salt on the melted chocolate before it sets. For an extra zing, try adding a hint of almond extract along with the vanilla.
If you’re ever in a pinch and want to prep ahead, feel free to make the dough, roll it into balls, and freeze them! When you’re ready, pop them in the oven straight from the freezer, giving them a couple of extra minutes. The texture will be just as delightful.
Making Memories
Lastly, the biggest reward of baking these cookies is sharing them with loved ones. I often think back to the summer afternoons when my grandmother and I would bake together, experimenting with colorful icing and shapes. Those were precious moments that added flavor to my childhood. Now, every time I whip up these pastel wonders, I can’t help but reminisce—and share that joy with those around me.
So, whether you’re planning a party, trying to impress friends, or just indulging your own sweet tooth, I encourage you to dive into making these Pastel White Chocolate Cookies. I promise, not only will your kitchen smell divine, but you’ll create memories wrapped in sweetness that last well beyond the last crumb. Happy baking!
Pastel White Chocolate Cookies
Ingredients
Method
- Preheat your oven to 350°F (175°C).
- In a large mixing bowl, cream together softened butter, granulated sugar, and powdered sugar until light and fluffy.
- Add in the egg and vanilla extract. Beat until well combined.
- In another bowl, whisk together flour, baking powder, and salt.
- Gradually add the dry ingredients to the creamed mixture. Mix until just combined.
- Divide the dough into four sections. Mix in pastel food coloring to each section until you achieve the desired colors.
- Roll colored dough into small balls, about one tablespoon each, and arrange on a baking sheet lined with parchment paper. Flatten slightly.
- Bake in the preheated oven for about 10 to 12 minutes until the edges are lightly golden.
- Let cookies cool on the baking sheet for a few minutes before transferring to a wire rack.
- Melt the white chocolate chips until smooth.
- Spread a thin layer of melted chocolate on the bottom of one cookie and sandwich it with another. Allow to set.