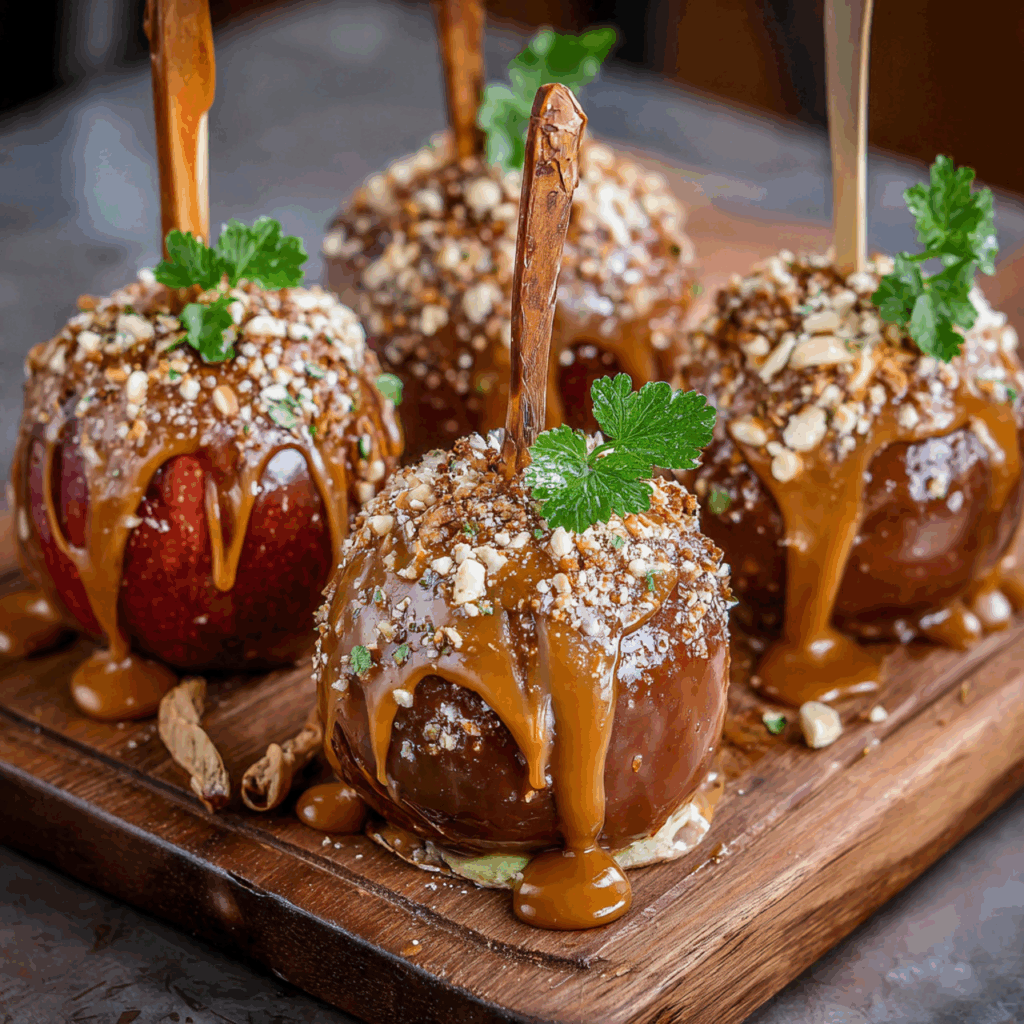
The Ultimate Peanut Butter Caramel Apple Pops (Easy & Healthy!)
Imagine the nostalgic joy of a classic caramel apple, but reinvented into a healthier, easier, and arguably even more delicious treat. Picture thick, crisp slices of fresh apple, enrobed in a rich, silky, homemade peanut butter caramel, and finished with a crunchy sprinkle of chopped nuts. That, my friends, is the simple, brilliant magic of…
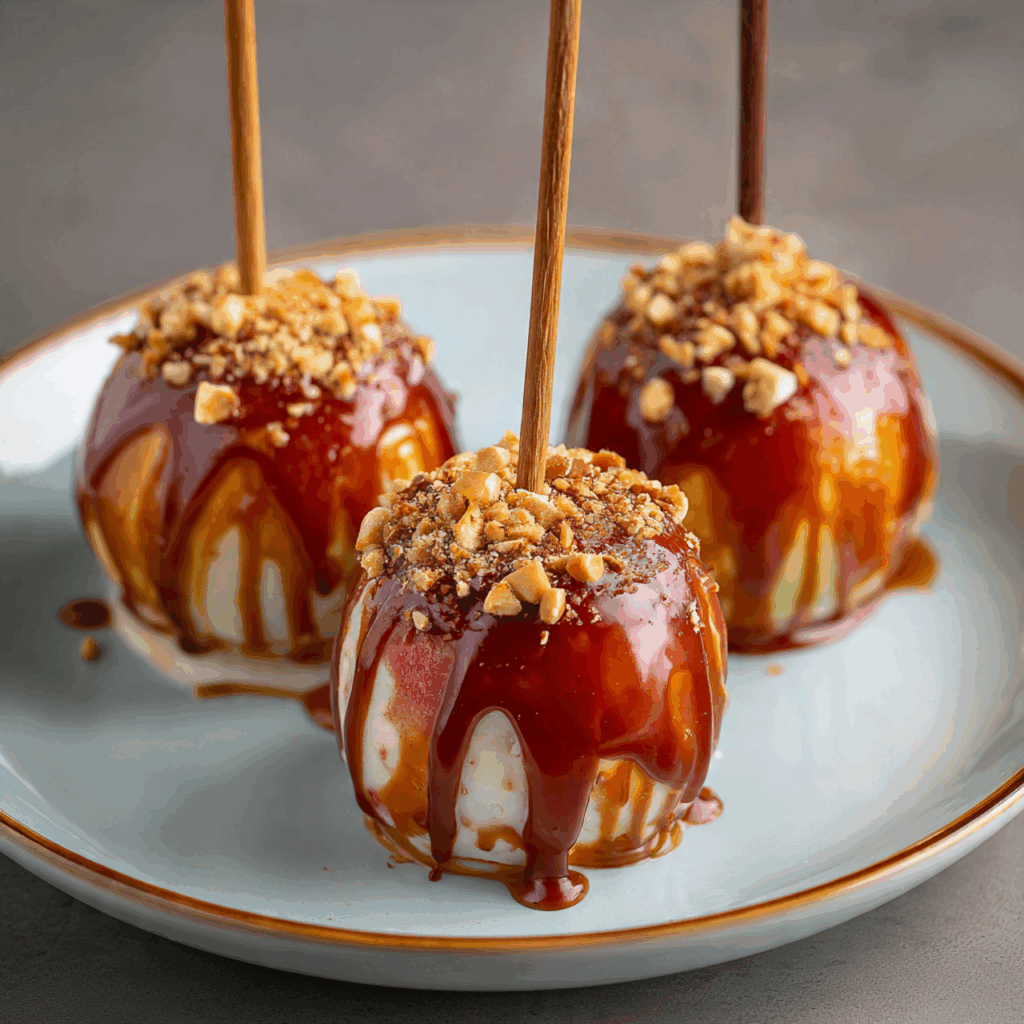
Imagine the nostalgic joy of a classic caramel apple, but reinvented into a healthier, easier, and arguably even more delicious treat. Picture thick, crisp slices of fresh apple, enrobed in a rich, silky, homemade peanut butter caramel, and finished with a crunchy sprinkle of chopped nuts. That, my friends, is the simple, brilliant magic of these Peanut Butter Caramel Apple Pops. This is, without a doubt, the most fun and satisfying way to celebrate the flavors of fall.
I promise you, these apple pops are a true delight for all ages. They are a fantastic, healthier alternative to candy apples and a wonderful way to get kids excited about eating fruit. The combination of the crisp, juicy apple with the rich, slightly salty peanut butter caramel is an absolute flavor explosion. It’s a true show-stopper for a fall party, a Thanksgiving treat, or just a special afternoon snack.
Get ready to create the most popular and talked-about treat of the season, a sweet little project that’s as fun to make as it is to eat.
Why You’ll Be Obsessed with These Apple Pops!
You are going to fall completely in love with this fun, simple, and outrageously delicious recipe. It’s a guaranteed hit. Here’s why you have to make them:
- A Healthier Twist on a Classic: You get all the fun of a caramel apple with a delicious, dairy-free peanut butter caramel that’s naturally sweetened with pure maple syrup.
- Ready in Just 20 Minutes: With a 5-minute caramel and quick assembly, this is an incredibly fast and easy treat to whip up anytime.
- The Perfect Combination of Flavors & Textures: This treat has it all! The crisp, juicy apple, the rich and silky caramel, and the crunchy, salty nut topping are a perfect match.
- Completely Vegan & Dairy-Free: This recipe is entirely plant-based and free from dairy, making it a wonderful, inclusive treat for guests with dietary restrictions.
Recipe Snapshot
| Prep Time | 15 minutes |
| Cook Time | 5 minutes |
| Total Time | 20 minutes (plus chilling) |
| Yield | 7-8 pops |
| Calories | ~300 kcal per pop |
| Course | Dessert, Snack |
| Cuisine | American |
| Difficulty/Method | Easy / Stovetop |
Your Shopping List for These Delicious Pops
This fun recipe uses just a handful of simple, wholesome ingredients. Here’s what you’ll need:
→ For the Apple Pops & Topping
- 3 large apples → Any crisp variety works! Pink Lady, Honeycrisp, or Granny Smith are all fantastic choices.
- 1 cup water & 2 tablespoons lemon juice → Optional, for soaking the apples to prevent browning.
- Popsicle sticks → For turning our slices into pops!
- Chopped nuts for sprinkling → Crushed peanuts and pecans are delicious.
→ For the Dairy-Free Peanut Butter Caramel
- 5 tablespoons coconut oil → The rich, healthy fat base for our caramel.
- 4 tablespoons pure maple syrup → For a refined-sugar-free sweetness.
- 1/2 teaspoon pure vanilla extract → Enhances all the other flavors.
- A pinch of salt → To balance the sweetness and enhance the peanut butter flavor.
- 6 tablespoons peanut butter → Creamy, natural peanut butter works best.
- 1/4 cup plant milk → Such as oat, soy, or coconut milk, to create a silky, smooth sauce.
Let’s Get Crafting! Your Step-by-Step Apple Pop Guide
Ready to create the most fun and delicious fall treat? This process is so quick and easy.
Part 1: Prep the Apples
- Slice the Apples: Wash and dry your apples. To get perfect, core-free slices, slice the outer “cheeks” off the apple first, then slice the sides next to the core. Aim for thick slices, about 1/2 to 3/4-inch wide.
- Soak the Slices (Optional): If you won’t be eating the pops right away, it’s a good idea to prevent browning. Soak the apple slices for 5-10 minutes in a bowl with 1 cup of water and 2 tablespoons of lemon juice.
- Insert the Sticks: Line a large baking sheet with parchment paper. If you soaked the apples, pat them completely dry. Carefully make a small slit in the bottom (skin side) of each apple slice with a knife, then gently push a popsicle stick into the center until it feels secure.
Part 2: Make the Caramel & Assemble
- Make the Peanut Butter Caramel: In a small saucepan, melt the coconut oil over high heat. Once melted, whisk in the maple syrup, vanilla, and salt. When the mixture is bubbling, whisk in the peanut butter. Keep whisking continuously until the mixture starts to thicken. The order is important!
- Finish the Sauce: Remove the pan from the heat and whisk in the plant milk until the sauce is smooth, silky, and looks like real caramel! If it seems too thin, let it cool for a few minutes to thicken up.
- Dip and Top: One by one, dip an apple pop into the warm caramel, using a spoon to help coat it completely. Place the coated pop on the parchment-lined baking sheet.
- Add Toppings Immediately: If you’re using chopped nuts or other sprinkles, be sure to sprinkle them on the pop right after you dip it, while the caramel is still wet, so they stick properly.
- Chill to Set: Once all the pops are coated and decorated, place the baking sheet in the refrigerator for about 30 minutes, or until the caramel has firmed up.
WiseRecipes’ Top Tips for Perfect Apple Pops
These simple tricks will ensure your festive treats are flawless and fun to make.
- Follow the Caramel Ingredient Order. As the recipe notes, the order of operations is very important for the caramel’s texture. Melting the oil and syrup first before adding the peanut butter is key to getting a thick, dippable consistency.
- Pat the Apples Dry. Whether you soak them in lemon water or not, make sure your apple slices are completely dry before dipping. Caramel will not stick to a wet surface!
- Let the Caramel Cool if Needed. If your caramel seems too thin and is running right off the apples, don’t panic! It just needs to cool down a bit. Let the saucepan sit off the heat for 5-10 minutes, and it will thicken up considerably as it cools.
- Work Quickly with Toppings. Have your chopped nuts or any other toppings ready to go in a small bowl before you start dipping. The caramel begins to set as soon as it hits the cool apple, so you need to sprinkle the toppings on right away for them to stick.
- Use Crisp Apples. For the best eating experience, choose a firm, crisp apple variety like Pink Lady, Honeycrisp, or Granny Smith (for a tart option). Softer apples like Red Delicious can be mealy and won’t provide that satisfying crunch.
Peanut Butter Caramel Apple Pops
Ingredients
Equipment
Method
- Slice the apples into ½ to 3/4 inch wide slices. Optional: soak the apple slices in lemon water for 5-10 minutes to prevent browning, then pat completely dry.
- Line a large baking sheet with parchment paper. Carefully make a small slit in the bottom of each apple slice and gently push in a popsicle stick.
- In a small saucepan, melt the coconut oil over high heat. Once melted, whisk in the maple syrup, vanilla and salt.
- Once the mixture is bubbling, whisk in the peanut butter, whisking continuously until the mixture starts to thicken.
- Remove from heat and whisk in the plant milk until it’s smooth and silky. If the caramel is too thin, allow it to cool for a few minutes to thicken.
- Gently dip an apple slice in the caramel to coat it completely, using a spoon to help. Place the coated pop on the parchment-lined baking sheet.
- Immediately sprinkle the pop with chopped nuts before the caramel sets. Repeat with all apple slices.
- Place the baking sheet into the fridge for about 30 minutes to allow the caramel to set.
Notes
Keep Them Fresh! Storing Your Apple Pops
These are a fantastic make-ahead treat for a party or a fun snack for the week!
- Storage: Store the finished apple pops in a single layer in an airtight container in the refrigerator. Placing a small piece of parchment paper between them can help prevent sticking. They will stay fresh and delicious for up to 4-5 days.
FAQs: Your Apple Pop Questions, Answered!
Can I use a different kind of nut butter?
Yes, absolutely! Creamy almond butter or cashew butter would be a fantastic and delicious substitute for the peanut butter in the caramel sauce.
What other toppings could I use?
Get creative! Mini chocolate chips, shredded coconut, sprinkles, or crushed-up freeze-dried fruit would all be fun and delicious toppings for these apple pops.
My caramel is still too thin. How can I fix it?
If letting it cool down doesn’t thicken it enough, the easiest fix is to whisk in another tablespoon or two of peanut butter. The nut butter is the primary thickener, so adding a little more will help it firm up.
Can I make these for a party?
Yes, they are perfect for parties! You can make them a day in advance and keep them in the fridge. They look beautiful arranged on a platter and are an easy-to-eat, mess-free treat for guests.
Final Thoughts: The Perfect Fall Treat
There is so much joy in creating a treat that is both fun to make and secretly healthy. These Peanut Butter Caramel Apple Pops are a true celebration of autumn, a simple and delicious project that is perfect for getting the whole family involved in the kitchen. I hope they bring a little bit of sweetness and fun to your day. Happy crafting!