The Ultimate Peppermint No-Churn Ice Cream (So Easy & Festive!)
Imagine a scoop of the creamiest, dreamiest ice cream, bursting with the cool, refreshing flavor of peppermint and swirled with rich, dark chocolate. Now, imagine making it at home with absolutely no ice cream maker required. That, my friends, is the pure, festive magic of this Peppermint No-Churn Ice Cream. It is, without a doubt,…
Imagine a scoop of the creamiest, dreamiest ice cream, bursting with the cool, refreshing flavor of peppermint and swirled with rich, dark chocolate. Now, imagine making it at home with absolutely no ice cream maker required. That, my friends, is the pure, festive magic of this Peppermint No-Churn Ice Cream. It is, without a doubt, the easiest and most impressive frozen treat you will make this holiday season.
Here’s the thing about homemade ice cream: it often feels like a complicated project reserved for people with fancy gadgets. I created this recipe to shatter that myth. It’s my go-to for creating a spectacular, holiday-worthy dessert using just a handful of ingredients and a simple loaf pan. It’s a fun, foolproof recipe that delivers a truly luxurious result.
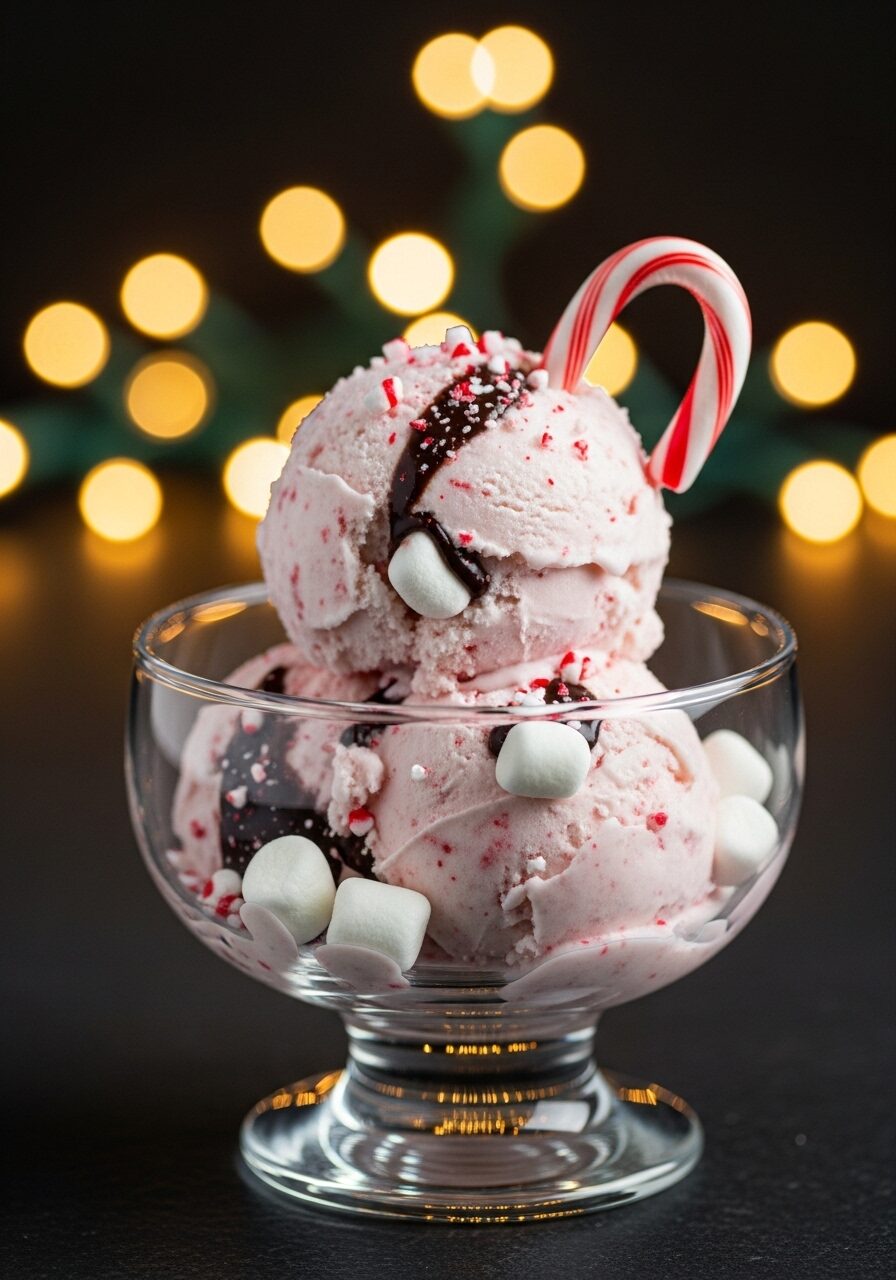
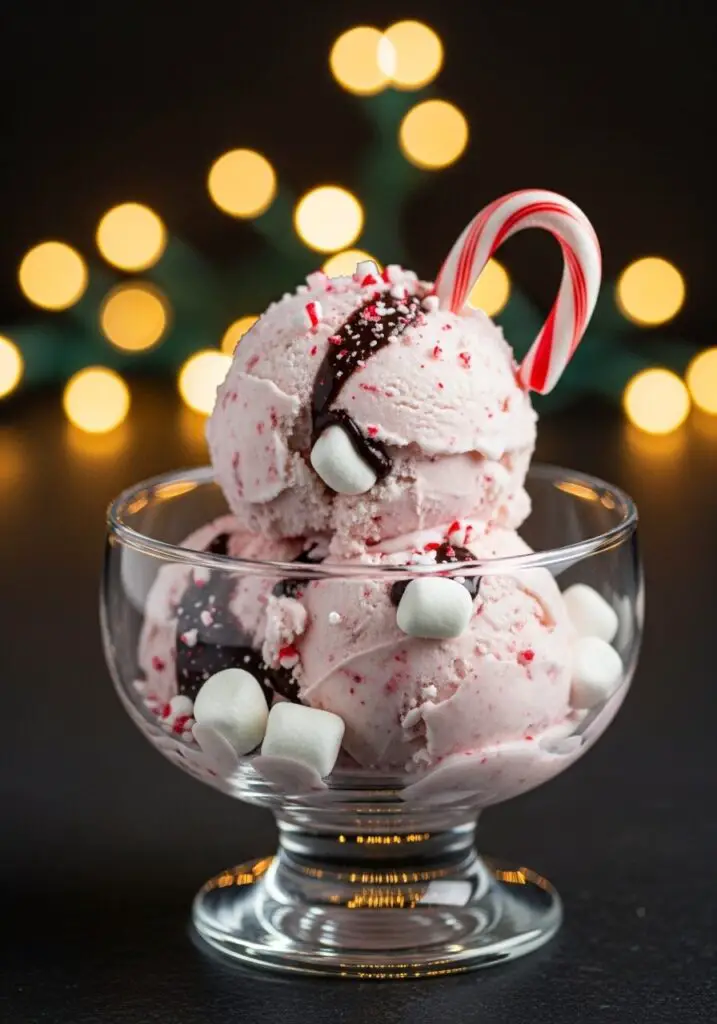
I promise you, there is no greater feeling than pulling a pan of perfectly frozen, beautifully swirled homemade ice cream from your freezer. The refreshing mint flavor from two types of candy, the fluffy little marshmallows, and the rich chocolate sauce create a symphony of festive flavors and textures. It’s like a winter wonderland in a bowl.
Get ready to master the art of no-churn ice cream and create a stunning, delicious dessert that will have everyone asking for your secret.
Why This No-Churn Ice Cream is a Holiday Dream!
You are going to be completely obsessed with how simple and delicious this festive ice cream is. This recipe is a true holiday game-changer. Here’s why:
- No Ice Cream Maker Needed! This is the best part. All you need is an electric mixer and a loaf pan to create incredibly creamy, scoopable ice cream.
- Packed with Peppermint Flavor: We’re using two types of candy—chocolate-peppermint candies and crushed peppermint puffs—for a double dose of festive, minty goodness.
- Incredibly Creamy & Fluffy: The combination of whipped cream and sweetened condensed milk creates a foolproof, silky-smooth base that never gets icy.
- A Perfect Holiday Project: It’s a fun, low-stress recipe that’s perfect to make ahead of time, freeing you up during busy holiday preparations.
- A Festive, Fun Texture: The chewy mini marshmallows and crunchy peppermint bits suspended in the creamy ice cream make every single spoonful an exciting experience.
Recipe Snapshot
| Active Time | 20 minutes |
| Freezing Time | 4 hours |
| Total Time | 4 hours 20 minutes |
| Yield | 12 to 14 servings |
| Calories | 278 kcal per serving |
| Course | Dessert |
| Cuisine | American |
| Difficulty/Method | Easy / No-Bake, Frozen |
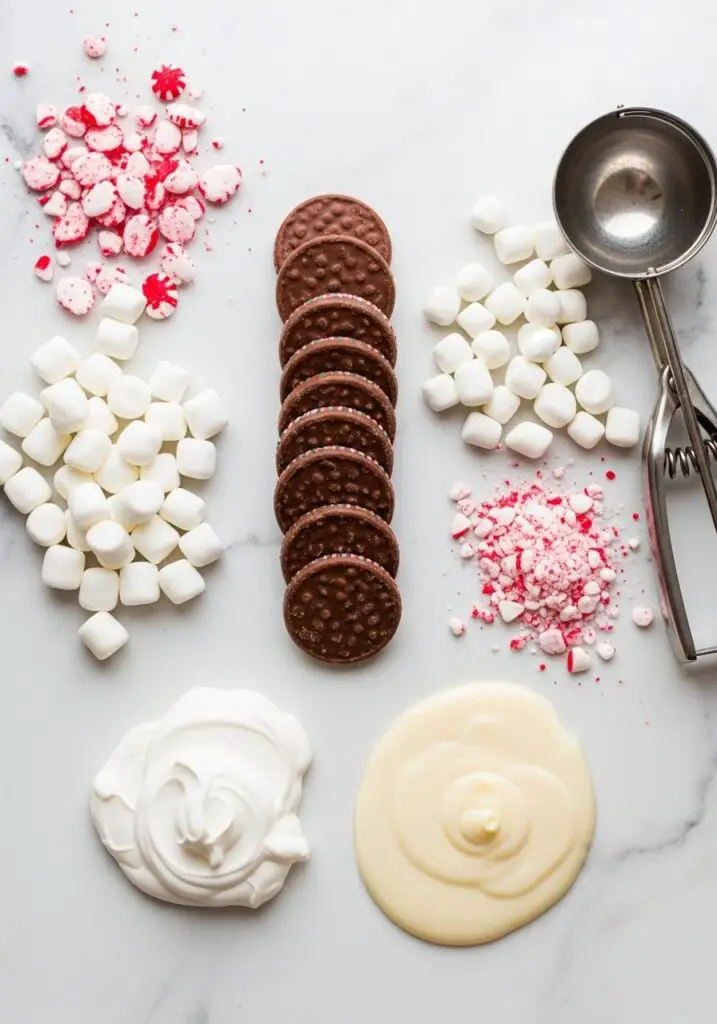
Your Shopping List for This Frozen Treat
This recipe uses a few simple, festive ingredients to create its magical creamy texture and minty flavor. Here’s what you’ll need:
→ For the Ice Cream Base
- 2 ¾ cups heavy cream → Divided. This is the key to the light, airy texture.
- One 14-ounce can sweetened condensed milk → Provides the sweetness and the creamy, never-icy base. Do not substitute!
- 2 cups mini marshmallows → For a fun, chewy surprise in every bite.
→ For the Peppermint Flavor & Mix-Ins
- 18 chocolate-peppermint candies → Such as peppermint patties. These melt down to create a rich chocolate-mint swirl.
- ½ cup crushed peppermint puffs → Or other hard peppermint candies. They add a festive color and a delightful crunch.
- Candy canes → Optional, for a perfectly festive garnish when serving.
Let’s Make Ice Cream! Your No-Churn Guide
The secret to no-churn ice cream is all about creating an airy base and working with cold ingredients. Let’s get started!
Part 1: The Peppermint-Chocolate Sauce
- Chill Your Pan: First things first, place your 9-by-5-inch metal loaf pan in the freezer to get it nice and cold. This is a crucial step!
- Melt the Candies: In a medium saucepan, combine the chocolate-peppermint candies and ¾ cup of the heavy cream. Heat over medium heat, stirring frequently, until the candies are completely melted and the sauce is smooth, about 5 minutes.
- Cool Completely: Remove the sauce from the heat and set it aside to cool completely to room temperature. You can’t add hot sauce to a cold cream base!
Part 2: The Fluffy No-Churn Base
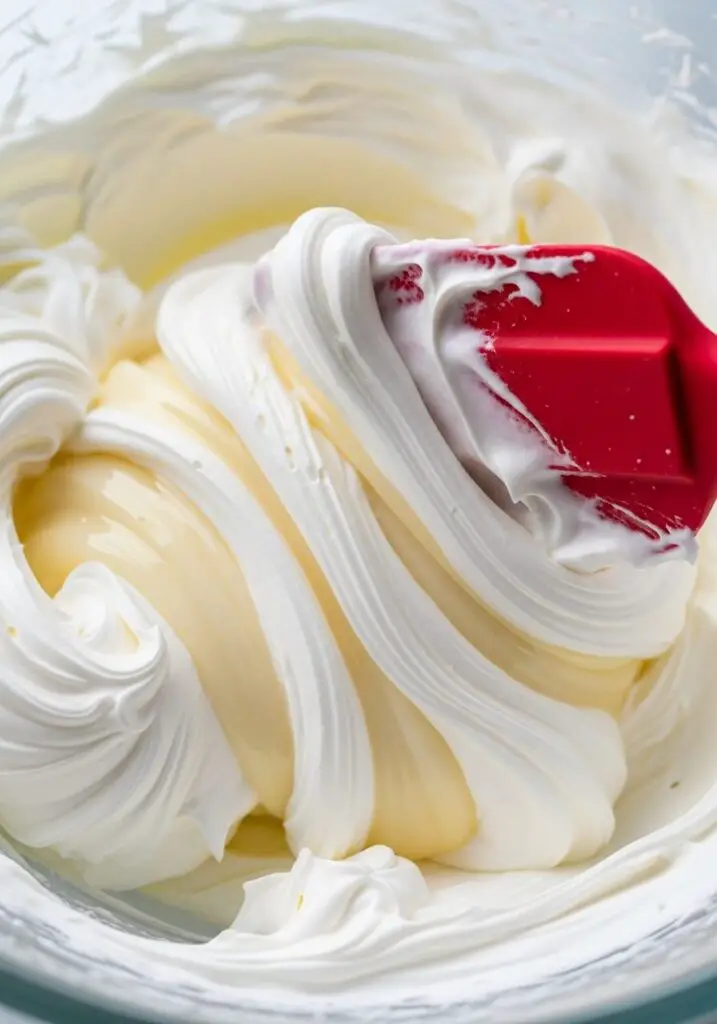
- Whip the Cream: In a large, chilled bowl, use an electric mixer on medium-high speed to whip the remaining 2 cups of heavy cream until firm peaks form, about 2 minutes. This means when you lift the beaters, the peak holds its shape.
- Lighten the Condensed Milk: Pour the sweetened condensed milk into a separate medium bowl. Gently fold in about 1 cup of the whipped cream with a rubber spatula. This lightens the condensed milk, making it easier to incorporate without deflating your cream.
- Combine and Fold: Gently fold the lightened condensed milk mixture back into the large bowl of whipped cream until it’s well blended and no streaks remain. Be careful not to overmix!
- Fold in Marshmallows: Gently fold in the mini marshmallows.
Part 3: Layer, Swirl, and Freeze
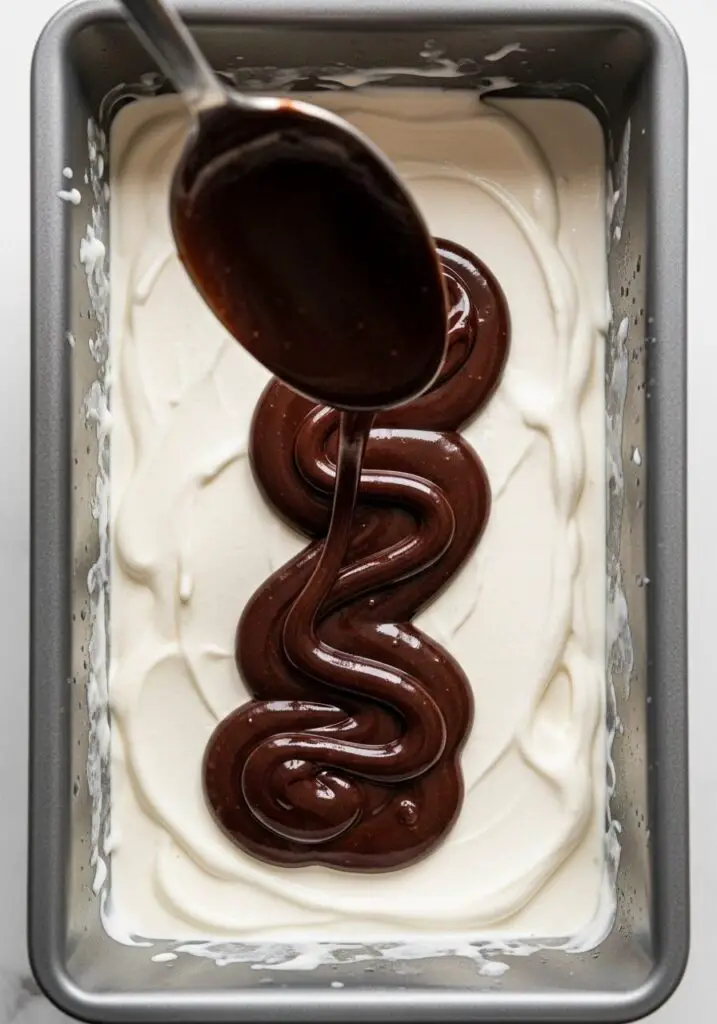
- Reserve Some Sauce: Remove 2 tablespoons of the cooled chocolate-peppermint sauce and set it aside for the topping.
- Layer the Ice Cream: Remove your chilled loaf pan from the freezer. Pour about one-third of the ice cream mixture into the pan. Drizzle half of the remaining chocolate sauce over the top. Add another third of the ice cream, then drizzle with the rest of the chocolate sauce. Top with the final third of the ice cream mixture.
- Top and Drizzle: Sprinkle the crushed peppermint puffs evenly over the top. Drizzle with the 2 tablespoons of reserved chocolate sauce.
- Freeze!: Loosely cover the pan with plastic wrap and freeze until the ice cream is solid and scoopable, at least 4 hours, or overnight for best results.
WiseRecipes’ Top Tips for Perfect No-Churn Ice Cream
Follow these simple secrets to ensure your ice cream is perfectly creamy, never icy.
- Chill Everything! This is the golden rule of no-churn ice cream. Use a chilled metal loaf pan and a chilled mixing bowl for your whipped cream. Cold ingredients and tools help the ice cream freeze faster, which results in a creamier texture.
- Whip to Firm Peaks. Be careful not to under-whip or over-whip your cream. You’re looking for “firm peaks,” which means the cream holds its shape well when you lift the beaters, but it’s not starting to look grainy or curdled.
- The Folding Technique is Key. When combining the whipped cream and condensed milk, use a gentle folding motion with a spatula. This keeps all the air you whipped into the cream, which is what gives the ice cream its light, scoopable texture.
- Cool the Sauce Completely. Adding even a slightly warm sauce to your cold cream base will cause the whipped cream to deflate and melt. Be patient and let the chocolate-peppermint sauce cool all the way to room temperature.
- Cover Properly for Freezing. Pressing plastic wrap directly onto the surface of the ice cream before freezing can help prevent ice crystals from forming on top, keeping it creamier for longer.
Peppermint No-Churn Ice Cream
Ingredients
Equipment
Method
- Place a 9-by-5-by-3-inch metal loaf pan in the freezer to chill.
- In a medium saucepan over medium heat, combine the chocolate-peppermint candies and 3/4 cup of the heavy cream. Cook, stirring frequently, until the candies are melted, about 5 minutes. Cool the sauce completely.
- In a large bowl, whip the remaining 2 cups heavy cream with an electric mixer on medium-high until firm peaks form, about 2 minutes.
- Pour the condensed milk into a medium bowl and fold in 1 cup of the whipped cream to lighten it. Then, fold this lightened mixture back into the remaining whipped cream until well blended. Gently fold in the marshmallows.
- Remove 2 tablespoons of the cooled chocolate-peppermint sauce and set aside.
- Pour a third of the ice cream mixture into the chilled pan. Top with half of the remaining chocolate-peppermint sauce. Add another third of the ice cream, then the rest of the sauce. Cover with the remaining ice cream mixture.
- Sprinkle the crushed peppermint puffs on top and drizzle with the reserved 2 tablespoons of sauce.
- Loosely cover with plastic wrap and freeze until solid and scoopable, about 4 hours or up to overnight. Serve with a candy cane, if desired.
Notes
Keep It Frosty! Storing Your Ice Cream
Proper storage is key to keeping your homemade ice cream delicious and free of ice crystals.
- Freezer: Store the ice cream tightly covered in the freezer. After the initial freeze, pressing a piece of plastic wrap directly onto the surface of the ice cream before putting the lid on an airtight container can help maintain its creamy texture. It will keep for up to 2 weeks.
FAQs: Your No-Churn Ice Cream Questions, Answered!
Do I have to use sweetened condensed milk?
Yes, for this style of no-churn ice cream, sweetened condensed milk is an essential ingredient. Its high sugar content is what keeps the ice cream soft and scoopable instead of freezing into a solid, icy block. It cannot be substituted with regular milk or evaporated milk.
What if I can’t find chocolate-peppermint candies like peppermint patties?
No problem! You can create a similar sauce by melting 4 ounces of good-quality semi-sweet chocolate with the ¾ cup of heavy cream and adding ½ teaspoon of peppermint extract. Let it cool completely before using.
Can I use a different kind of pan?
A metal loaf pan is ideal because metal chills quickly and evenly, which helps the ice cream set up properly. However, you can also use a similar-sized glass or ceramic dish, or even an 8×8 inch square pan. You could also use a freezer-safe container with a lid.
Can I make this without the marshmallows?
Of course! If you’re not a fan of marshmallows, you can simply omit them. For a different texture, you could fold in some chopped chocolate chunks or extra crushed peppermint candies instead.
Final Thoughts: Your Easiest Festive Treat
There is such a sense of accomplishment in serving beautiful scoops of your very own homemade ice cream, especially when it’s this easy to make! This Peppermint No-Churn Ice Cream is a celebration of all things festive, fun, and delicious. I hope it brings a little bit of sweet, minty joy to your holiday season. Happy scooping!